How to Draw a Cat
This tutorial will demonstrate how to draw a cat in a simple yet detailed way, using various unique step-by-step techniques.

How to Draw a Cat: Introduction
Cats are one of the most beloved animals, having taken over both people’s homes and the Internet. They have also won my heart and become a part of my site.
In this tutorial, I will show you how to draw a cat in a simple yet detailed way. There are many cat breeds, and each cat is unique in its own way.
To help you draw the cat you want, I have created a series of tutorials that are both unique and simple. Each lesson will guide you through the process of drawing a cat in a particular style, using a specific technique.
Although each cat breed is unique, there are certain basic principles that apply when drawing any cat, from domestic cats to lions and tigers. This tutorial will cover those fundamentals to help you feel confident in drawing any cat.
Cat Drawing Tutorial
Materials
- Pencil
- Paper
- Eraser
- Coloring supplies
Time needed: 25 minutes
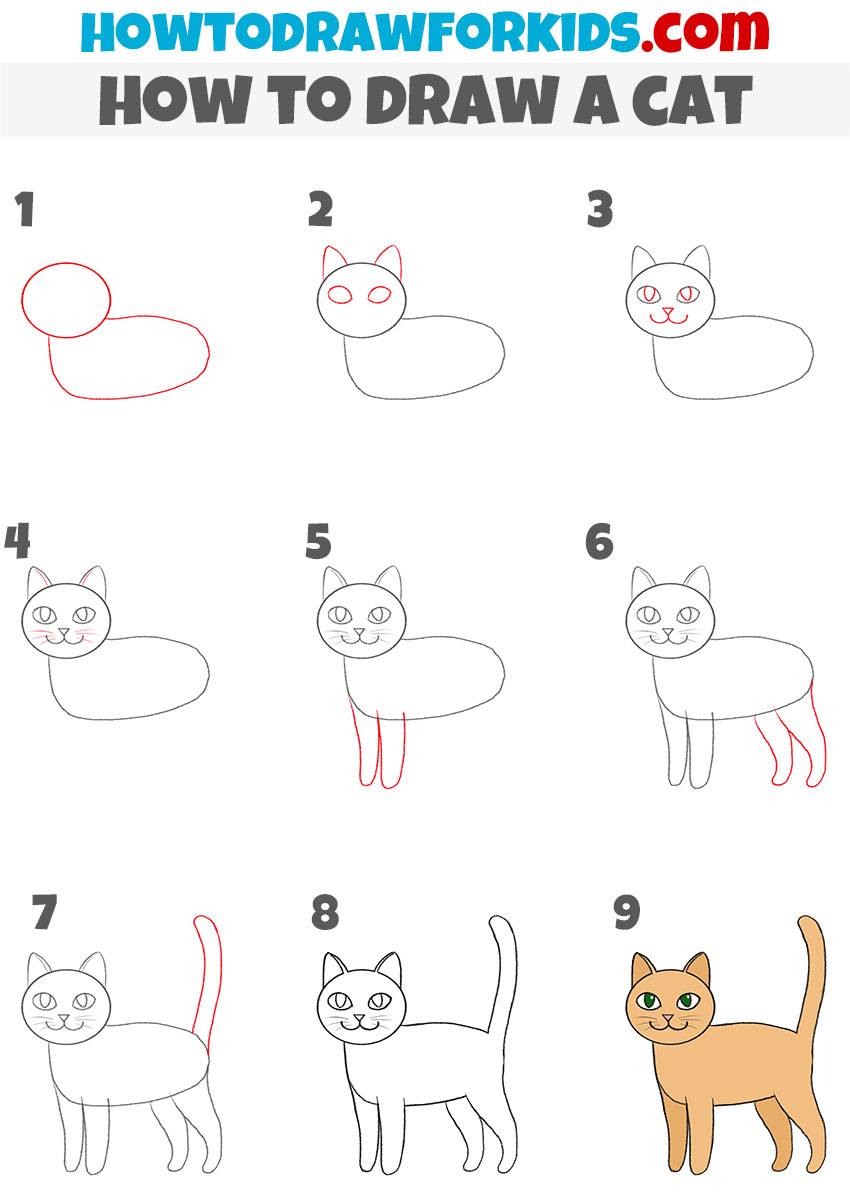
How to Draw a Cat
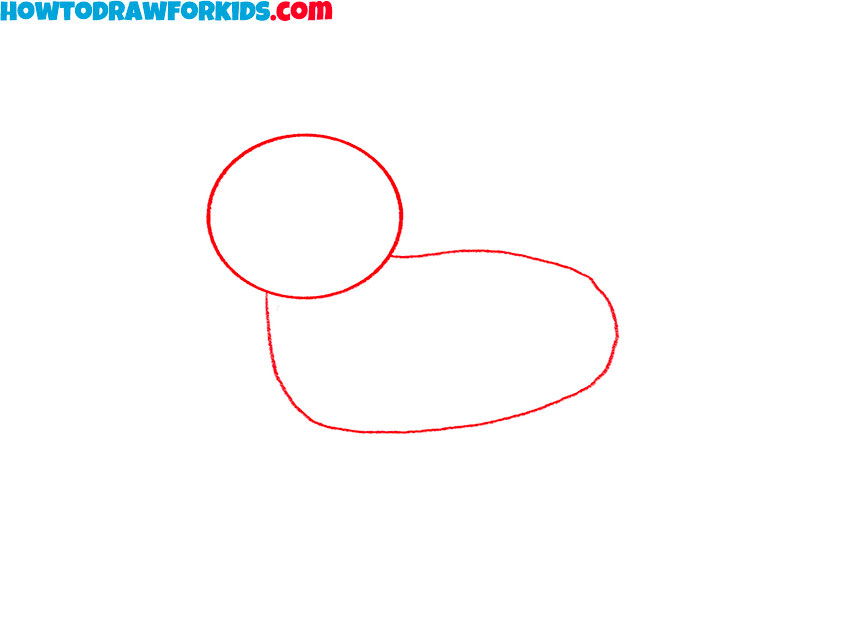
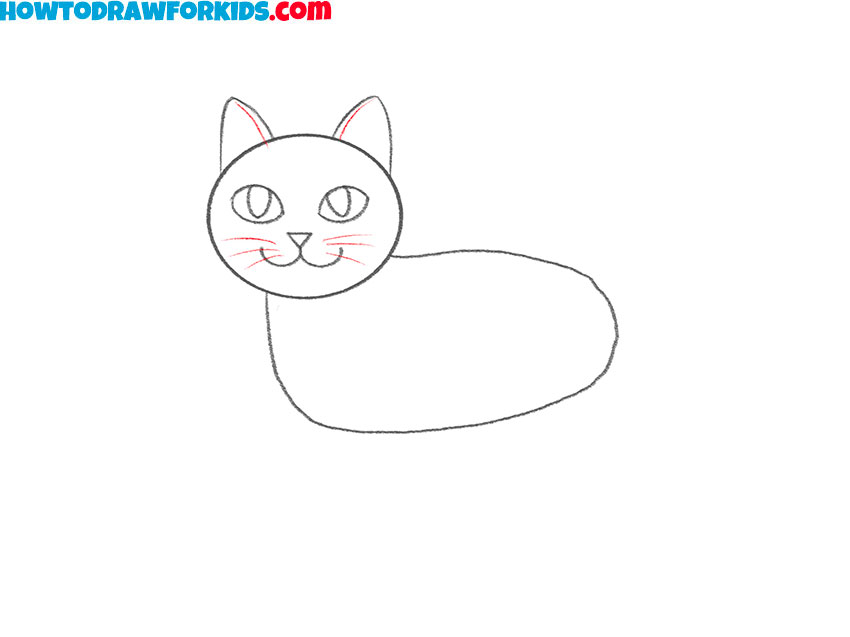
- Sketch the head and body.
To begin, sketch the basic shapes that form the foundation of your cat drawing. Start with a circle to represent the cat’s head. Below and slightly to the right of the head, draw an oval to form the body. Position these shapes so they overlap slightly. Keep your lines light, as this is just the base for your drawing.
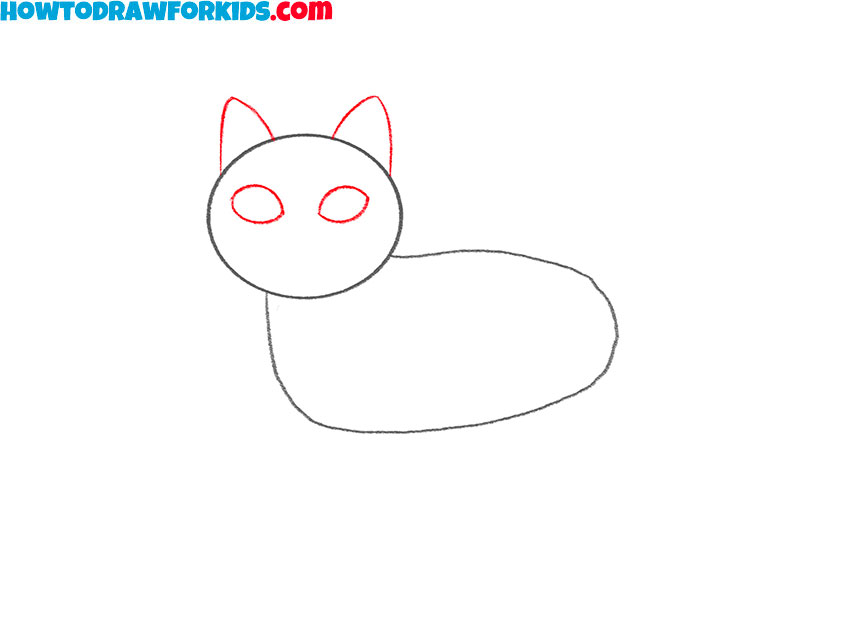
- Add the eyes and ears.
Next, add the cat’s defining facial features. Draw two triangular ears on top of the head. Inside the head circle, sketch two almond-shaped eyes. The left and right sides of the face should be symmetrical. These shapes will give your cat its distinctive appearance.
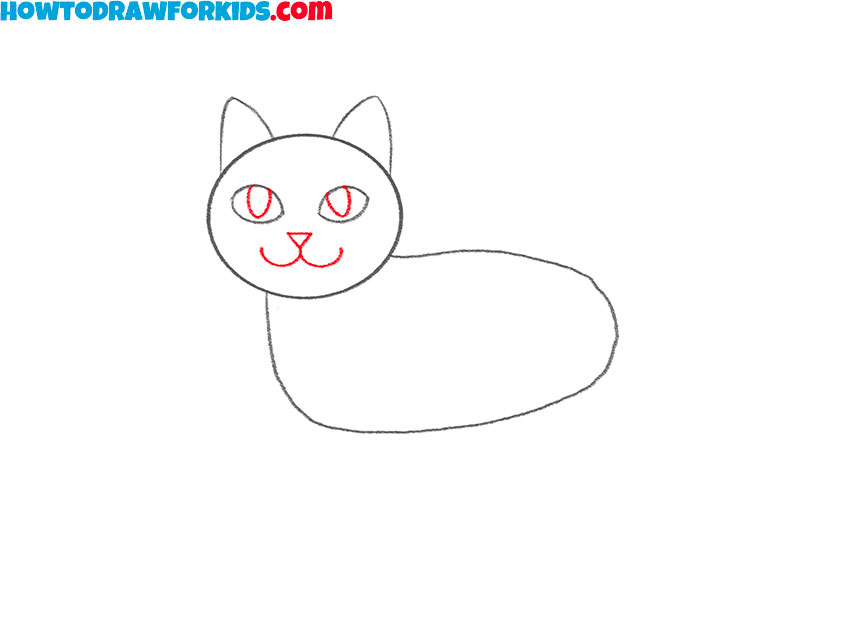
- Add the nose, mouth, and pupils.
In this step, illustrate the details of the cat’s face. Inside each almond shape, draw smaller ovals to form the pupils. Below the eyes, sketch a small triangular nose and connect it to a curved “W” shape for the mouth. Similar to the previous step, the details in this step should also be arranged as symmetrically as possible.
- Add the whiskers and detail the ears.
Add final touches to the cat’s face by sketching three short, slightly curved lines on each side of the face for the whiskers. Use light, smooth lines. Draw the whisker lines from the roots to the tips to ensure maximum accuracy. Now, the face of your cat drawing should look complete, allowing you to move on to the body.
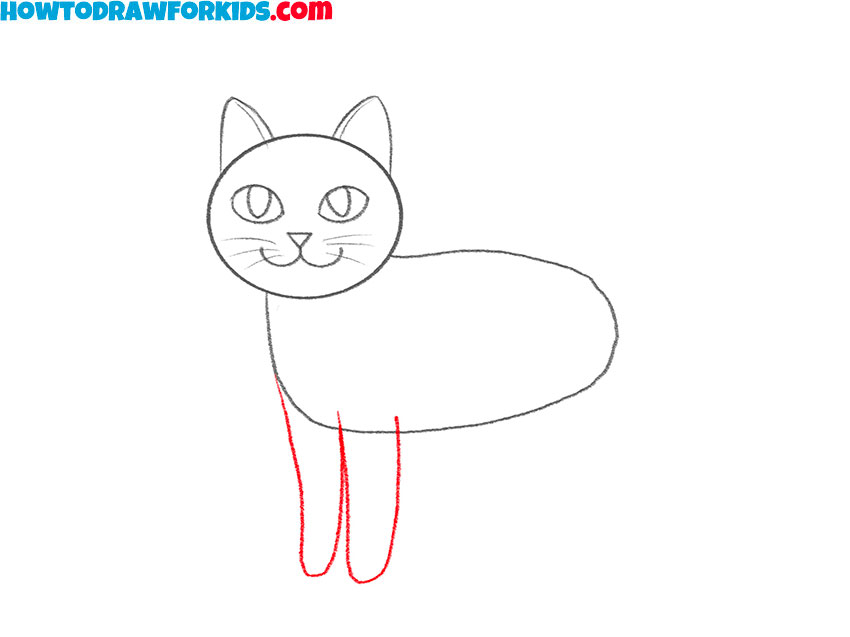
- Sketch the front legs and paws.
Now, move to the body of your cat and add the front legs. Draw two parallel lines for each leg starting from the bottom of the body and extend them downward. Slightly curve the lines at the bottom to create the cat’s paws. You can also sketch the toes with a few short lines.
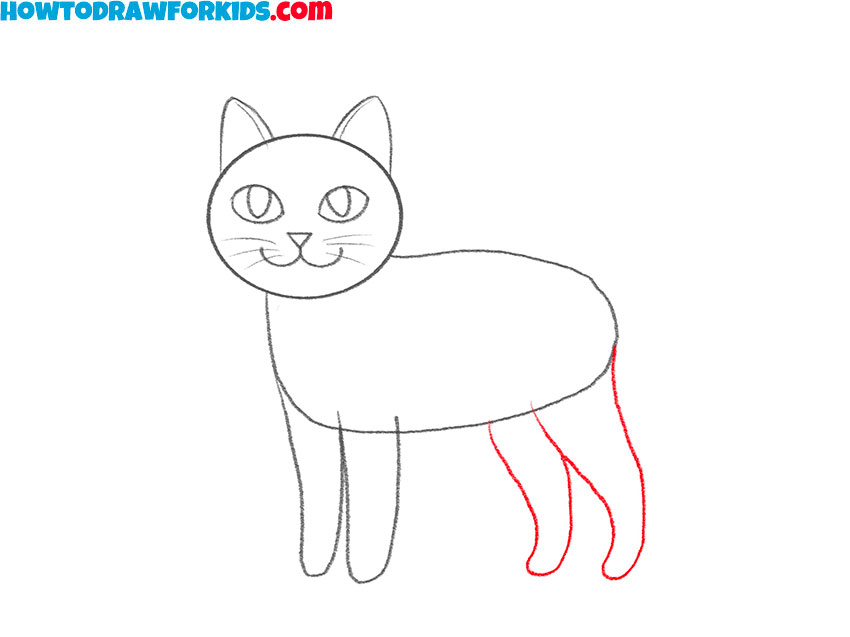
- Add the hind legs and paws.
To complete the body, draw the back legs. Extend two simple shapes downward from the rear of the oval shape and curve them slightly to suggest natural shape of the legs. Make sure the back legs are a slightly thicker than the front legs.
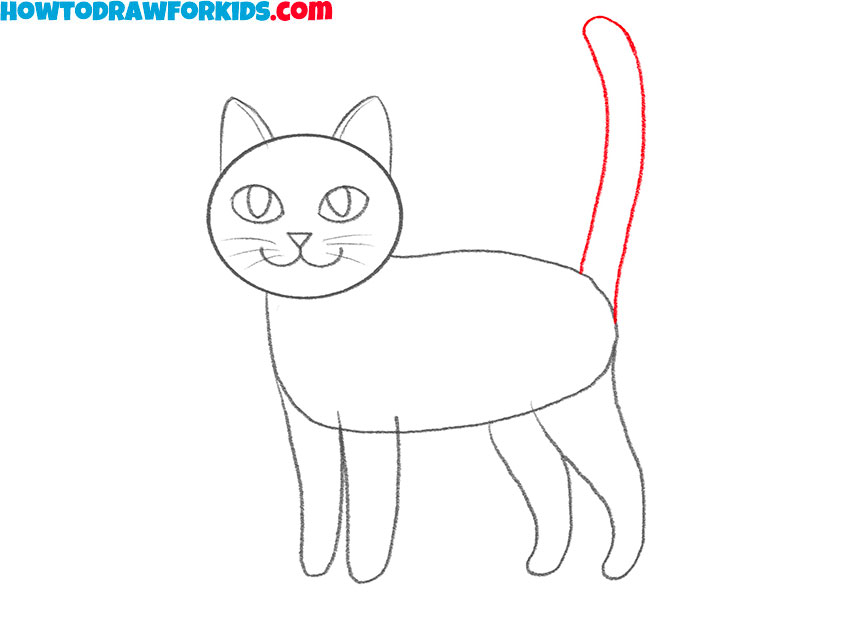
- Sketch the cat’s tail.
For the tail, draw a long, slightly curved geometric shape extending upward from the back of the oval body. The tail should have a wavy curve, with the tip smoothly rounded. The shape of the tail can be adjusted, such as drawing it in the form of a question mark.
- Erase the auxiliary lines.
Use an eraser to remove any unnecessary lines from your cat drawing. Refine the sketch by tracing over the visible lines to finalize the cat’s outline. This step makes the drawing clear and ready for coloring. At this stage, additional details can also be added if desired.

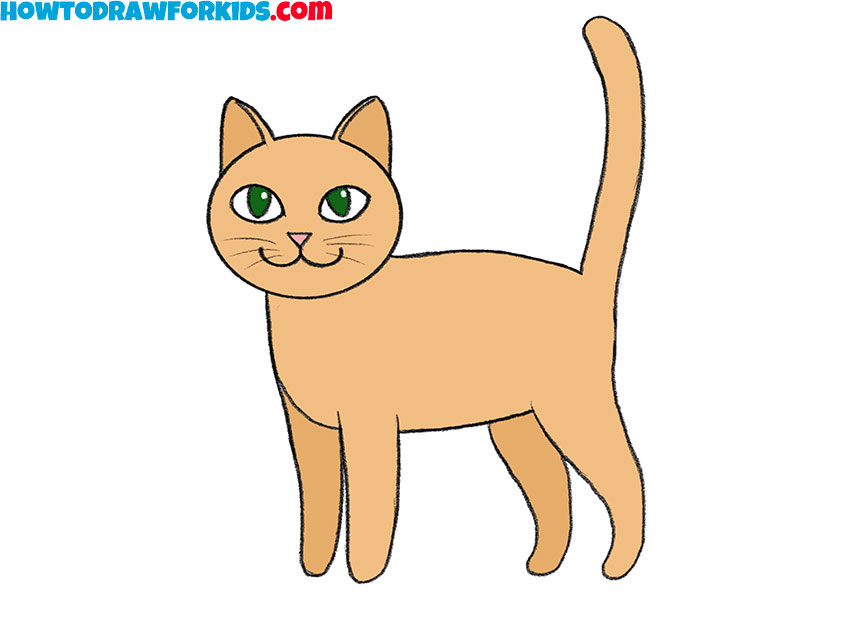
- Color the cat drawing.
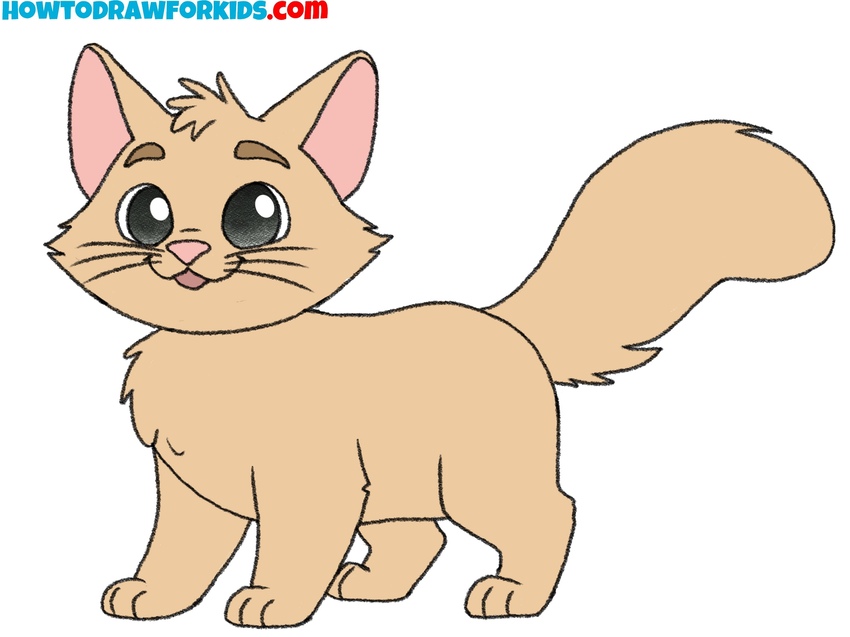
Use shades of orange, brown, or gray for the fur, depending on your preference. Color the eyes green, yellow, or brown, and shade the nose and inner ears with pink. But of course, these are not the only shades for coloring your artwork. You can choose any color you see fit.
Additional Content
For students who prefer a tangible reference, a detailed, free PDF file has been provided. This compact version of the lesson on how to draw a cat contains the essential steps, allowing you to draw a cat at any time, with or without an internet connection.
It is a useful resource for practicing your skills while commuting, at a cafe, or in the quiet of your garden. Download the file to have a complete guide that fits into your art kit or digital library, ensuring uninterrupted access to the instructions whenever needed.
How to Draw a Cat: Alternative Techniques
Once you’ve completed the basic tutorial on how to draw a cat, you can explore additional tutorials to hone your skills. These variations offer different poses, levels of detail, and styles, from cartoonish to realistic. Choose one that matches your interests and skill level to continue learning, or try them all, to boost you cat drawing skills.
How to Draw a Cat for Preschoolers
This straightforward cat drawing method is ideal for young artists in kindergarten. It uses simple shapes that are easy for little hands to draw. Also, the first tutorial shows a standing cat with four visible legs, while the second tutorial depicts a sitting cat with two visible front legs. Additionally, the second tutorial uses rounded, compact shapes for a softer and more cartoon-like appearance.
Start by drawing an oval for the head and a slightly larger curved line below it for the body, with the lower part tilted slightly to one side to show the sitting position. Add two curved lines extending downward from the bottom of the body to outline the front legs.
Sketch two triangular ears on top of the head and a curved tail extending upward from the back. Inside the head oval, draw two small circles for the eyes, a triangle for the nose, and two simple curved lines for the mouth. Add small details like whiskers and refine the outline. Erase unnecessary lines, ensuring the final shape looks clean. Color the cat with soft tones, adding green or blue for the eyes.

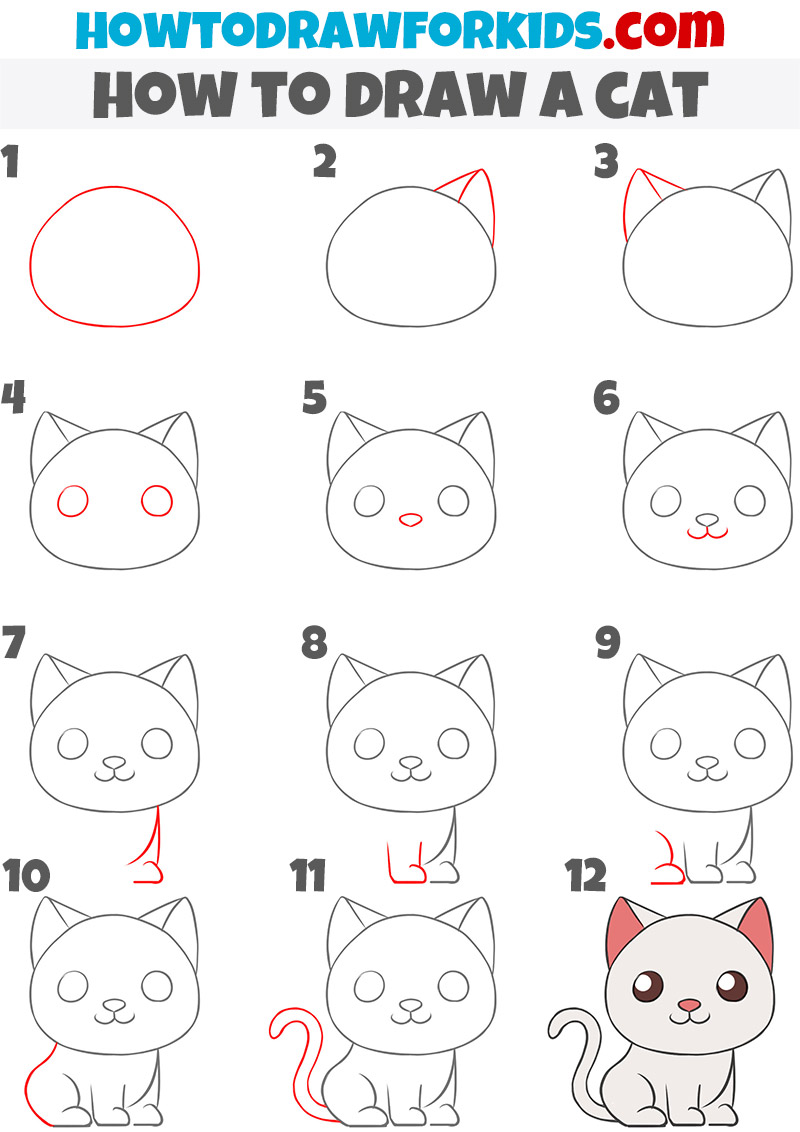
How to Draw a Small Sitting Cat
This tutorial focuses on drawing a seated cat with a large, rounded head and smaller body proportions, emphasizing a cartoon-like style. Compared to the first tutorial, which depicts a standing cat, this version simplifies the structure of the animal. The steps are more detailed, making it easier for beginners to follow.
Start this guide on how to draw a cat by sketching a large oval for the head. Add two triangular ears on top of the head of the cat. Draw two circles for the eyes and a small oval for the nose in the center of the face. Below the nose, add two simple curved lines for the mouth.
Outline the cat’s chest beneath the head with a smooth curve, and draw the front legs as slightly curved lines extending downward. Add rounded paws at the base of the legs. Complete the body with a curved line for the back leg. Draw a thin, curved tail extending from the back of the body. Refine the outline by erasing unnecessary lines. Color the cat drawing using light tones for the body, darker shades for the ears, and add color to the eyes and nose.
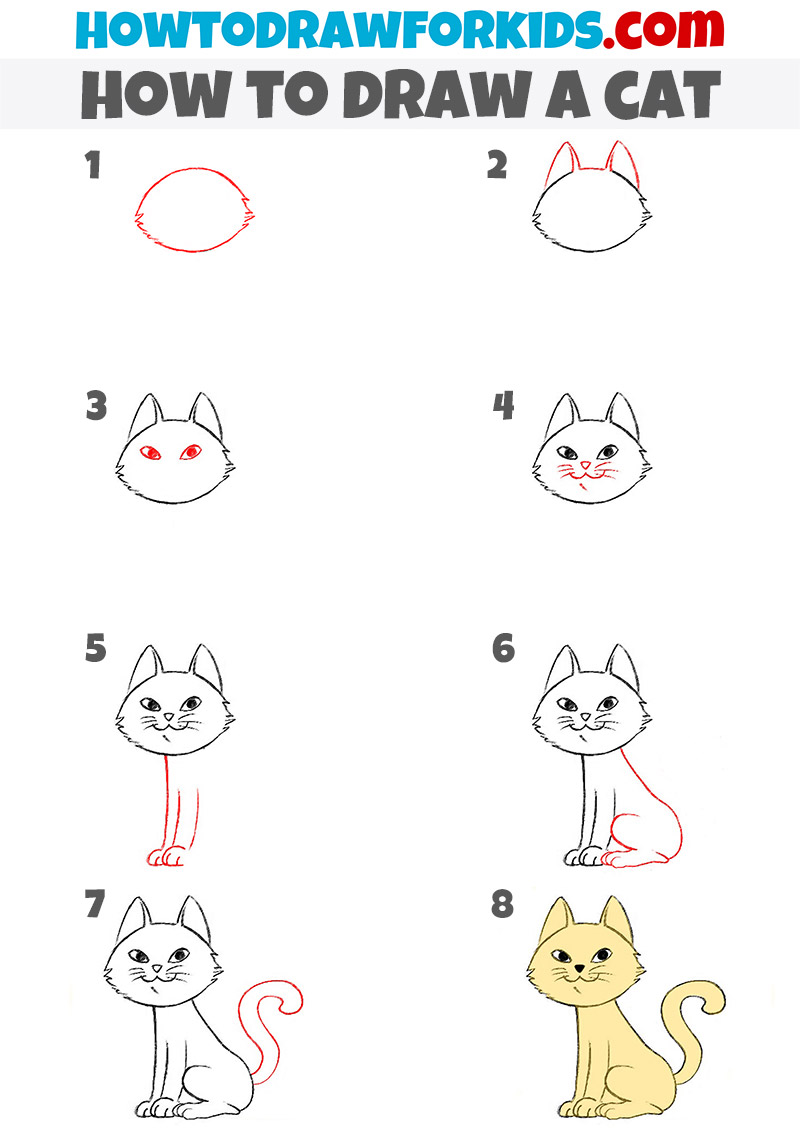
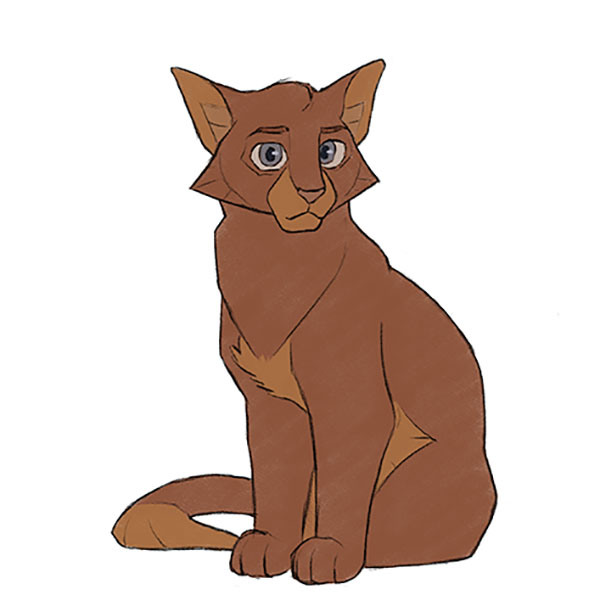
Alternative Cat Drawing Technique
This tutorial will show you how to draw a sitting cat with sharper features and a more realistic face compared to the first tutorial. The head is drawn with jagged lines to indicate fur, and the overall style leans toward a more detailed and semi-realistic appearance. Unlike the first tutorial, this one includes a curled tail and adds finer details, such as distinct fur lines and facial features, making it more intricate for advanced beginners.
Begin by drawing a rounded shape for the cat’s head, using slightly jagged lines to represent fur texture at the sides. Add two pointed ears on top of the head. Inside the head, draw almond-shaped eyes, a small triangular nose, and a simple curved mouth. Include fine lines for whiskers on each side of the face. Extend two slightly curved lines downward from the head to create the front legs, and add rounded paws at the bottom.
Draw a curved line from the back of the head to outline the body. Then, draw the hind leg using curved lines, depicting the paw and toes. Add a curled tail extending outward from the body. Refine the outline, ensuring smooth connections between all parts. Erase any unnecessary guidelines and color the cat with natural tones to complete the cat drawing.
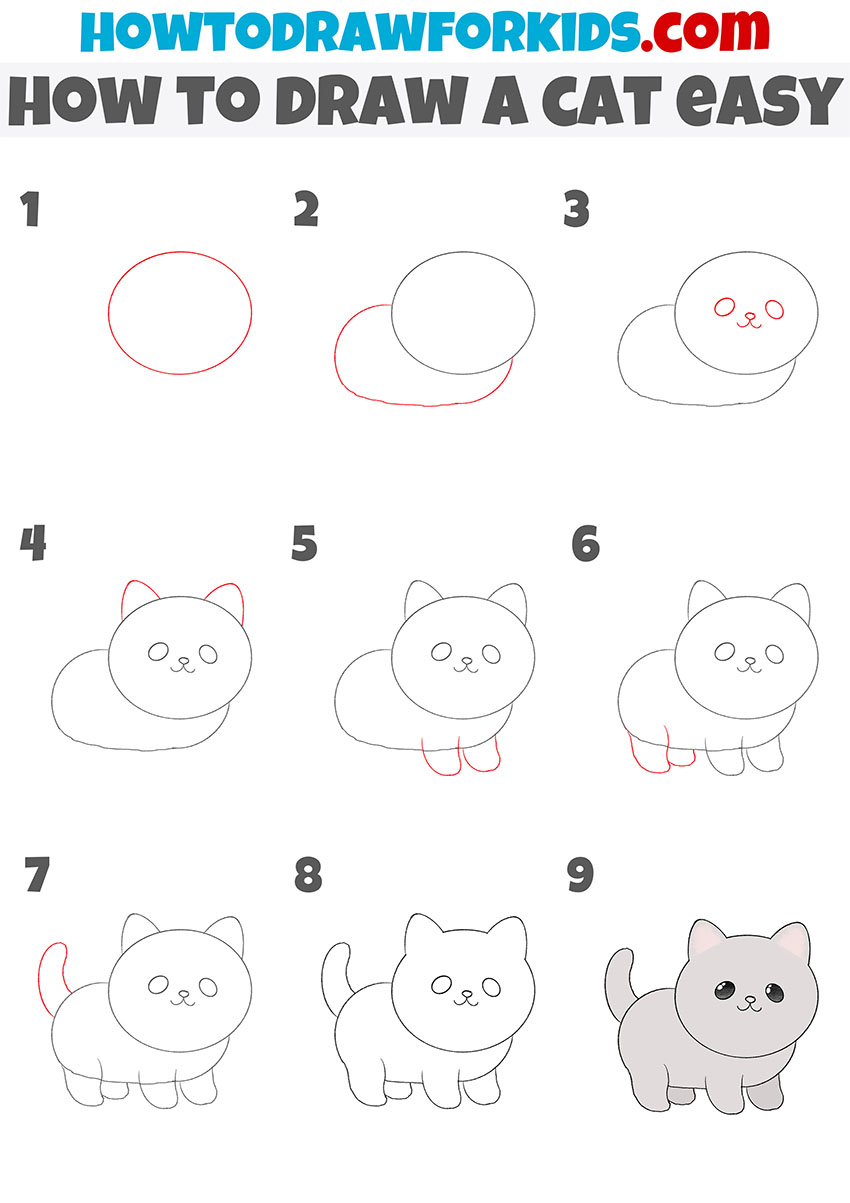
Easy Cat Drawing Tutorial
This technique will show you how to draw a cat easy, using simple and rounded shapes. The cat has softer, childlike proportions, with larger eyes and a small body, making it appear more cartoonish and approachable for new artists.
Start by drawing a large oval for the cat’s head and a slightly flattened oval below it for the body. Make sure the body overlaps slightly with the head. Add two small circles inside the head for the eyes and a small nose in the center, connecting it to a simple curved mouth. Sketch two triangular ears on top of the head.
Draw the front legs as two parallel shapes extending downward from the body, with rounded paws at the base. Add the hind legs as curved shapes extending from the back of the body. Sketch a short, curved tail extending upward from the back. Refine the outline by erasing unnecessary lines and ensuring all shapes connect smoothly. Color the cat drawing in light shades, like gray or beige, for a soft and finished look.
Simple Cat Drawing Technique
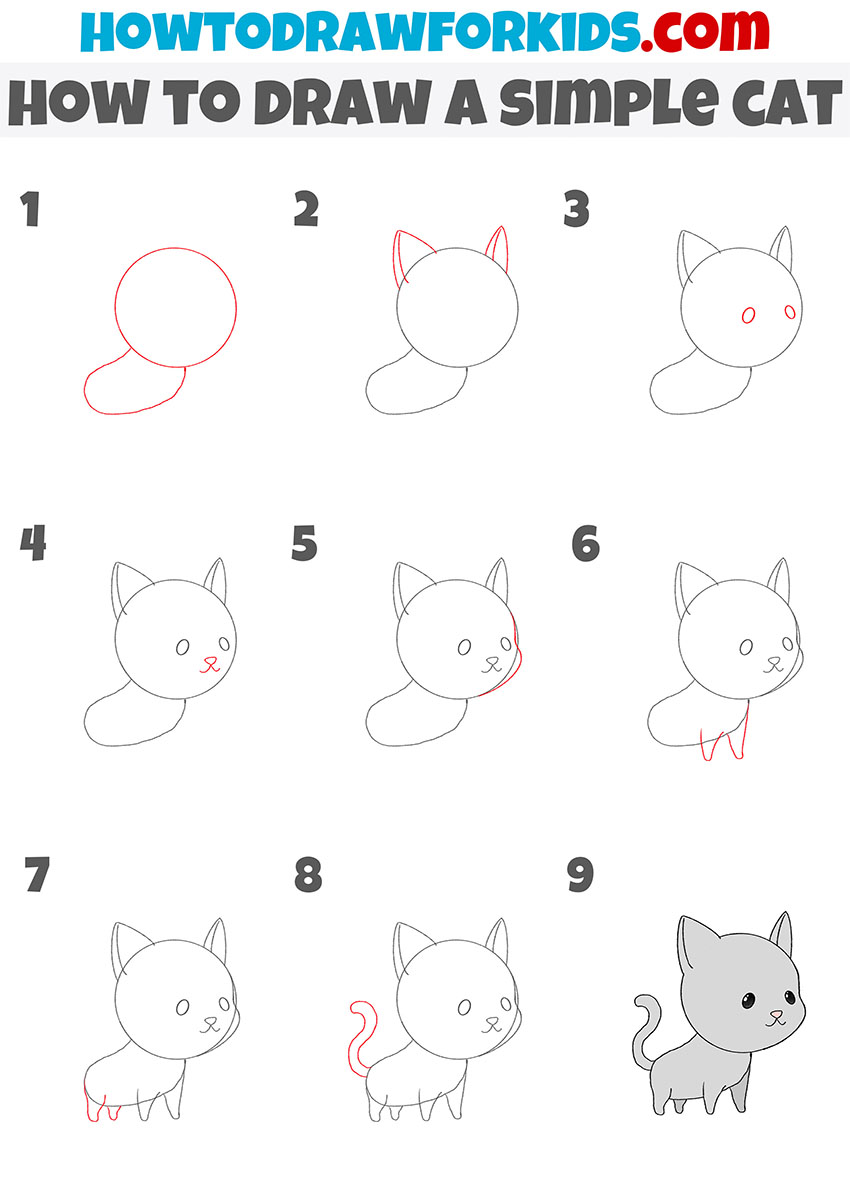
This method shows how to draw a cat in a simple chibi-like style, characterized by its oversized head and small body. Compared to the first tutorial, this version simplifies the structure by using basic shapes and omitting detailed facial features like whiskers. The body is proportionally smaller than the head, and the overall look is cartoonish, making it suitable for beginners and younger artists.
Start drawing a cat with a large circle for the head and a smaller, slightly tilted oval below it for the body. Add two pointed triangular ears at the top of the head. Inside the head, draw two small ovals for the eyes and a tiny triangular nose below them. Add curved lines for the mouth beneath the nose. Outline the side of the face with a slight curve to define the cheeks.
Draw two parallel, slightly curved lines from the body oval to form the front legs, adding rounded paws at the base. Sketch the back legs as smaller curved lines near the end of the body. Add a thin, curved tail extending upward from the back. Refine the outline by erasing unnecessary lines and smoothening connections. Color the simple cat in a single tone, like gray or beige, to complete the drawing.
Adding Some Realism
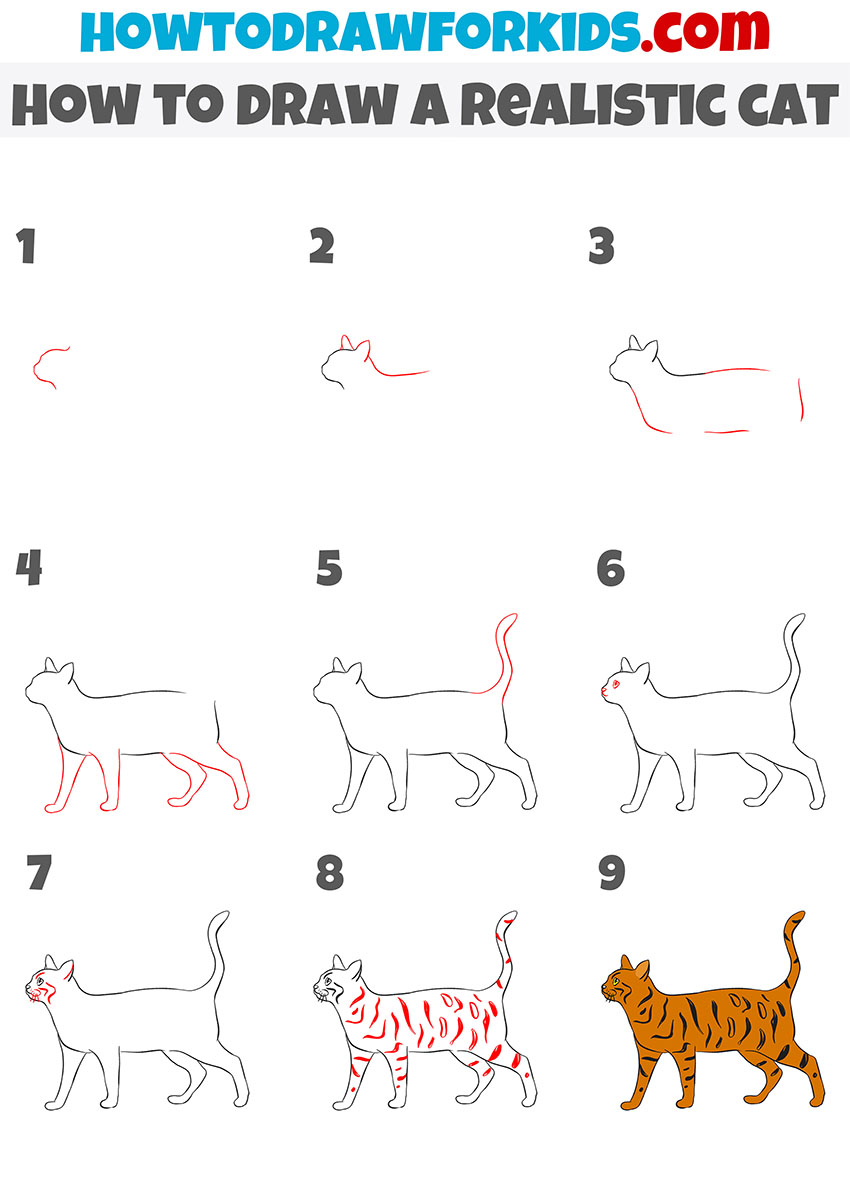
This tutorial shows how to draw a cat using more realistic shapes, with accurate proportions and more detailed features, including a defined posture, a natural stance, and fur patterns. Unlike the previous tutorials, which simplify shapes, this tutorial emphasizes a bit more anatomical accuracy, curved lines, and realistic details like stripes and facial features.
Start by sketching the outline of the cat’s head with a slightly curved jawline. Add two pointed ears at the top. Extend the neck into the body by drawing a long, smooth curve to define the back and chest. Outline the cat’s limbs with elongated, slightly curved shapes for the front and back legs, keeping the paws rounded. Draw the tail as a long, upward-curving shape extending from the rear of the body.
Add facial details, including almond-shaped eyes, a small triangular nose, and mouth. Incorporate details such as fur patterns or stripes along the body and legs, keeping the lines smooth and consistent. Erase any unnecessary guidelines and refine the outline to achieve a clean, polished look. Finally, color the realistic cat with natural tones, adding darker stripes or patterns for a finished appearance.
Conclusion
The lesson on how to draw a cat has now concluded. Through this tutorial, we have covered a variety of techniques and styles to draw one of the most popular animals. If you have followed all the steps across the instructions provided, you should have gained significant skills in drawing cats and improved your overall drawing skills.
Remember, this lesson is just one part of a larger collection of animal drawing tutorials. Using simple and straightforward techniques, you can also learn to draw a dog, bunny, bat, and more. The collection is designed to make drawing accessible and enjoyable for learners of all levels.
To stay updated on new lessons, consider subscribing to my social media channels. This will ensure you are informed about the latest tutorials and updates available on my website.


I love howtodrawforkids.com. It’s the best.😁
It’s great to know you’re enjoying the tutorials and finding the site useful.
I love this page being an adult I learn more
I would like to get this via email