How to Draw a Cat Nose
The cat nose, with its velvet softness and button-like charm, is a delightful challenge for any artist. In creating this tutorial on how to draw a cat nose, my goal was to demystify the process, breaking it down into simple, approachable steps. I aim to show you that such delicate features can be drawn with ease and confidence.

How to Draw a Cat Nose: Basic Information
Capturing the essence of feline charm in your sketches starts with one small but vital detail – the nose. That’s why I’ve tailored a lesson on how to draw a cat nose, simplifying it into easy steps. This guide is designed with clarity, to help you craft a nose that’s as realistic as it is adorable, using my straightforward approach.
As we sketch together, you’ll notice that this cat nose is not just a shape, but a symphony of contours and shadows. The method I’ve devised pays homage to the soft triangles and gentle curves that make up the feline snout. It’s about capturing not only form but also the soft texture that invites a touch.
By following my method, you’ll not just draw a cat nose; you’ll capture the very quintessence of feline grace. With each stroke, you’ll find yourself closer to creating a nose that could twitch or whisk away on a whim. It’s a delightful first step to not only mastering the art of drawing cats but also to bringing a piece of their elegance into your artwork.
Cat Nose Drawing Tutorial
Materials
- Pencil
- Paper
- Eraser
- Coloring supplies
Time needed: 20 minutes
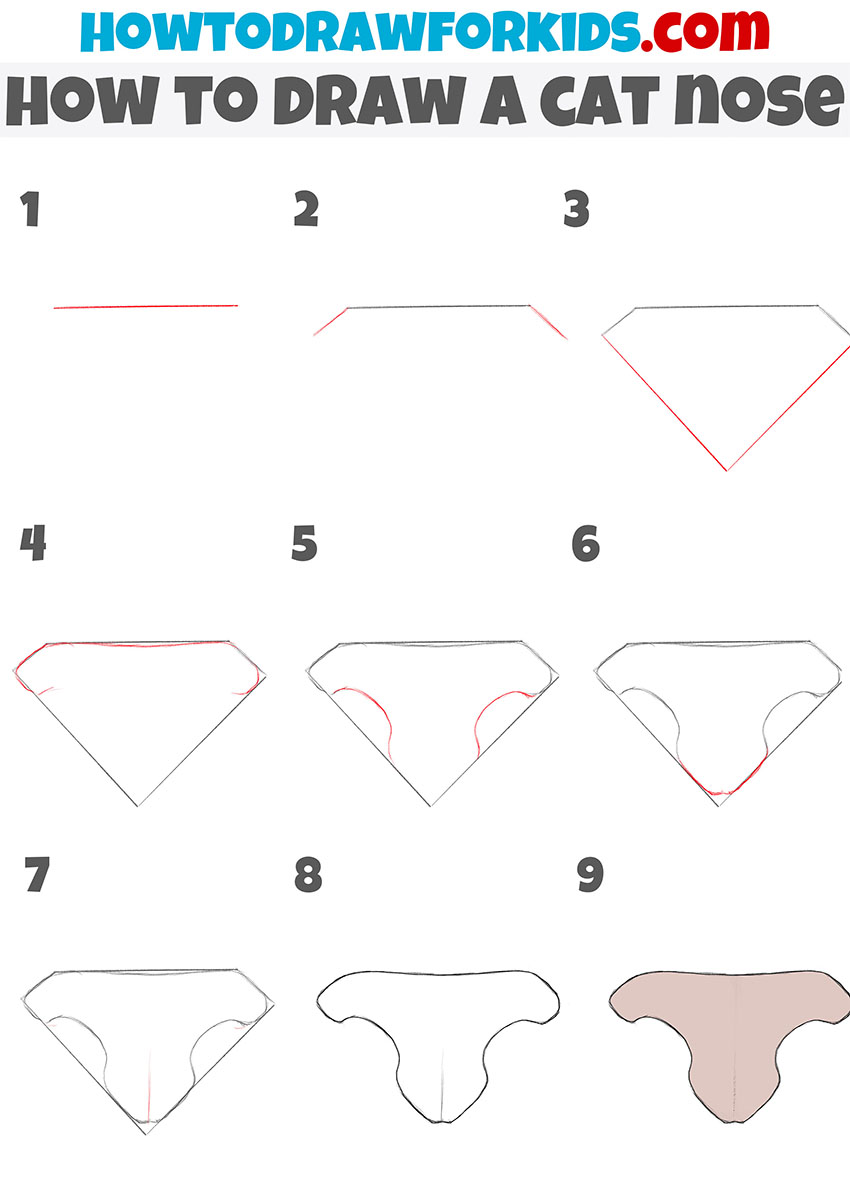
How to Draw a Cat Nose
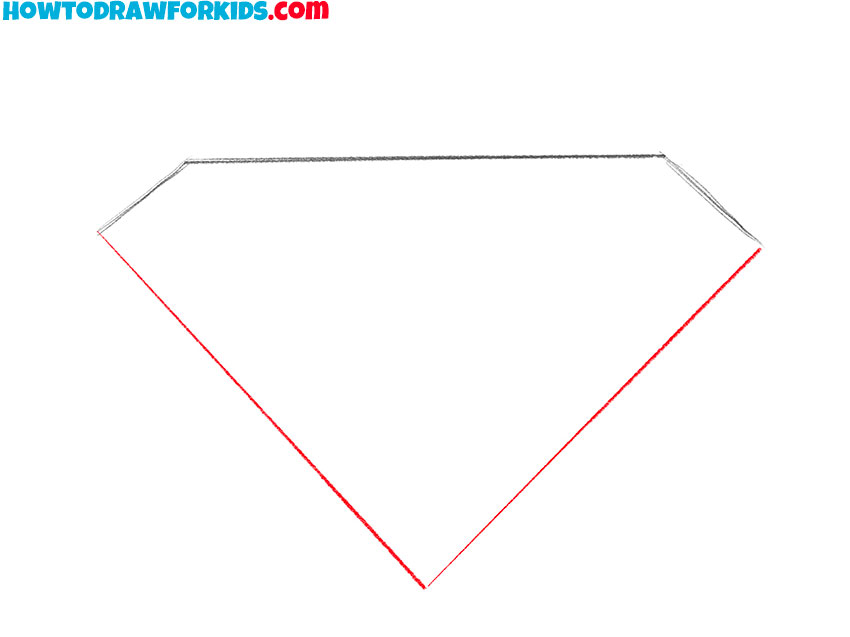
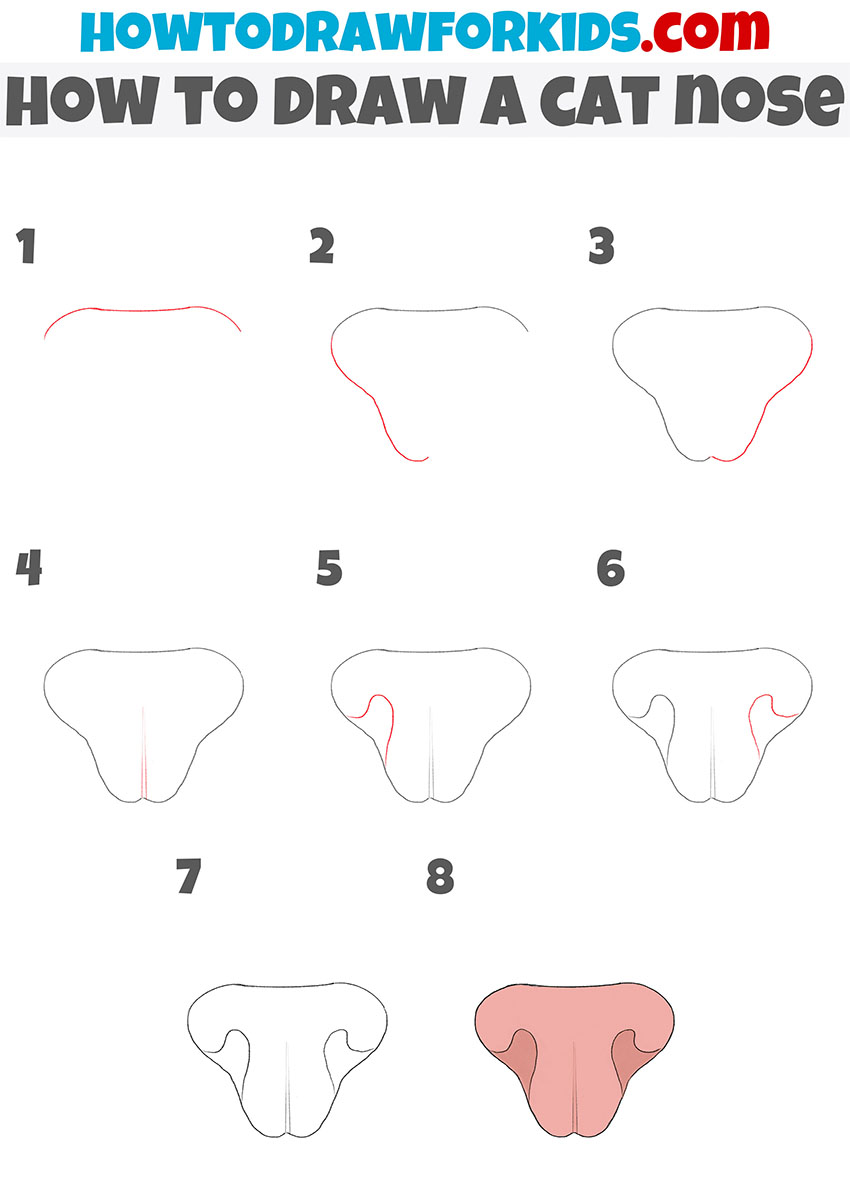
- Draw the upper contour of the nose.
This step will be very simple, to do it you only need to draw one straight horizontal line.

- Picture the sides of the upper part of the cat’s nose.
From the two ends of the previously drawn straight line draw two short straight oblique lines.

- Add the lower part of the nose.
From the bottom ends of the short lines draw two straight lines and connect them at one point.
- Improve the outline of the upper part of the nose.
To make the nose look more realistic, add curved lines near its upper contour.
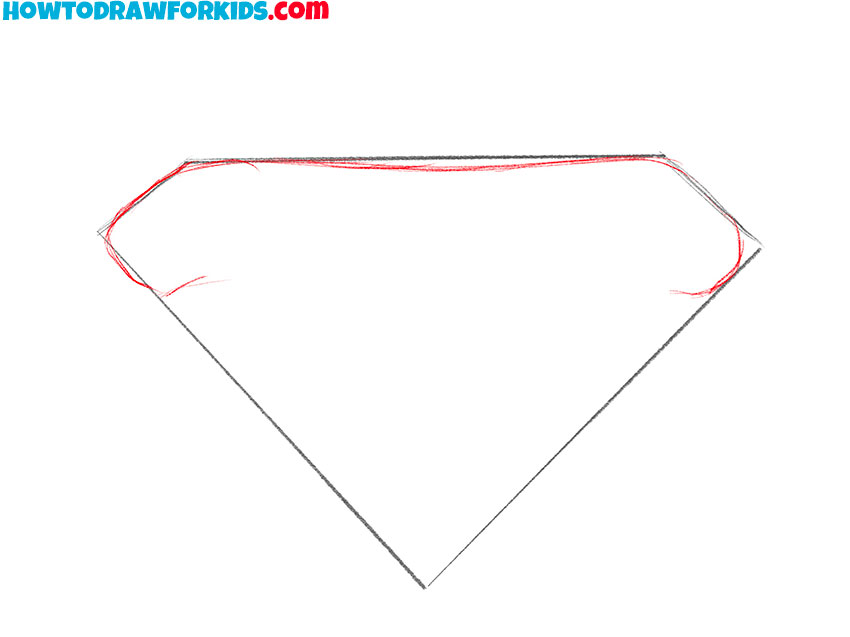
- Picture the nostrils.
To do this step, add symmetrical curved lines on the right and left sides.

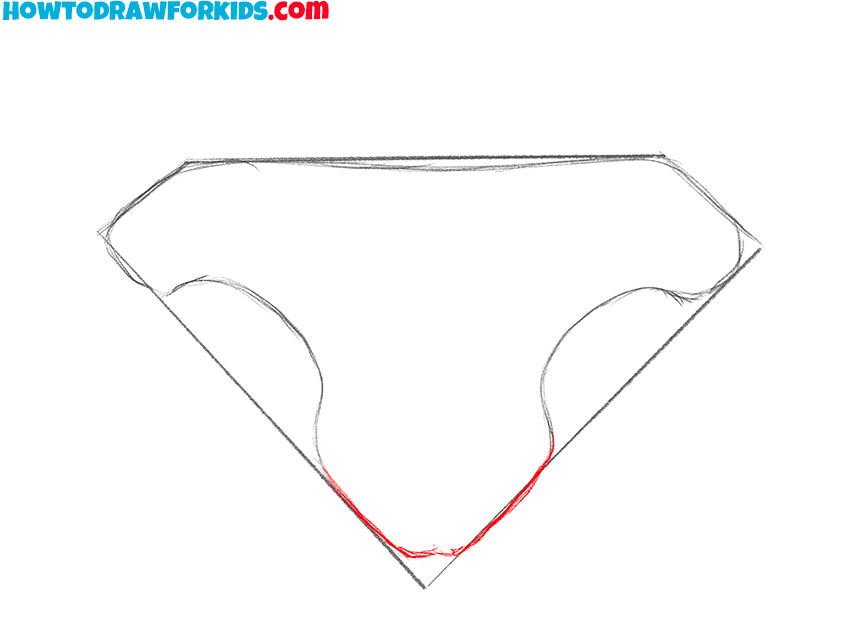
- Improve the contour of the lower part of the nose.
Add a flowing curved line to the bottom of the cat’s nose to make it look more realistic.
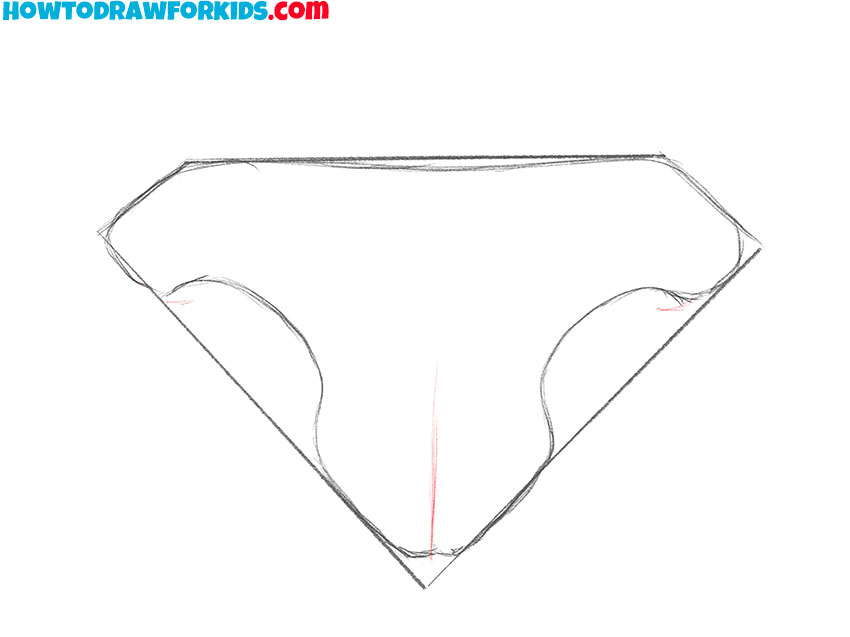
- Add the decorative elements.
Use short lines to depict the shaded areas, and add a straight line in the middle of the nose.
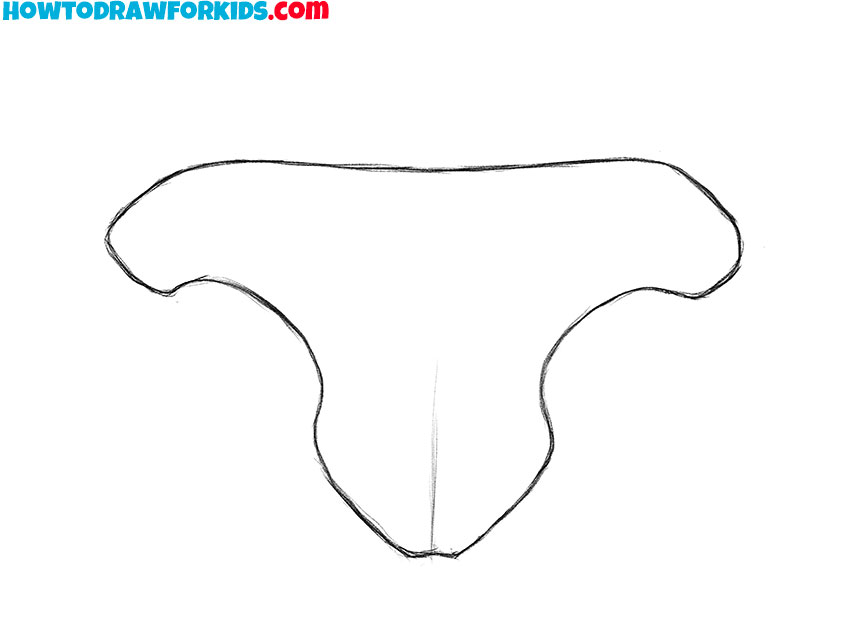
- Erase unnecessary lines.
Use an eraser to remove auxiliary lines that appeared during the drawing process.
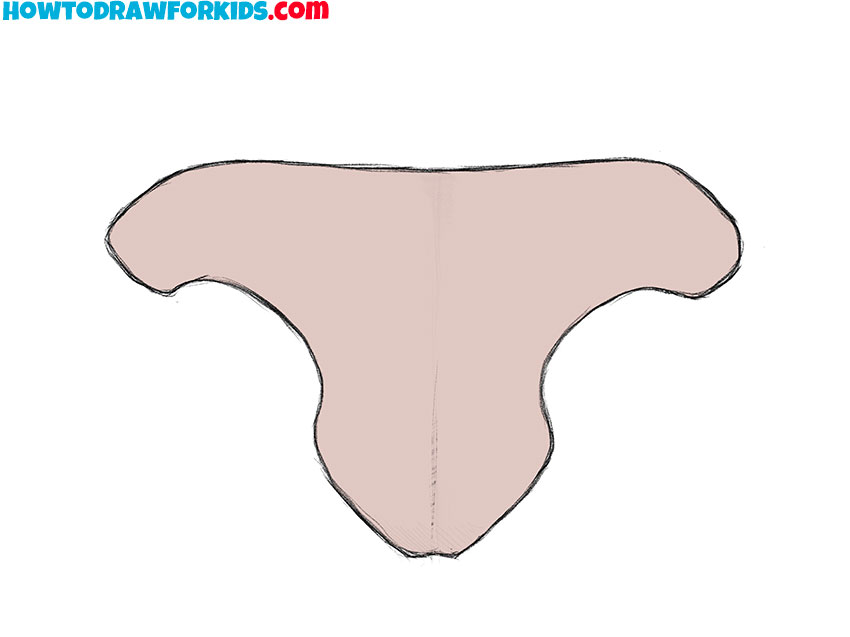
- Color the drawing.
To color the cat nose you drew, you should use a gray-pink.
Additional Content
To complement your artistic endeavors, I’ve prepared a free PDF file that encapsulates the essence of our cat nose drawing lesson. It’s readily available for you to download, offering a portable glimpse into this charming aspect of feline artistry, accessible anytime, with or without the whispers of the internet.
This compact guide is not a reiteration of the lesson you’ve already mastered; instead, it’s brimming with additional material aimed at enhancing your drawing skills. After you’ve acquainted yourself with the basics, this PDF will be your silent guide, nudging your talent further along the artist’s path.
Consider this PDF a little treasure trove of artistic advancement, a supplement to practice and perfect the nuances that transform good work into great. It’s crafted to be your companion as you continue to explore the artful subtleties of capturing not just a cat’s nose but its very essence.
Alternative Drawing Method
Beyond the foundational lesson, I’ve crafted another drawing technique for the cat nose, presenting an alternative route to polish your artistic skills. This technique invites more practiced hands to experiment with shadow and light, capturing the plushness and dimension that make a cat’s nose an object of fascination.
This additional method is not just a variation – it’s an expansion of your drawing vocabulary. It encourages you to play with texture, allowing the cat’s nose to emerge organically from the page, as if you could reach out and feel its warmth. It’s about pushing past the basics, exploring the depth of what your art can become.
Embrace this technique as an artistic challenge, one that will sharpen your senses and deepen your appreciation for detail. By incorporating these lessons, your ability to draw a cat nose will grow, not just in accuracy but in the storytelling potential of every line and shade.
How to Draw a Cat Nose: More Practice
This alternative method for sketching a cat nose begins with a simple, serene line that defines the nose’s bridge, encouraging a soft start to a drawing that will captivate with its lifelike result. The next step involves gentle curves, outlining the distinctive lobes and the central ridge that are the hallmarks of a cat’s nose.
Adding dimension comes next, as we etch in the nostrils and refine the curves, giving the nose a three-dimensional appearance. It’s a technique that pays special attention to the play of light and shadow, enhancing the tactile feel of the nose. The nostrils are not just drawn; they are sculpted into the page.
In the final stage, subtle shading underlines the nose’s form, providing a sense of depth and warmth. This method doesn’t rush. Instead, it evolves with each stroke, gradually building a nose that seems to have a velvet touch and the potential for a gentle twitch.
Precision Tips for Sketching a Cat’s Nose
In the subtle journey of capturing the feline grace within your sketches, especially that of a cat’s nose, a few well-kept secrets can elevate your artwork tremendously. Here’s a curated collection of tips and tricks that will enhance the charm and accuracy of your drawings:
- Start with Symmetry: Begin with light lines to ensure the symmetry of the nose; cats’ noses are centered and balanced on their faces.
- Gentle Curves: Remember, the top of a cat’s nose has a gentle, almost imperceptible curve; avoid making it too flat or too rounded.
- Nose Texture: Cats have a unique texture on their nose, like a fingerprint. Try to replicate this by using subtle stippling or soft cross-hatching techniques.
- Mind the Bridge: The area between the eyes and the nose, the nasal bridge, should be drawn with a light touch to suggest, not define.
- Nose Width: A cat’s nose is usually not wider than the space between their eyes; keep this in mind to maintain proportion.
- Depth through Shading: Use light shading around the edges of the nose to give it a three-dimensional form and make it ‘pop’ from the page.
- Nostril Details: The nostrils are not simply holes; they have shape and depth. Pay attention to their placement and angle for a realistic look.
- Highlight the Highlights: Leave small areas of the nose unshaded to represent reflective, wet spots – they give life to your drawing.
Let these tips be the whispering muses that guide your hand in future works. With practice, each nuance will become second nature, and your ability to render the delicate features of a cat’s nose will flourish. Carry these tricks in your artist’s toolbox, and use them to breathe life and realism into every feline figure that graces your canvas.
Conclusion
Our sketching session has reached a purr-fect finale, and it’s been an absolute joy to share these moments of creation with you. Should your artistic appetite crave more, my website is brimming with a diverse array of tutorials. Why not cozy up to drawing a jacket‘s folds next, or bloom into mastering the delicate petals of a hibiscus?
I warmly invite you to join our creative community across various social platforms, where the announcement of new lessons flutters through like a leaf on the breeze. Should your heart yearn for particular insights or techniques, your comments under the lesson are the seeds from which new tutorials grow.