How to Draw a Cobra
This guide on how to draw a cobra will help you create a simplified and cute version of one of the most iconic snakes in the world.

How to Draw a Cobra: Introduction
In this tutorial, you will learn how to draw a cobra. It is a venomous snake that lives in hot countries. Such snakes are widespread and highly recognizable. There are different types of these snakes in nature. The largest and most aggressive is the king cobra. Cobra is dangerous to humans and other animals. Cobra can move quickly on land and in water.
A distinctive feature of all cobras is the wide hood. This is the part of the body where the ribs are pulled apart by the muscles and the external shape of the body changes. You can see this in the picture. The cobra opens its hood in times of danger, and when at rest, the cobra looks just like any other snake.
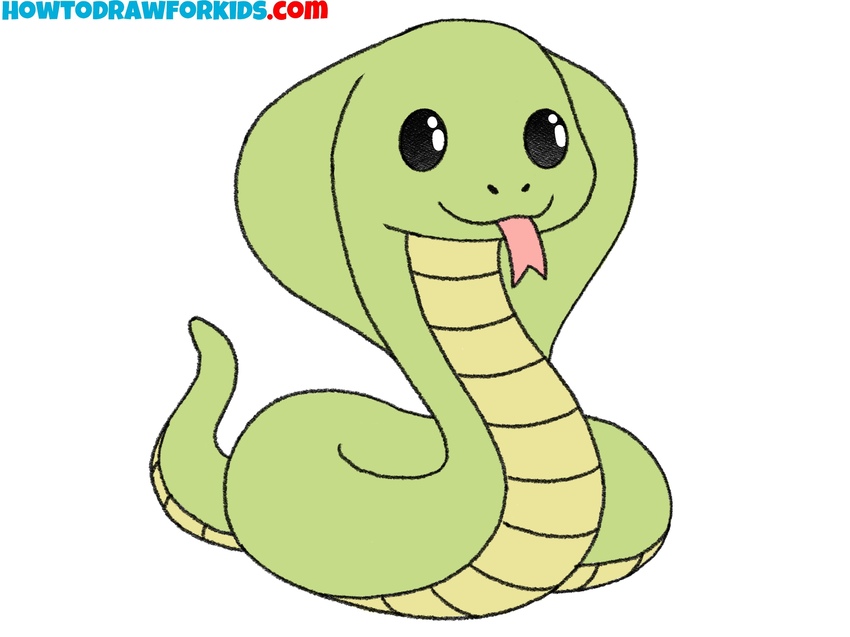
In the picture, you see a cobra, which opened its hood and stuck out its tongue. Thus, the cobra prepares to attack. It is in this form that you will depict a cobra in this lesson. Be attentive and use the prompts at every step, and then you will quickly complete this lesson and acquire useful skills.
The body of the cobra is smooth, so in this tutorial, you will need to be able to make smooth rounded lines. Note that the lower torso is usually lighter in color and the back is dark and variegated.
Cobra Drawing Tutorial
Materials
- Pencil
- Paper
- Eraser
- Coloring supplies
Time needed: 30 minutes
How to Draw a Cobra
- Sketch the cobra head shape
As always, we start with the head, and sketch a rounded shape to create its base. You can draw the cobra head as a circle or oval, depending on the type of snake you want to replicate. Try to use very smooth and flowing lines on this and next steps.

- Draw the cobra body curve.
From the base of the head, sketch two long curved lines that sweep downward and then curl to one side, creating the coiled body of the cobra. You can imitate drawing an “S” curve, because this helps convey the snake’s natural movement. Sketch both lines parallel and end them in a rounded coil.

- Sketch the small snake tail.
Next, draw a short curved line from one side of the coil to create the tail tip. The tail should be narrower than the rest of the body. In addition, you can sketch a few more additional rings of the snake’s body wrapping around it from different sides if you want to create a more complex composition.

- Add the cobra hood.
Now sketch the expanded hood by drawing two large curved lines starting near the sides of the head and stretching outward before joining the body. This wide hood is what makes a cobra instantly recognizable and shows us what kind of snake we are looking at.

- Sketch the snake eyes and mouth.
Inside the head, draw two large round eyes and a small curved mouth line. You can make the eyes of the cobra smaller, if you want to make it look more realistic, or make them look like a couple of ovals, as larger eyes give the drawing a more animated appearance.

- Add the forked snake tongue.
Add a forked tongue extending from the mouth, creating a thin shape and then split it into two sharp tips. This very simple detail will make your snake drawing look more recognizable. You can make this tongue thicker or thinner than in my example.

- Add the snake belly stripes.
Using long and smooth lines, draw the separation on the front of the body. Then, on the front of the cobra’s neck and belly, draw several curved horizontal lines to represent the segments. These should follow the shape of the body, curving with the contours.

- Correct the outline shape.
To make your cobra sketch ready for coloring, erase any unnecessary guidelines and make the main lines smooth and clean. This is also a great place to correct and errors in your sketch and check if there are any mistakes in proportions.

- Add green and yellow tones.
A light green works well for the body of the cobra, while the belly can be filled with a pale yellow shade. The tongue should be red, and the eyes dark with a small highlight to make them appear a bit more realistic. You could also try different variations, like a darker green or even a brown cobra.

Easy Cobra Drawing Tutorial
In addition to the main lesson, here is another way to draw a snake in an even more simplified style. This variation reduces details even further but keeps the recognizable cobra shape. Also, here you’ll see a completely different sequence of steps.
To illustrate this cobra, use two circles for the eyes, then outline the upper part of the head with a curved line to enclose them. Extend two flowing lines downward to form the neck and body. Keep the curves symmetrical. Add the lower coil by drawing an oval attached at the base, then connect it with another smaller oval to show the tail.
Add circles inside the eyes and mark small scale-like curves down the underside. Refine the outline carefully, erasing extra marks. Shade the eyes darker, color the hood and body with green and brown tones.