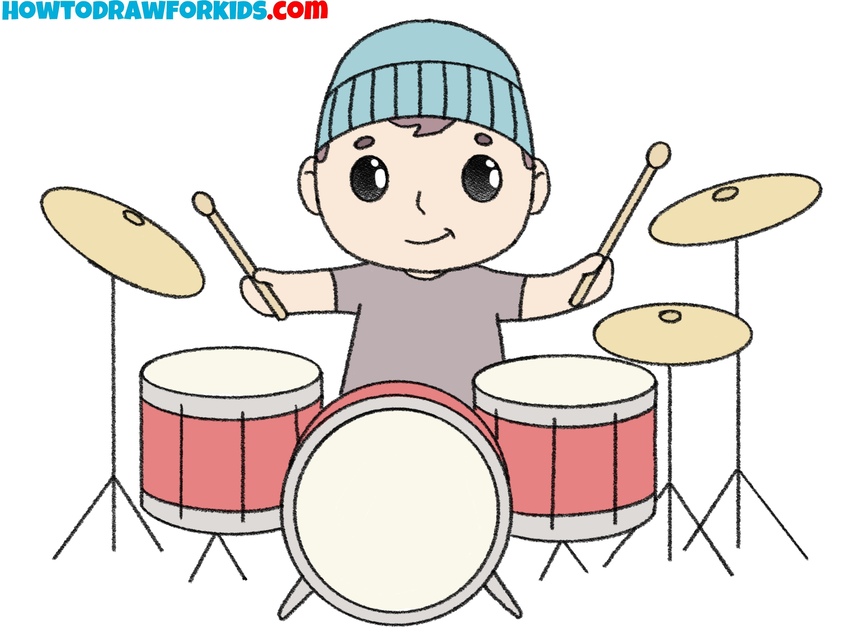
How to Draw a Drummer
Learn to create complex and detailed compositions with this tutorial on how to draw a drummer seated at a classic drum set.
How to Draw a Drummer: Introduction
Drawing complex, detailed compositions is an important skill for any artist, and it’s something worth practicing right after you’ve learned how to draw the human figure. Once you’re comfortable drawing a person, the next logical step is to place that figure into a scene where they interact with their environment.
One of the most common and useful subjects to work with is a person interacting with objects. In this lesson, for example, we’ll learn how to draw a drummer sitting at a classic drum set. This is a great way to practice how the human body fits into a composition and how it connects with the surrounding objects.
Throughout the tutorial, we’ll also focus on drawing a variety of geometric shapes that make up both the figure and the drum kit. You’ll practice working with circles, ovals, cylinders, and other basic forms, which are very important for understanding how to construct and arrange different elements inside a complex drawing.
We’ll also learn how to create complex and interesting compositions without overloading the drawing and while maintaining correct proportions throughout. To help you understand more in the topic, I’ve also included a simplified tutorial at the end that shows how to draw a drummer in a more basic form.
Drummer Drawing Tutorial
Materials
- Pencil
- Paper
- Eraser
- Coloring supplies
Time needed: 45 minutes
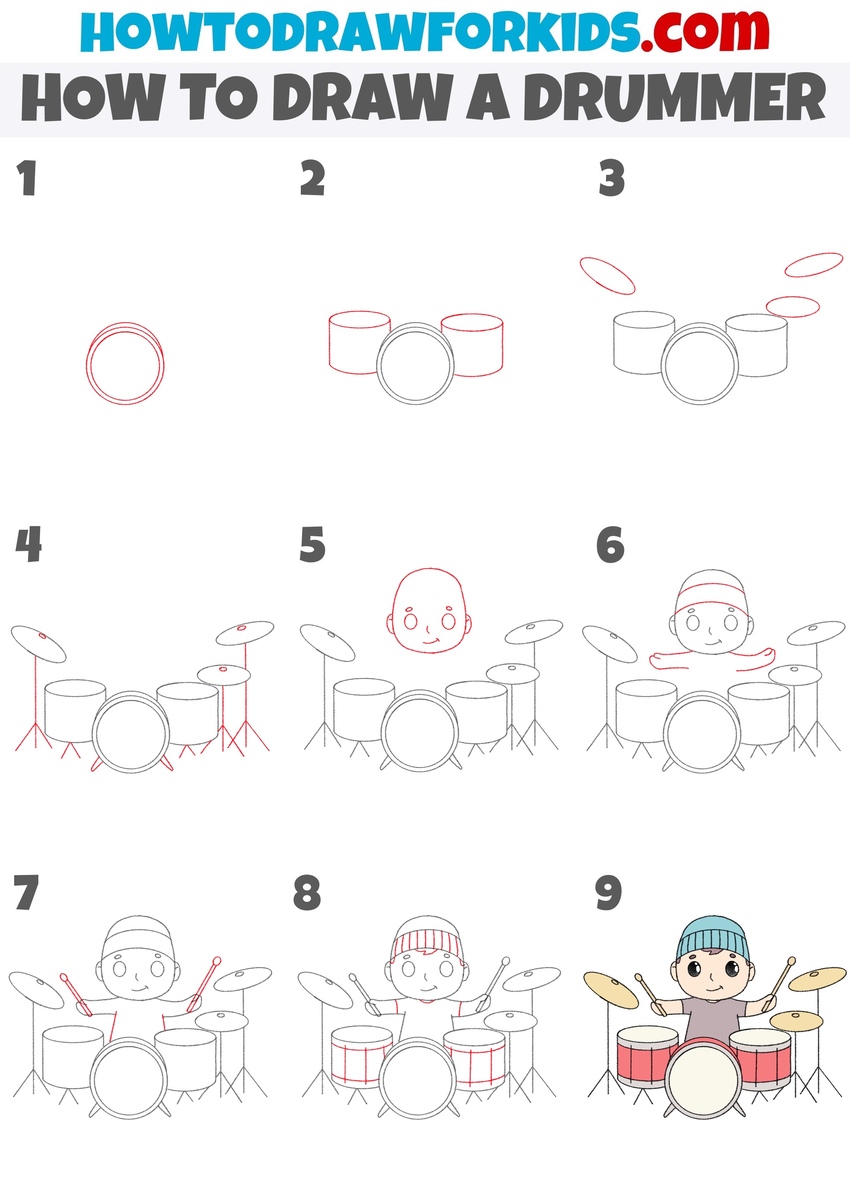
How to Draw a Drummer
- Draw the front drum.
First, draw the central drum, known as the bass drum, which is the largest in the drum set. Sketch a large circle in the lower part of the paper. Then, draw a second, slightly smaller circle inside it to give it some thickness. Then, draw the back part with a small curve to make it look like a three-dimensional drum.

- Add two side drums.
Next, draw two tom drums on either side of the bass drum. These should be smaller than the center drum and slightly higher in position. Draw ovals to represent the top of the drums, then bring vertical lines down from each side and curve the bottom to close the shapes.

- Sketch the cymbals.
Now, draw three horizontal ovals above the tom drums. These ovals will represent the tops of the cymbals, angled slightly to match a typical drum setup. Make sure the shapes are long and narrow to give the sense of perspective, as the cymbals are viewed from the side.

- Add stands and details.
Draw thin, straight lines coming down from the cymbals to the ground, then add additional lines branching outward at the base to create tripod legs. Also, draw small circles in the center of each cymbal to show where they connect to the stands. Then, add stands for the rest of the drums in the same way.

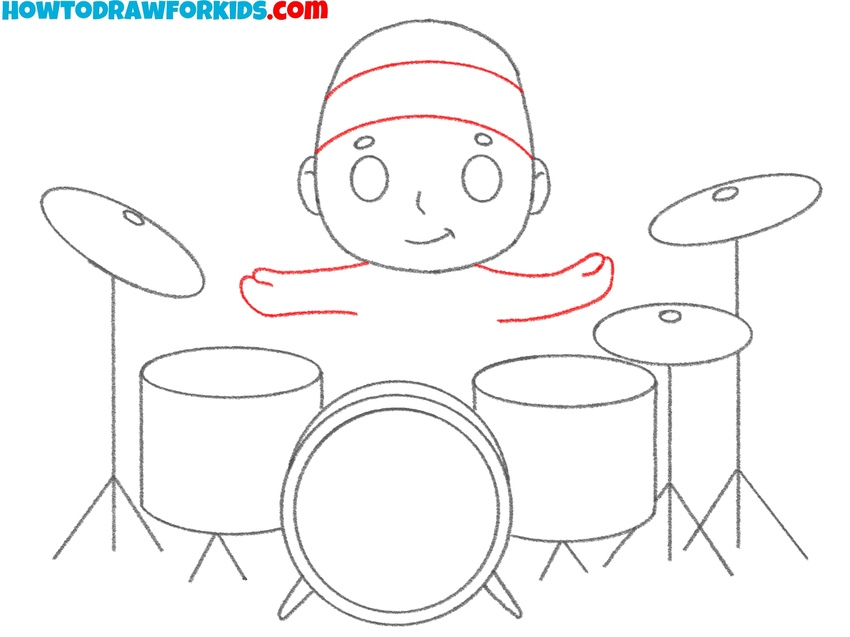
- Draw the drummer’s head.
Now it’s time to draw the drummer. Begin by drawing a large, rounded head in the space above the bass drum and between the cymbals. Add two large circular eyes, a small nose in between, and a smiling mouth. Keep the facial features simple. Draw the ears on each side of the head.

- Draw the drummer’s arms.
Sketch two curved arms extending from below the head outward toward the sides, as if the drummer is holding up drumsticks. After that, draw the drummer’s hands with simple mitten-like shapes. Then, draw a rounded hat on top of the head.
- Illustrate the drumsticks.
Draw two long, narrow shapes extending from the ends of the drummer’s hands. Each drumstick should be slightly angled and point toward different sodes, showing that the drummer is actively playing. After that, draw the visible part of the drummer’s torso with a couple of simple lines.

- Add final drum details.
Sketch a few vertical lines across the toms to represent the structure or rims of each drum. Also, add vertical lines on the bottom part of the drummer’s hat to complete the design in the same step you can remove any guidelines and give your drummer drawing a finished look.

- Color the drummer drawing.
First, color the drums – use red or another bright color for the drum shells, and a neutral tone like gray for the rims and drumheads. Color the cymbals a light yellow or gold. For the character, choose skin tones for the face and arms and any color you like for the hat and shirt. The drumsticks can be left in a light brown or tan.

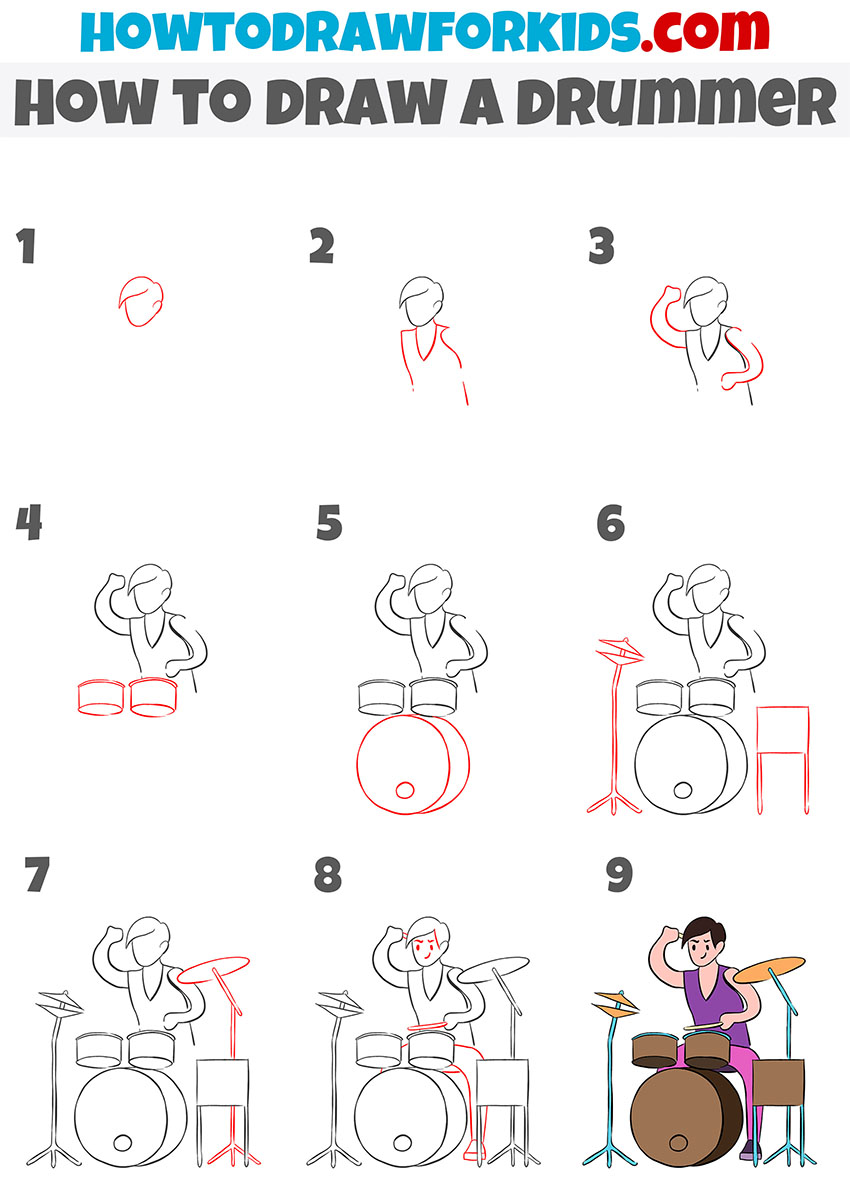
Simple Drummer Drawing Tutorial
This tutorial on how to draw a drummer is more stylized compared to the first one. The pose shows the drummer in action, raising one arm. The figure is drawn first, followed by the drums. The drum set is also simplified, using clean and angular shapes, including a visible drum stool, which wasn’t present in the previous version. The final coloring is more stylized and uses bold tones for contrast.
To begin this simplified and more stylized version of the tutorial on how to draw a drummer, sketch the head with a curved hairstyle, then sketch the upper body and shoulders using soft lines. Add both arms in active poses – one lifted as if about to strike a cymbal. Draw two small tom drums in front of the drummer, followed by a large bass drum below.
Add a cymbal stand to the left and a small rectangular seat behind the character. Sketch a second cymbal stand and crash cymbal on the right. Then, draw the eyes, a smile, and some simple details. Draw the legs below the drum set to show the drummer sitting properly. Finally, color the full scene, using distinct tones for each drum, the cymbals, and the drummer’s clothing.
Conclusion
So, young artists, how did you like this tutorial on how to draw a drummer? Was the second version easier or more challenging than the first one? Let me know if you followed all the steps exactly or if you added your own ideas – maybe different colors, extra instruments, or a unique hairstyle for your character.
If this lesson helped you better understand how to draw a drummer in action, I’d be glad to hear about it. And don’t forget, you can always continue improving your skills by checking out other tutorials on my website – there are plenty of lessons on drawing people, musical instruments, and full compositions.
You’re also welcome to experiment even more. Try adding a background, like a concert stage or an audience. Or draw more band members to create a full scene.
And of course, if you enjoyed this lesson, don’t forget to share it with your friends, classmates, or art teacher.