How to Draw a Vest
Drawing clothing items is simpler than expected. My step-by-step lesson on how to draw a vest will guide you through the process.
How to Draw a Vest: Introduction
This lesson on how to draw a vest will teach you how to illustrate this item of clothing in really simple way. This guide is intended to be useful for kids and beginners. Traditionally, the lesson will include two parts. First, we will draw a vest in a simple yet realistic style, and then we will try a more simplified style.
A vest is a short, collarless, sleeveless garment. In the traditional style, it is worn under a jacket, frock coat, or tailcoat. It can also be used in other contexts, such as part of a costume or work attire.
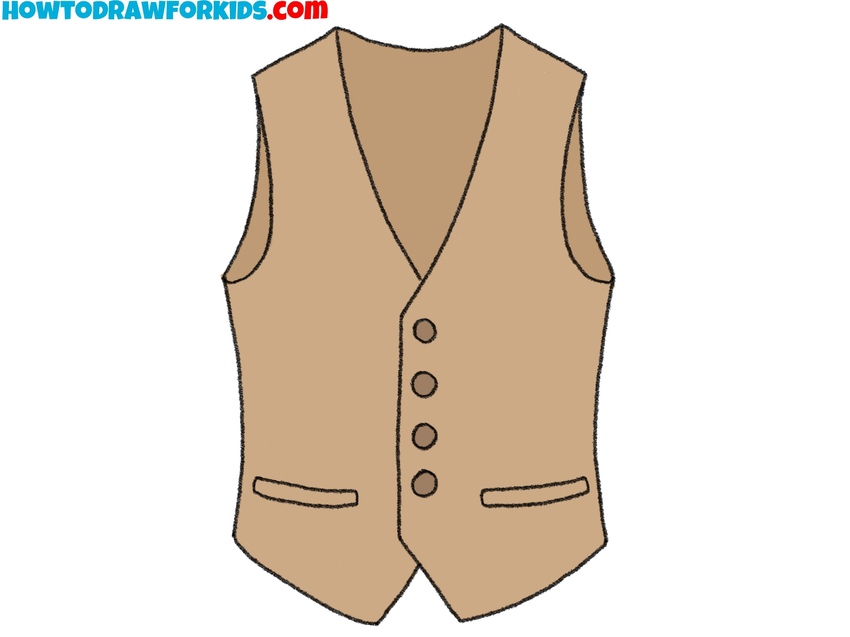
In the image, you see a basic model of the vest. The design is simple, but there may be some difficulty in creating an even outline. It is important to draw straight and curves lines, and ensure that both sides of the vest are symmetrical. Once the outline is complete, you can add a few buttons in the center.
For coloring, you may use any color your like, for example brown as in the first tutorial, or purple, as shown in the simplified version of the guide. Or you can choose any other color you prefer.
Vest Drawing Tutorial
Materials
- Pencil
- Paper
- Eraser
- Coloring supplies
Time needed: 25 minutes
How to Draw a Vest
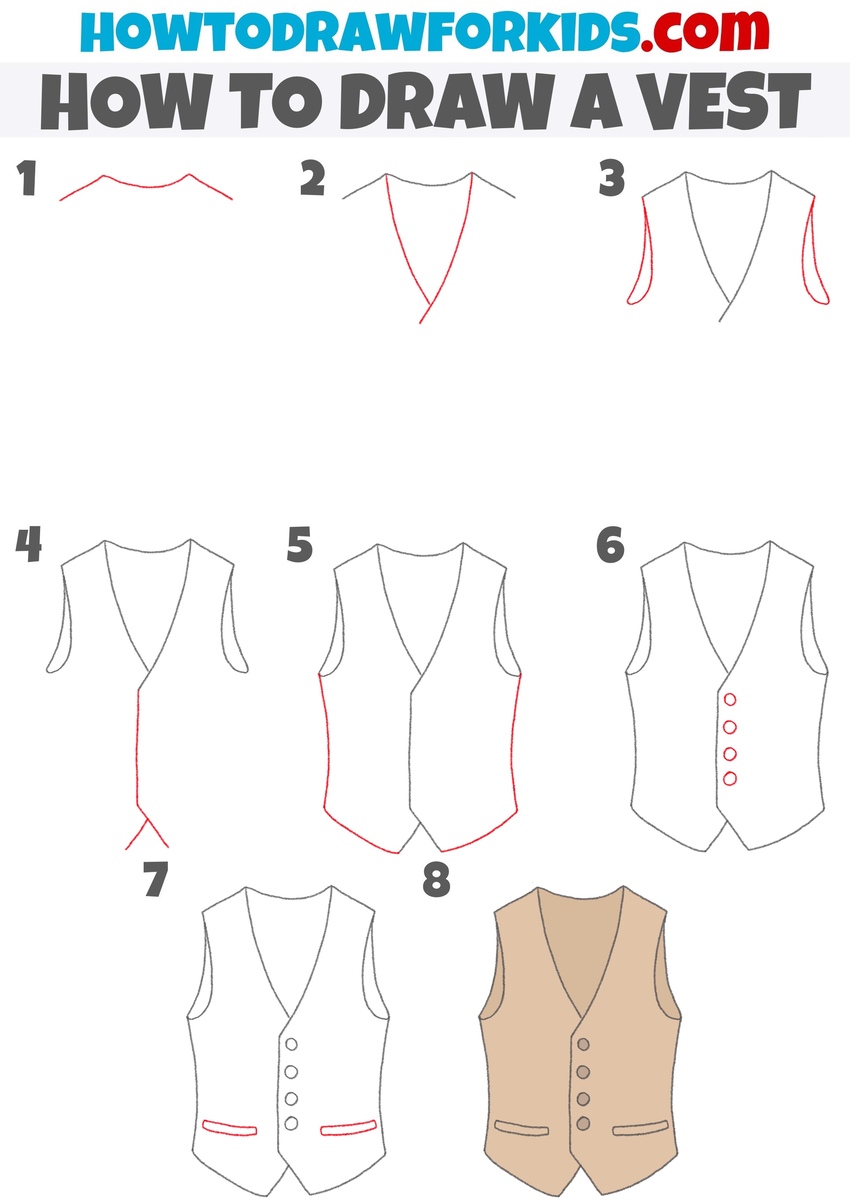
- Draw the top edge of the vest.
To begin your vest drawing, start by sketching the outline for the top part of the collar and shoulders area. Draw a wide and flat “U” shape with two straight lines at the sides near the top of your page. Keep your lines light so you can adjust them if necessary.

- Draw the outline of the collar.
Now, with the top edge at the place, let’s get to the vest collar. Since this is a classic vest, the collar area resembles a “V” shape. To create this part, first draw one slightly curved line from top to bottom, followed by another line to complete the “V” shape.

- Sketch the armholes.
From the upper edges near the shoulders area, draw a gentle curve on each side. These curved lines should resemble loops or uneven ovals. The armholes should have a slight curve to mimic how fabric would drape around the arms.
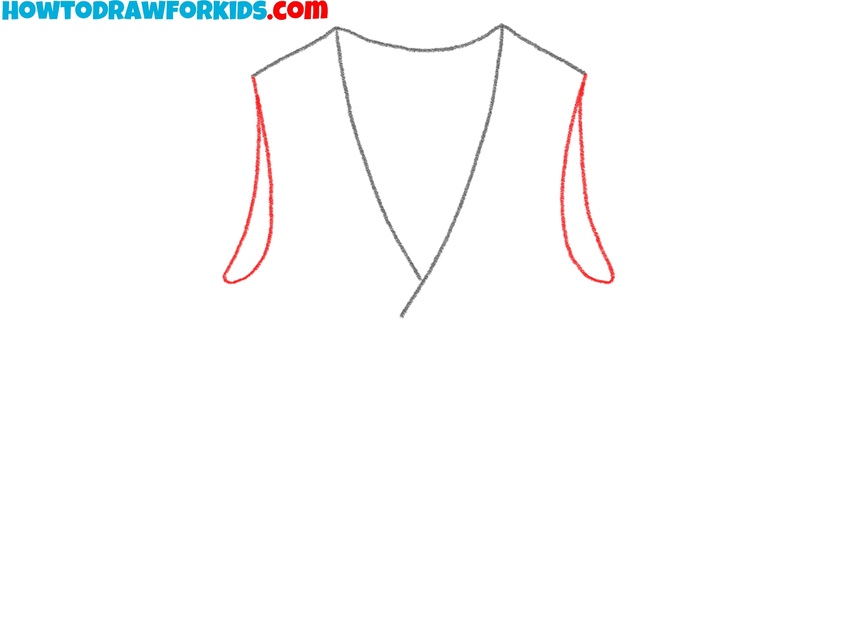
- Draw the central line of the vest.
Start from the bottom point of the V-shaped collar and draw a straight line extending downward. This line divides the vest into two halves. Next, divide this line into two, slightly diverging to the sides, to depict the natural outline of this part of the vest.

- Sketch the side and bottom edges.
Now, complete the basic outline of the vest by drawing lines along the sides of the body. Draw a vertical line down each side, extending from the armholes to the bottom edge. Then, draw the bottom edges connecting the side edges with the lines from the previous step.

- Add the buttons.
Draw three or four evenly spaced circles on one side of the center front, starting near the top and moving downwards. These circles represent the vest’s buttons and should be small and uniformly sized. Position the buttons at regular intervals to create a clean and natural look.

- Draw the pockets on the vest
Draw a small horizontal rectangle near the lower section on each side of the vest. These rectangles should be narrow and slightly curved reflect the vest’s shape. Also, remove unnecessary lines and add some details if necessary to prepare the vest drawing for coloring.

- Add colors to the vest drawing.
Once you’re satisfied with the outline, color I your vest drawing. You can choose a traditional color like brown or gray or add hatching to show fabric texture. Color the buttons and the inside of the jacket a darker color to keep your vest design from looking too monotonous.

Vest Drawing Tutorial for Preschoolers
The main differences between this vest drawing tutorial and the first are in the style and simplicity. In this version, the vest is more simplified, with fewer curved lines and a simpler, straight-edged design. The steps are more concise, focusing on the vest’s basic shape, collar, buttons, and pockets without additional decorative details.
To draw a simple vest, start by sketching one side. Draw a vertical line for the side edge, then angle it inward at the bottom to form a pointed shape, representing half of the vest. In the second step, mirror this outline by drawing the other side, ensuring both sides are symmetrical.
Next, add the details to your vest drawing. Draw a small curved line at the top for the neckline. Add three small circles along the center line for the buttons. Then, draw two short horizontal lines on each side near the bottom for the pockets. Finally, color in the vest to complete the look.

Conclusion
The lesson is complete. Learning how to draw items of clothing will make it easier to draw clothing on a person. If you found this tutorial interesting, be sure to check out my other tutorials in the Clothing category to learn how to draw pants or try your hand at drawing a dress. You can combine lessons from the “People” and “Clothes” categories on my site to create interesting artworks.
Remember to download the PDF version of the simplified vest guide, which includes the steps described above, along with some additional useful content. Additionally, as is customary, I recommend subscribing to my social networks to ensure you don’t miss any new drawing lessons.

