How to Draw an Ear
In this tutorial, we will focus on improving the basic skill of drawing portraits by learning how to draw an ear in four simple steps.

How to Draw an Ear: Introduction
The ear is one of the most prominent features of the head, making it an essential element to master when drawing a human portrait. Understanding how to draw an ear is a fundamental skill for creating accurate and realistic portraits.
While the ear may seem simple at first glance, it has a complex structure that requires careful attention to detail. Illustrating its shape and features correctly is very important to achieving a realistic representation.
In this lesson, I will explain how to draw an ear as clearly and simply as possible. Following these steps will help you understand the key elements involved in recreating its intricate details.
Keep in mind that every person’s ears are unique, and their shapes can vary. By adjusting the outline or internal features, you can adapt your drawing to match the specific look you want.
Ear Drawing Tutorial
Materials
- Pencil
- Paper
- Eraser
- Coloring supplies
Time needed: 20 minutes
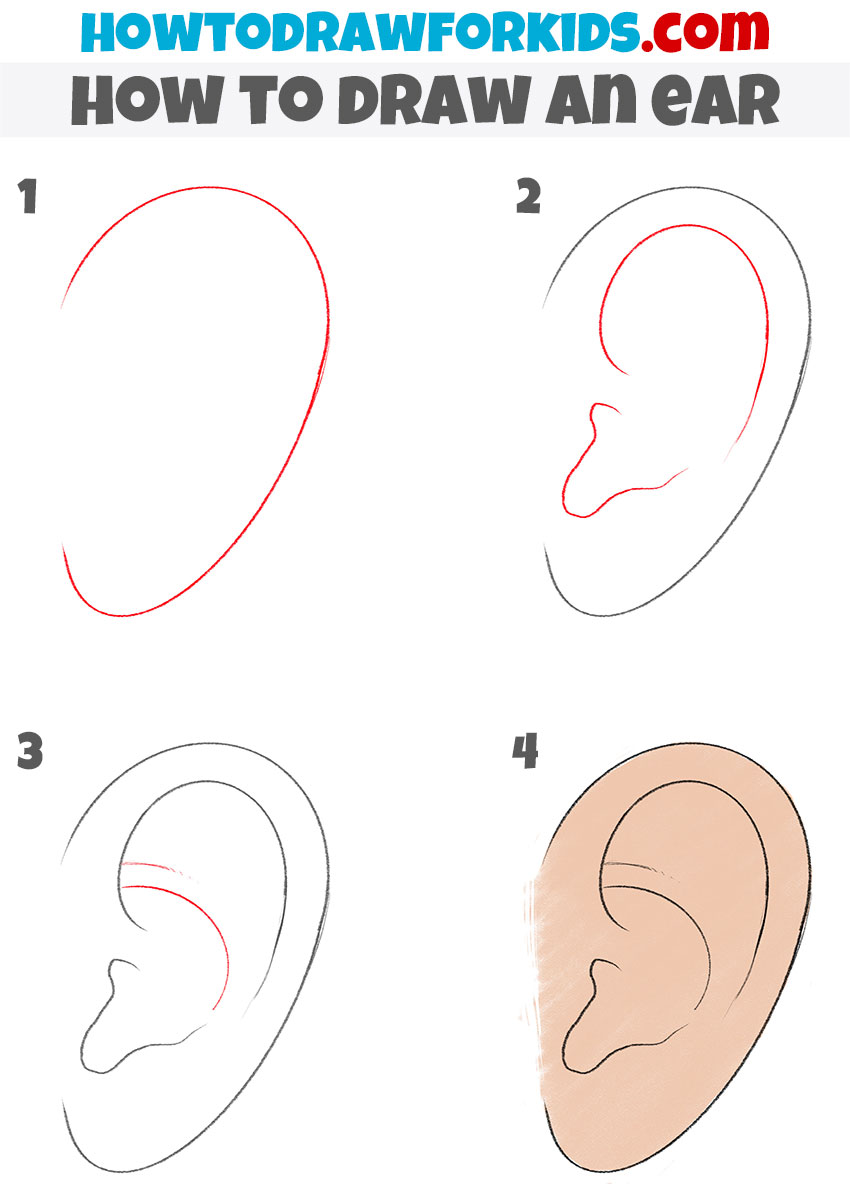
How to Draw an Ear
- Draw the outline of the ear.
Begin the process of learning how to draw an ear by sketching its basic outline. Start with a large, elongated oval shape to represent the outer edge of the ear. Make sure the oval is slightly tilted to match the natural angle of the ear on the head. Keep the lines light so they can be adjusted or erased if needed.

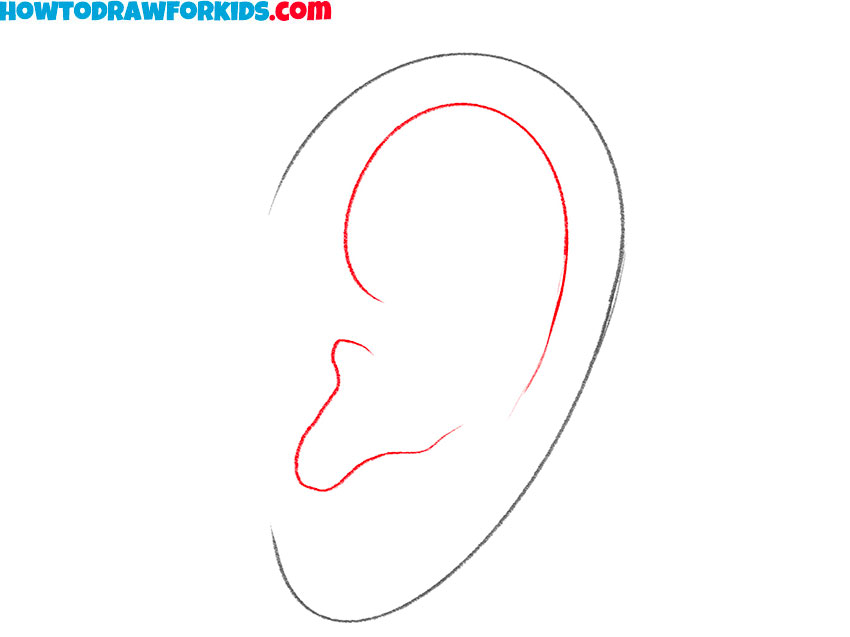
- Draw the details of the ear.
Inside the oval, draw a curved line that runs parallel to the outer edge. This line represents the helix, the rim of the ear, and helps define its overall form. Next, sketch another smaller curved shape near the center to outline the concha, the part of the ear that leads into the ear canal.
- Add the smaller details.
Detail your ear drawing by including smaller lines that make it realistic. Focus on the inner curves and folds, such as the antihelix. These smaller features may seem minor but are very important for creating a lifelike representation. Pay attention to the proportions and spacing between the details.

- Finalize and add colors.
Complete the process of drawing an ear by refining the outlines and adding shading or color. Use an eraser to remove any unnecessary guidelines and improve the final lines to make them look finished. If you plan to color the ear, choose a skin tone that matches the intended subject.

Additional Content
To conclude the ear drawing tutorial, you can download a PDF file that contains a concise version of the lesson. This file provides practical tools for use anytime, even without internet access.
How to Draw an Ear: Advanced Advices
To further improve your skills, consider incorporating advanced techniques into your ear drawings. Start by refining the shape to make it more realistic, focusing on the natural curves and proportions.
Next, add more details, such as the smaller folds and subtle lines, to enhance the overall complexity of your ear drawing. Practice drawing the ear from different angles to better understand its structure and how it appears in various perspectives.
Experiment with drawing ears of different shapes to capture a range of individual characteristics and improve your overall drawing skills. Finally, try adding shadows and highlights to give your drawing more realism and make it appear more three-dimensional.
Conclusion
This lesson is now complete. You have learned how to draw an ear step by step. I hope you found the process straightforward. Do you like the drawing you created? If you found this tutorial helpful, consider sharing it with others who may enjoy drawing.
This lesson is one of the fundamental lessons designed to teach young artists how to illustrate a portrait. To further develop your portrait drawing skills and broaden your abilities, consider reviewing my eyes drawing lesson and face drawing lesson.
Feel free to leave your questions in the comments if you have any about this lesson. You can also share your thoughts and suggest ideas for future lessons. Don’t forget to follow me on social media for more content.