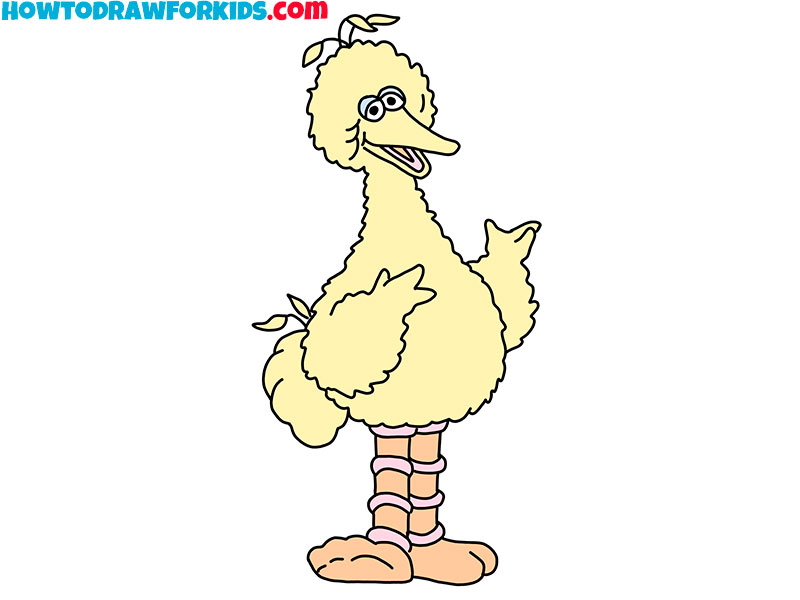
How to Draw Big Bird
This lesson will be especially loved by all fans of Sesame Street, because here we will learn how to draw Big Bird from this legendary show.

How to Draw a Big Bird: Introduction
Especially for children and beginner artists, and Sesame Street fans, I have prepared a new lesson in which I will show you how to draw Big Bird step by step. There are a huge number of birds on our planet that can be depicted in different ways. Many artists draw birds in their paintings using different drawing techniques.
In this lesson, you will learn how to draw a large bird that stands on long legs. Here the bird is presented in a cartoon form, so it looks unrealistic, but very funny. The bird stands on its paws, and the ends of the wings look like human hands, the beak is slightly open.
To draw the outline of the body, use jagged wavy lines, so you will depict the magnificent plumage of the bird. For coloring, you can use the same shades that are suggested in the instructions or any other colors of your choice.
For a more convincing result, you can take the person drawing lesson to learn the basic proportions and principles of creating anthropomorphic characters.
Big Bird Drawing Tutorial
Materials
- Pencil
- Paper
- Eraser
- Coloring supplies
Time needed: 30 minutes
How to Draw Big Bird
- Sketch the round cartoon eyes.
Sketch the eyes of Big Bird, which are two small circles placed side by side. After that, add tiny circles inside for the pupils. Don’t forget, that cartoon eyes don’t always follow realistic rules. If you sketch a line lightly across the page as a guide, it helps you keep both eyes level.

- Draw Big Bird’s beak.
Now sketch Big Bird’s long beak. It’s shaped almost like a cone with a soft curve at the end. To illustrate a beak like this, I often tell my students to think of a bent triangle, but with rounded corners. Add a line inside to show the separation between the upper and lower beak.

- Sketch the round head shape.
Draw the round outline of the head with a fuzzy, irregular line to illustrate feathers of Big Bird. Unlike a perfect circle, you want to sketch it with soft bumps and curves. This technique is something I use often when teaching students how to illustrate animals with fur or feathers – you don’t want the line too smooth.

- Add feather tufts to the head.
Next, sketch the little tufts of feathers on top of Big Bird’s head. Think in small clusters, draw a couple of curved lines that branch outward, not just single strands. These tufts don’t need to be perfectly even, and in fact, a little asymmetry makes them feel more natural.

- Sketch the teardrop body.
Now, draw Big Bird’s body as a large, teardrop-shaped form beneath the head. It should be wide at the bottom and narrow at the top, connecting smoothly to the head. Avoid using straight or smooth lines, but instead draw Big Bird’s torso with small wavy lines to convey the texture of the feathers.

- Draw Big Bird’s wings.
Add one wing to the side of the body. After that, draw the second arm on the opposite side. Unlike real birds, Big Bird’s wings are simplified, almost like an arm covered in feathers. So, you are not aiming for realistic bird anatomy, it’s more like drawing a cartoon arm with texture.

- Sketch the tail feathers.
Draw the tail feathers at the lower back of the body. Like the wing, they’re very simplified. Avoid making them symmetrical or overly neat. Instead, illustrate a series of simple curves that create overlapping feathers. This creates the impression of texture without needing dozens of lines.

- Draw Big Bird’s striped legs.
Big Bird is famous for his striped legs, so this step is especially important. Sketch two long, narrow legs extending downward from the body, and then draw the wide, flat feet at the bottom. To make the legs recognizable, illustrate the horizontal stripes across them.

- Color the character.
The final step is coloring Big Bird. Fill in the body with bright yellow, keeping the beak orange and the legs striped with orange and pink. You can make your big bird drawing more cartoonish by outlining it with dark lines, or give it a more dimensional look by adding shadows.

Additional Content
I remind you that now you can download a PDF file for free, which contains a brief instruction and additional training materials. This will help you return to the lesson at any time and complete it again.