How to Draw an Elephant
With the help of several step-by-step instructions, I want to show you how to draw an elephant – one of the largest and most unusual mammals living on this planet.
How to Draw an Elephant: Basic Information
Welcome to this step-by-step tutorial on how to draw an elephant. Elephants are one of the most majestic and recognizable animals, making them an excellent subject for artists looking to improve their drawing skills. This tutorial is designed to help young artists understand and replicate the unique features of an elephant.
Drawing an elephant involves understanding its distinct anatomy and proportions. Elephants have a very recognizable appearance, and no matter whether you draw them in a realistic or cartoon form, you must illustrate them as correctly as possible. In this tutorial, I will tell and show you how to do it.
To make the process of learning how to draw an elephant more comprehensive, I have supplemented the main lesson with several additional ones. These additional lessons will help you gain a more thorough and detailed understanding of how to depict this unique animal.
Elephant Drawing Tutorial
Materials
- Pencil
- Paper
- Eraser
- Coloring supplies
Time needed: 40 minutes
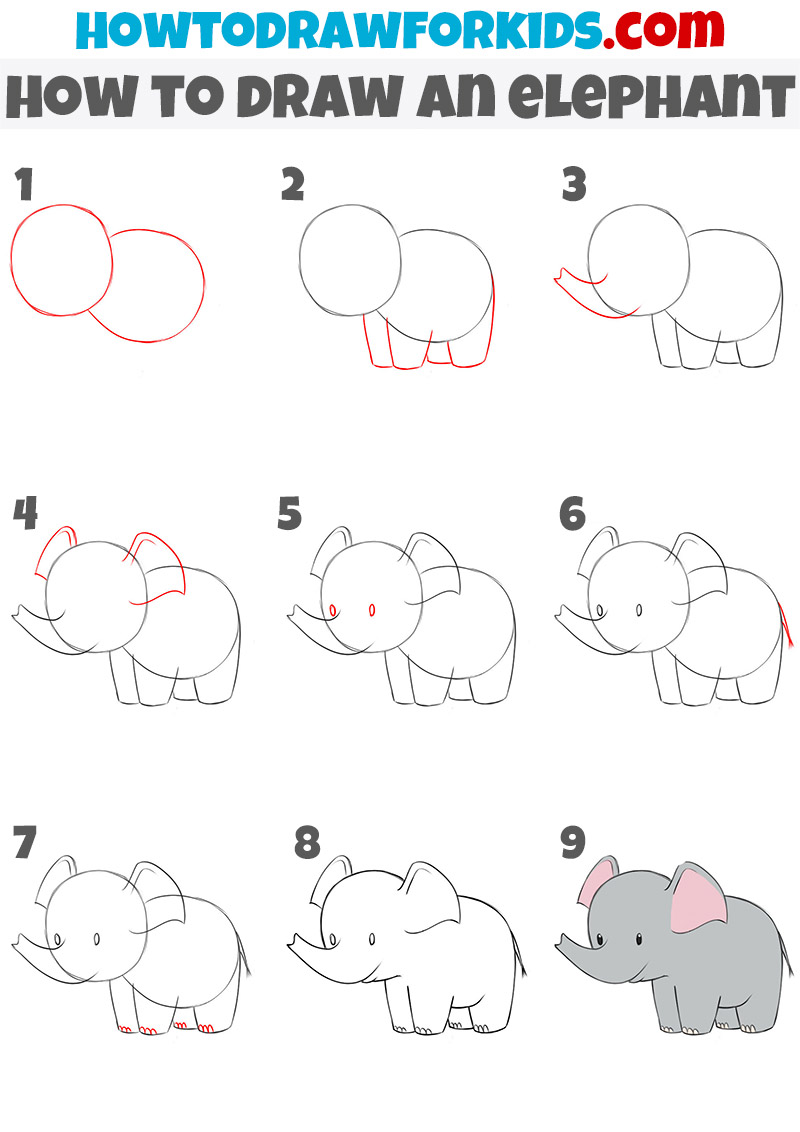
How to Draw an Elephant Step-by-Step
- Create the contours of the head and torso.
So, we begins with drawing two overlapping round shapes. The oval forms the main body of the elephant, while the cirle, overlapping on the left side, outlines the head. This foundational technique establishes the basic form and is common in drawing animals to get the proportions right from the start.

- Sketch the elephant’s legs.
Draw four rectangular shapes beneath the larger circle, creating the elephant’s limbs. These shapes should be drawn with slightly rounded corners to suggest the fullness of the elephant’s stout legs. The front legs towards us should slightly overlap the hind legs – this is a very important detail.

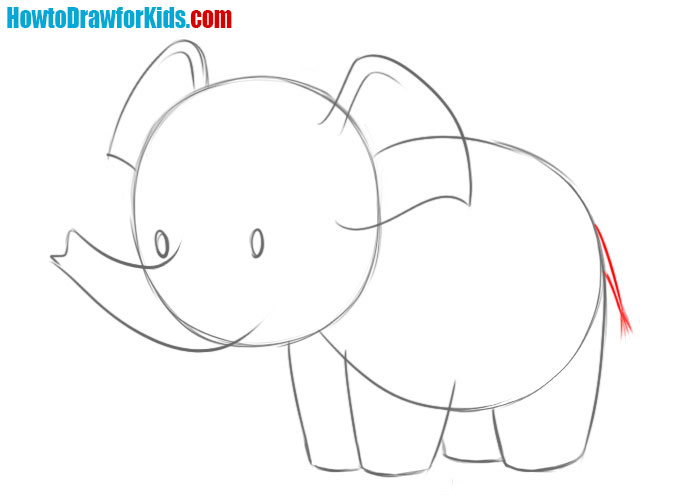
- Illustrate the trunk.
With the legs in place, it’s time to add the elephant’s most distinguishing feature – its trunk. From the center of the smaller circle (the head), draw a long, curved line that extends outward and then curves back towards the body. This line should flow smoothly, mimicking the natural curve of an elephant’s trunk.

- Draw the ears of the elephant.
Sketch two smaller curves on the top of the head for the ears, making sure they’re roughly the same size for balance. By the way, different types of elephants have completely different ears – from huge to very small. So, you can choose in this step the most suitable appearance for your elephant.

- Illustrate the eyes.
Add small ovals for the eyes, placing them just above the midpoint of the head circle, ensuring they are aligned and evenly spaced for a symmetrical look. A common technique in drawing cartoon eyes is to place them lower on the face to make the character appear cuter and more childlike.

- Sketch the elephant’s tail.
After adding the eyes, it’s time to complete the elephant’s body by drawing the tail. Extend a small, slightly curved line from the rear of the larger circle, which is the elephant’s body. The tail should be thin and taper towards the end, finishing with a small tuft of hair.
- Illustrate the toes and nails.
Now, add some finer details to the elephant’s legs by drawing its toes. At the bottom of each leg, sketch three small, rounded shapes that represent the elephant’s toes. The toes are a small detail but are essential for making the elephant look complete and more realistic.

- Review the drawing and remove the extra lines.
In this step, we will accentuate the elephant’s form by clarifying its final contours. Carefully review your elephant drawing and identify any lines that are no longer necessary, gently erasing them to clean up the sketch. Now, intensify the primary outlines to give your elephant more finished look.

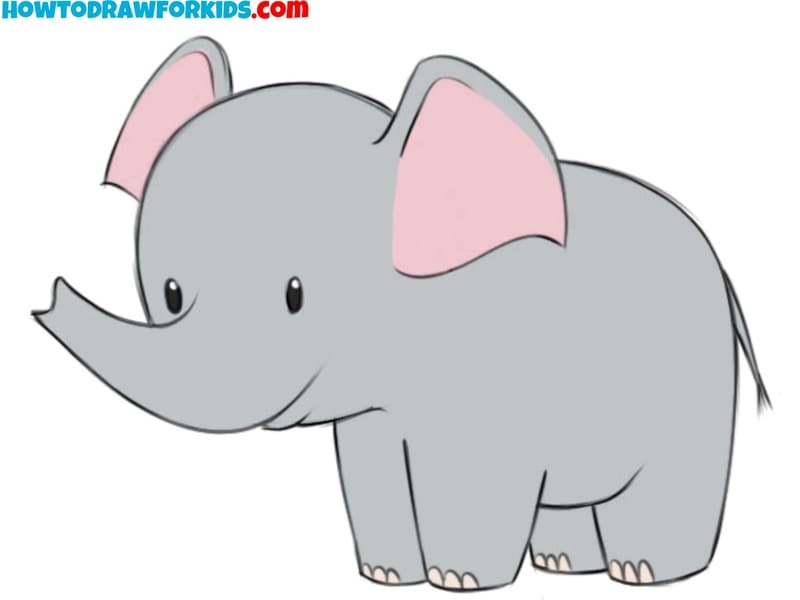
- Color your elephant.
Typically, elephants are gray, so use a shade of gray for the body. Add some pink inside the ears to highlight the softer, inner part. You can also use a darker shade for the toes and the tip of the trunk and tail to add dimension. Finally, you can shade the body to give it a more three-dimensional appearance.

How to Draw an Elephant: Alternative Tutorials
As you likely know, consistent practice is very important for developing good skills. To make these practice sessions thorough and engaging, try observing the object you’re drawing from various perspectives. Moreover, it’s crucial to be able to depict the same object in different styles, ensuring your artistic abilities are well-rounded.
To ensure that all these conditions are met, I have collected for you several additional ways to draw an elephant. In each of them, I have presented different techniques and difficulties. Try them all to hone your skills.
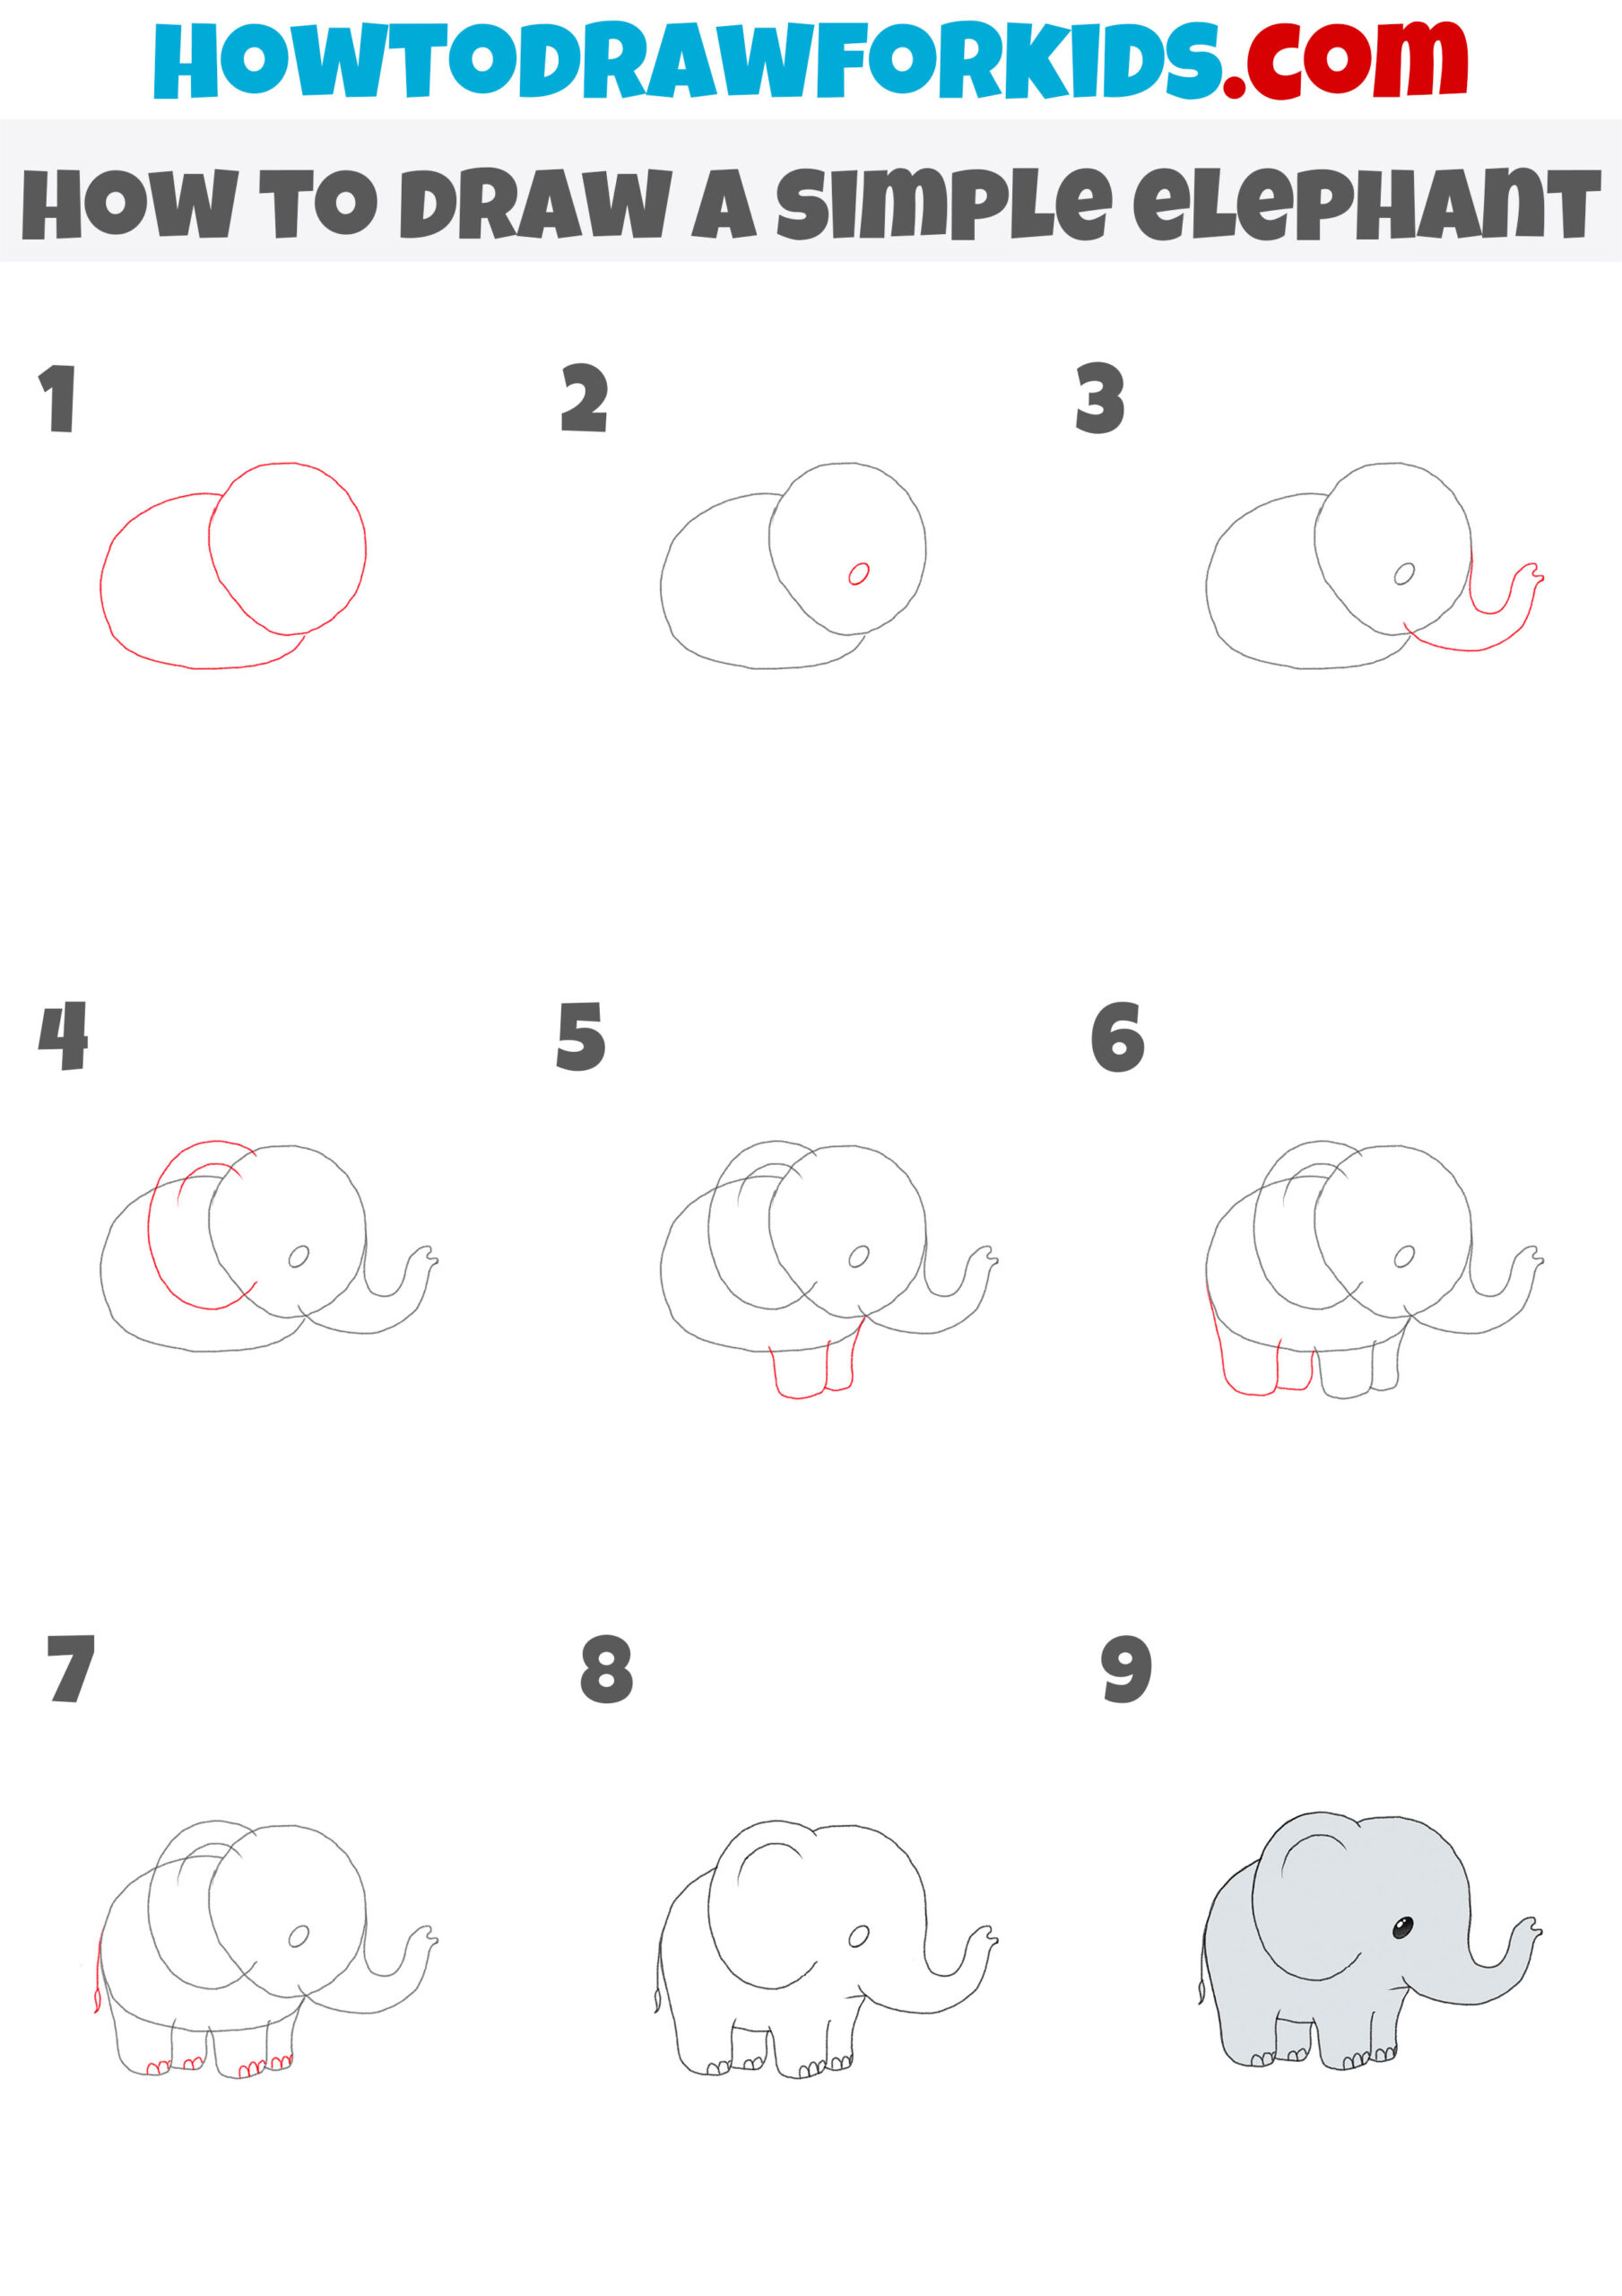
Simple Elephant Drawing Tutorial
This is an additional tutorial for drawing an elephant, offering a slightly different approach from the first one. The steps here are simpler, with fewer details, making it easier for beginners. The overall appearance is more rounded and compact, and the sequence of steps builds the elephant’s body first before adding features like the trunk and ears.
Start by drawing a large circle for the body and a smaller circle overlapping it on the right for the head. Next, add a curved line extending from the head to the body for the back and sketch a small curve for the start of the trunk. Extend the trunk further with a downward curve, ending in a rounded tip.
Add a small, curved tail on the left side of the body. Draw a circle within the head for the eye and a big curve overlapping the head and body to form the ear. Then, draw the front legs as two rectangular shapes underneath the head. Add the hind legs in a similar fashion near the back of the body. Finally, refine the shapes, erase unnecessary lines, and color the elephant light gray, adding a black dot for the eye to complete the drawing.
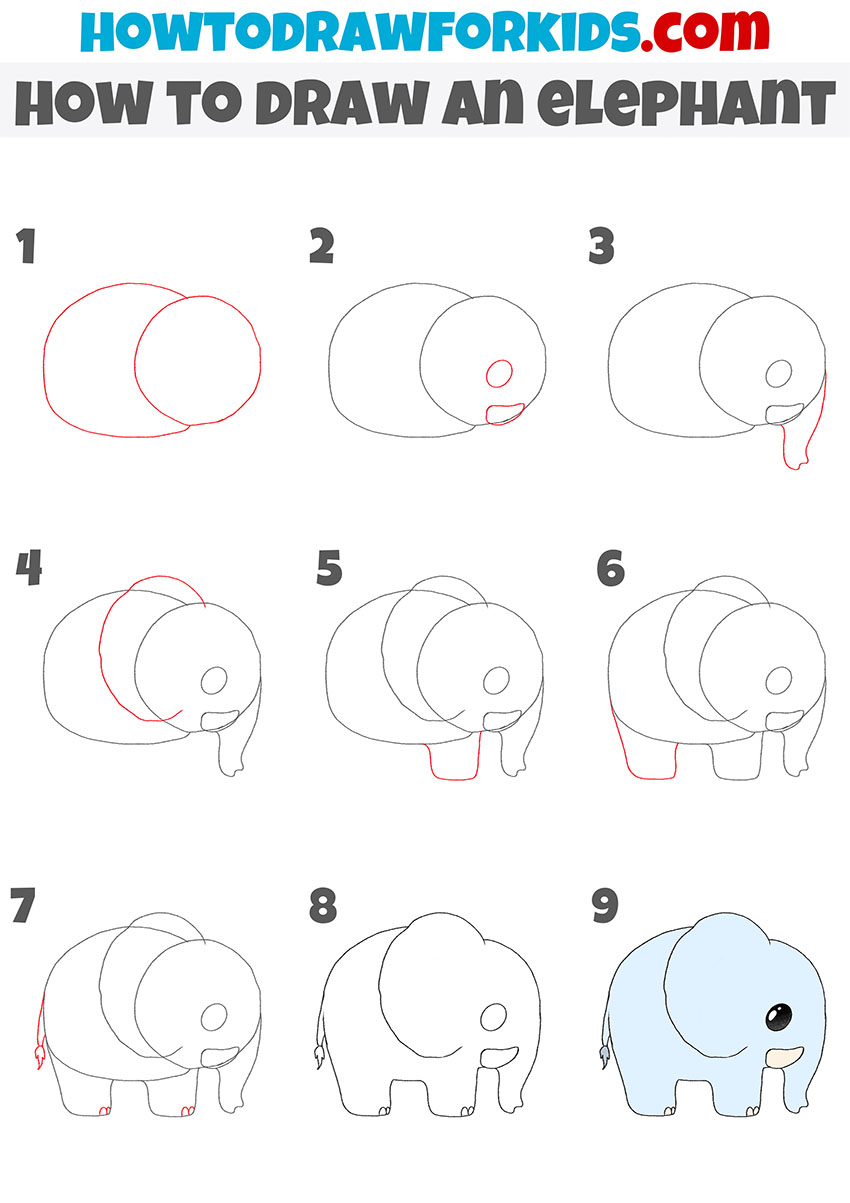
Cute Elephant Drawing Tutorial
This tutorial shows how to draw a cute, side-view cartoon elephant in nine steps.
Begin by drawing two overlapping ovals, with the larger one on the left for the body and the smaller one on the right for the head. Add a small circle inside the head oval for the eye, and beneath it, draw a short horizontal curve for the tusk. Extend the trunk downwards, giving it a slightly wavy shape.
Next, draw the ear as a curved line overlapping the head and body. Then, add the front legs, which are rectangular and placed under the head. Continue by drawing the back legs, similar in shape to the front legs, under the body. Add a thin tail extending from the back, with a small tuft at the end. Finally, refine the lines, erase any unnecessary guidelines, and color the elephant, using blue or gray for the body and black for the eye.
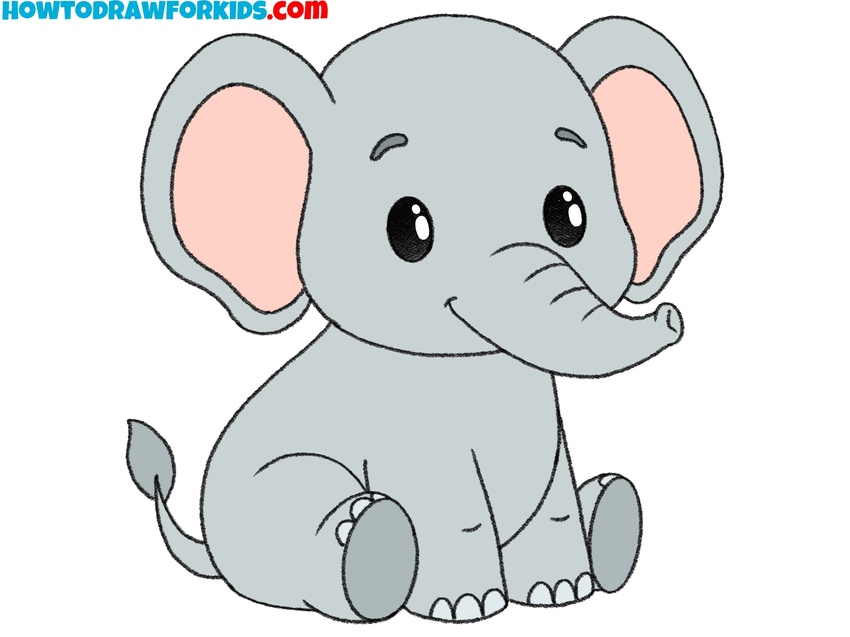
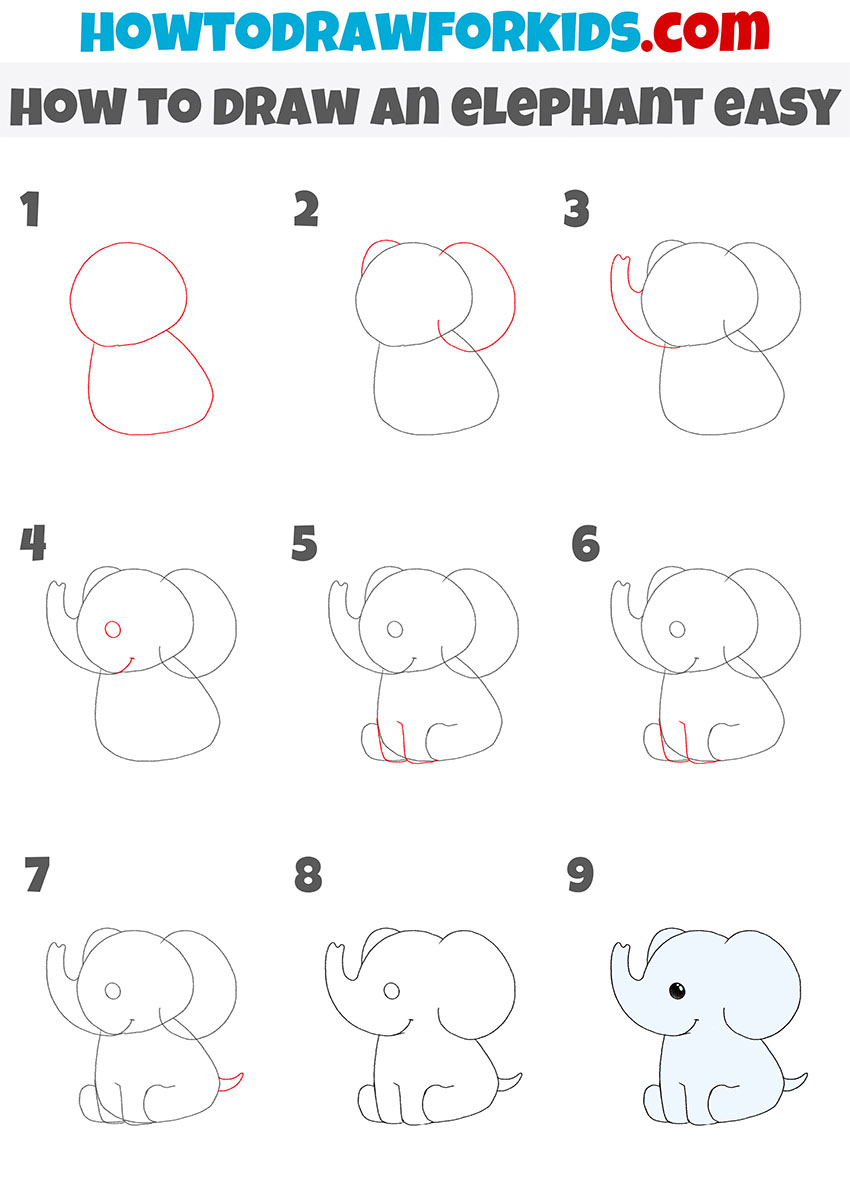
Sitting Elephant Drawing Tutorial
This tutorial guides you through drawing a sitting cartoon-style elephant in nine steps.
Begin by sketching an oval for the head and a larger oval for the body. Next, draw two overlapping circles on each side of the head for the ears. Add the trunk by extending a curved line from the head. After that, draw a small circle on the face for the eye and a curved line for the mouth.
Continue by drawing the front legs using two curved lines extending downward from the body, followed by the hind legs in a similar fashion. Add a small tail on the right side of the body. Once the basic outline is complete, refine the shapes and add final details like toes. Finally, color the elephant, using gray for the body and black for the eye.
Conclusion
In conclusion, mastering the art of drawing elephants requires both patience and practice. By following the steps outlined in this tutorial, you have learned how to capture the unique features and proportions of these majestic creatures. Remember to experiment with different perspectives and techniques to further train your skills.
I’d love to see your progress! Share your elephant drawings with me on social media. Ready to expand your skills? Check out my other tutorials about animals. Also let me know what you thought of this tutorial and what you’d like to learn next.