How to Draw Cinnamoroll
I’ve created an easy-to-follow tutorial on how to draw Cinnamoroll. You’ll learn to illustrate this cute character, from fluffy ears to tail.
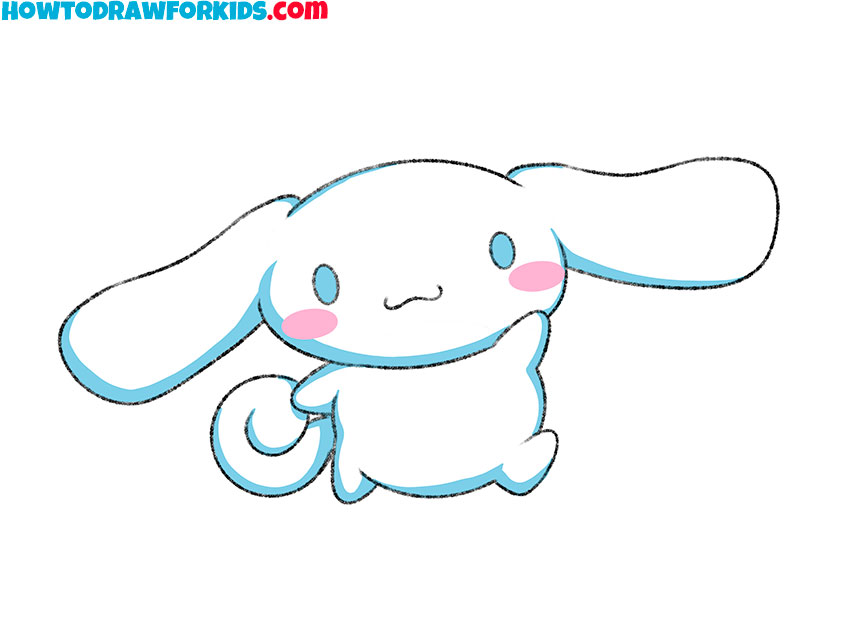
How to Draw Cinnamoroll: Basic Information
Drawing Cinnamoroll provides an opportunity to understand the creation of simplified cartoon characters. The character’s design is uncomplicated, featuring basic shapes and minimal details. This simplicity is beneficial for young artists, as it allows them to focus on mastering the essentials without being overwhelmed by complexity.
Creating simple and minimalistic color palettes for characters is another important lesson in this tutorial. Cinnamoroll’s color scheme is straightforward, primarily using light blue and cream colors. This teaches artists the power of a limited color palette, showing how a few well-chosen colors can effectively convey a character’s personality and appeal.
Finally, creating recognizable characters through their characteristic features is a critical skill emphasized in this tutorial. Cinnamoroll is instantly identifiable by his floppy ears, large eyes, and cheerful expression. These distinctive features are what make the character memorable.
By focusing on these key attributes, artists learn how to highlight and exaggerate specific elements to create a strong visual identity for their characters. This understanding is crucial for developing characters that stand out and are easily recognizable, a valuable skill in both professional and amateur art.
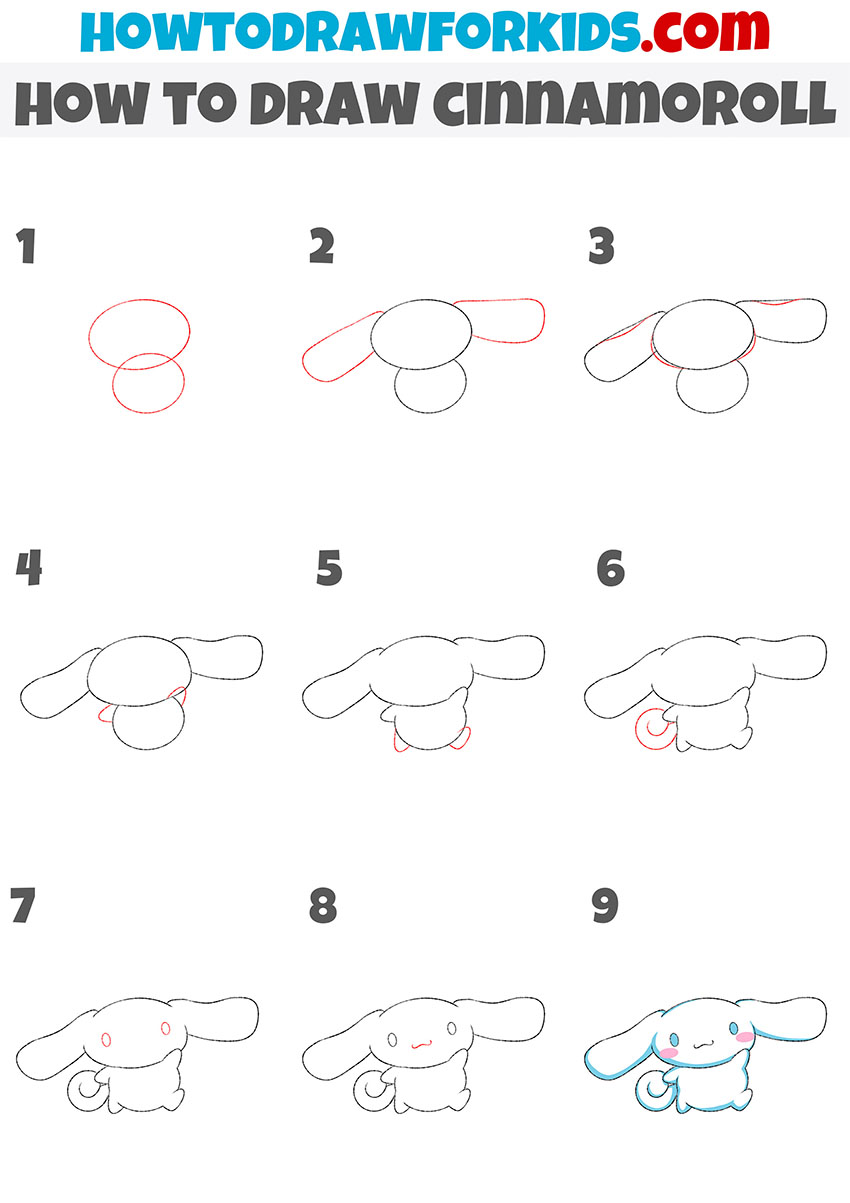
Cinnamoroll Drawing Tutorial
Materials
- Pencil
- Paper
- Eraser
- Coloring supplies
Time needed: 30 minutes
How to Draw Cinnamoroll
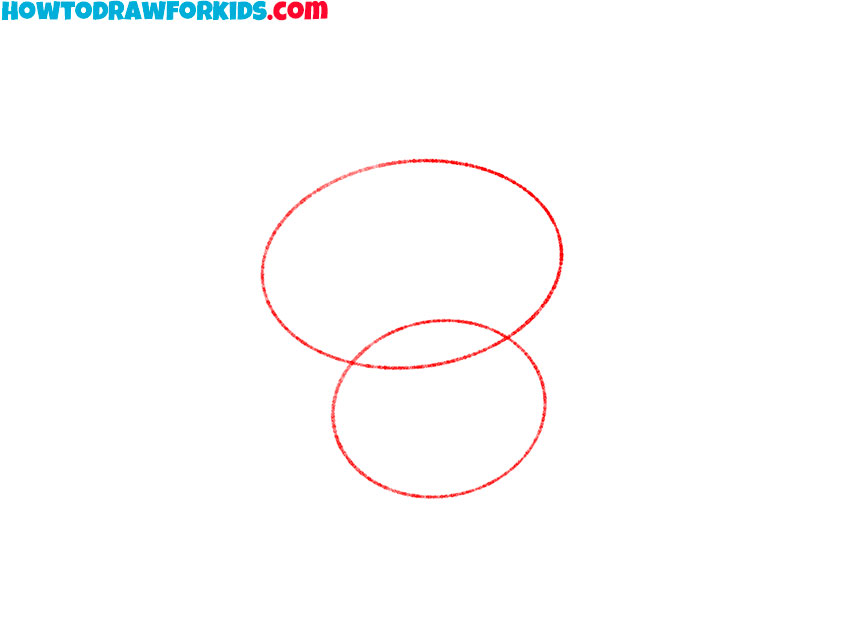
- Draw the head and body of Cinnamoroll.
The top oval is larger and represents Cinnamoroll’s head. The bottom oval is smaller, forming the character’s body. Ensure the ovals overlap slightly to create a seamless transition between the head and body. Keep the lines light and sketchy so they can be easily adjusted later.
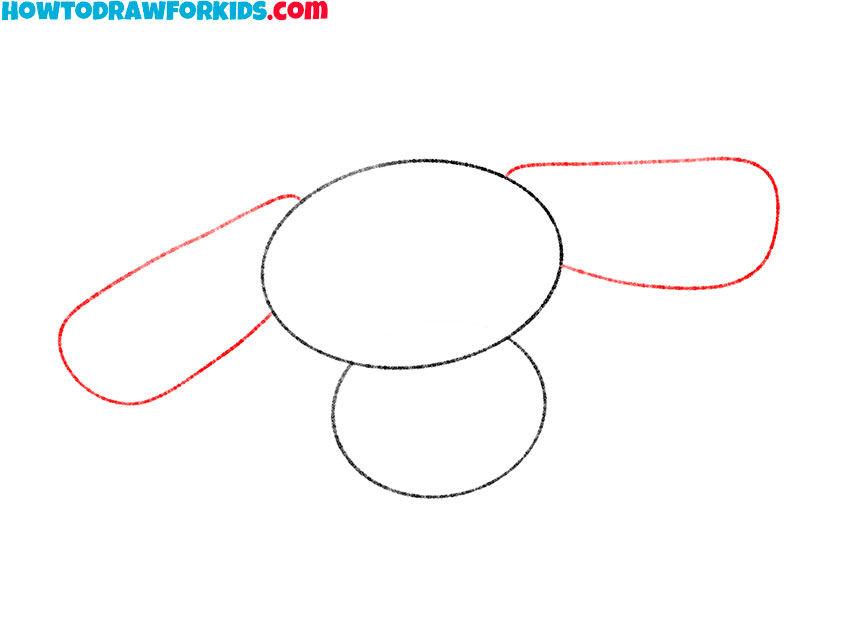
- Illustrate the ears.
Next, draw two long, curved shapes extending from either side of the head to create Cinnamoroll’s floppy ears. These shapes should be slightly wider at the tips and taper towards the base. These ears are a distinctive feature, so take your time to ensure they have a gentle, flowing curve.
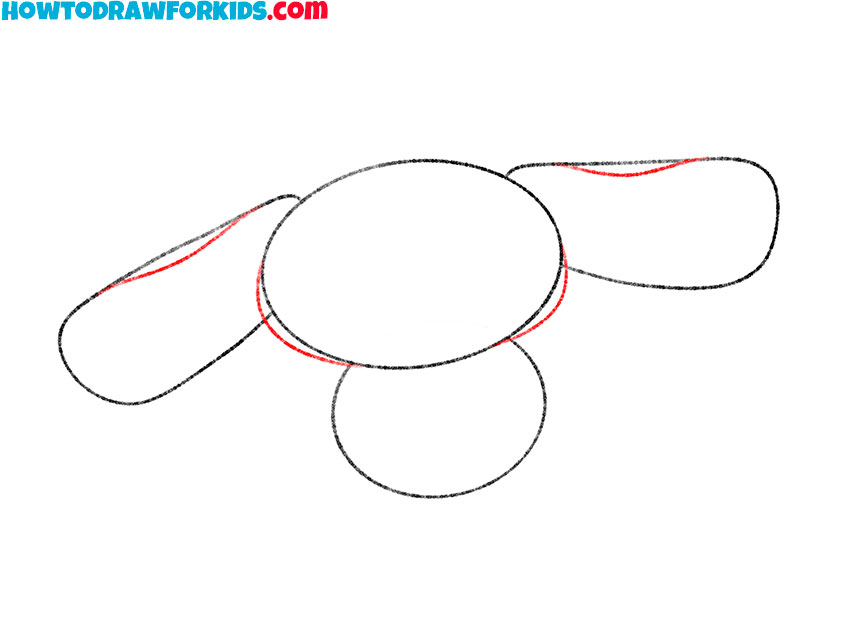
- Refine the outline of the head and ears.
Smoothen out any rough edges of the ears and cheeks of Cinnamoroll. Ensure the ears are connected smoothly to the head, giving them a natural flow. After this, draw two curved lines on the sides of the head to illustrate the outline of the cheeks.
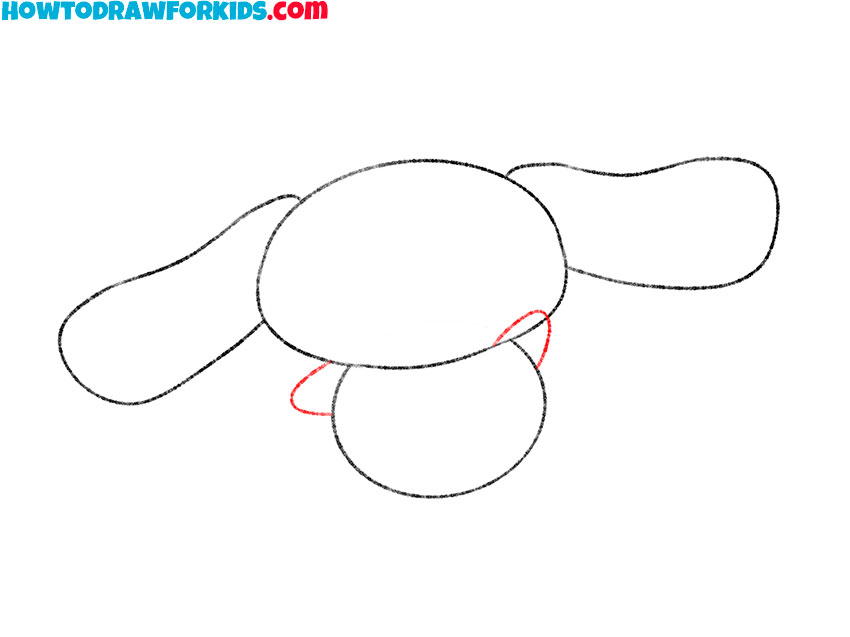
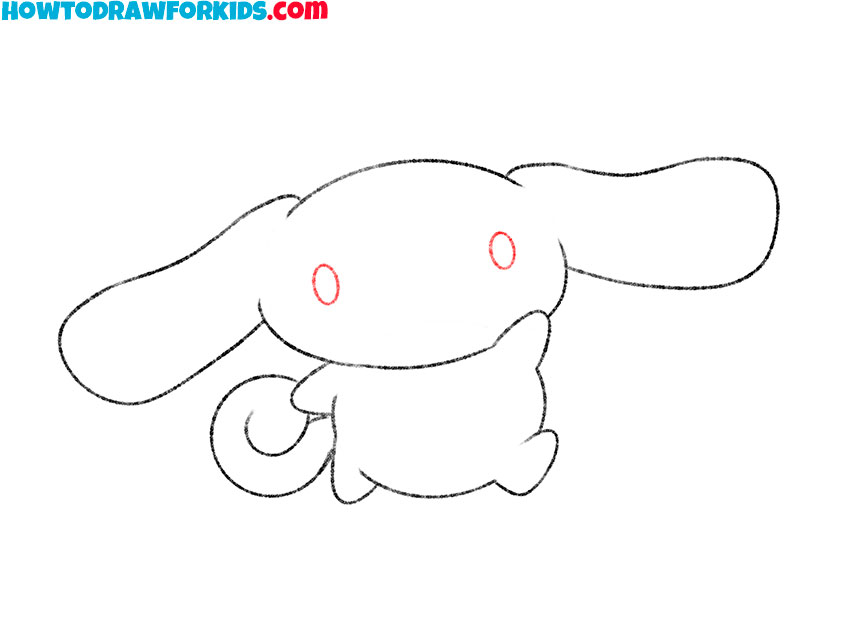
- Draw Cinnamoroll’s arms.
Add two small curves on each side of the body to outline Cinnamoroll’s arms. Like most characters from the Hello Kitty Universe, Cinnomoroll does not have any complex hand shapes. Super simplified hand outlines add a cartoonish feel to the look while removing any distracting details.
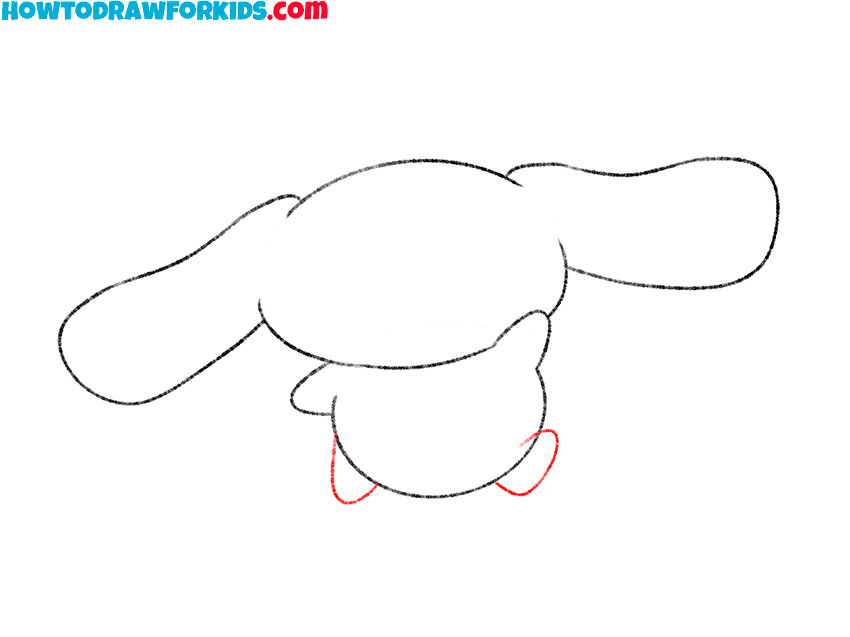
- Sketch the legs.
Draw the character’s legs using similar lines. The legs should be slightly larger than the arms and, like the upper limbs, should maintain a very minimalistic style. The legs should look soft and stubby, adding to the overall adorable appearance.
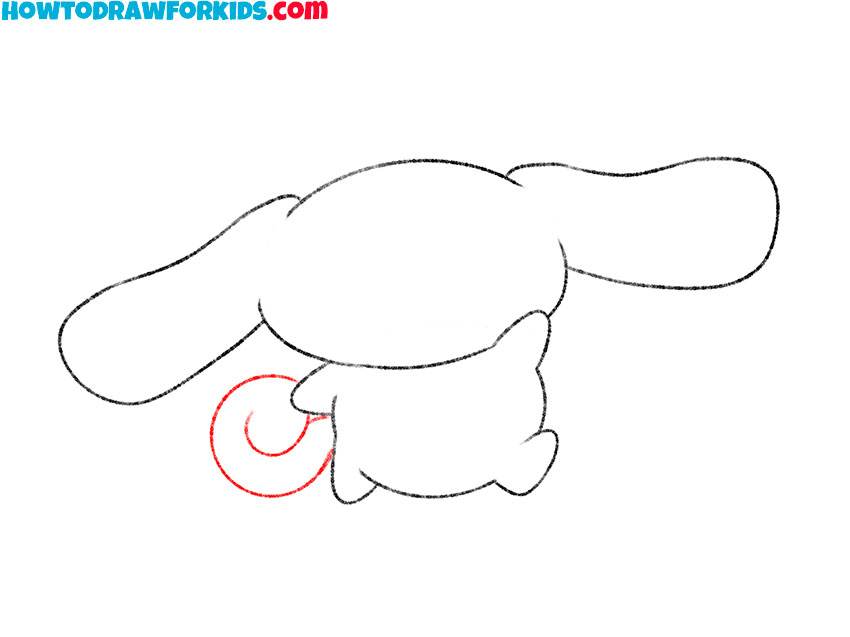
- Add the curved tail.
Add Cinnamoroll’s tail by drawing a small, curled shape on the left side of the torso. The tail should start from the lower part of the body and curl upwards in a smooth, circular motion. This fluffy, spiral tail is a distinctive feature of Cinnamoroll, so ensure it is proportionate and well-positioned.
- Draw Cinnamoroll’s eyes.
Sketch the eyes by drawing two small, round shapes on the head. Position them symmetrically and evenly spaced. The eyes should be simple, round, and expressive. Keep your lines light and adjust as necessary to get the placement and size just right.
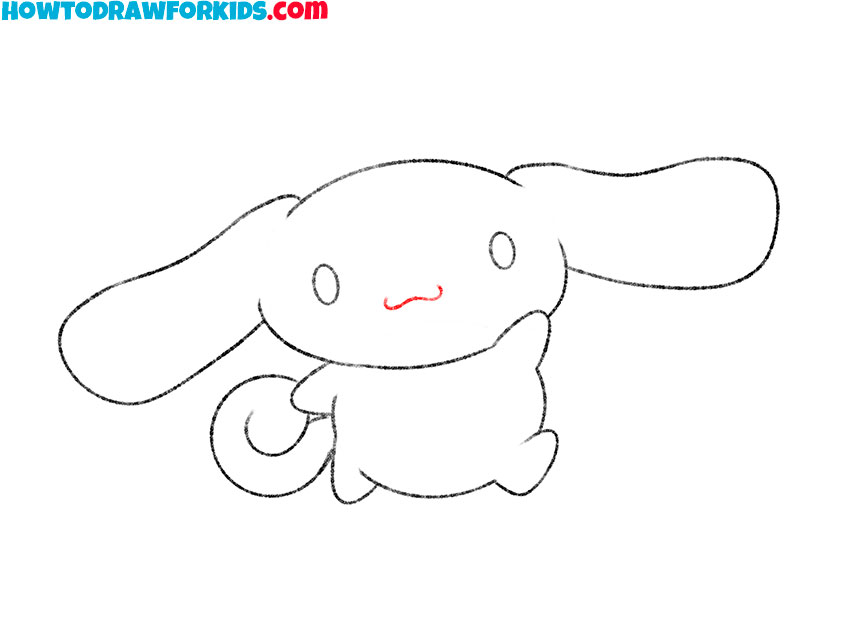
- Add the mouth.
Draw Cinnamoroll’s mouth by adding a small, curved line between the eyes. This line should be simple and curved upwards to create a happy, cheerful expression. This step completes the basic facial features, giving Cinnamoroll its signature smile.
- Color your Cinnamoroll drawing.
Use a light blue for the eyes. Add small blush marks on the cheeks for an extra touch of cuteness. Next, add shadows to the desired areas using a light blue color similar to the one used for the eyes. Your charming Cinnamoroll drawing is now complete!

Additional Materials
I’ve created a PDF file that offers a succinct version of this drawing lesson for easy use. Notably, it’s a free resource that you can download. Also, once you have this PDF, you’ll have the flexibility to draw anytime, even without internet access.
In addition, it serves as a handy guide for quick reference whenever you feel the urge to practice. Equally important, you can carry this lesson with you for moments of inspiration on the go. Plus, it’s a great tool to share with fellow budding artists who might not always have connectivity.
How to Draw Cinnamoroll: Advanced Tips
Is a special part where I give you some super tips to make your Cinnamoroll drawing the best they can be:
- First, take a step back and review your drawing from a distance or in a mirror. This technique helps you spot any areas that might be disproportionate and need adjusting. By gaining a fresh perspective, you can more easily identify and correct any imbalances in your drawing.
- Next, experiment with altering the shapes of Cinnamoroll’s eyes and mouth. Try different curves and angles to portray a range of emotions effectively. This practice enhances the expressiveness of your character and improves your ability to convey different feelings through subtle changes.
- Furthermore, consider accessorizing your character with items like a bow or a collar. Adding these elements introduces new shapes and expands your drawing skills. Accessories can also add uniqueness to your Cinnamoroll drawing, making it stand out.
- Additionally, think about adding a simple backdrop to provide context for your character. Sketching a park or a room setting behind Cinnamoroll can create a story and make your drawing more interesting. Backgrounds help place your character in a setting, making the composition more complex.
- Try drawing Cinnamoroll in various poses. This makes your drawing more dynamic and helps you practice and improve your understanding of cartoon anatomy and movement.
- Look at other images of Cinnamoroll for inspiration and guidance. References can help you understand how the character is typically portrayed and ensure your drawing stays true to the original design while allowing room for personal touches.
- Try drawing Cinnamoroll with different facial expressions. Practice making slight changes to the eyes and mouth to convey emotions like happiness, surprise, or curiosity. This will help you understand how small changes can impact the overall mood of your drawing.
- Draw a series of Cinnamoroll illustrations in different scenarios or outfits. Draw Cinnamoroll in different poses and add other characters from the Hello Kitty Universe.
Conclusion
In this tutorial, we’ve explored various techniques to help you draw Cinnamoroll, a beloved character from Sanrio. By following the detailed steps and incorporating the additional tips provided, you can boost your understanding of cartoon character drawing, focusing on key aspects such as proportions, symmetry, line work, and minimalistic coloring.
I hope you found this tutorial helpful and enjoyable. If you did, please share it with your friends and fellow artists. Don’t forget to subscribe to my social media for more tutorials and tips on improving your drawing skills. Visit my website to find other tutorials that can further boost your drawing skills.
Leave comments and share your drawings with me. Your feedback and artworks are always welcome and inspire me to create more content made to your needs. Feel free to share any wishes or suggestions for future tutorials, as I’m always looking to help young artists grow and improve their skills.

i like when you draw you are a wonder full man i i’m not joking now i’m a artis now now i i’m a good
I do not nohow