How to Draw a Leprechaun
In the spirit of St. Patrick’s Day, I’ve created three very fun and easy-to-follow tutorials on how to draw a leprechaun.

How to Draw a Leprechaun: Introduction
Leprechauns are well-known mythical characters that usually appear as small figures with large heads, thick beards, and a tall hat. In this lesson, I will show you how to draw a leprechaun step by step, keeping the process simple and clear.
The classic look of a leprechaun includes a suit with a jacket, pants, shoes, and of course the top hat. These elements give a chance to practice drawing clothing details such as folds, collars, and buckles. Pay attention to how the hat sits on the head and how the beard frames the face, as these are important parts of the character.
When drawing, it is useful to focus on proportion and clean outlines. As always, we will start with the basic shapes for the body and head, then add the beard, hat, and clothes step by step. This way you will get a neat and recognizable leprechaun figure that is easy to color or use in your own drawings.
Leprechaun Drawing Tutorial
Materials
- Pencil
- Paper
- Eraser
- Coloring supplies
Time needed: 40 minutes
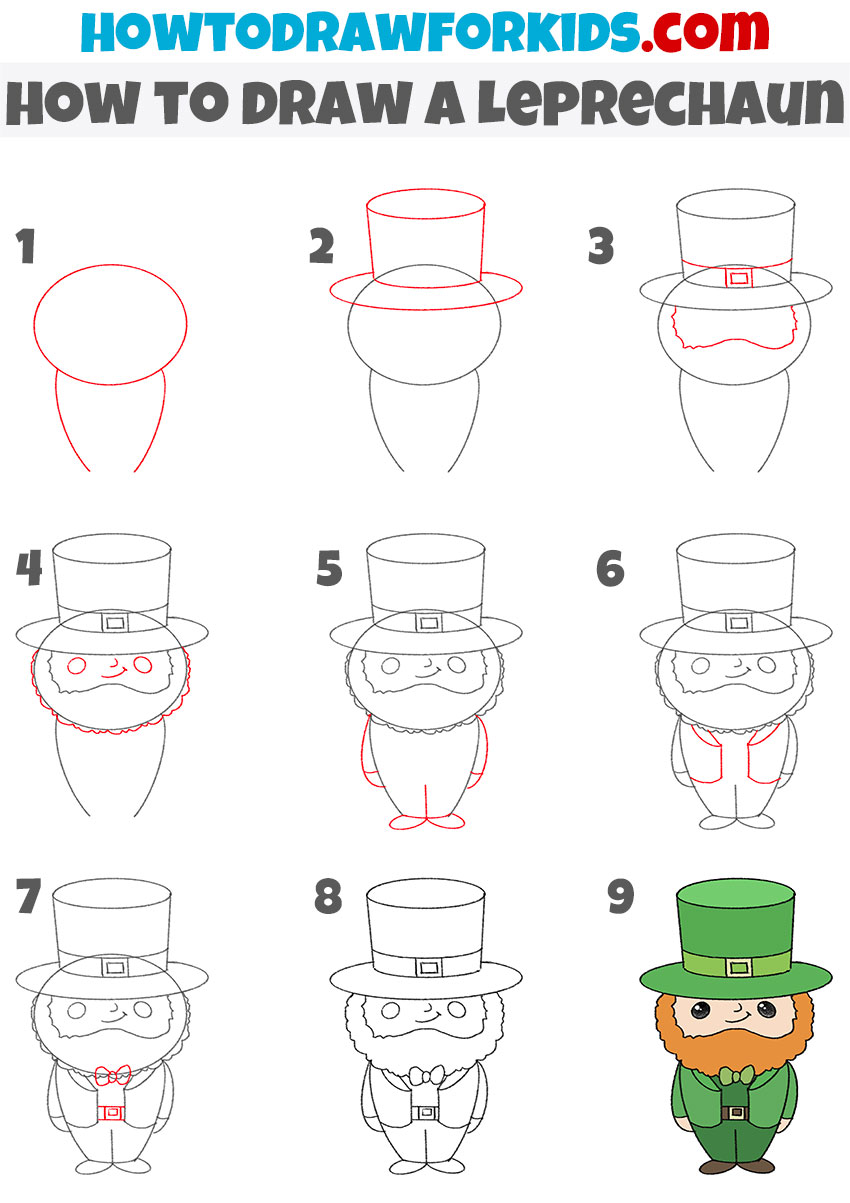
How to Draw a Leprechaun
- Outline the head and torso.
Draw a large oval for the leprechaun’s head. Below that, sketch a tapered shape for the body that looks almost like a wide teardrop or a carrot with the point facing down. Don’t forget, that even a tricky subject becomes easier if you begin with very simple shapes.

- Sketch the classic hat outline.
Now illustrate the leprechaun’s tall hat, which is one of his most recognizable features. Draw a wide oval for the brim that overlaps slightly with the head shape. Then sketch two vertical lines extending up. Connect the lines with a curved top to form a cylinder. This will be the classic leprechaun hat.

- Sketch the beard and hat buckle.
It’s time to add two very distinct details. First, sketch the inner edger of the fluffy beard around the face, using wavy lines. Don’t make it too perfect. Next, add a simple buckle to the hat by drawing a small rectangle centered on the brim and a smaller square inside it.

- Add the facial features.
Now, sketch the leprechaun’s facial features inside the head. Draw two round eyes, add small pupils, and sketch a simple curved line for the mouth. You can also add light eyebrows above the eyes. After that, draw the outer edge of the beard with another set of small and curved lines.

- Draw the leprechaun’s arms and legs.
Move down to the body and draw two simple arms. Each arm can be made of two curved lines connecting at the bottom. Then sketch small, rounded shoes at the base of the body. Compare these shoes to drawing wide triangles with rounded tips.

- Draw the leprechaun’s vest.
Add clothing details by sketching a vest on the leprechaun’s body. Start with two vertical lines on the torso, then connect them with angled lines to form the vest opening. You can add simple pockets or seams if you’d like, but even plain shapes give the idea of clothing.

- Illustrate the belt and bow.
Now illustrate a bow tie at the base of the neck. Create a small circle for the knot and add two triangles on the sides for the bow. Beneath that, draw a belt across the middle of the body. Keep the belt straight and add a small rectangle buckle. A leprechaun drawing feels incomplete without these two classic accessories.

- Clean the sketch and adjust details.
Remove the guidelines and check the proportions. If something looks asymmetrical or wrong, lightly erase and correct. A tip I often share: hold your paper at arm’s length to see if the character looks stable and well-proportioned. It’s easier to spot mistakes when you look at the drawing from a small distance.
- Add green, orange, and brown tones.
Finally, complete the leprechaun drawing by coloring it, using green for the hat, vest, and pants, as this is the traditional color associated with leprechauns. Add orange or reddish tones to the beard and hair, and brown for the shoes. The belt can be black with a yellow buckle, and the bow tie can also be green.

Additional Content
The PDF file provides a simplified tutorial on how to draw a leprechaun. This step-by-step guide breaks down the drawing process into manageable stages, starting with basic shapes and gradually adding details. In addition to the primary tutorial, the PDF includes two additional versions of the lesson, offering alternative approaches to drawing the leprechaun.
How to Draw a Leprechaun: Alternative Techniques
Any subject, especially a character, can be illustrated in more than one way depending on the purpose. A leprechaun drawn with more detail works well for complex scenes and compositions, while a simplified version may be better suited for logos, decorations, or teaching children. By practicing several different approaches, you develop the flexibility to adjust proportions, simplify forms, or change the overall style without losing the recognizability of the character.
How to Draw a Leprechaun: Simplified Version
Another variation worth practicing is a more simplified version of a leprechaun. Unlike the main tutorial, which may include more details and features, this one is created with very simple shapes and fewer elements. The character still includes the key traits of a leprechaun, such as the tall hat, beard, and traditional outfit, but the overall style is reduced to basic forms.
Create a large circular shape for the head and add a smaller trapezoid-like form underneath for the body. Sketch the tall rectangular hat with a wide brim sitting above the head. Place the facial features with simple dots for eyes, curved lines for the eyebrows and smile, and small shapes for the nose. Add the beard by drawing a rounded outline framing the lower part of the face, then attach the ears on each side.
Draw the buckle on the hat as a square with an inner square to represent the band detail. Form the arms with simple curves ending at the vest outline, then extend the short legs and small shoes at the bottom. When coloring, use a consistent green for the clothing and hat, brown or orange for the beard, and light tones for the face and hands.

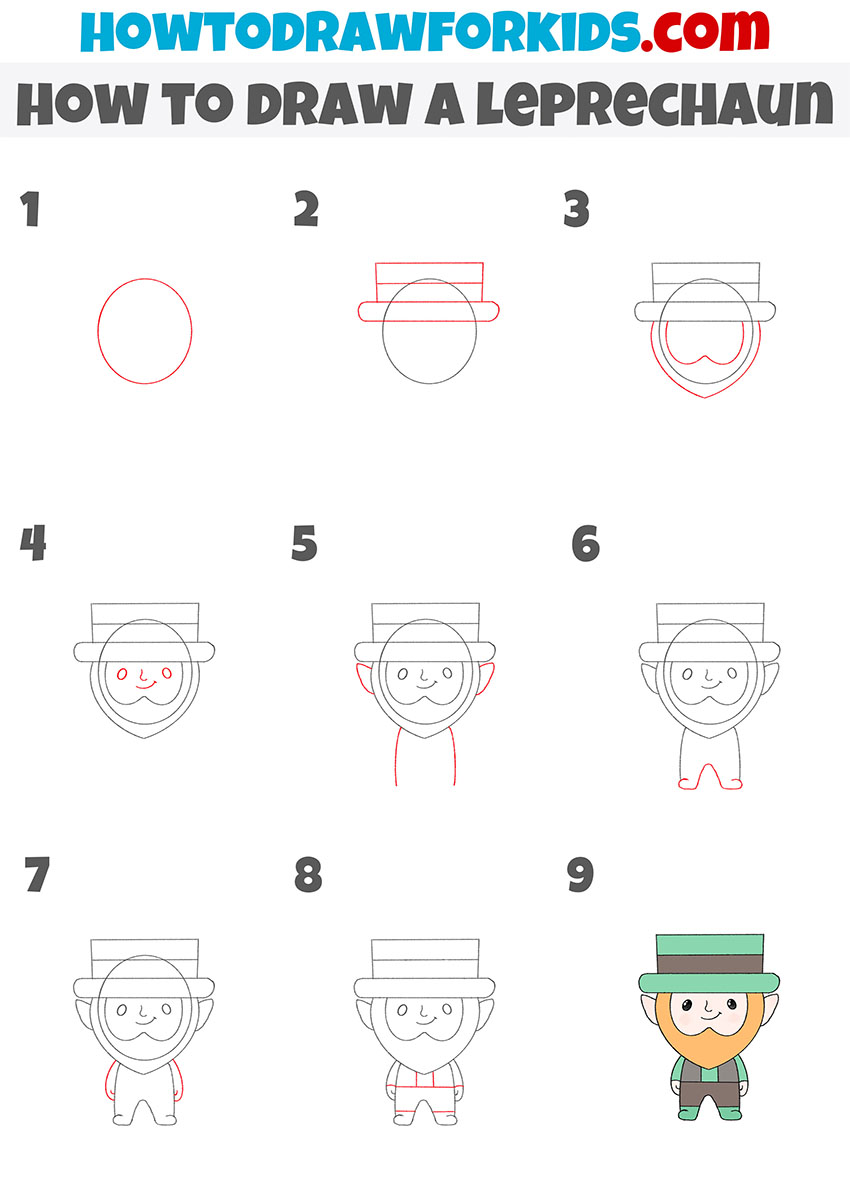
Cute Leprechaun Drawing Tutorial
This is an even more simplified and cute leprechaun drawing. The style is a bit more cartoon or chibi like. The features such as the hat, beard, and outfit are also recognizable, but have different shapes.
First, sketch a circle for the head and add a straight body line underneath. Sketch the wide hat on top with a rectangle for the crown and an oval brim across the head. Form the beard as a large pointed shape under the face, then place simple facial features, such as two small eyes, a short nose, and a curved smile.
Add the ears on each side and then sketch two straight lines for the body, closing them with a rounded bottom line. Draw the legs with short curved shapes and indicate small feet at the base. Place the arms at the sides with simple curves and add clothing details like the belt and sleeve lines. Finish the drawing by coloring the leprechaun hat and clothes in shades of green, the beard in orange, and the face in light skin tones.
Conclusion
You now have a complete drawing of a leprechaun, with all the main features such as the tall hat, beard, and traditional outfit carefully worked out step by step. This character is often tied to folklore and festive traditions. This is a very good subject to practice drawing fantasy characters in a simple style.
If you want to continue developing your drawing skills with other fantasy-inspired subjects, I recommend looking at the dragon drawing tutorial, where you can practice larger shapes, and also the fairy drawing tutorial, which shows more delicate details.