How to Draw Milk
And again we draw food, or rather a drink familiar to everyone, because here I will teach you how to draw milk in two very easy ways.
How to Draw Milk: Introduction
Today we will return to drawing everyday things and basic components of many more complex compositions. In this lesson we will learn in detail how to draw milk in a bottle using the simplified method that has already been established for us.
I intentionally simplified this lesson to the maximum, detailing each step and dividing the lesson literally into basic lines so that even the most inexperienced artist could draw a bottle of a hammer.
For those who find this lesson difficult, I have created an additional, even more simplified lesson that you will find at the bottom of this page. There I simplified everything even more and made it accessible for learning even for kindergarteners.
Milk Drawing Tutorial
Materials
- Pencil
- Paper
- Eraser
- Coloring supplies
Time needed: 20 minutes
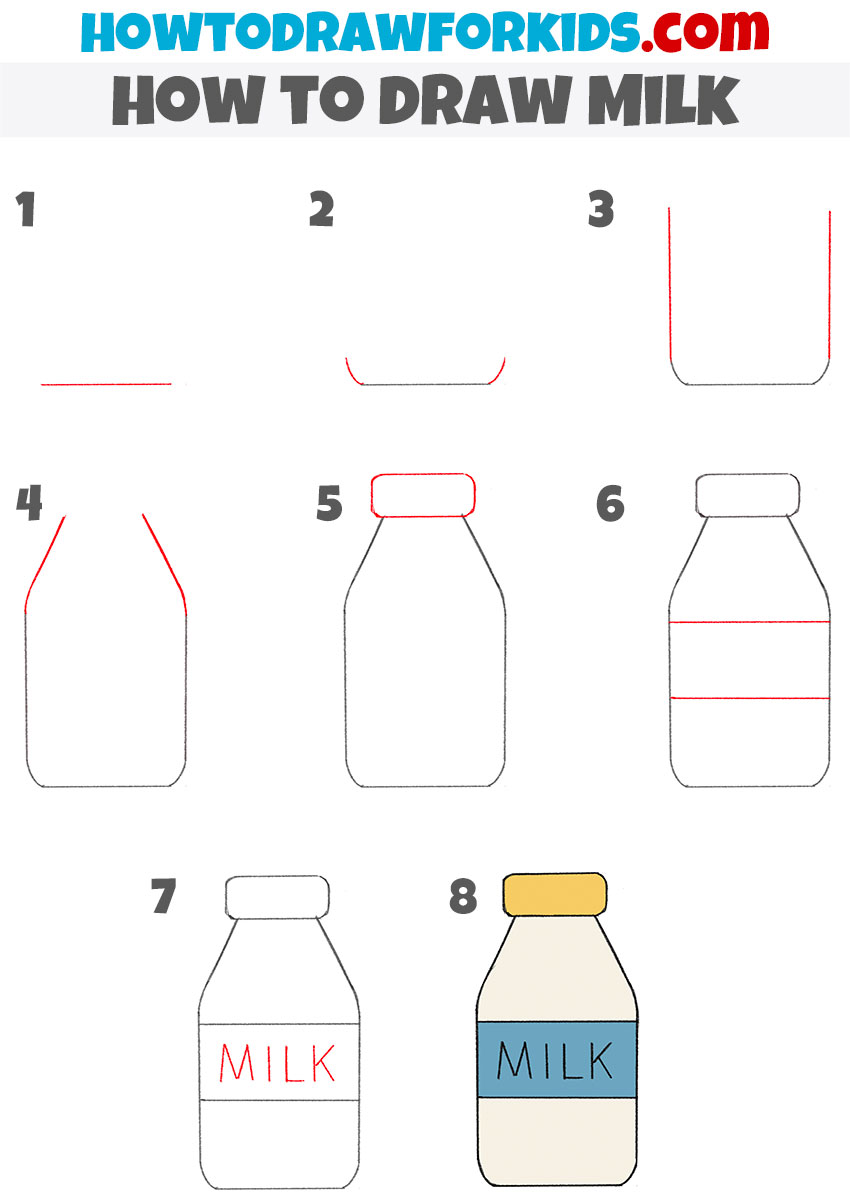
How to Draw Milk
- Create the bottom edge of the milk bottle.
Sketch a straight horizontal line near the bottom of your page. This is the bottom edge of the milk bottle. The width of this part determines the width of the entire bottle, and the slope of this small line can determine the angle of the entire future drawing.
- Add the bottom side curves.
From the ends of the horizontal base, sketch small upward curves that round off the bottom corners. This gives the milk bottle its realistic and dimensional base instead of a sharp box-like look. These two curves should be perfectly symmetrical.

- Draw the milk bottle side edges.
Now extend two vertical lines upward from the curves you just created. These lines should be tall and parallel, forming the side edges of the milk bottle. Keep an eye on symmetry. One side shouldn’t lean more than the other, or the bottle will look tilted.

- Form the shoulders of the bottle.
At the top of the vertical lines, angle them inward to form the shoulders of the bottle. This part narrows the container and leads into the neck. This parts gives the bottle its recognizable outline. Imagine how a real bottle tapers before it reaches the cap.

- Sketch the bottle cap shape.
Now draw a rounded rectangle at the top of the shoulders. This is the cap or lid of your milk bottle. Keep the corners slightly curved rather than square to show that it’s a three-dimensional object. Check the bottle’s overall balance. Sometimes adjusting the cap size helps correct earlier small mistakes in proportion.

- Mark the label area.
Across the middle section of the bottle, draw two horizontal lines. These represent the label where “milk” will be written. Labels help break up the empty space on the bottle and add detail that makes it recognizable. Keep your lines light, straight, and parallel. If you don’t get them even at first, erase and try again.

- Write the word milk
Inside the label, write the word “MILK” in blocky capital letters. Keep the letters clear and readable. Many students ask if it’s okay to stylize the letters, and I often suggest trying a bold, simple font first, then experimenting with different looks later.

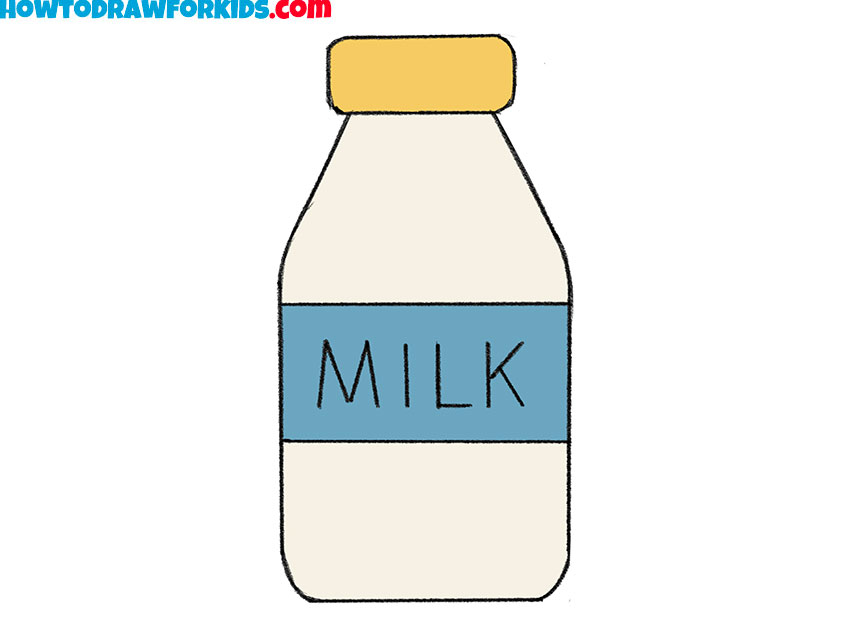
- Paint the bottle sketch.
To complete the milk bottle drawing, add color. Fill the body of the bottle with a light cream tone or leave it white to convey milk inside. Shade the cap a solid color, such as gold or red, and make the label blue so the word “MILK” stands out.

Additional Content
To complement your learning process, I’ve crafted a free PDF file that serves as a concise version of this lesson. It’s designed to be a handy reference you can download and utilize anytime, even when the internet is out of reach.
While it doesn’t include the steps or tips, it’s filled with supplementary materials to further refine your drawing skills once you’ve grasped the fundamentals. Consider this PDF an artistic ally, there to help consolidate the knowledge you’ve gained from the main lesson.
With practice templates and additional practice projects, it will help cement your skills and encourage you to approach drawing with a critical and creative eye. Download it, and let it be a companion to your continuous improvement and the evolution of your artistic talent.
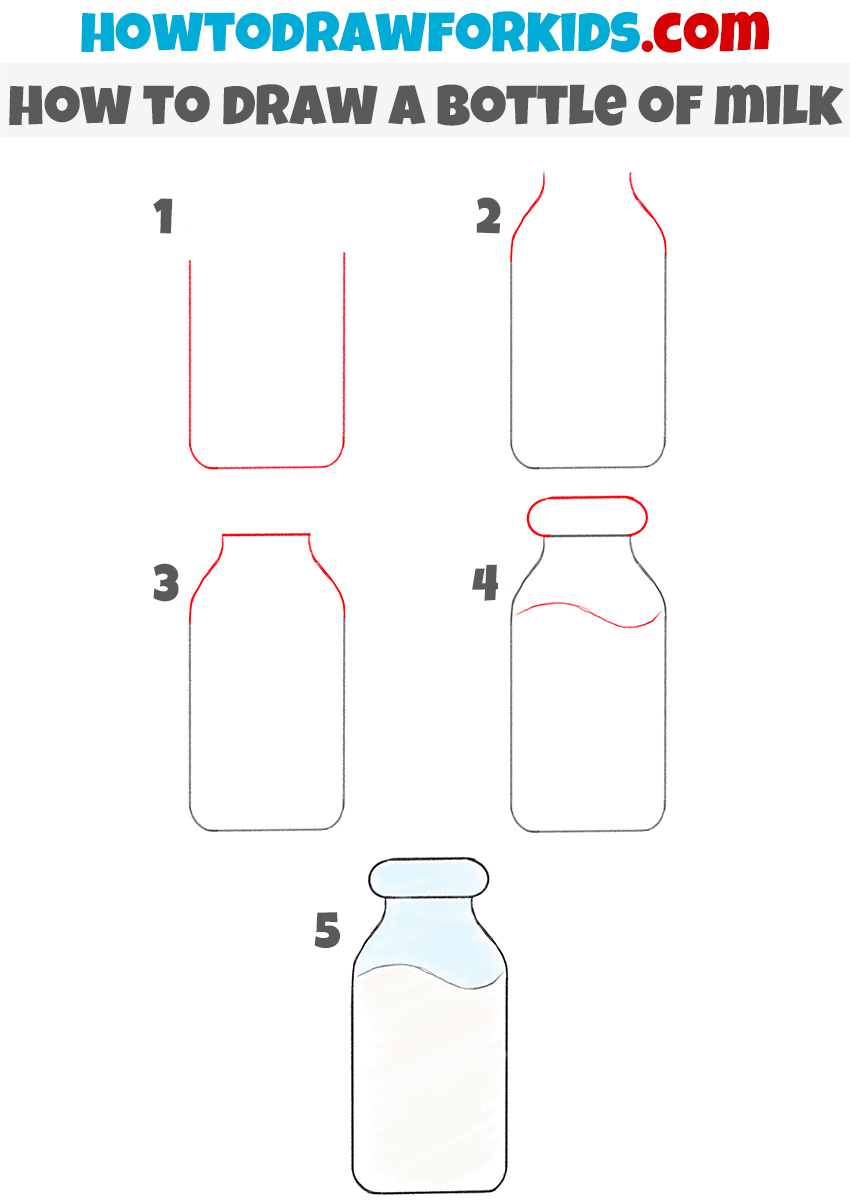
How to Draw Milk for Kindergarten
The style here is very simplified, with basic outlines and minimal details. This is a very accessible option even for beginners or preschoolers. Drawing such objects helps to strengthen accuracy when working with straight and curved lines together, which is useful for a wide range of drawing tasks. Since bottles are symmetrical, this exercise also develops a better sense of balance and proportion on the page.
Outline a rectangular base with rounded corners to form the bottom of the milk bottle. Extend two vertical lines upward and connect them with a smooth curve. Draw the neck by slightly narrowing the lines near the top and then add the rounded cap section. Sketch a wavy horizontal line across the bottle to indicate the milk level inside. Keep this line natural rather than perfectly straight, as liquid in a container is rarely still.
Refine the outlines to ensure both sides of the bottle are symmetrical. When coloring, shade the glass lightly with pale blue or gray tones and use white with a slight creamy tint for the milk itself. Avoid pressing too hard with your pencil or coloring tool. Keep the tones soft so the bottle looks transparent.
Conclusion
By finishing these two drawings, you now have two very simple illustrations of milk bottles. As I’ve said, this subject work well in combination with other everyday food sketches.
If you enjoyed this, you might also want to try the step-by-step guides on how to draw an egg, another very simple objet. Also, you can draw an apple, or even a create a drawing of bread, since these lessons all build on the same basic approach to sketching familiar objects.
They fit together naturally and can be practiced as a set for more confidence with food drawings.
For even more practice, take a look at the food coloring pages where you can work on shading and color choices to complement your line work.
I just couldn’t this page
It’s very engaging. So much to learn and practice. My 12, 11 and 9 years old kids will have so much to learn and do. Any on shading for this age group. Nothing near this is taught in their schools.
Thank you, Kalu. I’m glad your kids enjoy learning from these tutorials.