How to Draw a Shopping Bag
To improve your sketching of everyday objects, I’ve created this tutorial to show you how to draw a shopping bag in two methods.
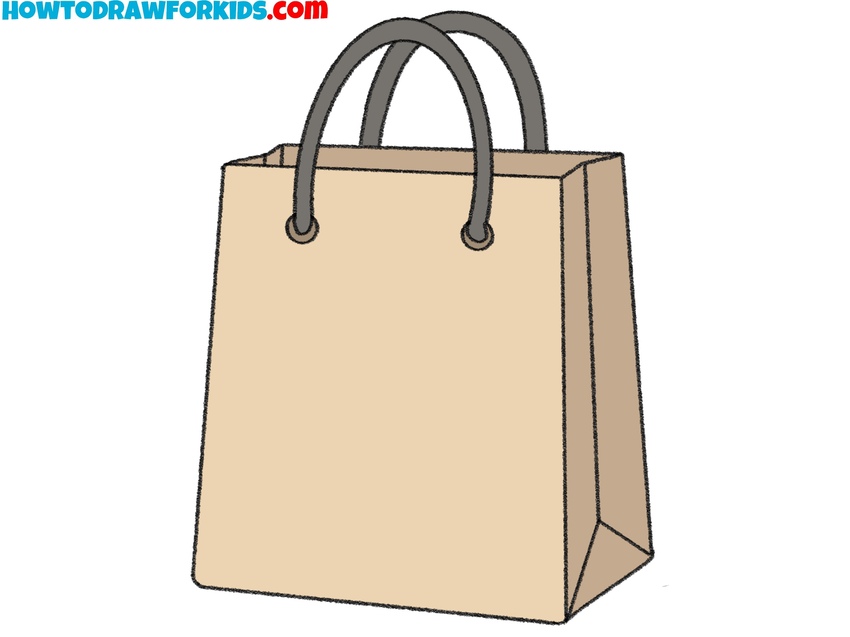

In this tutorial, you will learn how to draw a shopping bag. The shopping bag usually has a standard rectangular shape. The material from which such bags are made in plastic or paper. There are two handy handles on the top. Such a package can contain a lot of purchases, it can be food, clothes and any other goods.
This lesson consists of nine simple steps. By following my step-by-step instructions, you can easily cope with this task. Each step contains one simple action that any child or aspiring artist can repeat.
In this lesson, you will need the ability to draw smooth, straight lines. Try to do it yourself, without using improvised elements. Train your skills and in the future, you will easily draw more complex objects.
Materials
- Pencil
- Paper
- Eraser
- Coloring supplies
- Ruler (optional)
Time needed: 15 minutes
How to Draw a Shopping Bag
- Sketch the front panel.
To begin, sketch the front panel of the shopping bag. Draw a trapezoid shape where the top edge is slightly shorter than the bottom edge. If you prefer a different shape, you could make the trapezoid narrower or broader, longer or shorter.

- Draw the bag opening.
Now it’s time to show that the bag is open at the top. On the top of the trapezoid draw another flat trapezoid. This creates the thickness of the opening flap. It also defines the perspective and makes the bag appear three-dimensional.

- Draw the shopping bag side face.
To give the bag its volume, add a side panel on the right. Sketch a couple of straight lines to create another one trapezoid and connect it to the front face, forming a side face. This extra plane should be narrower than the front panel.

- Sketch the folding line.
Shopping bags often have a crease or folded edge where the side tucks in. Sketch a vertical line within the side panel and add a short triangular line at the bottom to show the fold.

- Sketch the handle holes.
Handles are attached through small holes near the top of the bag, so draw two circles on the front panel, close to the upper edge. Draw them on the same level.

- Draw the handles of the shopping bag.
From the left circle, draw two smooth, curved lines rising upward and arching back down into the right circle, forming the first handle loop. To complete the pair, sketch another curved strap directly behind the first one. Use the same technique: sketch two curved lines from one hole to the other

- Finalize the main bag outlines.
Before finishing the bag, take a moment to remove the extra guidelines that are no longer needed. Erase the inner construction lines from the panels, as well as any overlapping marks. If you’d like, you can also lightly strengthen some of the outer lines or add some extra details, for example a brand name or logo.

- Paint the panels and handles.
Once all the outlines are in place, turn the simple drawing into something recognizable by adding color. Fill the main parts of the body of the bag with a soft beige or tan, echoing the natural paper appearance most shopping bags have. To convey its three-dimensional form, make the side panel slightly darker, as if it sits in shadow. For the handles, choose a different tone like dark gray, black, or a rich leather brown.

Alternative Shopping Bag Drawing Tutorial
To draw this shopping bag in this alternative technique, first mark out a vertical rectangular shape for the main front surface. Add a vertical side edge on the right, then extend slanted lines to create the bottom of the bag.
After the main shape is ready, place two small dots near the upper edge of the front panel. From each dot, draw curved lines, creating the handles. When working on the handles, try to keep both arches similar in size. Finally, trace over the outlines and add shading to the side panel.