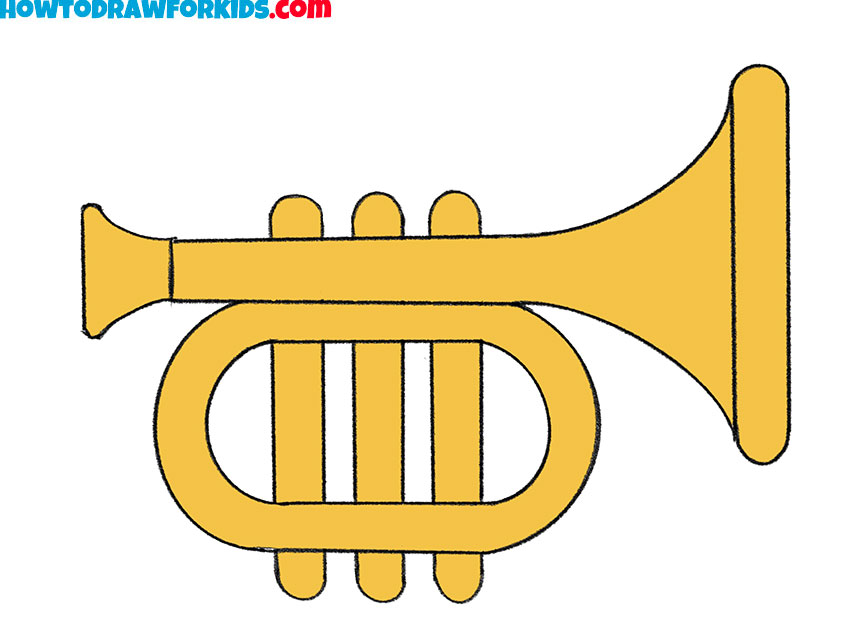
How to Draw a Trumpet
For kids learning to draw musical objects for a poster or project, this tutorial on how to draw a trumpet is a simple place to start.
How to Draw a Trumpet: Introduction
When drawing musical instruments in a simplified way, the most important thing is to convey their identity through just a few recognizable parts. For a trumpet, the narrow tube, flared bell, and button-like valves are enough. Getting these elements placed clearly will make the drawing feel complete and recognizable.
The trumpet in this tutorial is shown in profile, which is one of the easiest angles to draw. Choosing this view removes extra complication and focuses only on shape and layout. But of course, you can draw a trumpet in any other position and angle using this tutorial.
As with other drawing tutorials on my site, you can draw a trumpet as an independent artwork, or integrate it into a more complex composition. For example, you can draw a guitar next to it or sketch a violin, thereby creating a still life of musical instruments.
Trumpet Drawing Tutorial
Materials
- Pencil
- Paper
- Eraser
- Coloring supplies
Time needed: 25 minutes
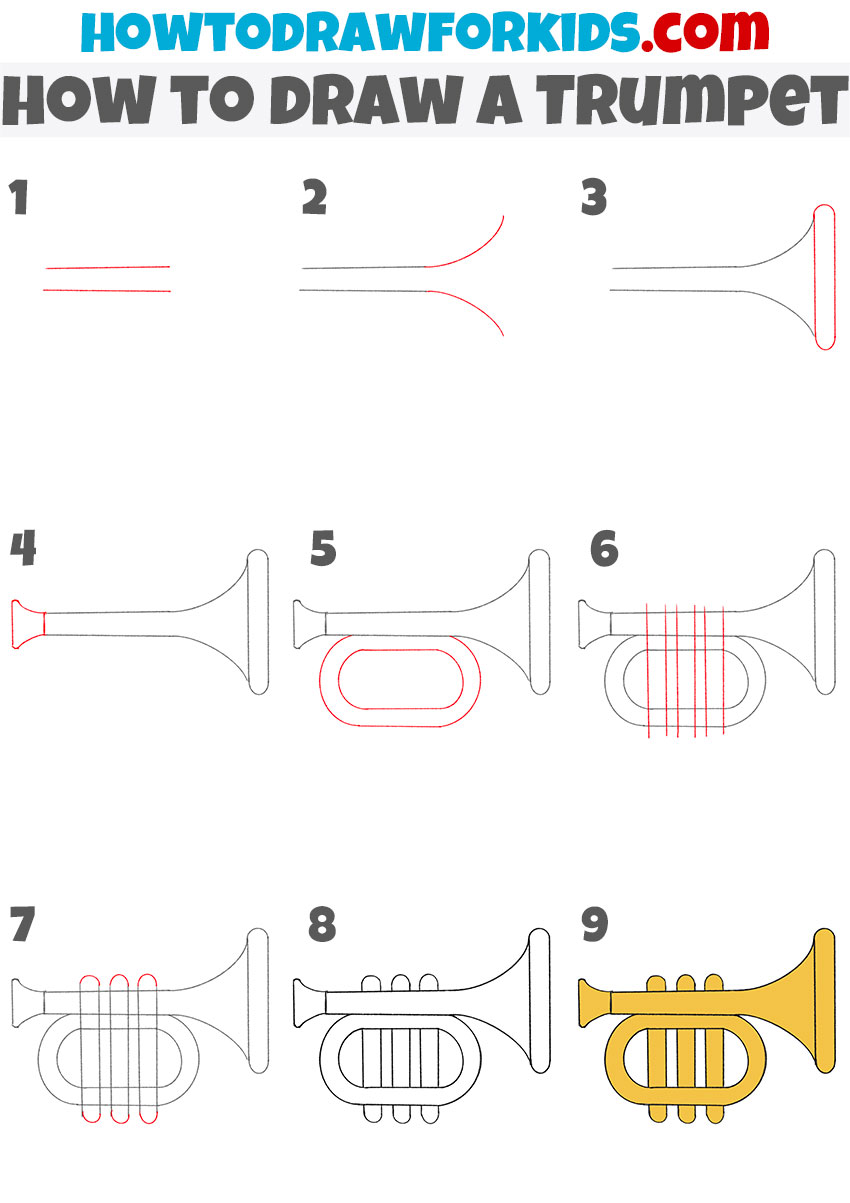
How to Draw a Trumpet
- Create the main tube outline.
Sketch two straight horizontal lines placed one above the other. These will define the tube of the trumpet. These two lines should be equal in size and perfectly parallel. Keep them light so you can erase some of the parts in later steps.. You can use a ruler or carefully sketch freehand.

- Add a flare at the end.
Slightly curve the right ends of both lines upward and downward. This forms the widening part of the trumpet called the bell leadpipe. Keep both arcs symmetrical and smooth. Avoid sharp angles or bumpy lines. This section should look natural and gradually widen.

- Draw the edge of the trumpet bell.
Now sketch an elongated oval at the end of the curves. This will be the bell where the sound comes out. In my example, you can see only the side edge without the opening itself. But if you want, you can add the opening and slightly rotate the entire trumpet toward the viewer.

- Draw the trumpet’s mouthpiece.
Draw a small, slightly cone or trapezoid shaped element on the left side of the body. This is the trumpet mouthpiece. As with other parts of the trumpet, you can modify this part, make it more detailed or make a small turn of the whole instrument and this part in particular.

- Create the trumpet’s valve loop.
Draw a large oval-like loop under the trumpet body using two smooth shapes. This is part of the valve tubing. It should be centered along the main tube. You can slightly change the shape, making it rounder or more squared to create a variation in the look of the musical instrument.

- Sketch three vertical valve pipes.
Now let’s add details to the trumpet drawing by sketching a series of vertical lines overlapping the geometric shapes from the previous steps. These represent the valve stems. Make sure they reach from the top of the tube to the oval loop. These lines should be parallel and evenly sized.

- Finish sketching the vertical valves.
At the bottom of each vertical stem, add rounded shapes to show the bottom ends of the valves. After this, using the same short semicircles, draw the edges of the tubes on the top side. In this way, you will complete the drawing of three vertical tubes of the trumpet.

- Trace the final instrument lines.
Clean up extra lines and reinforce the outlines of your trumpet drawing. Darken the main shape of the musical instrument. You can lightly draw the bolts or fittings if you want a more complex version. Avoid over-detailing to keep the trumpet drawing simple and readable.

- Add yellow-orange tones.
Color the trumpet body a golden yellow or bright brass tone. The valves can be the same gold or a soft gray. You can add a thin shadow under the trumpet if you’d like a finished and more dimensional look. Also try coloring the mouthpiece slightly differently using silver or grayish gold.

Additional Materials
To make practicing easier, I’ve prepared a free printable PDF with all the steps from this tutorial. You can use it to draw a trumpet offline or share it with others. Just click the button below to download and print the worksheet.
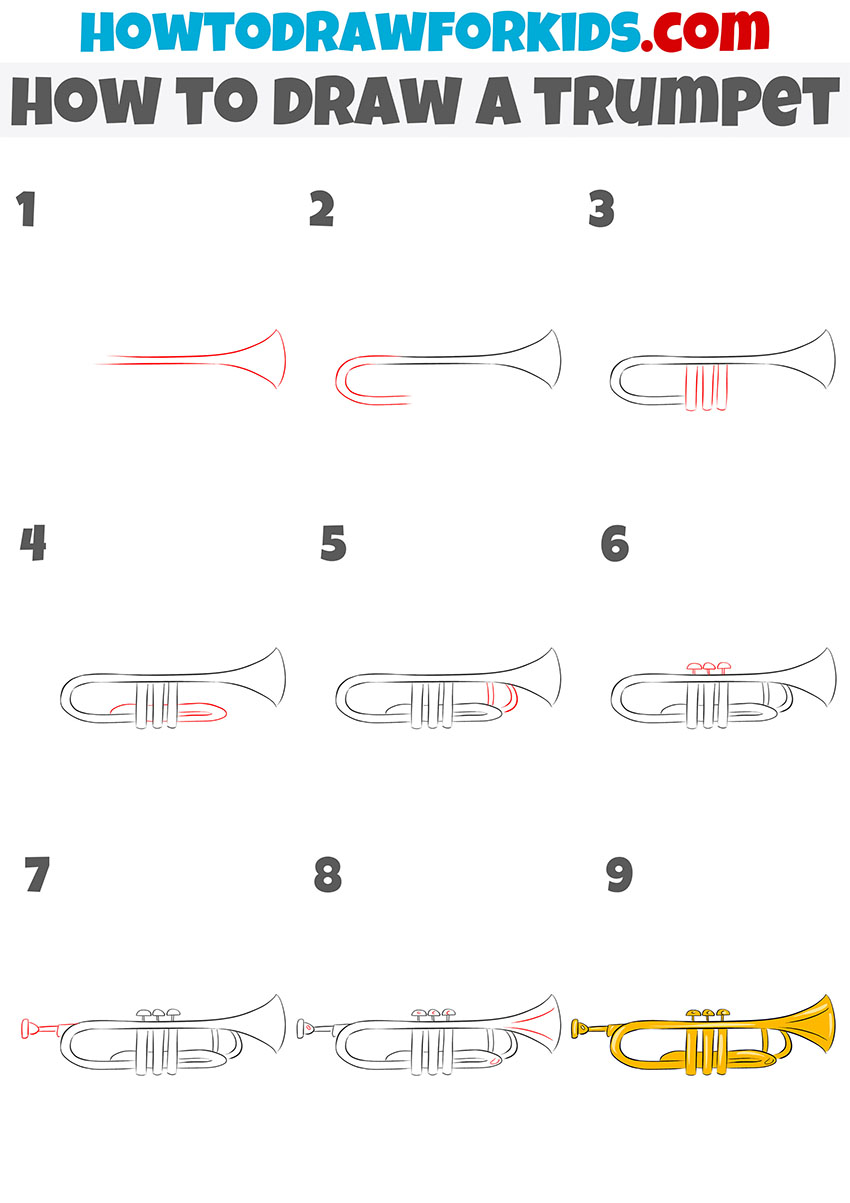
How to Draw a Trumpet: Alternative Method
This additional trumpet drawing tutorial shows a more realistic version of the instrument compared to the main cartoon-style trumpet lesson. The proportions here are closer to what you would see in an actual trumpet, and the colors look more realistic.
The drawing begins with the bell of the trumpet and moves through the body with carefully curved lines to create the pipework. The valves are placed in a more precise position, and the mouthpiece is clearly defined. Extra inner pipe shapes are added to give trumpet an even more realistic look.
This version can be colored in tones like gold or brass to create a realistic finish. You can also experiment with adding reflections or highlights using lighter colored pencils. This drawing is a good next step after completing the main trumpet drawing tutorial and helps young artists become more comfortable with proportions in technical-style objects.
Conclusion
These two trumpet drawing tutorials give you two clear ways to practice sketching musical instruments. The first tutorial demonstrated a simplified, cartoon-like version, ideal for beginners learning how to work with simple forms and basic proportions.
The second one introduces a more realistic trumpet shape, helping to develop important observation skills and the ability to work with more detailed outlines. Together, they offer a helpful progression for improving confidence in drawing recognizable musical instruments.
If you’re interested in expanding your musical-themed drawing practice, be sure to check out other instrument tutorials on the site. You can also download the printable PDF worksheets that go along with both trumpet tutorials to review the steps offline. Share your finished drawings in Pinterest and others social media, and don’t forget to save or share these tutorials with friends who enjoy drawing.