How to Draw a Nose
To learn how to draw portraits correctly, you need to know how to draw a nose – one of the most noticeable parts of the human face. On this page, I have gathered seven straightforward instructions to guide you through the detailed process of drawing this part of the face.
How to Draw a Nose: Basic Information
The nose is the centerpiece of the face, and learning how to draw a nose is a really important task if you want to draw realistic portraits.
This lesson hones in on the importance of structure and symmetry. With my guidance, you’ll learn to craft the subtle curvature of the nostrils and the gentle sweep of the bridge, which are the one of the most important parts of a nose’s anatomy.
To study the process of drawing a nose as thoroughly as possible, I have collected several completely different methods on this page. First, I will show you how to depict it using a method that will suit most of you.
Then I will introduce you to techniques of varying complexity that will allow you to learn how to sketch a this part of the face in different styles and from different angles.
Even though here I show how to draw a nose using very simple techniques, once you hone your skills you will be able to create very realistic images of this part of the face.
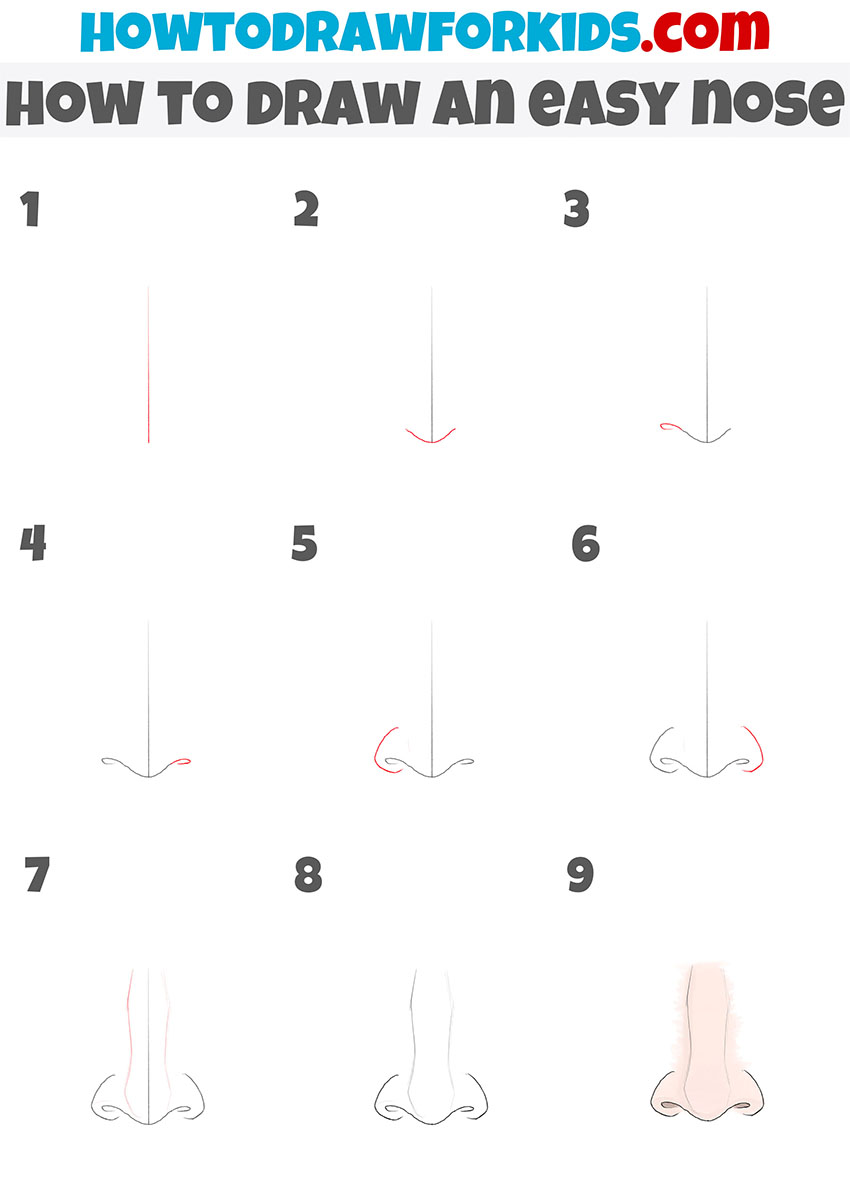
Nose Drawing Tutorial
Materials
- Pencil
- Paper
- Eraser
- Coloring supplies
Time needed: 30 minutes
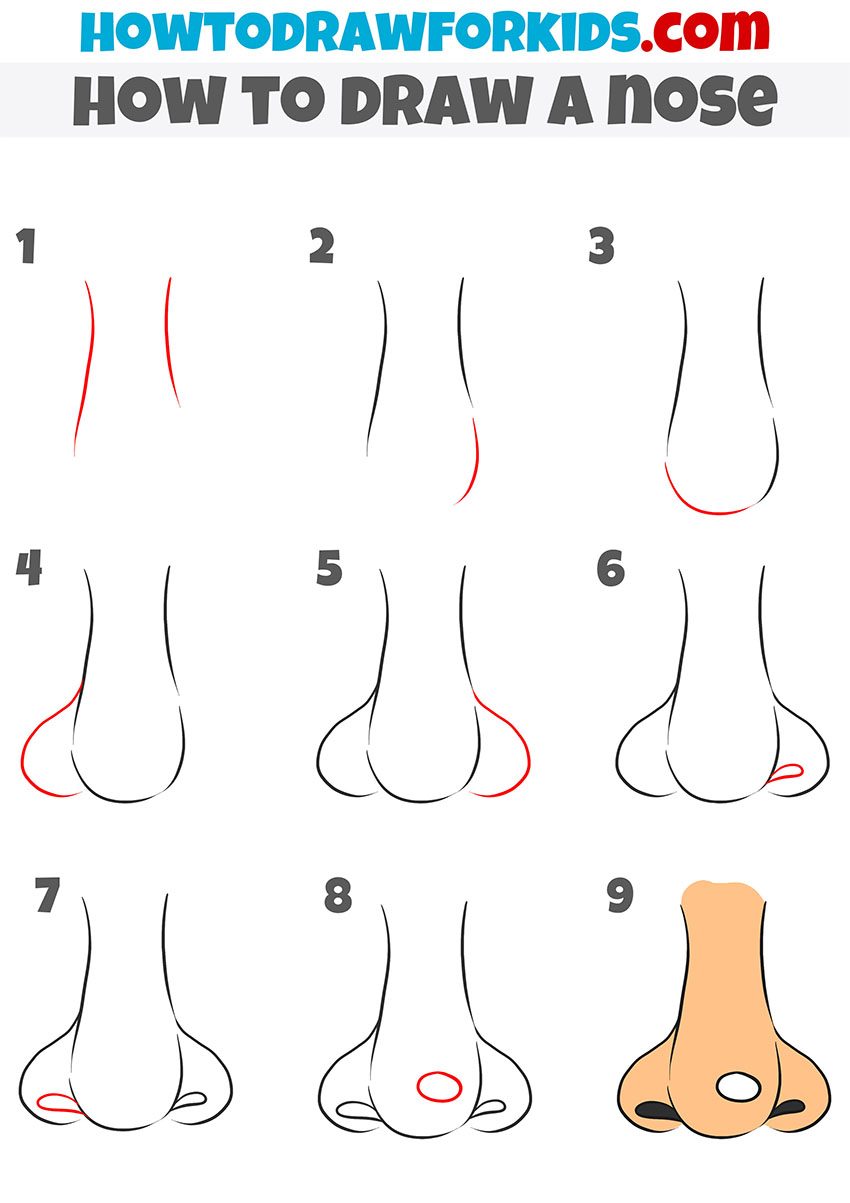
How to Draw a Nose
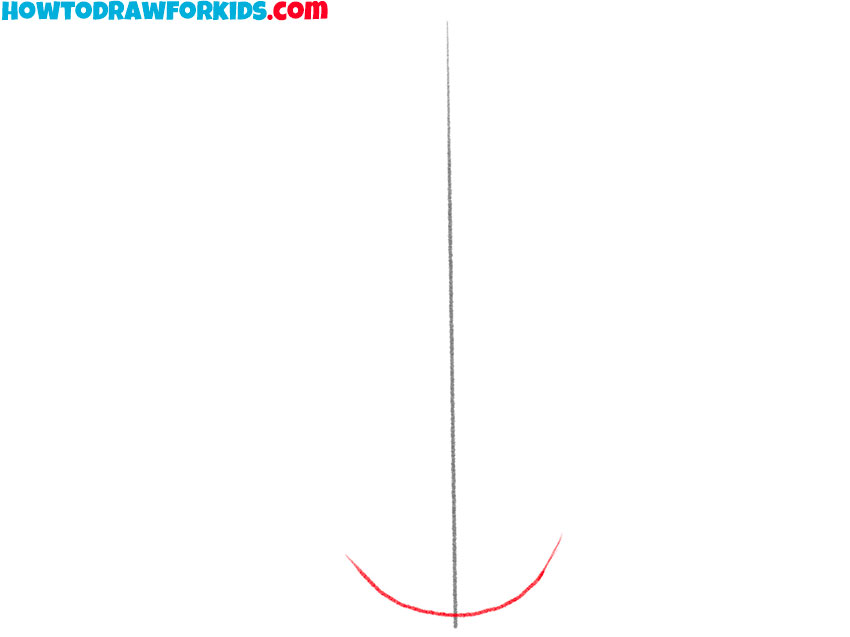
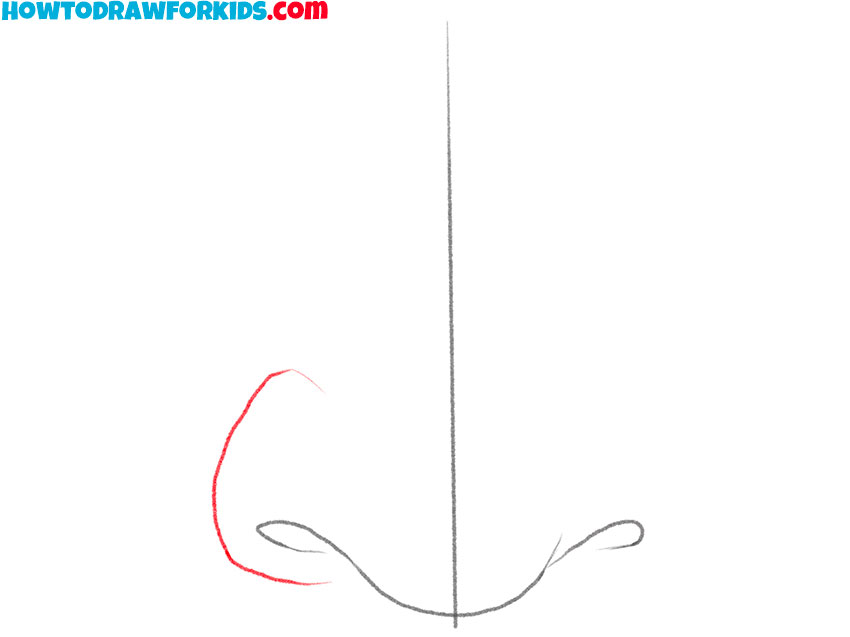
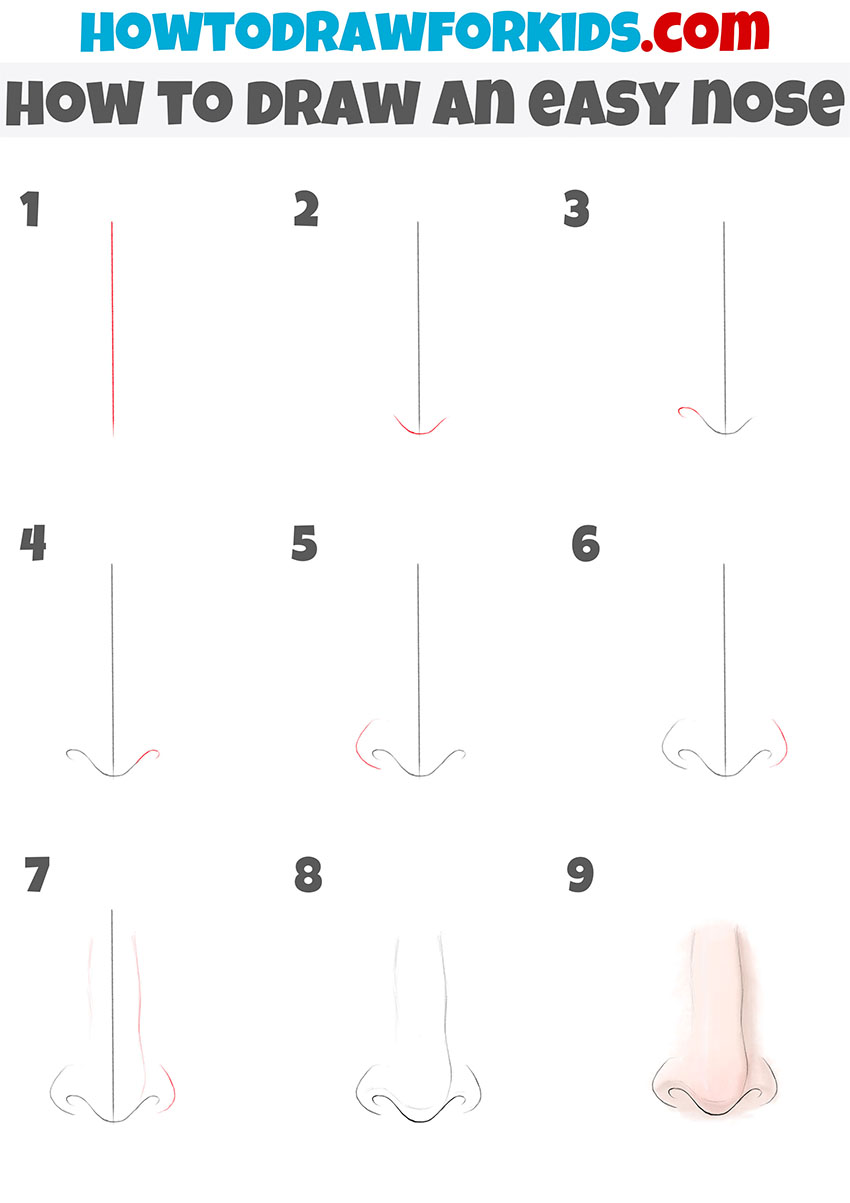
- Draw the center line.
Begin by drawing a straight vertical line in the middle of your paper. This line will serve as a guide to help keep the nose symmetrical. Make sure it is light and easily erasable, as this will not be part of the final drawing.

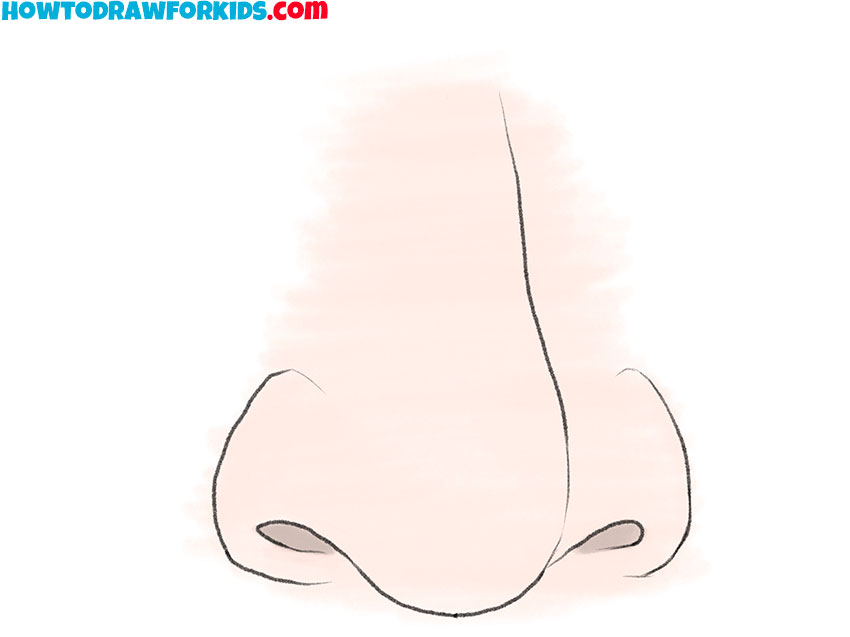
- Draw the bottom curve of the nose.
Now, draw a gentle curve at the bottom of the center line. This curve represents the base of the nose and will be the starting point for the nostrils. Ensure that this curve is centered on the vertical line and symmetrical on both sides. The curve should resemble a shallow “U” shape.
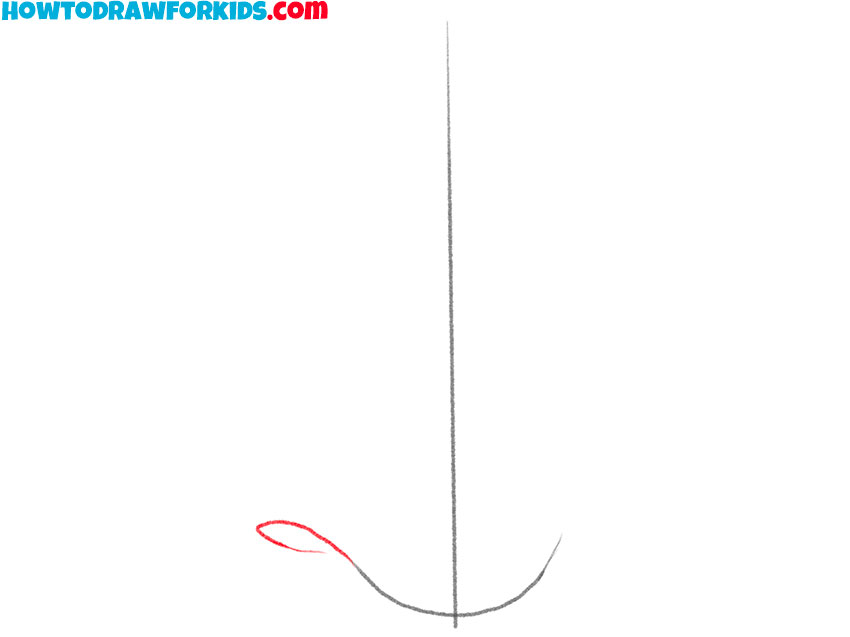
- Draw the nostril on the left.
On the left side of the bottom curve, draw a small, curved line that extend outward and slightly upward. This line will form the first nostril. The line should be short and not too wide, as the nostrils will be refined in later steps of this tutorial.
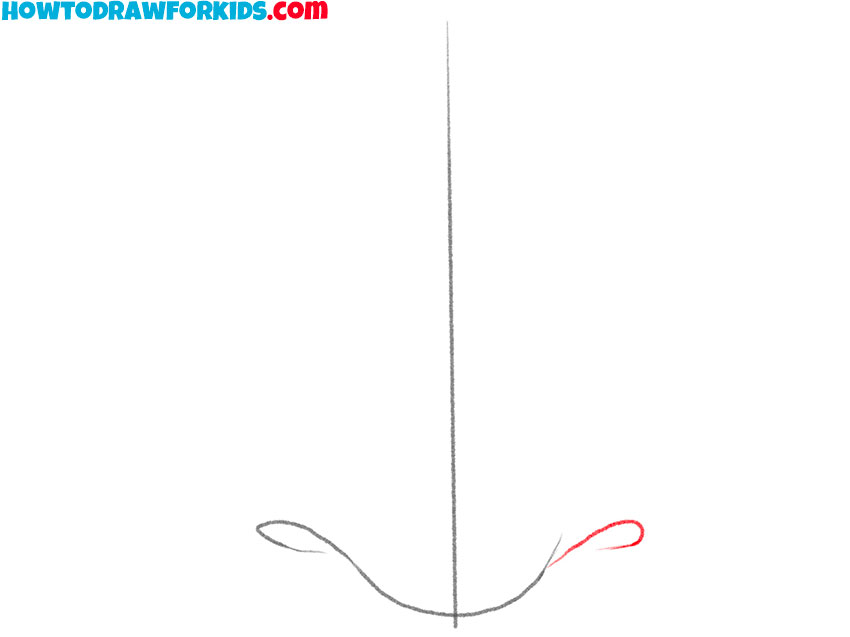
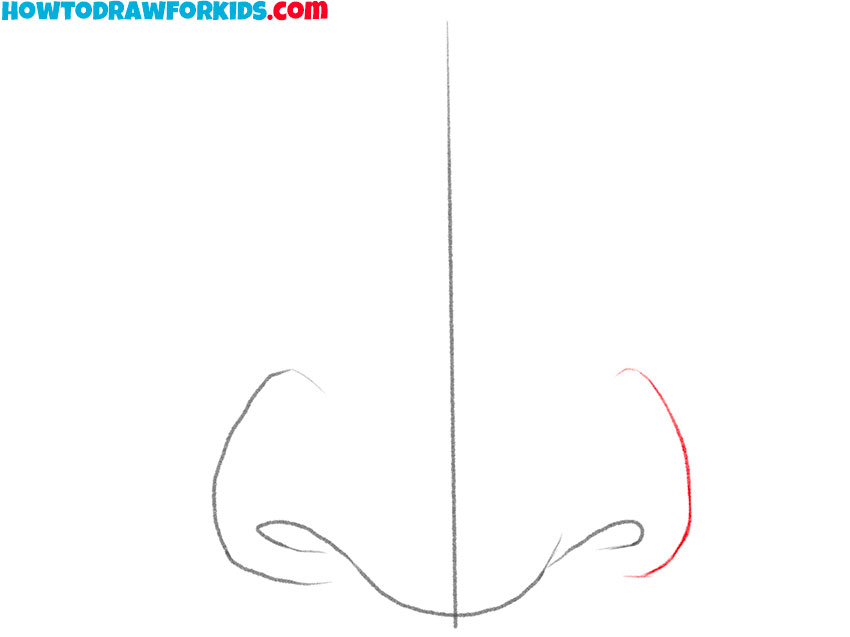
- Add the nostril on the right.
Now, refine their part of the nose by adding the second nostril. Extend the curved line from the second step, to create the nostril on the right. This nostril should mirror the nostril from the previous step. Ensure that the nostrils appear rounded and are of equal size.
- Illustrate the nasal wing on the left.
From the outer edge of the left nostril, draw a curved line that move outward and slightly upward. This line form the nasal wing, which is the side of the nose. Ensure these line is smooth and gently curved to give the nose a natural appearance.
- Add the nasal wing on the right.
Now repeat the line from the previous step to create the wing of the nose on the right. This part should also exactly repeat the similar one from the previous step. Make sure that both sides of the nose are as symmetrical as possible and look natural.
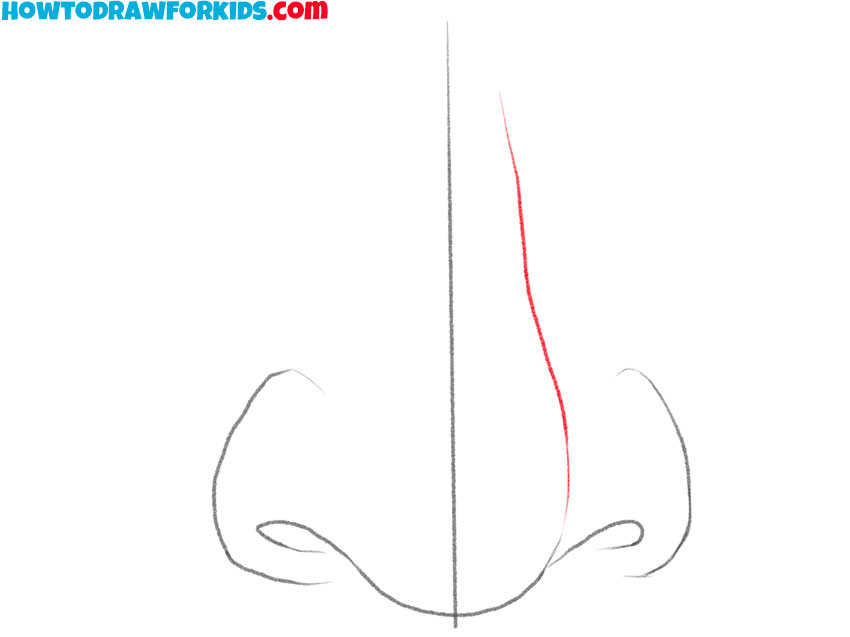
- Add the bridge line.
From the top of the nasal wing or the side of the central curve of the nose draw a line that extends upward along the side of the center line. This line represents the bridge of the nose. The bridge lines should follow the natural contour of the nose, curving slightly inward as they move up.
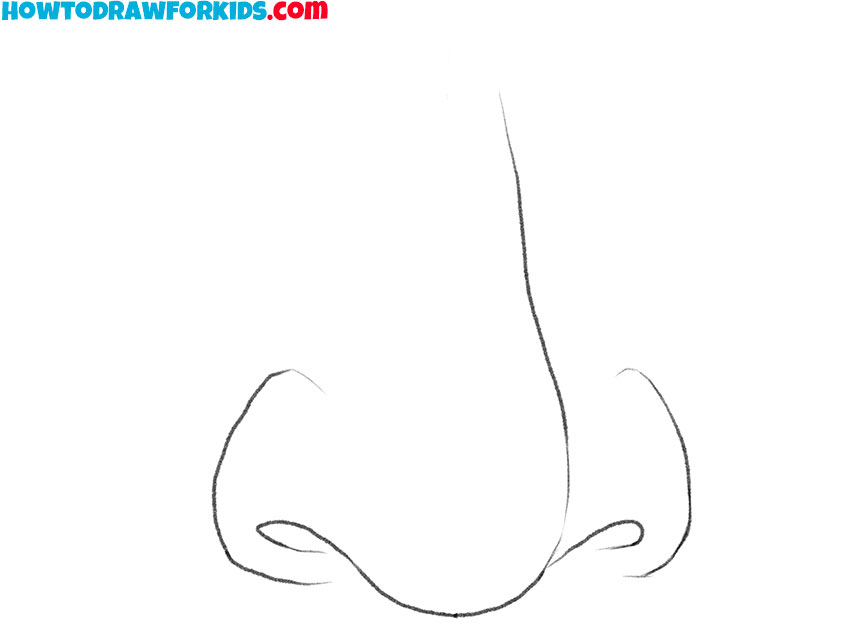
- Refine the nose shape.
Ensure the lines of the nose flow smoothly and maintain symmetry. Adjust the curves and angles as needed to achieve a more realistic nose shape. Erase the guidelines to give the sketch a polished and finished look. This step involves fine-tuning the structure to make it look natural.
- Add some colors the nose drawing.
Now, let’s complet this instruction by adding colors to give the nose a finished appearance. We are all different and have very different skin colors, so to color your nose, use any color from light peach to dark brown. Or use unusual colors, for example green, if you are drawing the nose of a fictional character.

Additional Materials
To further train your skills of drawing facial features, particularly in mastering the subtle art of drawing a nose, I’ve created an extensive, free PDF file. This file, easily downloadable, serves as an abbreviated tutorial, rich with detailed illustrations and clear, step-by-step instructions that I’ve put together to help you draw a nose with confidence.
You can download this guide to your device for those times when the internet is out of reach, ensuring that your ability to draw a nose is not limited by online availability.
How to Draw a Nose: Additional Techniques
In addition to the primary lesson, I have also crafted a series of alternative techniques for drawing noses. As you learn to draw a nose using these varying methods, you’ll find an array of approaches, from the classical to the avant-garde, challenging you to adapt and grow.
From minimalist interpretations ideal for quick sketches to more complex, anatomically detailed studies, these methods will broaden your understanding of how to draw a nose.
Detailed Nose Drawing Tutorial
Here again, let’s practice how to draw a detailed nose. We start with a central line to anchor the proportions, ensuring the nose sits perfectly centered. Next, sketch the base with a subtle arch, marking where the nostrils will begin. It’s these foundational shapes that set the stage for a lifelike nose.
Then carefully extend the lines outward and around, shaping the nostrils with a delicate touch. The nostrils curve naturally, giving our nose a sense of realism.
In the final steps, as you draw a nose to completion, refine the nostrils and bridge, adding slight shadows to emulate the contours of a real nose. Finish the sketch by adding some colors.

Adding Shadows and Highlights
In this detailed method of drawing a nose, we reach a pivotal stage: the addition of shadows and highlights, which will make sketch much more voluminous. Initially, establish the nose’s basic shape as in the previous tutorials; now, improve it by considering where the light falls and where the natural hollows of the nose create volume.
Introduce shading along the sides of the bridge and around the curves of the nostrils. This shadowing effect grants dimension, transforming flat lines into a 3D form that seems to lift off the page. Carefully, place these shadows, mindful not to overdo it, aiming for a subtle gradation that suggests roundness and structure.
Highlights are the final, critical touch. With delicate strokes, add lighter areas that represent the nose’s planes catching the light. This contrast between the shadows and highlights is what will make the nose appear realistic and full. Mastery of this interplay between light and dark is what will give your drawings a more professional look.
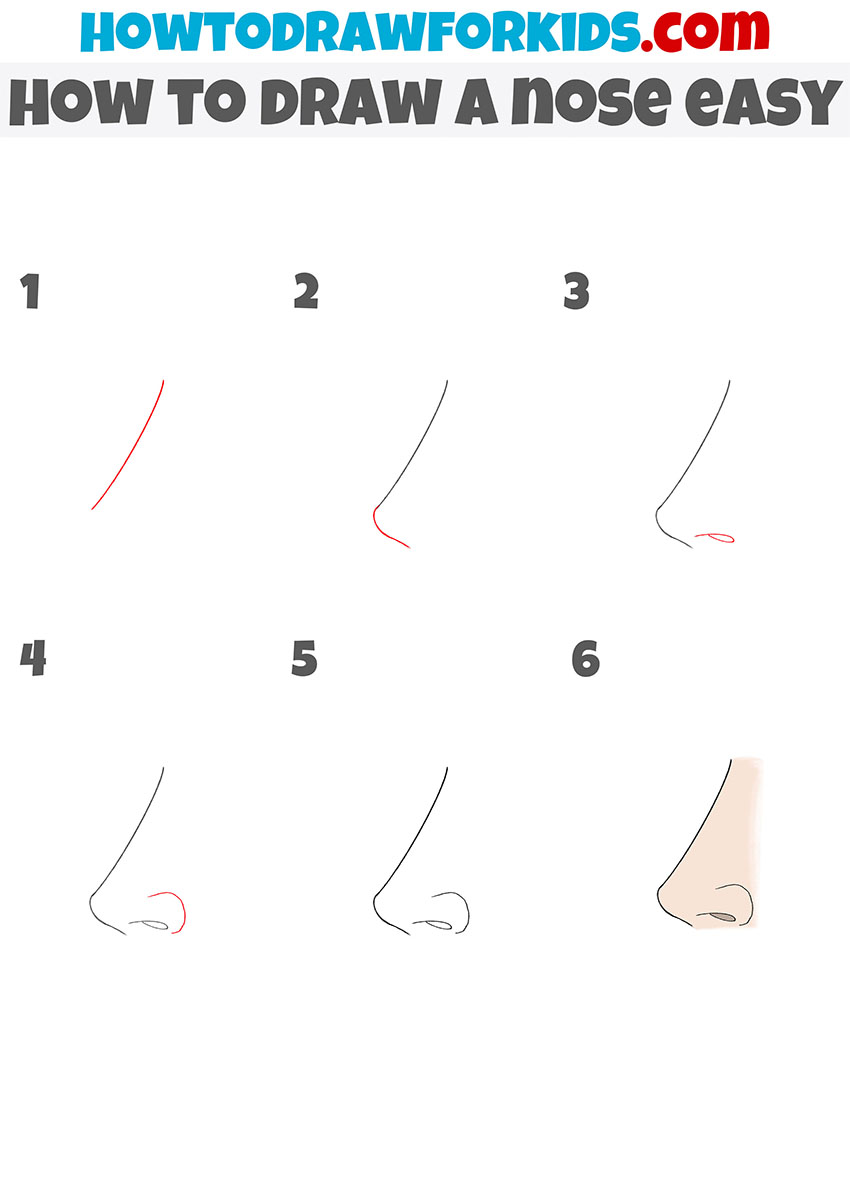
Drawing a Nose From the Side
Drawing a nose from the side can be a delightful challenge, illustrating the profile’s contours. Begin with a gentle curve that outlines the bridge of the nose, ensuring the slope is neither too steep nor too shallow. This initial line dictates the overall shape and is the foundation upon which we build when we draw a nose.
Continuing from the bridge, draw the nose tip with attention to the natural curve that defines the profile. This curve not only shapes the nose but also sets the foundation for the nostril, which is integral to the side view. A gentle touch is required to ensure the nostril is neither too pronounced nor too faint.
In this side perspective, the nostril and the flare are crucial. With a small hook-like shape, give a finished look to the nostril, paying close attention to its relative size and angle, which will impart a sense of realism to the drawing. To conclude, apply shading techniques to articulate the nostril’s volume.
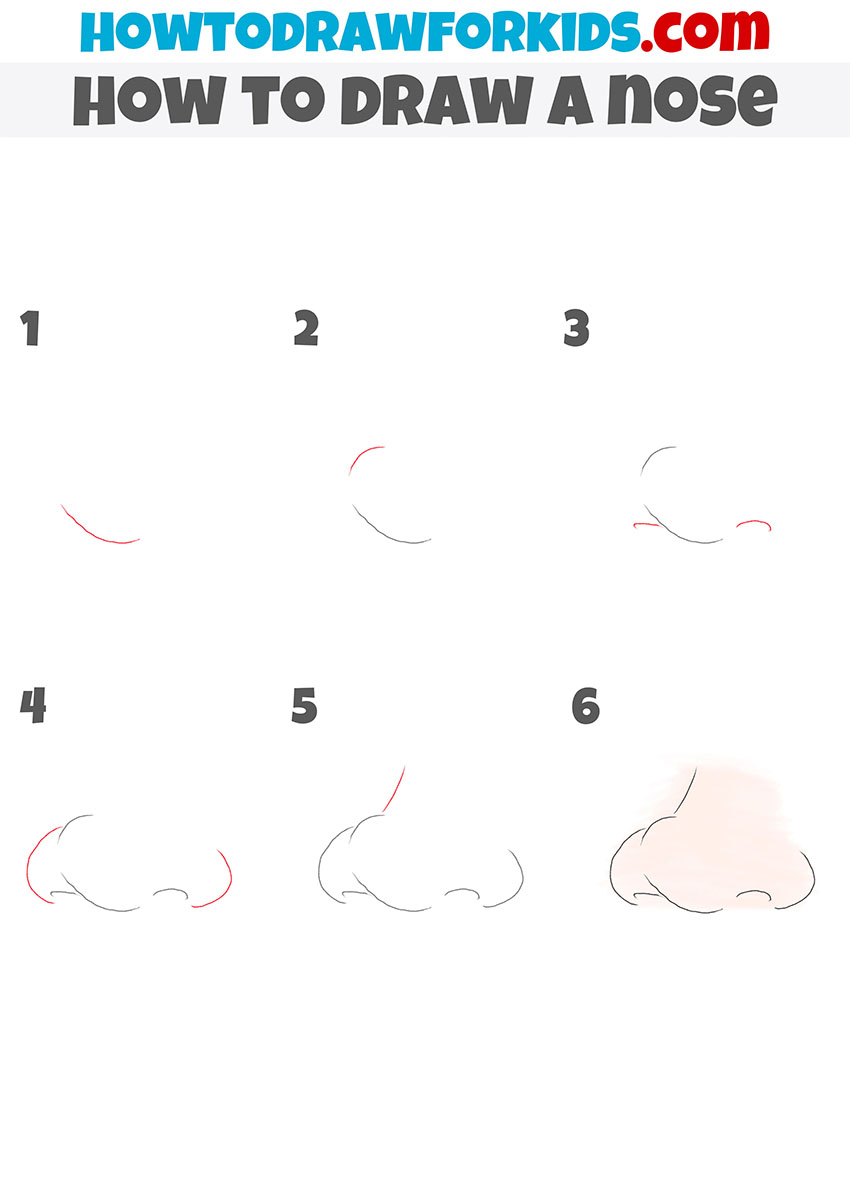
Experimenting With Shapes
In this tutorial, I’ll guide you through drawing a nose that may not conform to the typical shapes we often see, but captures the wonderful diversity found in human features. Start with a subtle curve, a foundational gesture that begins to tell the story of a nose unlike any other.
Building upon this, carefully add the nostrils and the defining lines of the bridge, illustrating the nose’s distinctive appearance. Our aim is to balance accuracy with the distinct shape, creating a nose that is both recognizably human and singularly personal.
As you follow the tutorial to its conclusion, your drawing will come to reflect the specific nose featured in the final image. This is a practice of not just observation and replication but also a celebration of the unique shapes that make every face really individual.
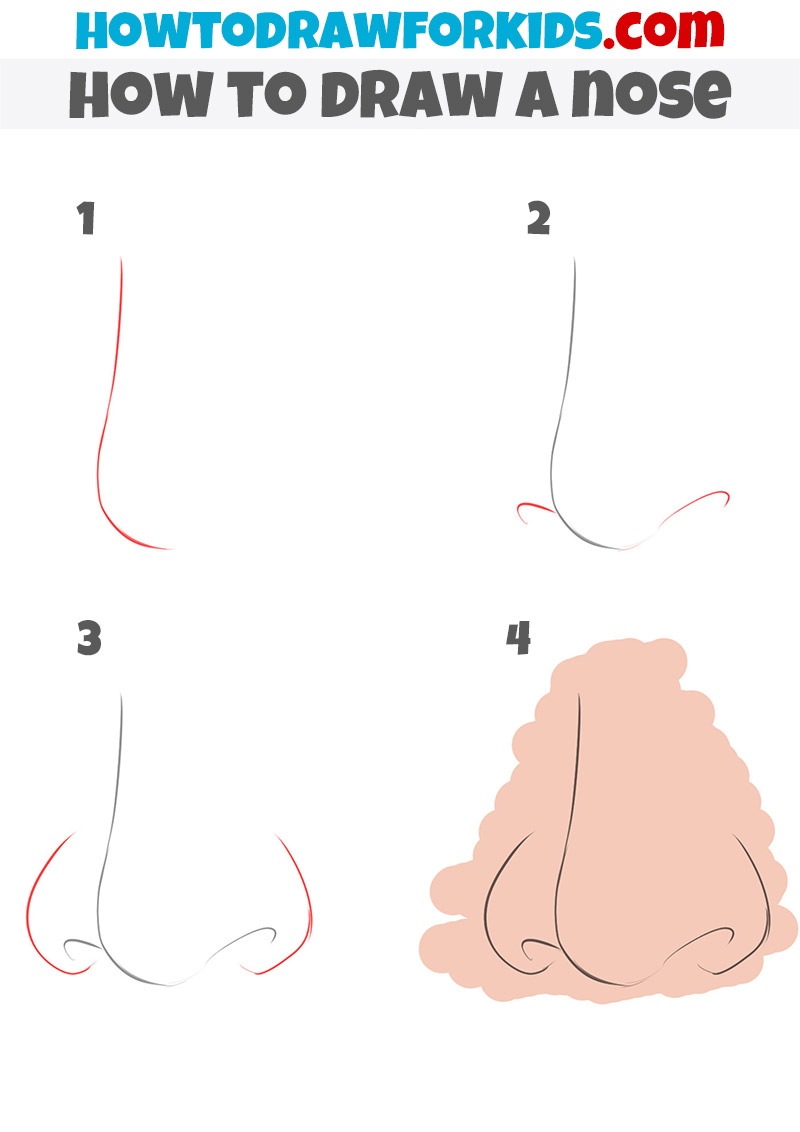
Drawing a Nose in 4 Step
This additional tutorial provides an alternative approach to drawing a nose, offering a simplified and more straightforward method compared to the first tutorial. Unlike the previous set of nine steps, this one comprises only four steps, making it ideal for beginners or those looking for a quicker sketching process. The primary differences lie in the sequence and the simplicity of the steps, which focus more on the overall appearance rather than detailed refinement.
Begin by drawing a curved vertical line, which will serve as the guide for the nose’s shape. Next, add the nostrils by sketching small, curved lines on each side of the bottom curve. These lines should be symmetrical and mirror each other.
Then, refine the nostrils by extending the curved lines outward and upward, connecting them to the initial guide line to form the nasal wings. Finally, add shades you like and some other finishing touches to give the nose a more realistic appearance, ensuring the contours are smooth and natural.
Drawing a Cartoon Nose
Finally, drawing a cartoon nose offers an opportunity to play with exaggeration and expressiveness. Begin with two wide, swooping curves that illustrate the broad, open sides of a comically oversized nose.
In the next phase, add the nostrils, drawing them as large, looping curves that drop from the halfway point of our initial lines. The key here is to maintain the balance between whimsy and believability.
To complete the cartoon nose, accentuate the contours with a thick outline, illustrating its roundness and volume. A well-placed highlight and a touch of shading give the nose a sense of plumpness, almost as if it could bounce like rubber.
Conclusion
So, if you are reading these lines, then most likely you have completed the basic lesson on drawing a nose and have become familiar with additional methods.
If so, then it’s time to remind you that my site is full of all kinds of drawing lessons, including lessons on body parts and facial details.
And if there’s a particular subject you’re itching to draw, don’t hesitate to leave a comment below with your requests. Your input shapes my future drawing lessons.