How to Draw Charcoal
Charcoal is one of the most expressive drawing tools, and in this lesson it even becomes the subject, so let’s learn how to draw charcoal.

How to Draw Charcoal: Introduction
Now you will learn how to draw charcoal. Charcoal is a solid combustible substance that is used in various fields – both in everyday life and in industry.
You will complete this lesson very quickly and easily. The main feature of this tutorial is that freeform lines are allowed here. You do not need to repeat all the lines exactly, as in the example. You only need to memorize the sequence of steps and color the finished drawing correctly.
The acquired skills will be useful to you in the future when you want to draw some elements of nature, for example, a mountain landscape. If you have noticed, charcoal is very similar to any rock, so you can easily draw any stone objects if you learn how to draw charcoal.
Now prepare all the necessary supplies and start the lesson.
Charcoal Drawing Tutorial
Materials
- Pencil
- Paper
- Eraser
- Coloring supplies
Time needed: 15 minutes
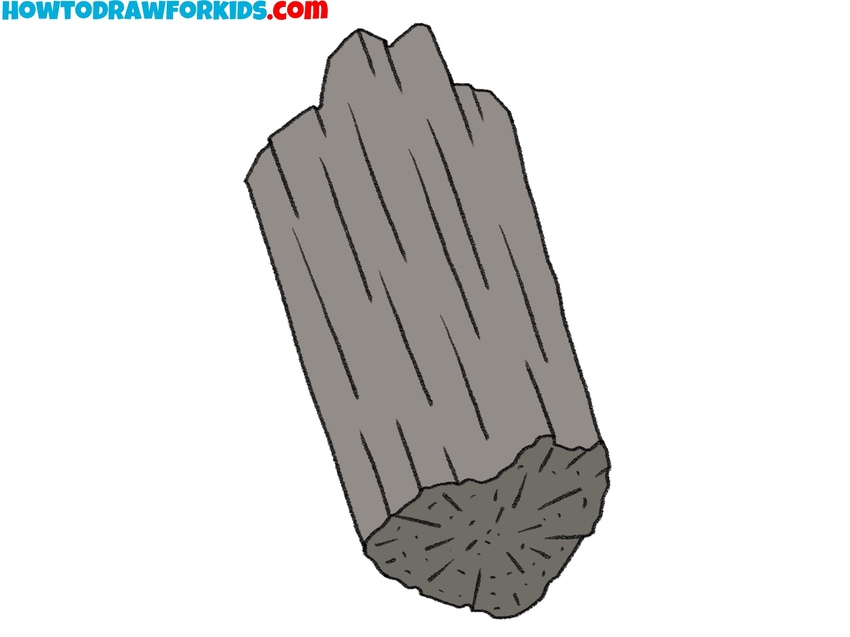
How to Draw Charcoal
- Outline the vertical edges.
To show the elongated form of a piece of charcoal, sketch two slightly slanted vertical lines. These lines represent the sides and will guide the proportions of the whole charcoal drawing. Keep the lines uneven instead of perfectly straight, since real charcoal is natural and has irregular shapes.

- Sketch the irregular bottom edge.
The end of a charcoal stick often looks broken or uneven, so sketch a jagged, wavy line connecting the two side lines at the bottom. This detail makes the drawing look more realistic and illustrates the texture. Keep the irregular shapes varied and avoid repeating the same curve or angle.

- Sketch the broken upper edge.
The top of the charcoal should now be illustrated with a rough contour, showing where the stick has broken naturally. Add some uneven, pointed shapes to represent splintered wood at the top. Vary the height of these points so that the shape looks organic.

- Sketch the vertical texture lines.
Charcoal has a fibrous look, so sketch several vertical lines along the length of the stick. These should not be perfectly straight or evenly spaced, add variety in length and slight waviness. This step is important because it shows the grain of the material and gives the viewer the impression of a natural surface.

- Draw the cracks at the base.
To make the end of the charcoal more believable, add radiating lines inside the irregular bottom shape. These lines should extend from the center to the edges, like cracks or fibers. As with other textures of this subject, very the directions and lengths to create a natural appearance.

- Darken the main contours.
At this stage, clean up the outline and adjust any parts that feel too symmetrical. Use more clear strokes to darken the lines you want to keep. Erase any unnecessary guide marks so that only the intended structure remains. You may also add a few small cracks or breaks along the sides for even more realism.
- Darken the surface.
To complete the charcoal drawing, shade the entire form with a dark gray or black tone to represent the subject. Leave the broken bottom slightly lighter or darker with fine crack lines visible inside. You can apply shading in the direction of the vertical texture lines to improve the surface grain.

How to Draw a Pile of Coal
When looking beyond a single stick of charcoal, it is also useful to practice drawing how pieces collect together in natural piles. The aim is to illustrate how coal appears when gathered.
The work begins with outlining a few basic polygon-like shapes to represent the main coal blocks. Add more shapes gradually, letting them overlap to create a pile effect. Each new shape should connect to the ones already sketched.
Draw the angled lines that break the surfaces of the coal, giving each block dimension. Vary the directions of these lines to avoid monotony, and keep the edges sharp rather. Once the pile is complete, reinforce the outlines to unify the form, then add shading to separate the front and back planes.
Darker areas should fall in between the blocks, since coal in a pile often casts shadows on itself. Use simple dark fills to give the pile a solid and heavy look.

Conclusion
Another drawing lesson is over. Now you have learned useful new skills and enjoyed your time doing creative work.
For more practice, see the rock drawing tutorial to study similar solid forms. You can also visit the fire drawing tutorial to combine these elements into a complete scene.
Share your results, leave a comment, and return for more step-by-step lessons. Don’t forget to follow me on social media.

Iam a creative arts teacher would like to have these lessons for teaching at school.
That’s great to hear, Jostinah. All tutorials here are free to use for educational purposes. You can use them for classroom drawing lessons.