How to Draw a Dragon
This lesson includes several simple step-by-step tutorials to teach you how to draw a dragon, a powerful and popular creature from the world of myths and fantasy.
How to Draw a Dragon: Introduction
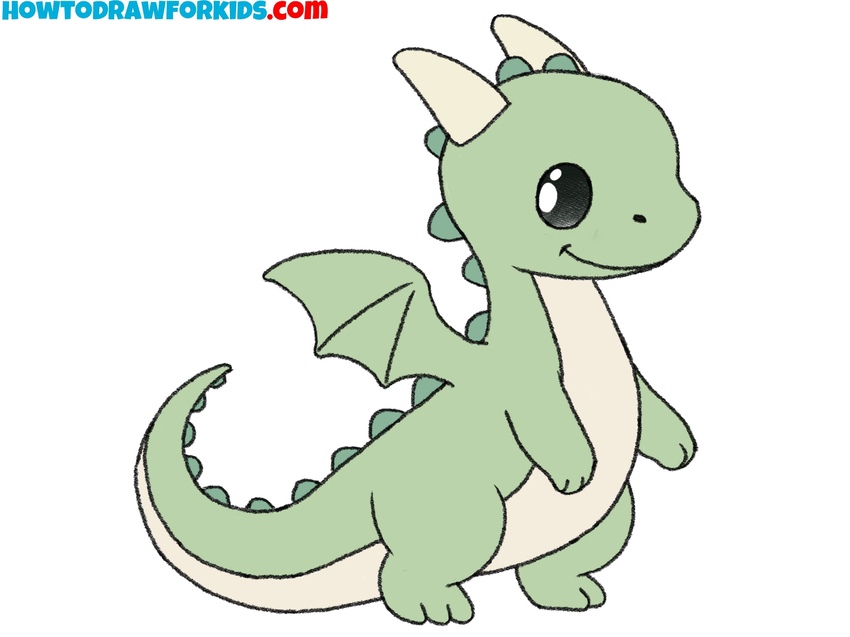
Dragons are among the most well-known mythical creatures, whose images appear in various works of art, from ancient myths to modern games. To help you create images of these creatures, I have prepared several lessons on how to draw a dragon.
Dragons have been featured in stories for centuries, even millennia, and their appearance has evolved over time. Different creators have developed many distinct depictions of this ancient creature, each reflecting their own style and cultural influences.
In this dragon drawing lesson I will cover several of the most recognizable representations of dragons. We will learn to draw a dragon in a static pose as well as in flight, exploring both simplified and more detailed approaches to suit different skill levels.
Basic principles to consider when drawing a dragon include its powerful long body with a tail, bat-like wings, clawed paws, and its overall appearance resembling a winged lizard. These key elements will guide you in creating your own dragon drawings.
Dragon Drawing Tutorial
Materials
- Pencil
- Paper
- Eraser
- Coloring supplies
Time needed: 40 minutes
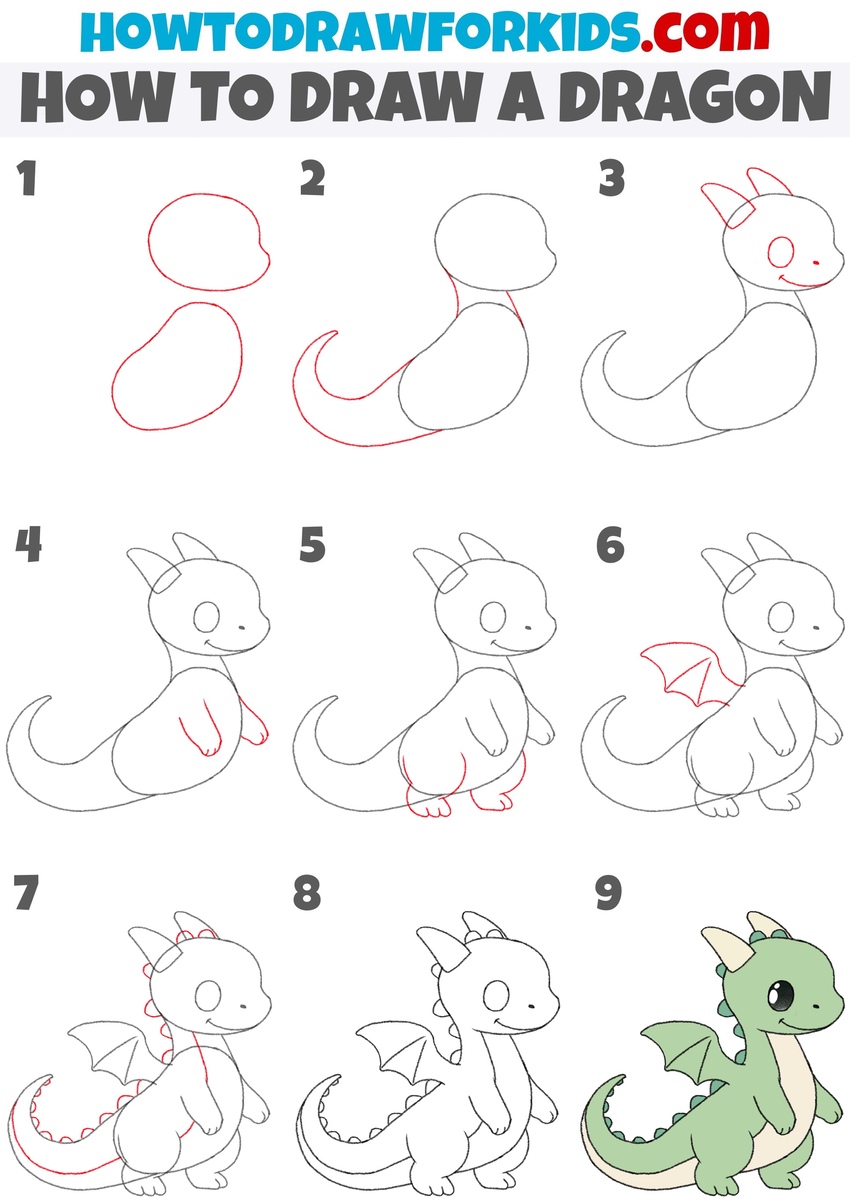
How to Draw a Dragon
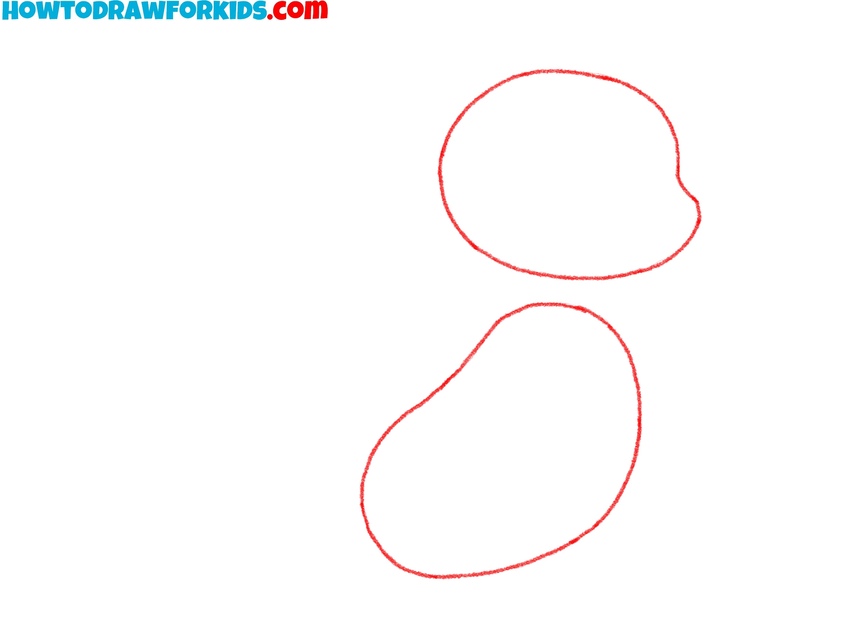
- Draw the head and torso.
Start drawing the dragon by creating the basic shapes for its body. Sketch a large oval for the body and a smaller oval for the head. Keep the lines of the dragon sketch light and simple since this stage is all about setting the foundation for the drawing.
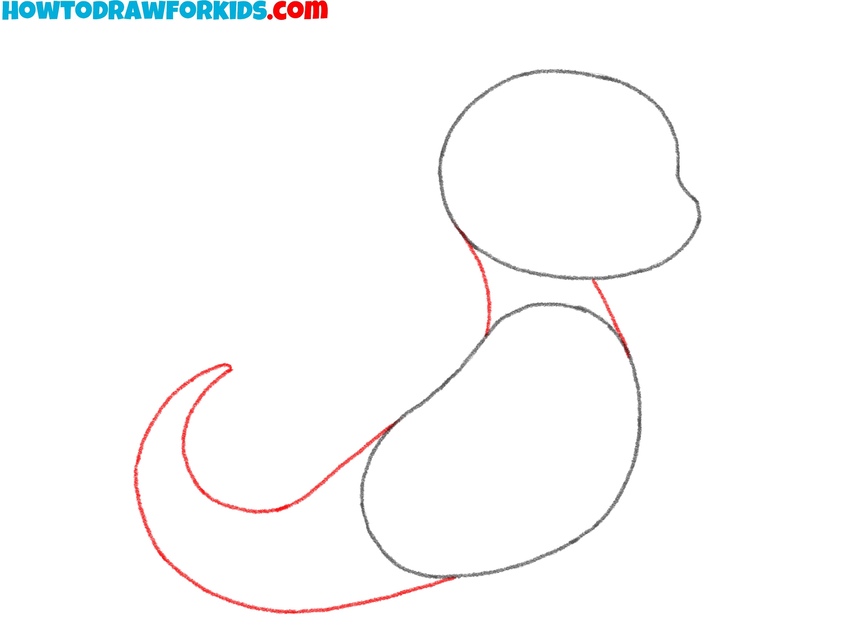
- Add the tail and neck.
Continue the dragon drawing by adding a curved line for the tail at the bottom of the body oval. The tail should taper towards the end. The length of the tail should be approximately equal to the length of the dragon’s body. Then, create the connection between the body and head by outlining the dragon’s neck.
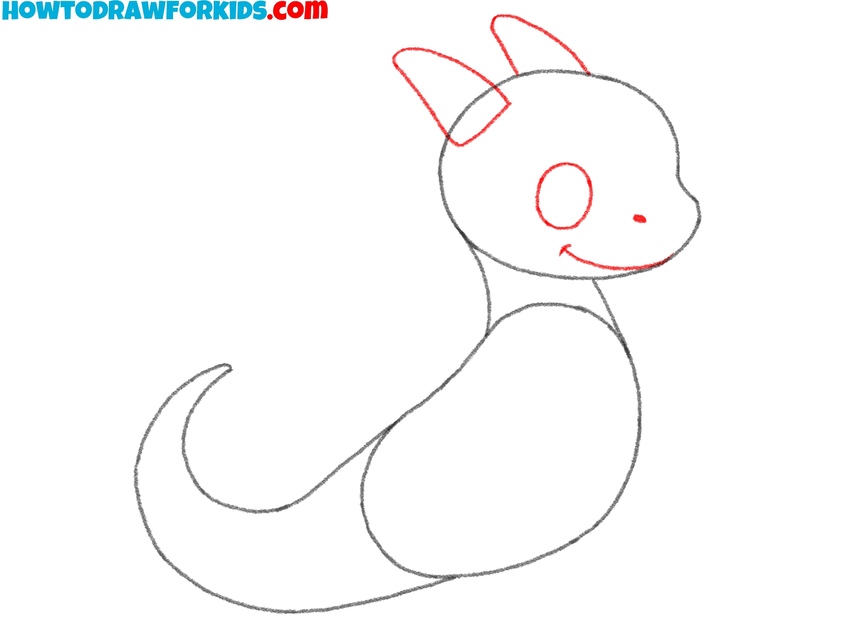
- Detail the face of the creature.
Now, draw the eye of the dragon as an oval or circle. Then, draw a small curved line for its smiling mouth. Above the mouth, draw the nostril as a simple dot. After that, sketch two curved horns on top of the head to give the dragon its characteristic appearance.
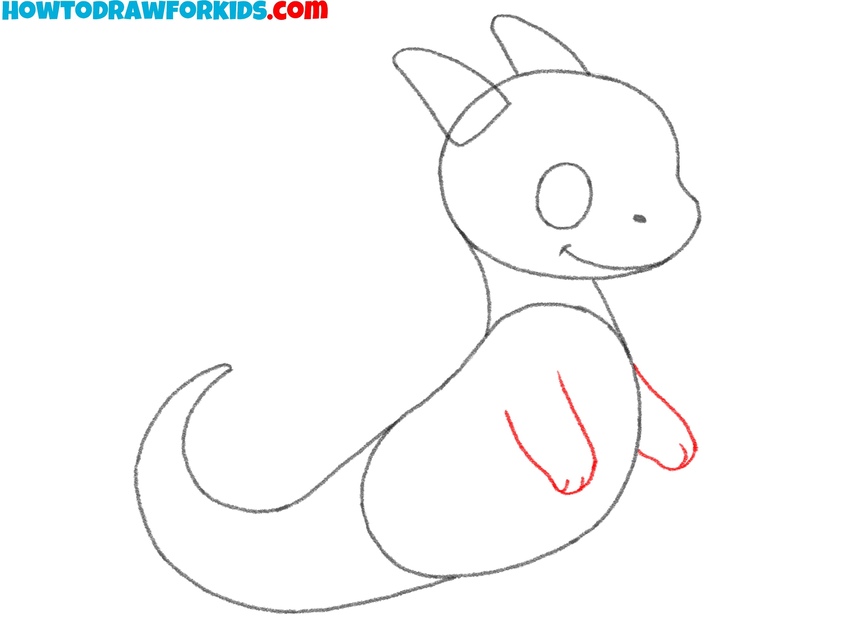
- Sketch the arms.
Add two simple, curved lines extending downward from the body to outline the arms of the dragon. These should have rounded ends to represent the paws. Keep the arms of the dragon really simple, creating just their overall shape and outlines of the fingers.
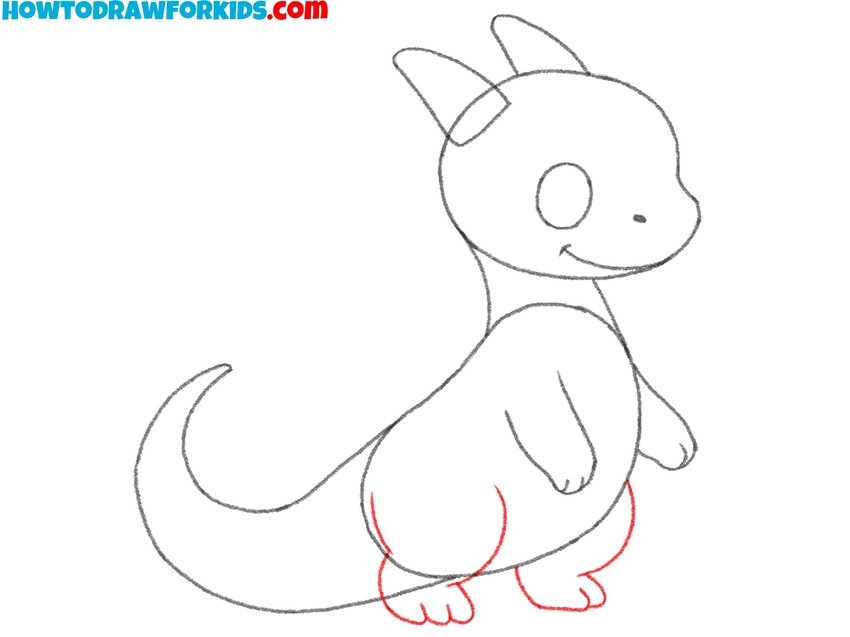
- Draw the legs.
Sketch slightly larger, rounded shapes extending from the lower part of the body to represent the legs and feet. To give the dragon’s feet a slightly more realistic look, you can draw pointed claws at the ends of the toes. By the way, you can do the same with the hands of the mythical creature.
- Add the wings.
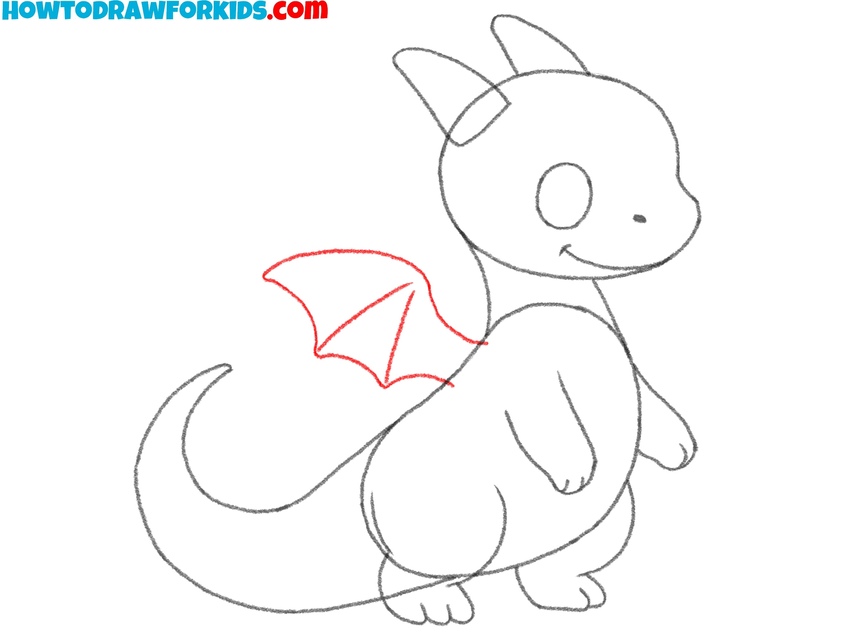
Sketch one wing extending from the dragon’s back, using curved lines for the edges and inner structure. The wing should resemble a bat’s wing, with pointed ends and visible sections. Wings are one of the most distinctive features of a dragon. This part will make your dragon more recognizable.
- Add the back spikes.
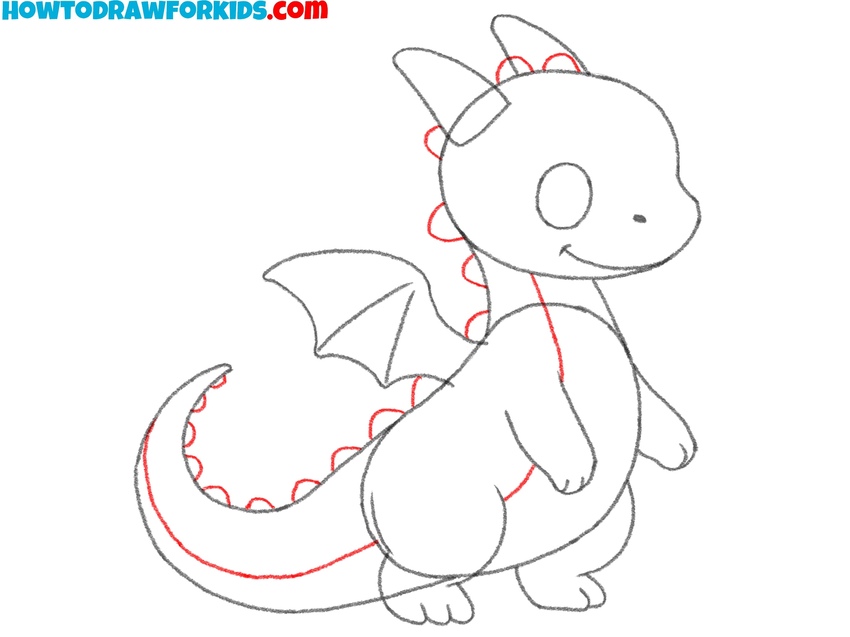
To give your dragon drawing more recognizable appearance, draw a series of small, curved spikes running down its back and tail. Start from the top of the head and continue along the body, following the curve of the tail. These spikes should gradually decrease in size as they approach the tail’s end.
- Refine the outlines of the sketch.
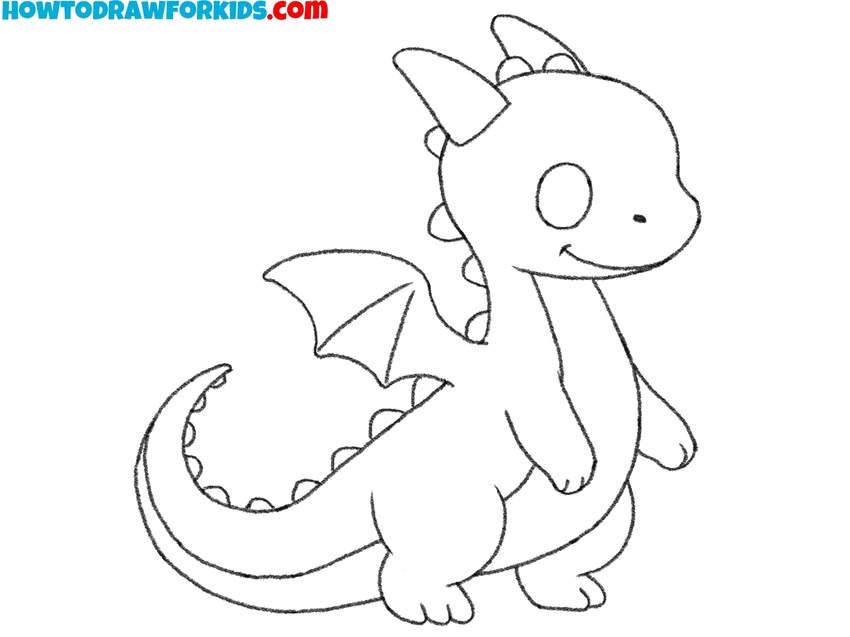
Go over your dragon sketch, erasing any unnecessary lines and darkening the basic outline. Add small details if needed. Double-check the proportions of the dragon’s body, legs, wings, and tail to ensure everything looks finished and ready for coloring.
- Color the dragon.
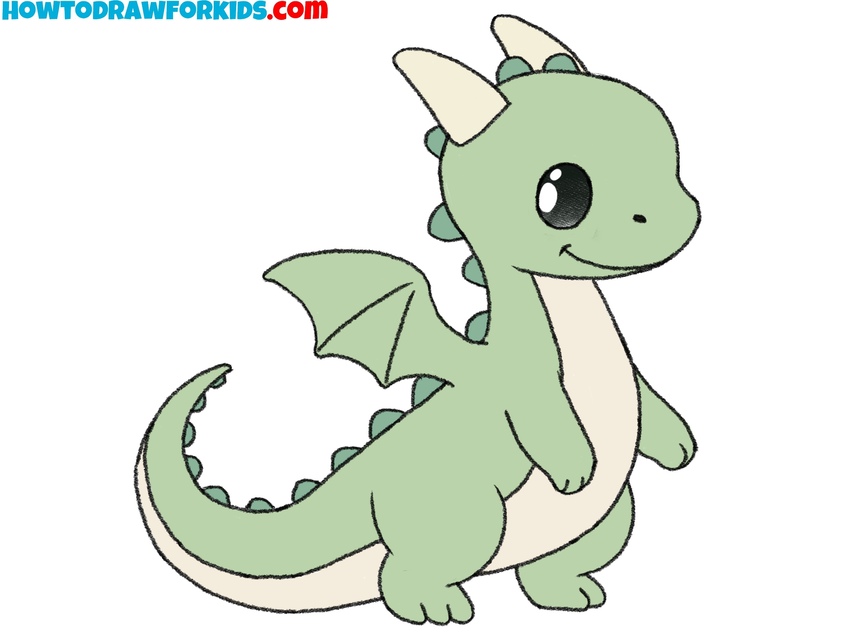
To color your dragon drawing, you may use shades of green, red, or any other color of your choice. Apply darker shades to the main parts of the body and lighter shades to the belly and the underside of the tail. For the spines on the back, use the darkest shade. Then, color the horns yellow and the eye black.
Alternative Techniques
As mentioned earlier, dragons have appeared in books for many centuries and have taken on new forms as characters in computer games. There are numerous types and variations of dragons, as well as countless poses.
To introduce you to some of these, I have prepared several additional lessons on how to draw a dragon. Each lesson includes a specific set of steps and is created in a unique style. You can select any of these lessons or attempt them all to improve your dragon drawing skills further.
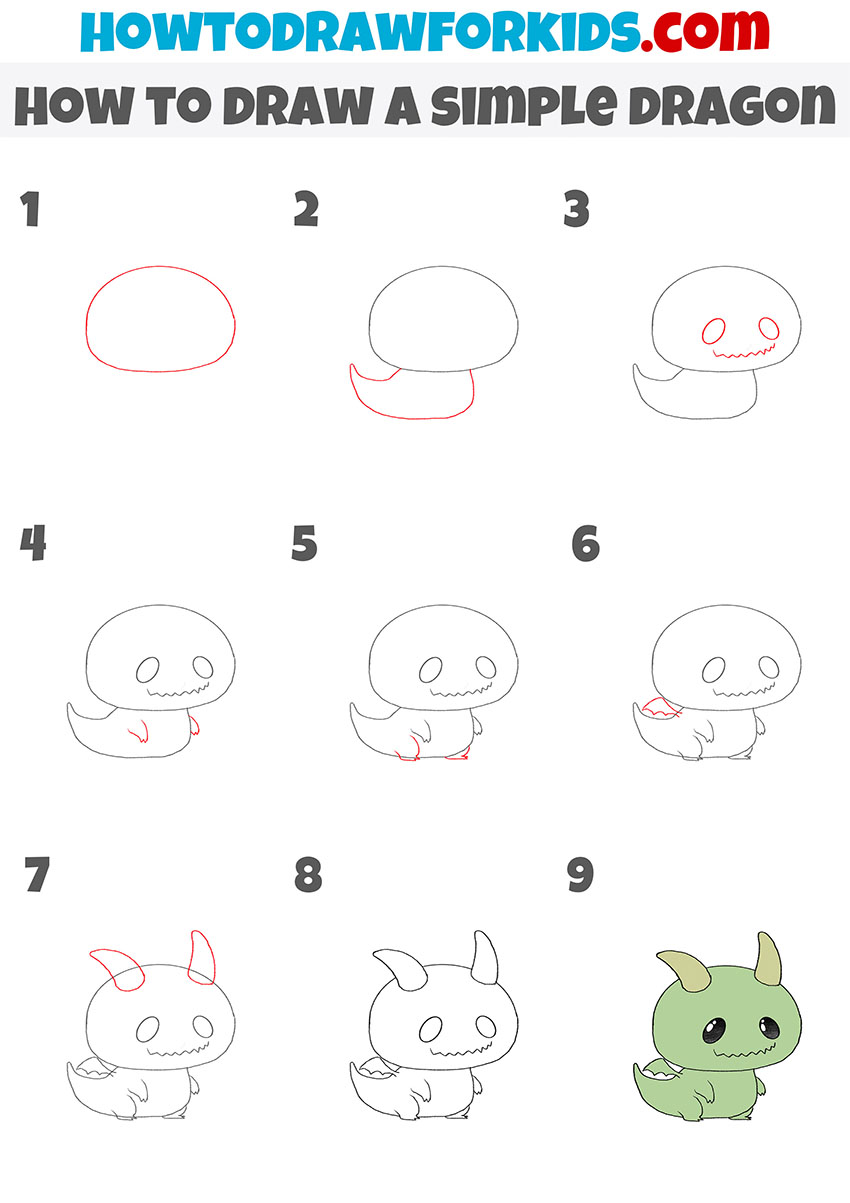
How to Draw a Simple Dragon
The distinctive feature of this tutorial on how to draw a simple dragon is its focus on creating a minimalistic and cartoon-like version of a dragon, which contrasts with the previous tutorial that emphasizes a slightly more detailed appearance. This tutorial uses simplified shapes and fewer details.
To draw a simple dragon, begin by sketching an oval for the head. Add a curved shape below it for the body, extending the tail from the body with a slightly pointed tip. Draw two oval eyes and a series of small curved lines for the mouth. Next, add small curved arms near the front of the body and draw the legs by sketching rounded shapes at the base.
You can add a few spikes along the back by drawing small triangular shapes. Then, sketch two curved horns on the top of the dragon’s head. Finally, refine the outline of the dragon, erase unnecessary lines, and color it. Use green for the body, lighter shades for accents, and dark colors for the eyes.
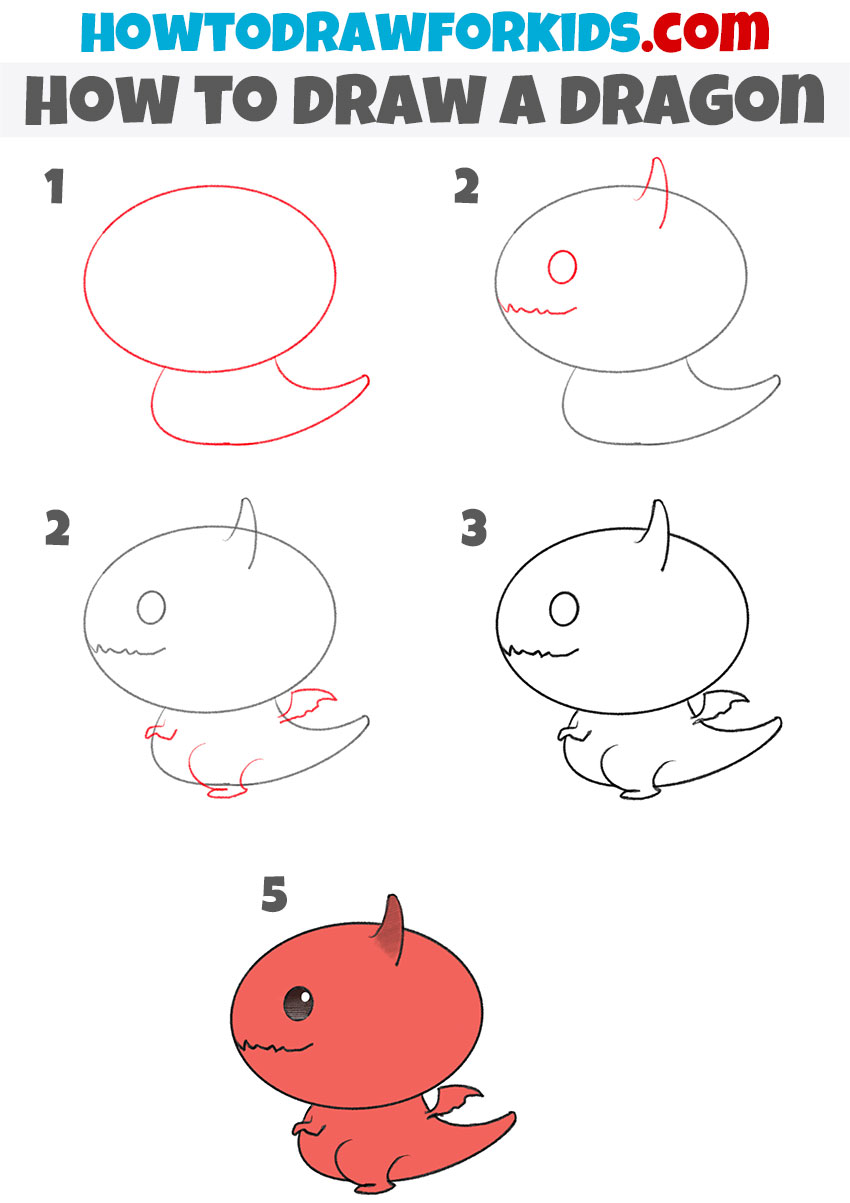
How to Draw a Dragon for Kindergarten
The distinctive feature of this tutorial on how to draw a simple dragon is its focus on creating a minimalistic and cartoon-like version of a dragon, which contrasts with the previous tutorial that demonstrated a slightly more detailed appearance. This tutorial uses simplified shapes and fewer details, making it perfect for kindergarten.
To draw a simple dragon, begin by sketching an oval for the head. Add a curved shape below it for the body, extending the tail from the body with a slightly pointed tip. Draw an oval eye and a series of small curved lines for the mouth. Next, add a small curved arm near the front of the body and draw the leg by sketching a rounded shape at the base.
Then, sketch a curved horn on the top of the dragon’s head. Finally, refine the outline of the dragon drawing, erase unnecessary lines, and color it. Use red or green for the body, lighter shades for accents, and dark colors for the eyes.
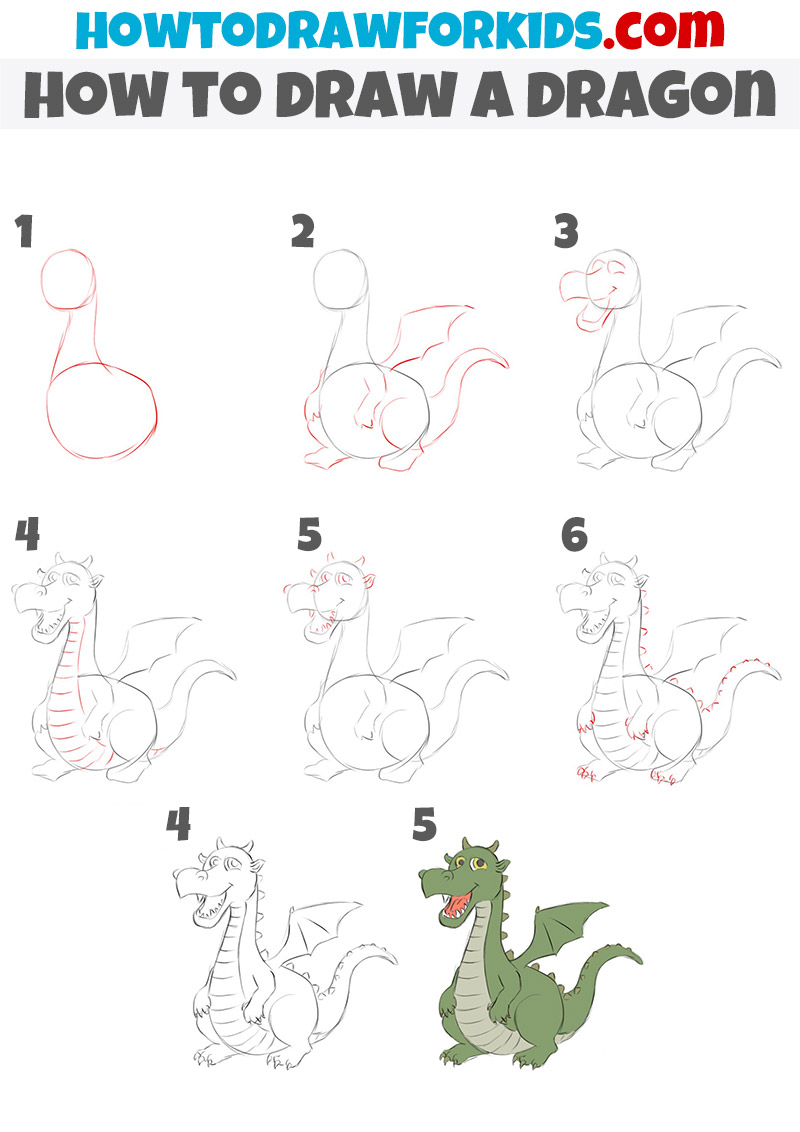
Detailed Dragon Drawing Tutorial
This tutorial on how to draw a dragon creates a more detailed dragon compared to the previous tutorials. It demonstrates a full-body drawing with small features, including defined facial expressions, a segmented underbelly, and a well-structured body with larger, more detailed wings and tail.
To learn how to draw a dragon with this technique, start by sketching an oval for the head and a larger rounded shape for the body, connected by a curved neck. Add small limbs at the base of the body and a long, curving tail extending from the back. Draw a large, bat-like wing with curved edges.
Focus on the dragon’s head by adding a snout, open mouth with visible teeth, and curved horns. Add eyes, nostrils, and a few lines to detail the facial features. Draw a segmented pattern along the dragon’s neck and belly to demonstrate its texture. Include small spikes along the tail for added detail. Refine the outline, erase unnecessary guidelines, and color the dragon using green shades for the body and lighter tones for the underbelly.
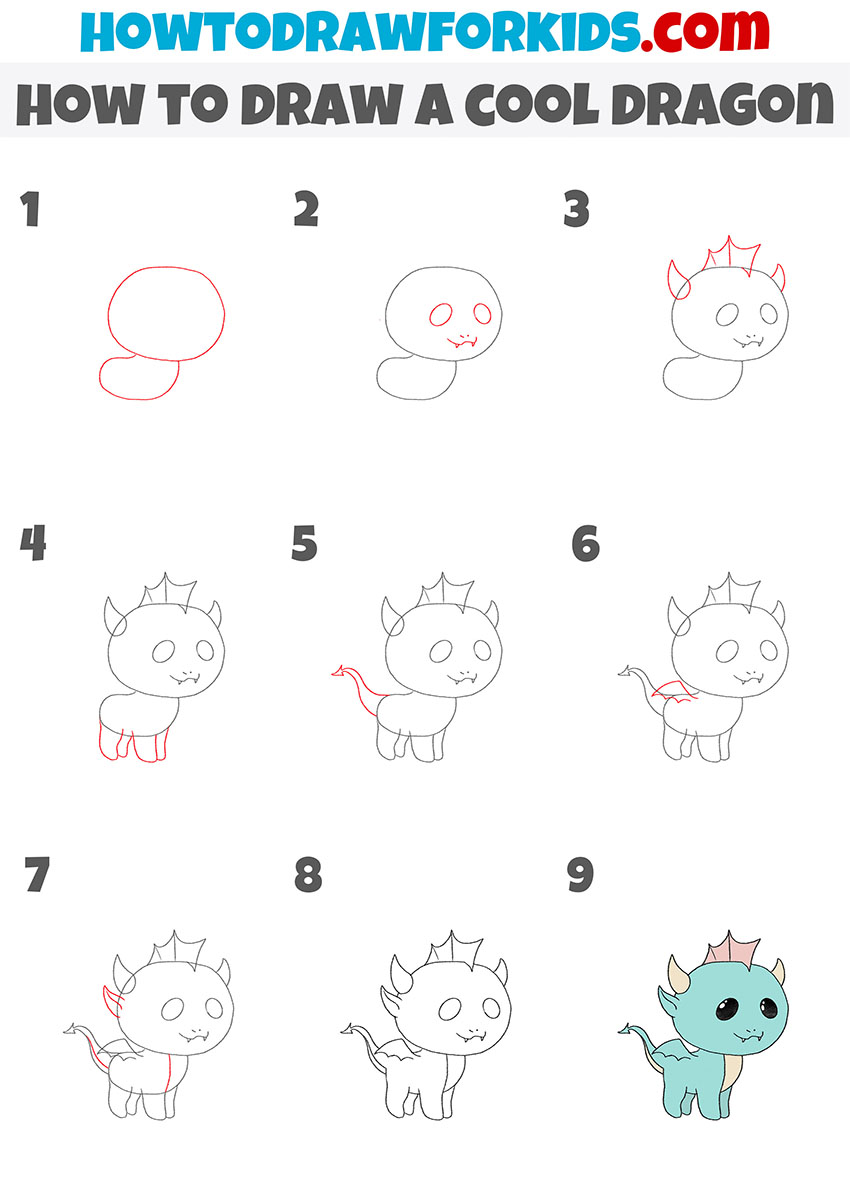
Cool Dragon Drawing Tutorial
So let’s move on to a simpler technique again. This tutorial on how to draw a cool dragon is distinctive for its focus on creating a small and cartoon-like dragon with unique features like a crown-shaped crest on its head, a simple tail, and compact wings. To make your cool dragon drawing look more unique, you can add other interesting details.
To draw a cool dragon, start by sketching a large oval for the head and a smaller oval below it for the body. Then, add two large, rounded eyes and a small mouth with curved lines. Draw pointed horns on both sides of the head and a crown-like crest at the top. Sketch simple legs beneath the body using curved lines, keeping them short.
Add a thin, curved tail with a pointed tip extending from the back. Draw small wings on the dragon’s back, using curved lines. Refine the outline, erase extra lines, and add final details. Color the dragon using light shades like blue or green, and highlight the crest, belly, and horns with contrasting colors.
Easy Dragon Drawing Tutorial
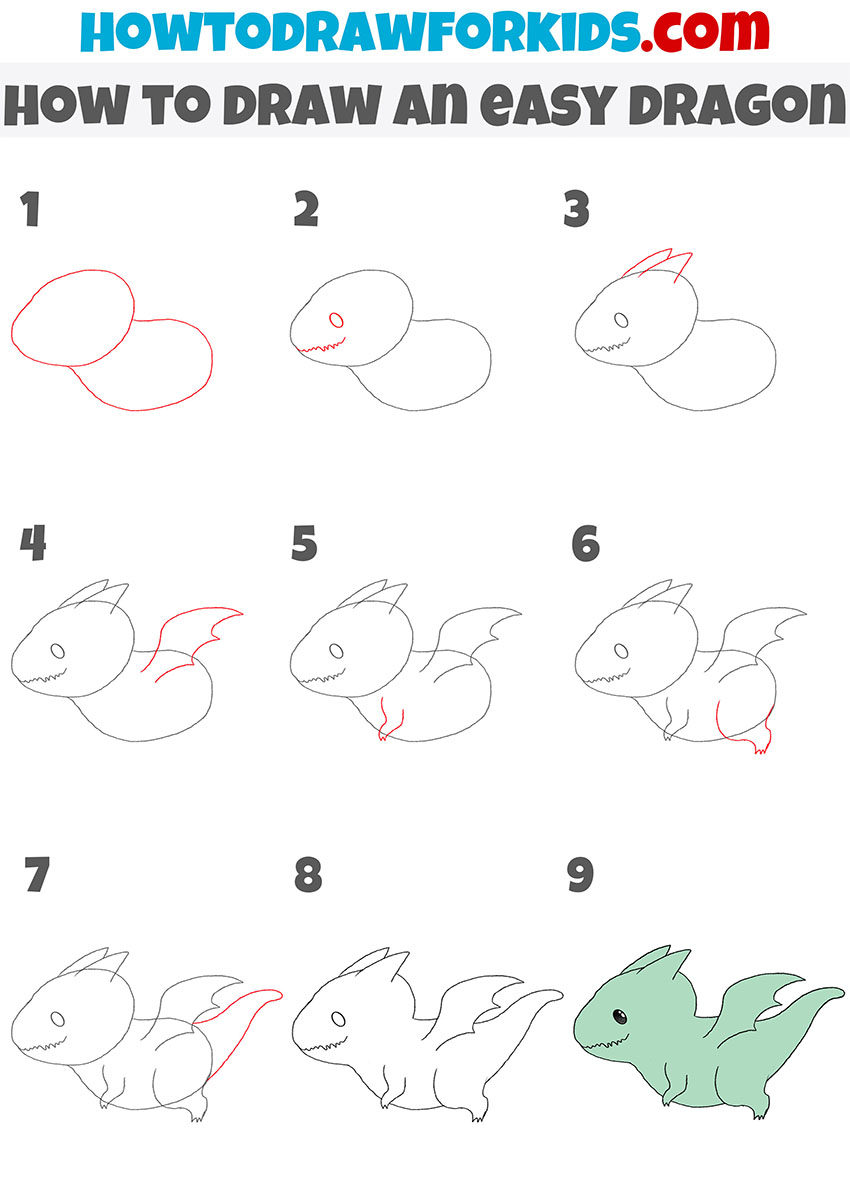
We continue to learn how to draw these creatures easily. So, this method provides an extremely easy way. This tutorial on how to draw an easy dragon demonstrates a compact and simple dragon design. Also, the pose of the dragon in this drawing will look different, because the dragon in this guide is demonstrated in flight.
To draw an easy dragon, start by sketching two overlapping ovals, one for the head and a larger one for the body. Draw an oval eye and a jagged line for the mouth. Add two small, pointed spikes on the top of the head for horns. Sketch a compact, curved wing extending from the back, using smooth lines for simplicity.
Draw a small, curved forelimb and a hind limb beneath the body. Add a curved tail extending from the back, tapering to a point. Refine the overall shape by erasing unnecessary guidelines and smoothing the outlines. Finally, color the dragon using light shades like green.
Advanced Dragon Drawing Tutorial
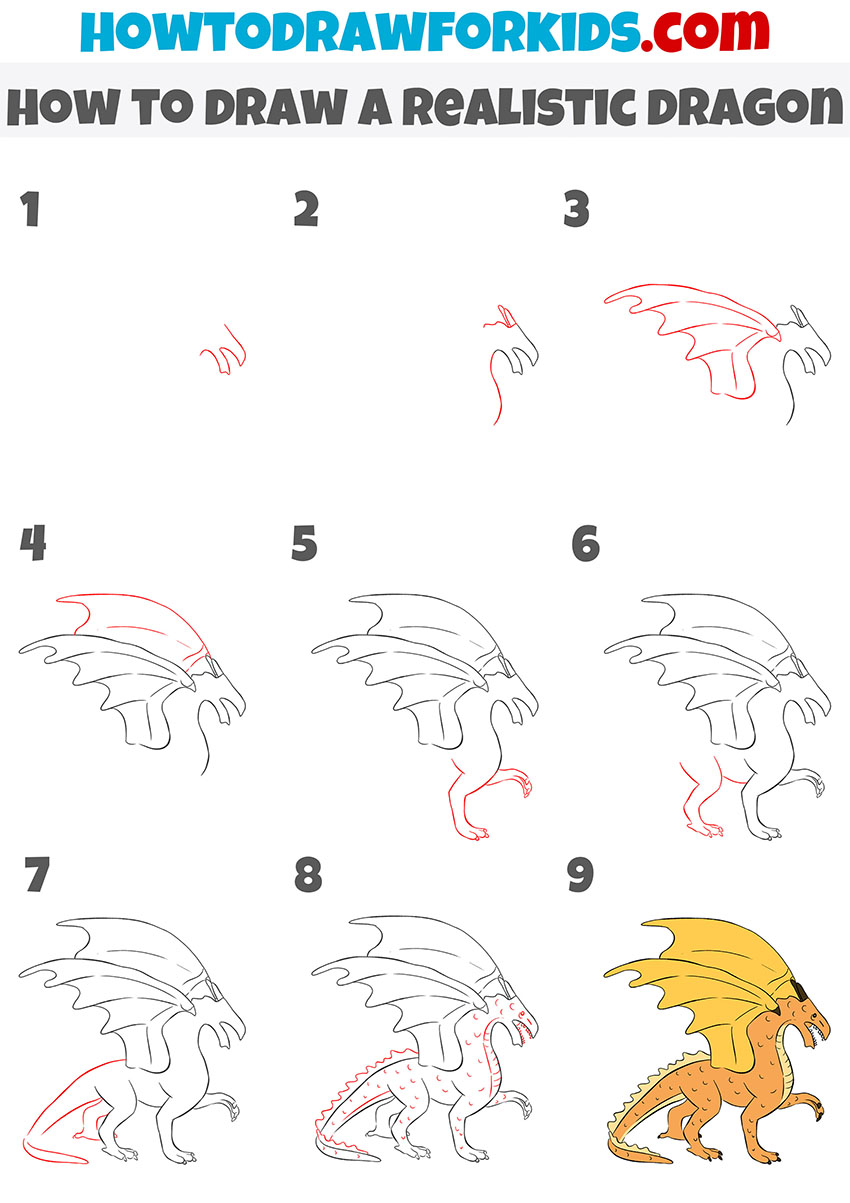
It’s time to work harder! That is, this method is a more advanced drawing technique. Furthermore, it introduces additional elements such as wing membranes, detailed claws, and a contoured body, creating a more realistic drawing compared to the basic form of other methods.
To draw a more realistic dragon, begin with the head, sketching sharp facial features and adding pointed horns. Extend the neck downward and outline the body. Draw large, bat-like wings with defined curves and visible segments, connecting them to the back.
Add long limbs with claws, paying attention to the joints and positioning to maintain realism. Sketch a curved tail with a tapering end and add spikes along its length. Refine the body by adding details like scales and folds in the skin. Include a segmented belly and distinct texturing on the wings. Complete the drawing by erasing unnecessary lines and detailing outlines. Color the dragon using desired tones, such as brown or yellow.
Angry Dragon Drawing Tutorial
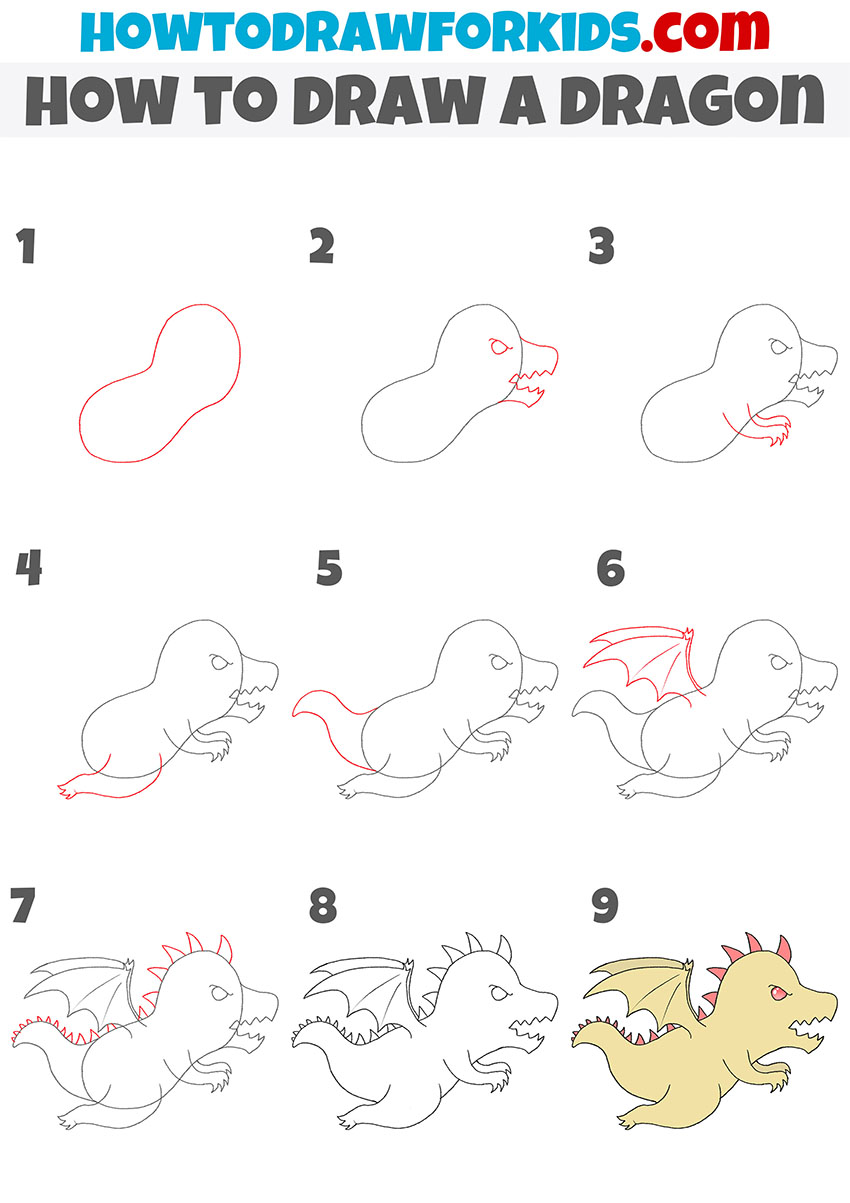
This tutorial on how to draw a dragon stands out with its emphasis on creating a fierce-looking dragon in motion. It includes detailed steps for shaping the body, defining the head with a snout and teeth, adding limbs with claws, textured wings, and finishing with sharp spikes along the back for a fierce look. Realistic, but easy, right?
To draw this angry dragon, begin with a bean-shaped outline to form the head and body. Add a pointed snout and a jagged line for the open mouth, sketching sharp triangular teeth. Draw a single oval for the eye with a slight curve to give it an angry expression. Outline small forelimbs with visible claws and add a curved hind leg positioned as though the dragon is mid-motion.
Sketch a long tail extending from the body with a pointed tip. Add large bat-like wings on the back, ensuring the structure has sharp edges and curves. Draw small triangular spikes along the back and tail for additional detail. Refine the overall outline, erase unnecessary lines, and color the dragon with tones like beige and red accents for the spikes.
How to Draw a Detailed Dragon at Flight
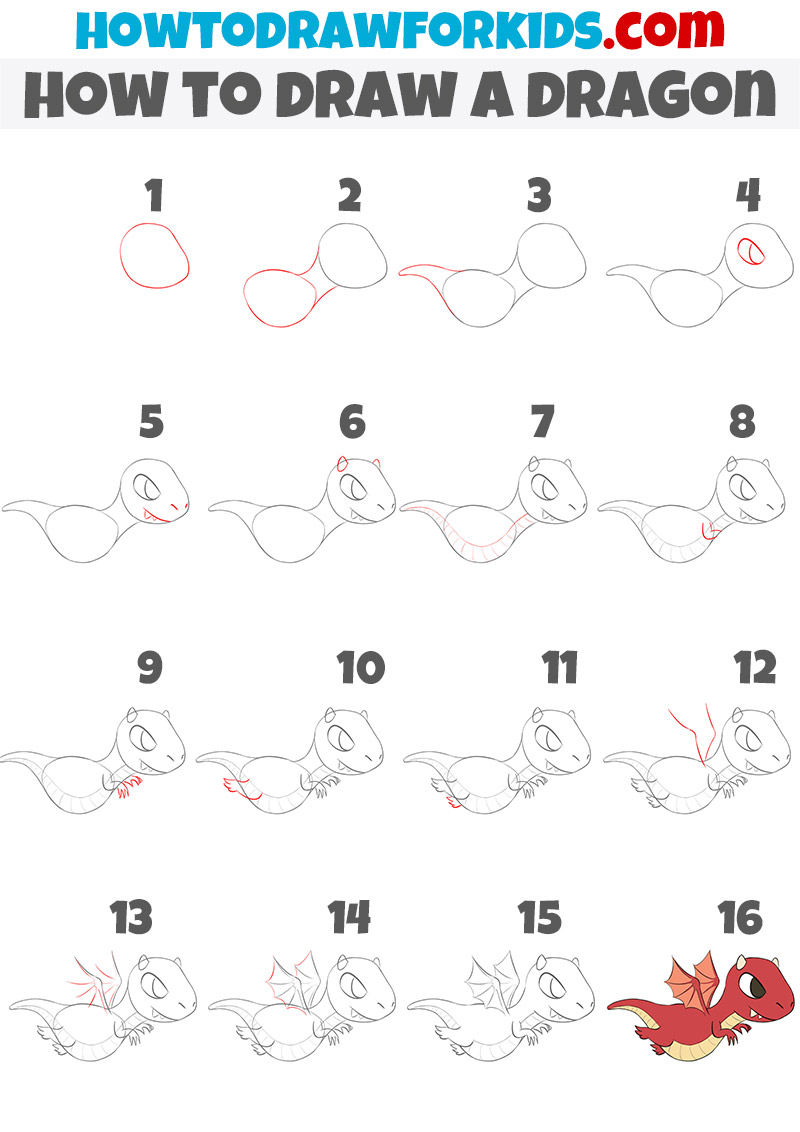
Let’s try again to draw a dragon a little more complicated (although you know that all my lessons are very easy to follow). This tutorial on how to draw a dragon focuses on creating a flying dragon. It stands out from the first tutorial by illustrating motion and adding detailed features like segmented underbelly scales and wing structures. The overall design is more aerodynamic.
To draw this dragon, start by sketching a small oval for the head and a larger oval for the body, connecting them with smooth lines to form the neck. Extend the tail into a curved shape for fluid motion. Add a large, almond-shaped eye and outline the mouth with small triangular teeth. Sketch two short horns on top of the head. Detail the dragon’s underbelly with curved horizontal lines along the body and tail.
Draw small limbs with slightly curved claws. Add long, pointed wings by sketching thin lines for the structure and filling them with curved lines to indicate wing membranes. Refine the body and erase unnecessary guidelines. Finally, color the dragon using vibrant shades, such as red for the body and lighter tones for the belly.
How to Draw a Dragon on Four Legs
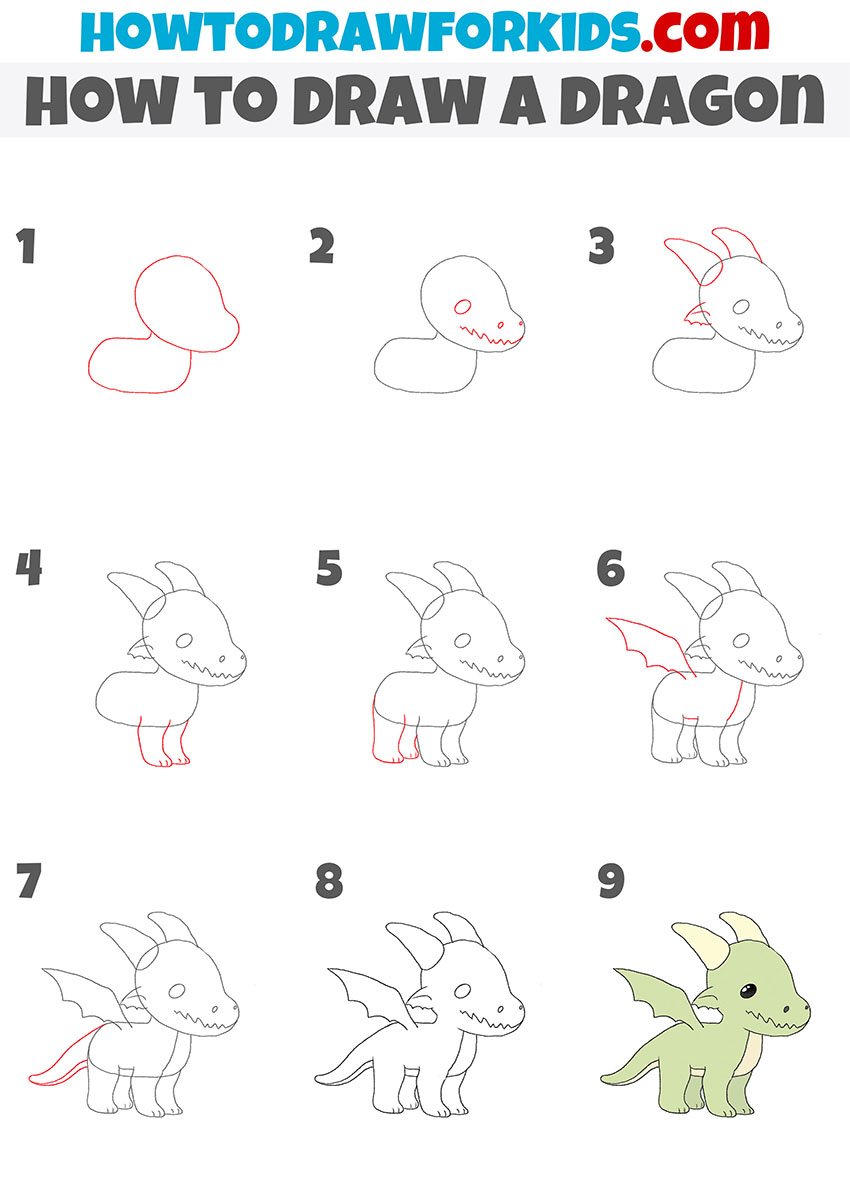
This tutorial on how to draw a dragon demonstrates a standing pose with simplified features, including larger horns and a smaller, compact body. Unlike the first tutorial, which focuses on a more traditional dragon with a balanced appearance, this guide highlights a cute, simplified design with minimal details.
To draw this dragon, start by sketching two overlapping ovals, one for the head and another for the body, connected with smooth lines. Add a small oval for the eye and a jagged line to form the dragon’s smiling mouth. Draw two large curved horns on top of the head. Sketch small triangular spikes to represent the ear. Add short front legs and larger hind legs beneath the body.
Draw a thin, curved tail extending from the back. Add a small wing by sketching a triangular structure with curved edges for the membrane. Refine the overall outline by erasing unnecessary guidelines and smoothing the lines. Finally, color the dragon using soft shades like green, with lighter tones for the belly and horns, completing this simple dragon drawing.
Conclusion
The drawing tutorials showcased here offer a range of techniques that demonstrate you how to draw a dragon, from simple and cartoonish to more detailed and realistic styles.
For those interested in training their drawing skills further, there are additional tutorials available on my website. For example, you can learn how to draw a dog with my collection of simple tutorials, or create a series of cat drawings in a really simple way.
I also invite you to follow me on social media for more updates, tips, and inspiration. On my YouTube channel you will find video versions of my tutorials, and on my Pinterest account you will find different announcements and interesting illustrations.

