How to Draw a Paintbrush
Join me as we delve into the art of sketching an artist’s tool with my easy tutorial on how to draw a paintbrush. We’ll start with basic shapes and then add details, ensuring that each part from the handle to the bristles is drawn with care and precision. This key lesson is your pathway to capturing the magic of art in its very creation.
How to Draw a Paintbrush: Basic Information
Welcome to a splash of creativity! I’m here to guide you through the simple strokes of how to draw a paintbrush, an artist‘s primary tool. This lesson unfolds an easy, step-by-step process to capture the essence of a paintbrush, transforming simple lines and shapes into an instrument of imagination on your page.
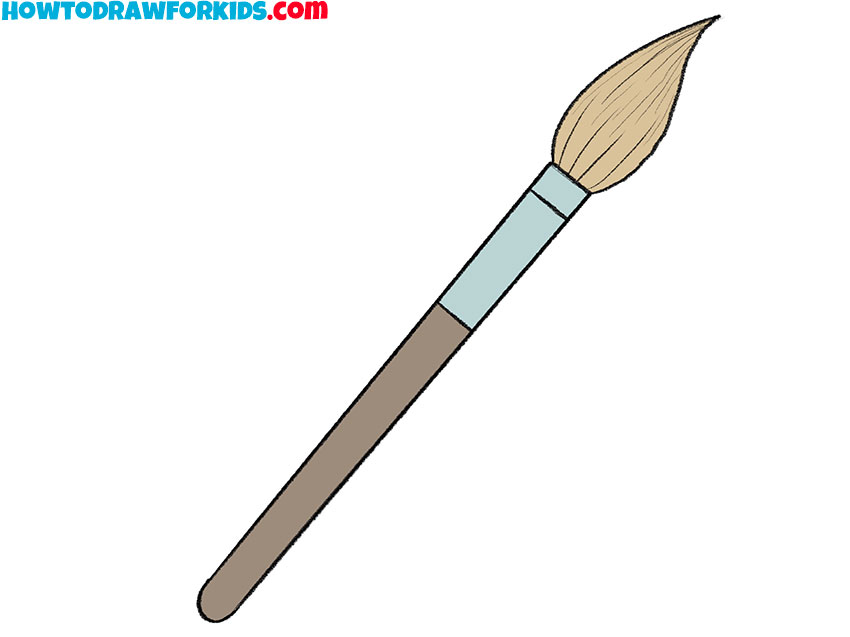
Observing this paintbrush, its features are distinct yet straightforward to replicate. We begin with a slender handle and add the metal ferrule that cradles the bristles – details that are small but significant in bringing our paintbrush to life. Every line we draw is a tribute to the tools that allow us to color our world.
By the end of this tutorial, to draw a paintbrush will be as easy as dipping it in paint. The method I’ve tailored for you pays homage to the beauty of simplicity, encouraging confidence in each budding artist. With a few graceful strokes, you’ll soon have a realistic paintbrush ready to be dipped in a palette of your wildest dreams.
Paintbrush Drawing Tutorial
Materials
- Pencil
- Paper
- Eraser
- Coloring supplies
Time needed: 25 minutes
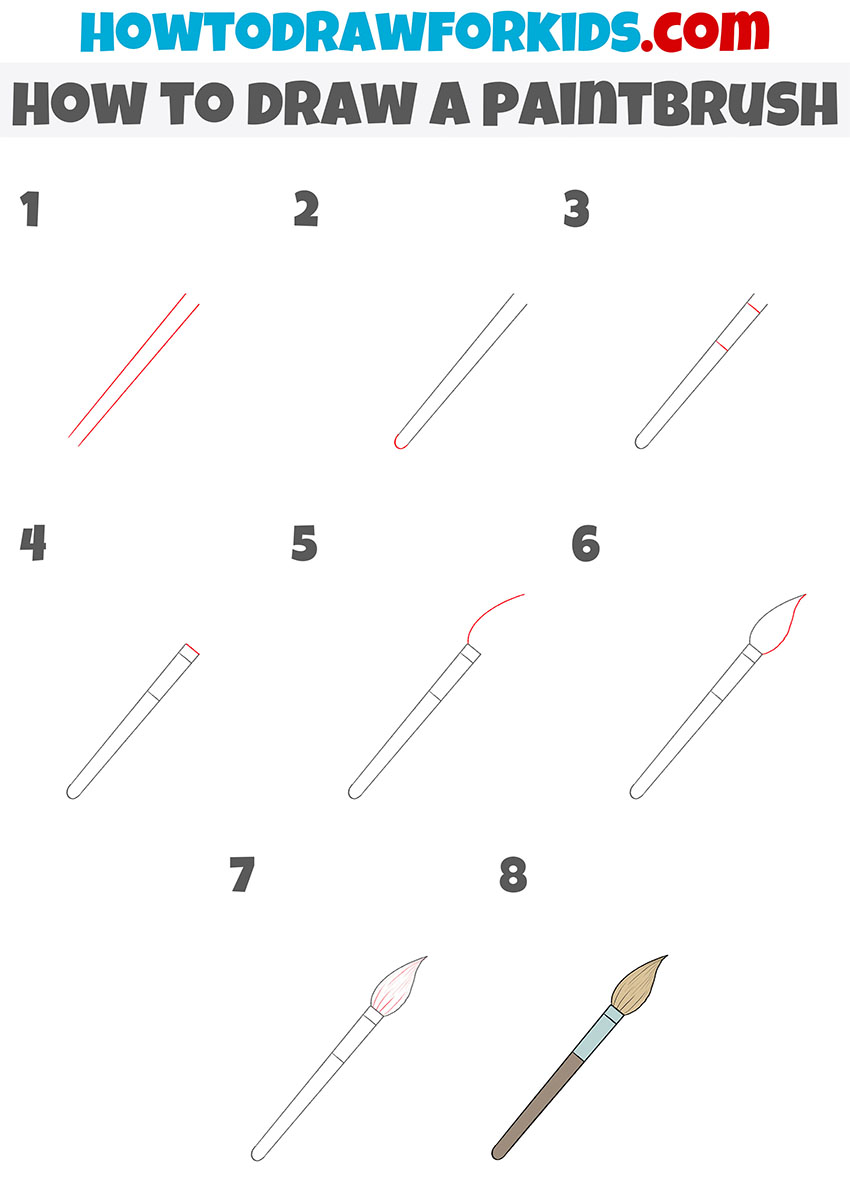
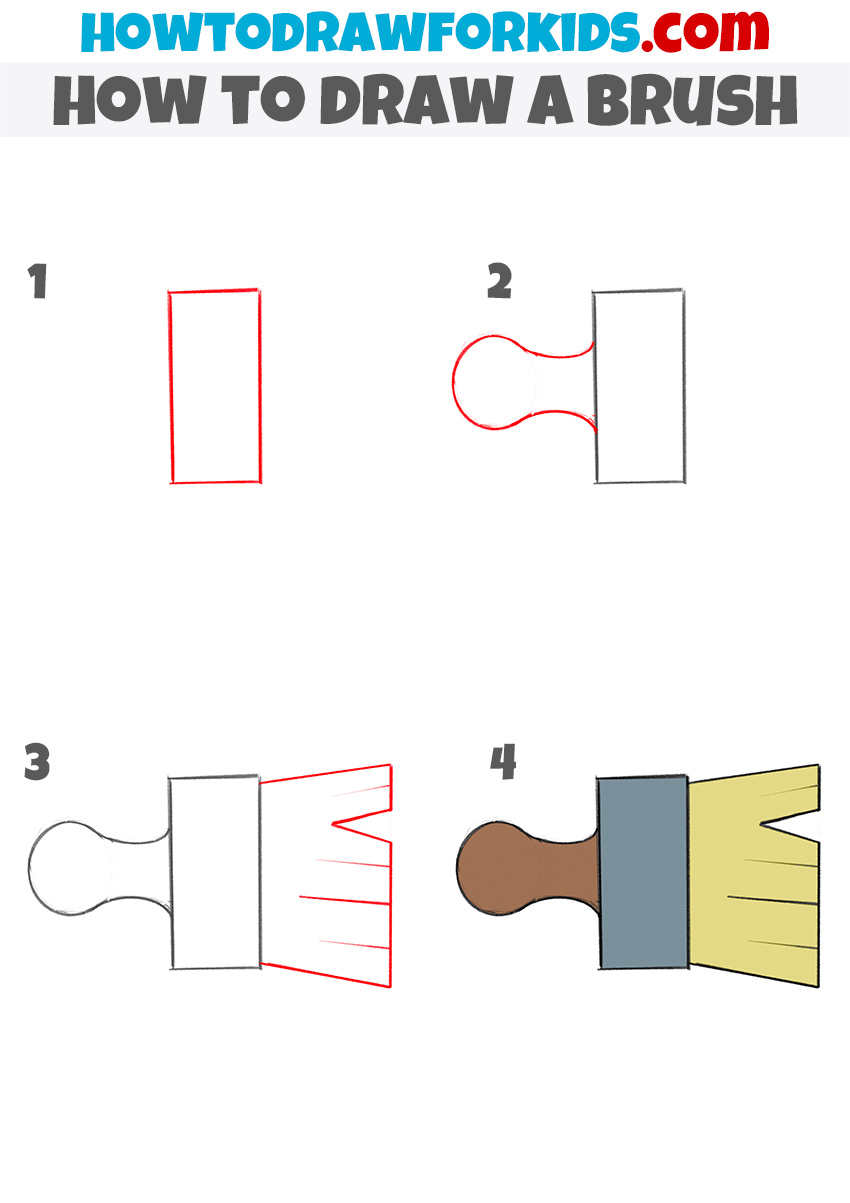
How to Draw a Paintbrush
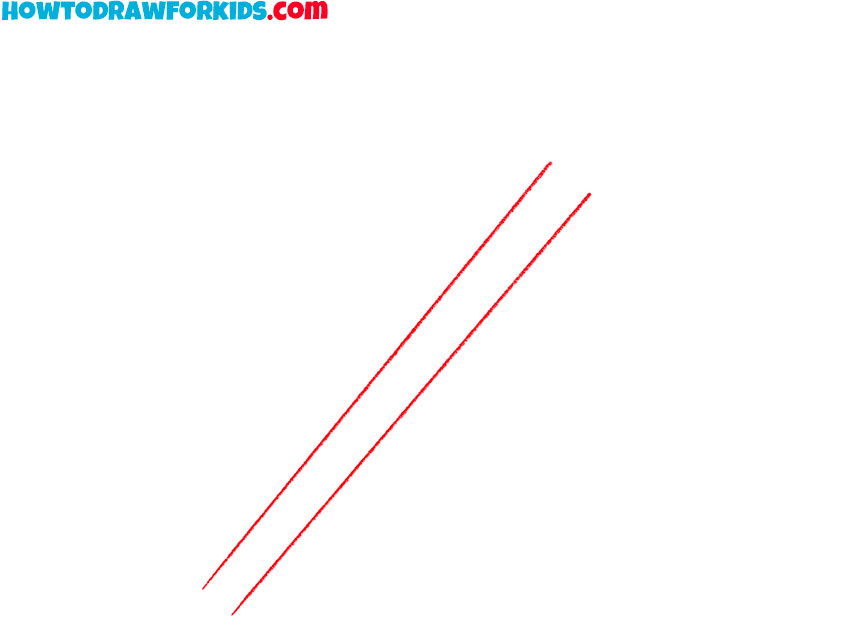
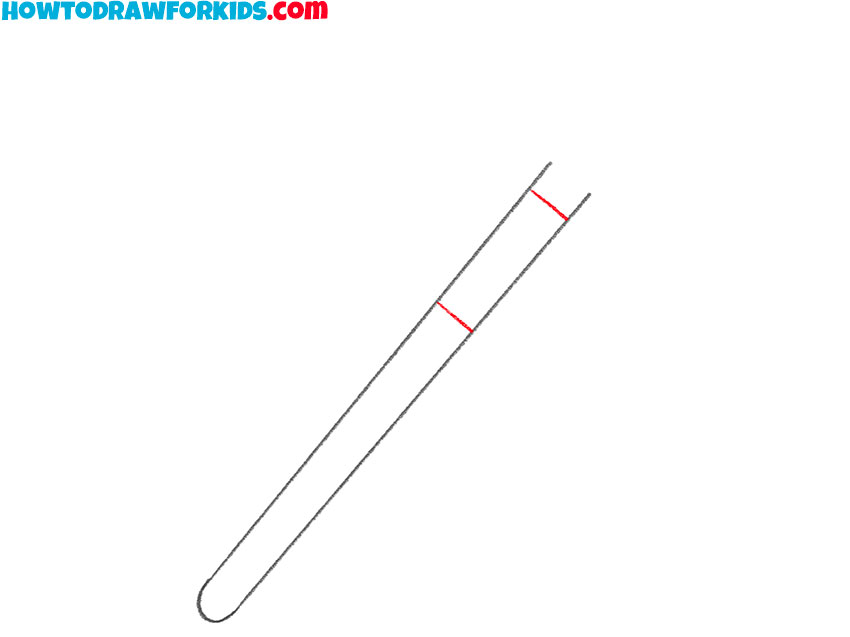
- Draw the brush handle.
Determine the size of the brush and draw two straight lines.
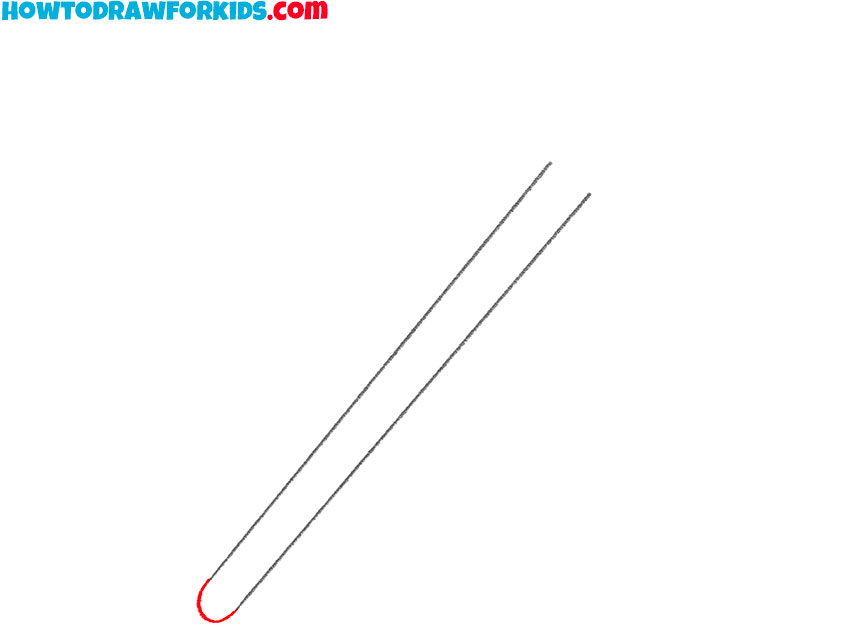
- Depict the end of the brush.
At one end, draw a small rounded connecting line.
- Sketch out the metal rim.
At the top of the brush, draw two transverse lines.
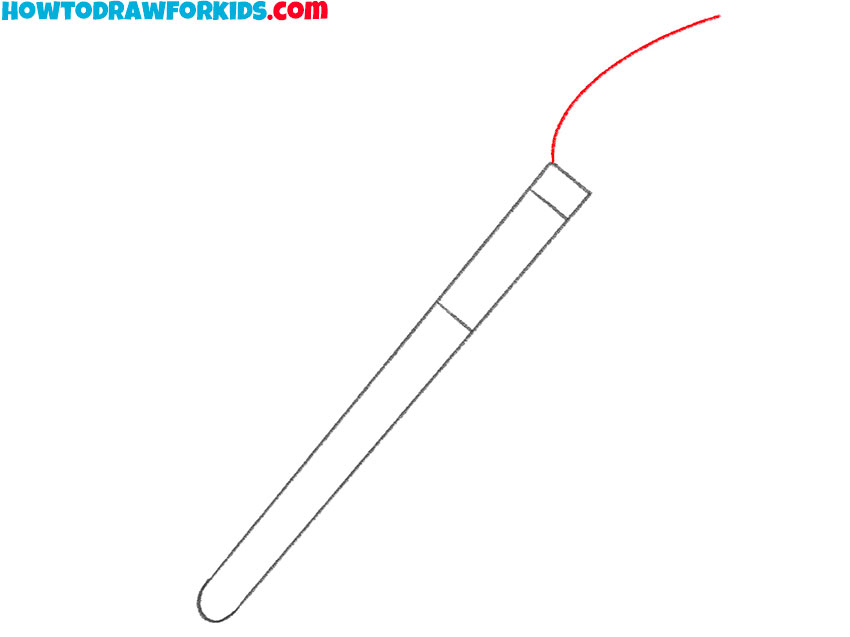
- Add the end of the metal rim.
Draw another cross line at the top.

- Start drawing bristles.
Depict a smooth rounded line at the top of the brush.
- Depict the second side of the bristles.
Draw the same line on the other side to get a sharp end.

- Detail the stubble.
Draw a few thin lines to depict individual hairs in the bristles.

- Color the paintbrush.
Choose beige for the bristles, blue for the metal rim, and brown for the handle.
Additional Content
For my eager learners looking to refine their skills beyond our session, I’ve crafted a special PDF companion for this paintbrush lesson. It’s a succinct guide that you can download and delve into, no Wi-Fi necessary, perfect for those inspired moments in the quiet corners away from screens.
This PDF isn’t just a repeat of what we’ve covered; it’s a treasure trove of extra materials meant to sharpen those newly learned techniques. After mastering the initial lesson, these additional exercises will encourage you to explore depth, texture, and shading – further enriching your drawing abilities.
Think of this PDF as a personal art coach, available at the click of a button, offering guidance and practice tasks that build on the foundational skills we’ve started. It’s an invitation to deepen your artistic understanding and add layers of sophistication to your sketches, transforming simple lines into striking artwork.
Alternative Drawing Technique
In the spirit of artistic growth, I’ve also formulated an alternate technique for drawing a paintbrush, perfect for those seeking simplicity in their practice. This streamlined method strips down the process to its core, enabling a focus on the fundamentals and cultivating a solid base for budding artists.
With this new approach, I aim to provide a foundation that strengthens your drawing abilities. It’s a less is more strategy, where with fewer lines and curves, you’ll train your hand to create confident, deliberate strokes. This method isn’t just about ease but about embedding the essence of the paintbrush in your muscle memory.
This pared-down technique is a stepping stone towards more intricate artwork. By mastering this simplified version of the paintbrush, you’ll build a skill set that prepares you for any artistic challenge. It’s an encouragement to keep your practice light and enjoyable while steadily enhancing your capacity for more complex creations.
How to Draw a Paintbrush for Kindergarten
And now we approach the segment that’s a hit with the kindergarten crowd. Our alternative method simplifies each stroke, ensuring the young artists can follow along with confidence. We start with a simple rectangle for the brush’s handle, guiding our pencil straight down like a slide in the playground, easy and fun.
Above this foundation, we’ll draw the handle’s grip with a whimsical flourish, an oval shape that feels like drawing a cloud in the sky. This part of the brush, where tiny hands will pretend to hold, is drawn with gentle curves that are soothing for small fingers to mimic.
To cap off our creation, we add the bristles, a few straight lines cascading down from the handle, much like the tassels on a bookmark. This uncomplicated approach invites even the most hesitant little drawer into the enchanting world of art, leaving them with a charming, colorful paintbrush that’s a breeze to bring to life.
Profound Tips for Drawing a Paintbrush
Our artistic journey doesn’t stop at the last stroke of our paintbrush drawing; it’s only the beginning. Deep covering refers to looking beyond the surface of our sketches, understanding the why and how. Let’s delve into some crucial points to enhance our newfound skills.
- Proportion Precision: Ensure the handle and the bristles are in correct proportion to each other, essential for the paintbrush to appear realistic.
- Line Confidence: Practice drawing with a confident hand, creating clean, unwavering lines for both the handle and the bristles.
- Balance and Symmetry: Pay close attention to the balance of your drawing; the bristles should symmetrically align with the handle for visual harmony.
- Coloring Discipline: Encourage precision in coloring, staying within the outlines to foster an early appreciation for detail.
- Textural Exploration: Experiment by adding texture to the handle with various pencil strokes to mimic wood grain or the sheen of plastic.
- Bristle Definition: Teach the importance of individual bristle lines, which can add a realistic look and feel to the paintbrush.
- Understanding Shadows: Introduce simple concepts of shadow and highlight to give your paintbrush depth, making it pop off the page. For a better understanding, read my article on light and shadow in fine art.
To conclude, this deep dive into drawing techniques is not just about enhancing this individual paintbrush drawing. It’s about enriching your overall skill set and nurturing a meticulous eye for detail that will serve you in all artistic pursuits. Keep exploring these elements, and watch as every new drawing becomes a more vivid expression of your growing talents.
Conclusion
Our artistic journey doesn’t end with mastering the strokes of a paintbrush. The canvas of learning stretches far beyond, filled with lessons on drawing everything from winding roads to the adorable Pusheen. Each tutorial on my website is a new adventure, waiting to be explored with a pencil and imagination.
To ensure you’re always equipped for our next creative expedition, follow my social media channels. There, the latest masterpieces and tutorials await your discovery. And your thoughts? Leave a comment below with your wishes or curious inquiries for future tutorials. Together, we’ll sketch a world where creativity knows no bounds.