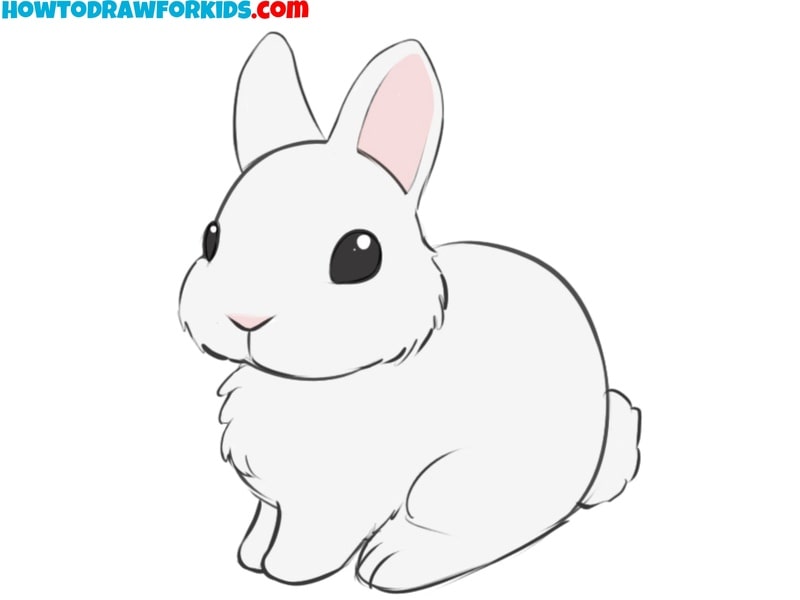
How to Draw a Bunny
Looking to sketch the cutest bunny? My step-by-step guide features five unique methods, designed for children to learn how to draw a bunny with ease. Each method brings its own flair, ensuring a rewarding and educational experience for budding artists.
How to Draw a Bunny: Basic Information
This lesson is likely to resonate with many, as it focuses on how to draw a bunny, and I can’t think of anyone who doesn’t adore these charming animals.
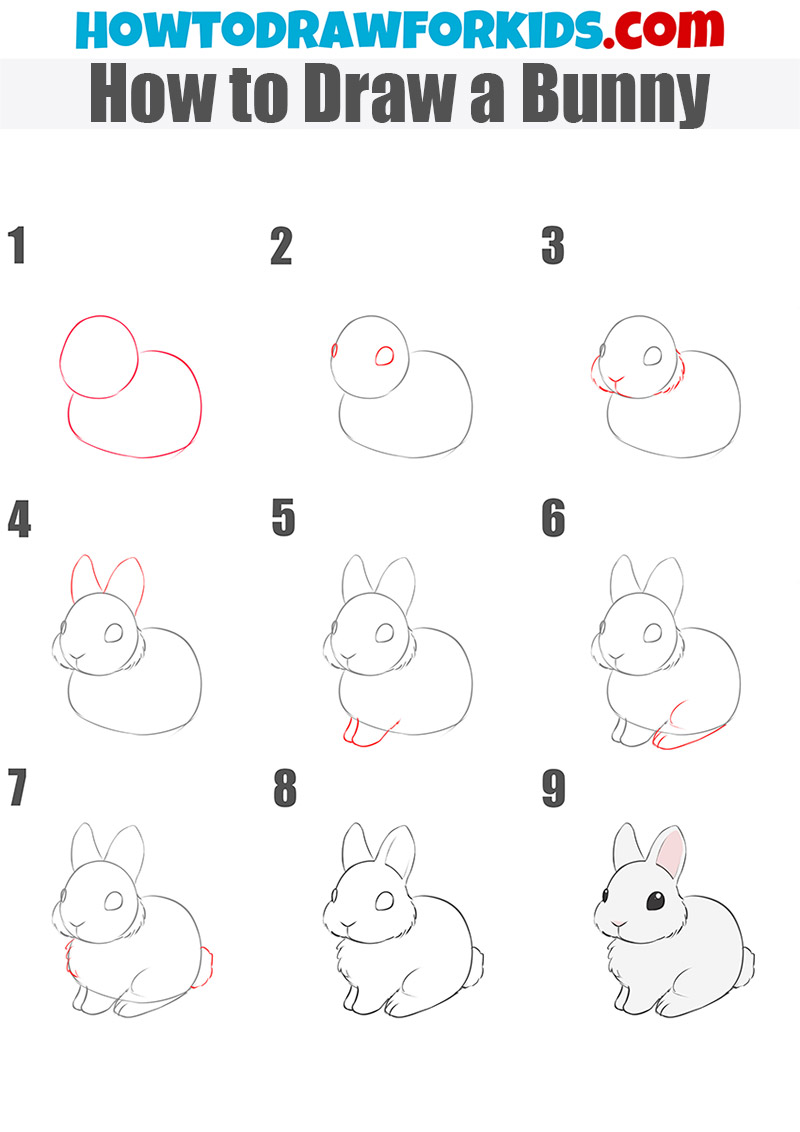
To guide you in drawing a bunny, I will start with a basic lesson broken down into nine easy steps. After that, I will present four additional instructions to help you learn new variations of bunny drawings and reinforce the skills you’ve learned.
Each lesson is distinct, with its own specific features. They vary in complexity, the inclusion of certain details, and the final drawing.
Although simplified in this tutorial, drawing a bunny introduces basic animal anatomy concepts, such as the structure of the limbs and how the body connects to the head. Understanding these basics is really important for anyone interested in drawing animals or even human figures, as it teaches how different body parts interact.
Bunny Drawing Tutorial
Materials
- Pencil
- Paper
- Eraser
- Coloring supplies
Time needed: 20 minutes
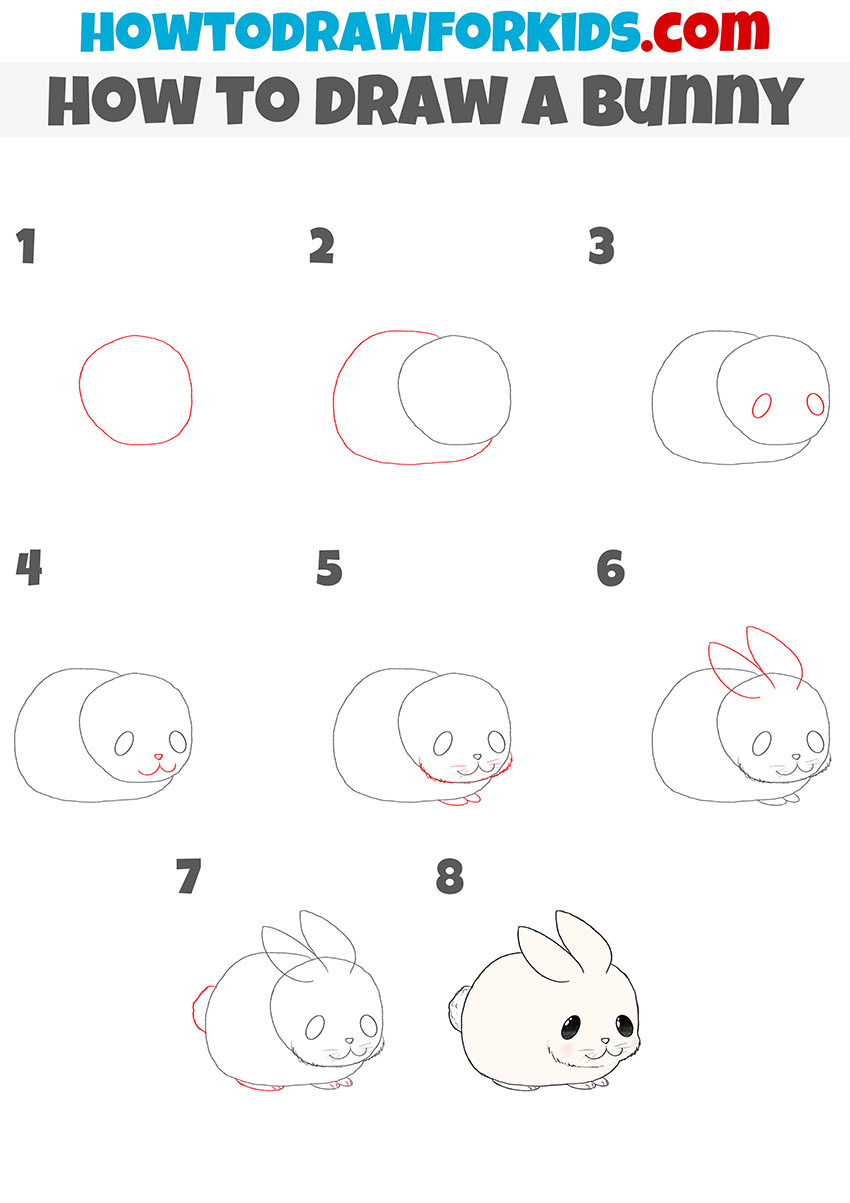
How to Draw a Bunny Step-by-Step
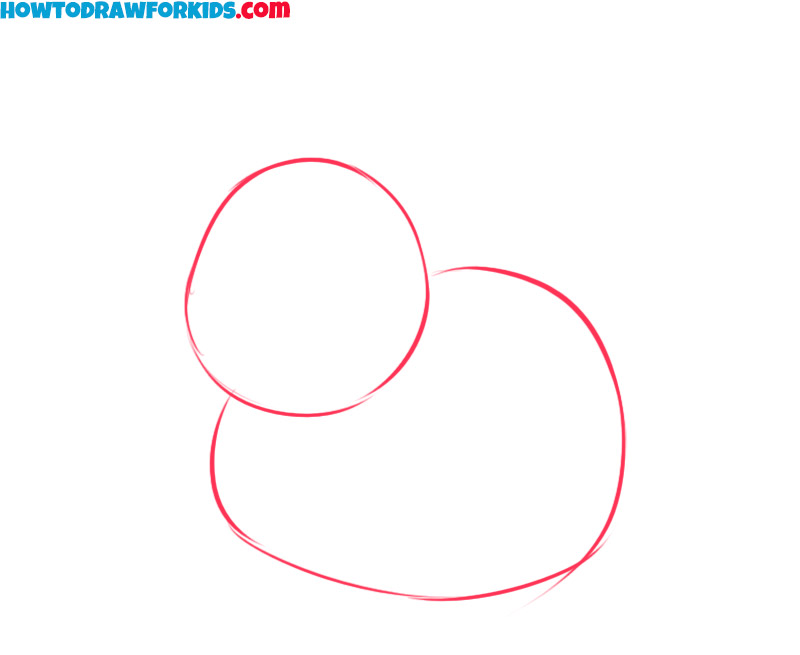
- Sketch the head and the torso of the bunny.
Start by drawing two overlapping ovals, one for the head and the other for the body. Position the smaller oval slightly to the left of the larger one, ensuring they intersect at the head’s lower right side. These ovals act as guides, helping to shape the overall form and ensuring proportionality in later stages.
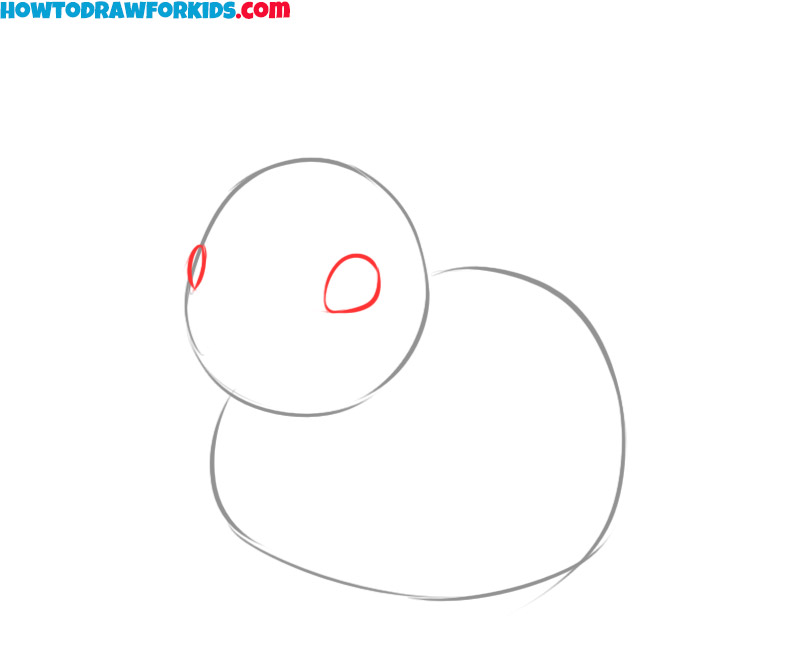
- Sketch the eyes of the bunny.
Add the bunny’s eyes by sketching two small, rounded circles on the smaller oval, spaced evenly to the left and right of the vertical centerline. The eyes should be positioned at roughly the middle of the head. The position of the eyes should convey the general position of the bunny’s head.
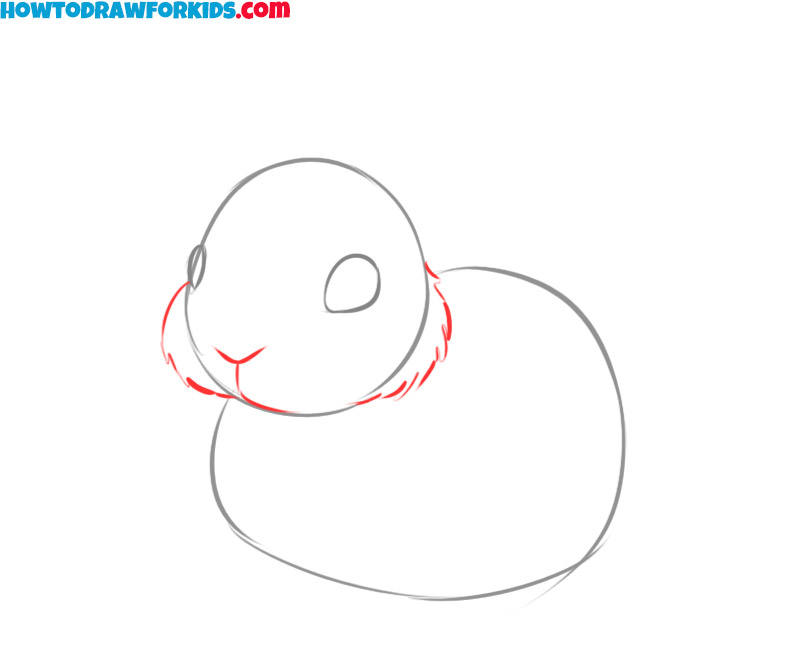
- Sketch the bunny cheeks.
Draw a tiny triangular nose at the bottom of the smaller oval. Illustrate the bunny’s mouth by extending two short, curved lines from the bottom of its nose, splitting downwards and to the left and right. Enhance the bunny’s cheeks by sketching soft, rounded lines from the nose down to the body’s oval.
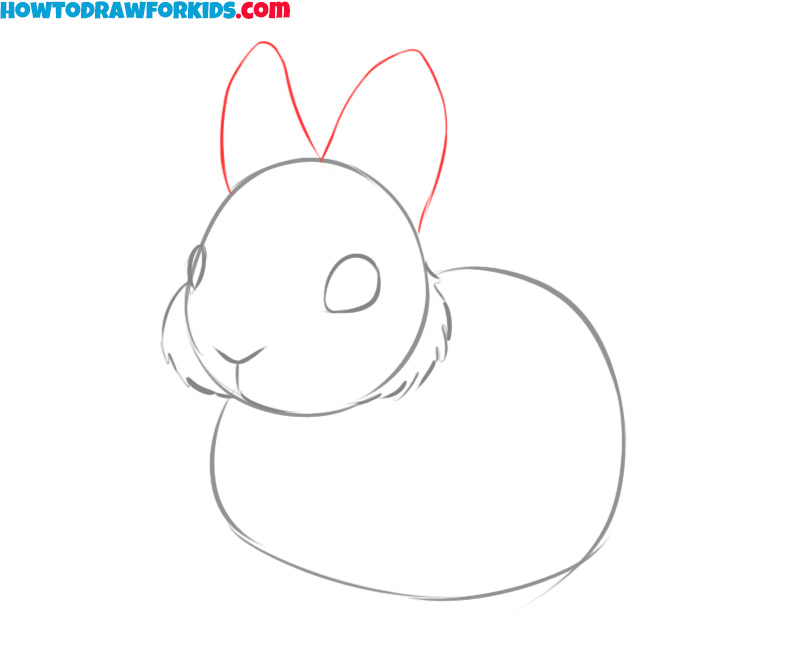
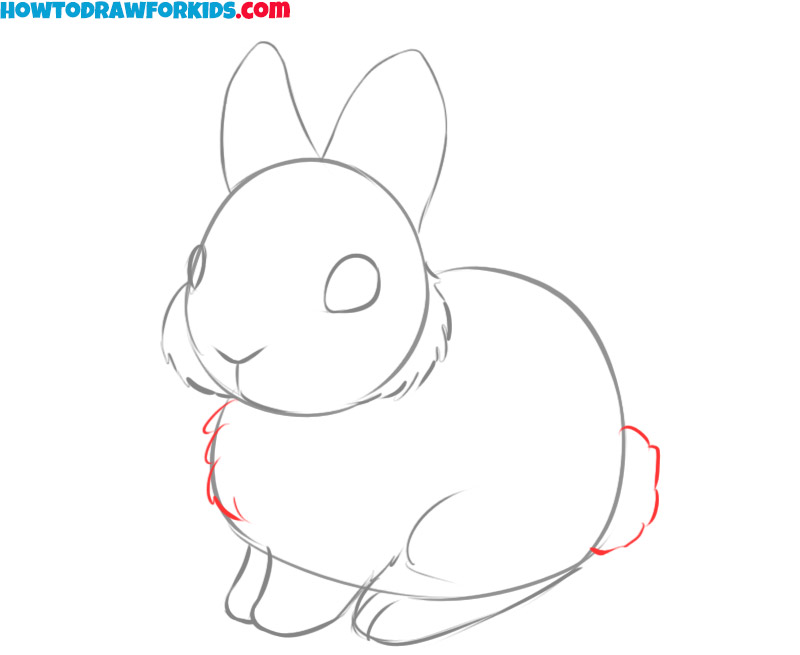
- Draw bunny ears.
Sketch two elongated, slightly pointed ovals for the bunny’s ears, emerging from the top of its head. The ovals should angle slightly outward and be positioned symmetrically, with one to the left and one to the right. The ear outlines should be somewhat rounded and soft, giving a gentle appearance.
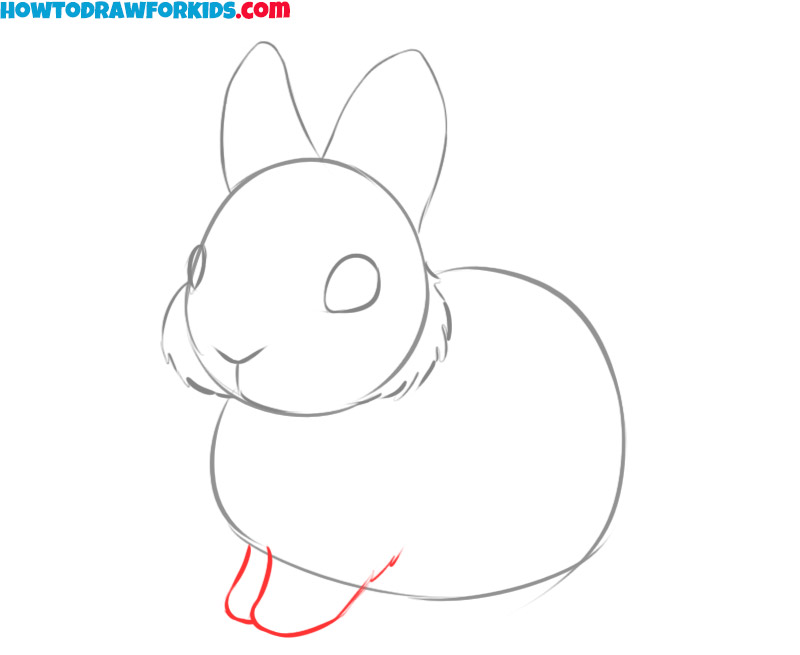
- Illustrate the front legs.
Sketch two small, elongated ovals extending down from its lower body, slightly to the left and right of its midline. Position these legs symmetrically, curving towards the body’s outline, and include slight bends at the knees.
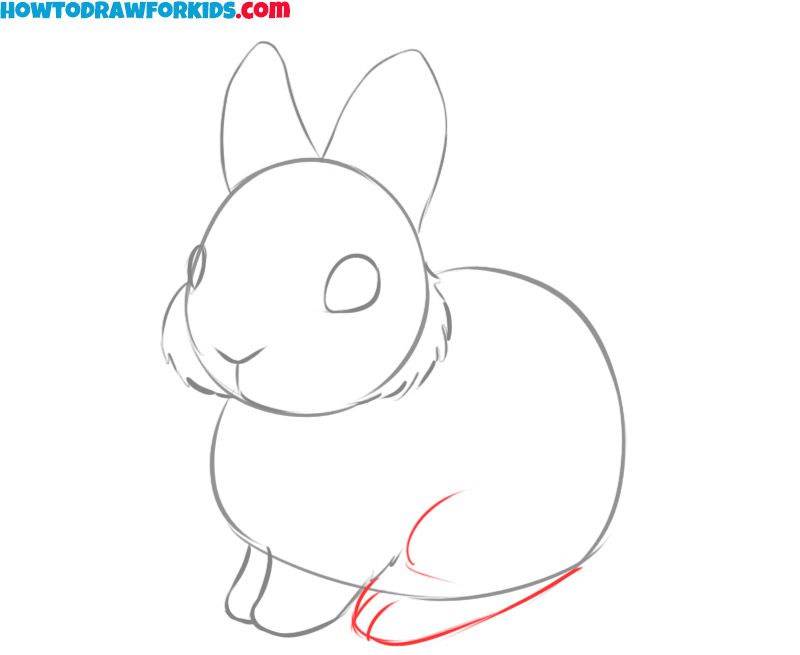
- Add the hind legs.
Add two rounded shapes on the lower body, slightly behind and below the front legs. These rounded shapes should curve downwards and then inward towards the bunny’s belly, suggesting a sitting posture. Position them symmetrically, with the lower part of the legs blending into the body’s curve.
- Illustrate the tail and chest.
Add the bunny’s tail by drawing a small, rounded shape at the back of its body, aligning it symmetrically with its lower body. Position the tail slightly upward, making it distinct from the hind legs. To add more detail and texture to the bunny, drawing fur on its chest.
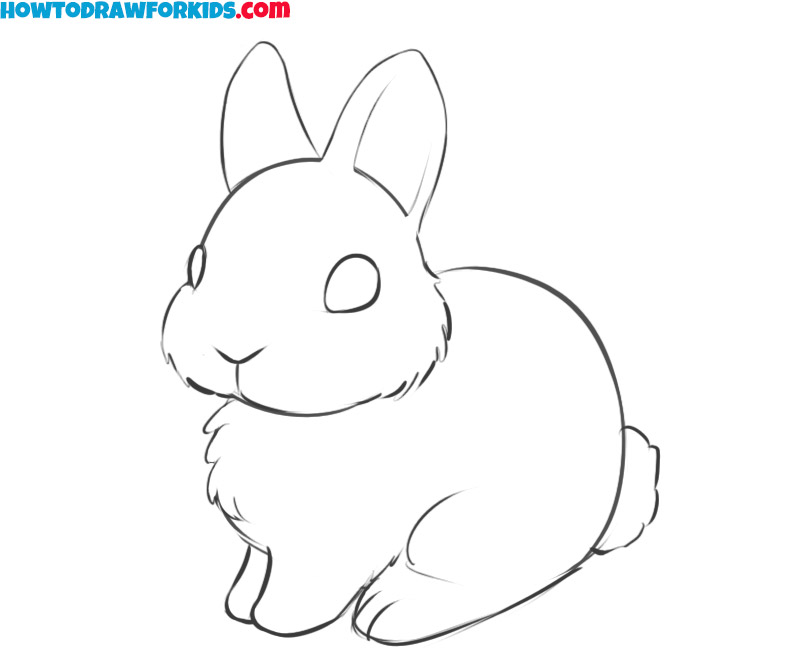
- Erase the guidelines from the artwork.
Refine the bunny drawing by tracing over the initial ovals and curved lines with smoother, more precise strokes, connecting all features seamlessly. Remove any unnecessary guidelines, creating a finished outline. This final contour should highlight the bunny’s roundness, emphasizing its natural curves.
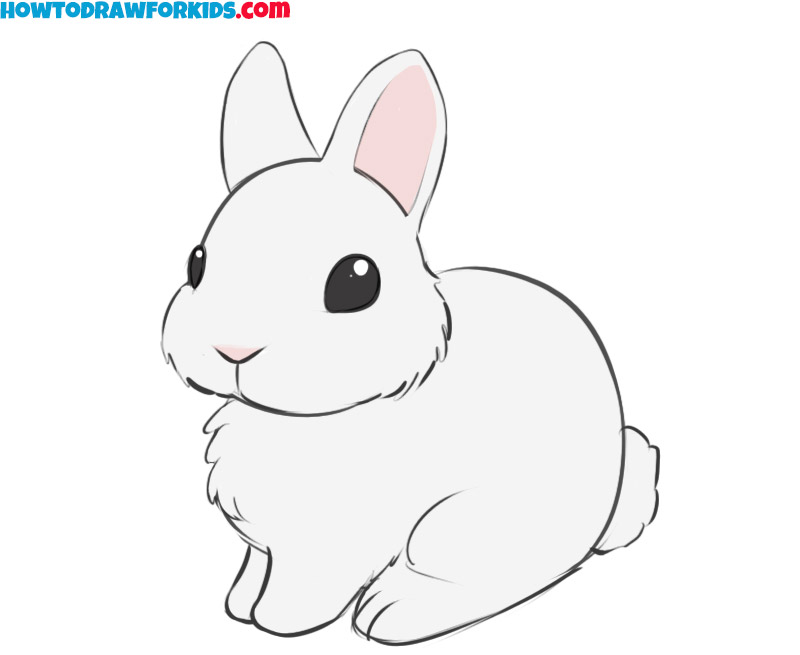
- Color the bunny drawing.
Fill in the bunny’s eyes with solid black, leaving small white dots to suggest a reflective gleam. For the body, apply a very light grey color. Alternatively, you can color the bunny’s body in varying shades of brown, with lighter patches or streaks of white to add further texture and natural variation.
Additional Content
I’ve put together a free PDF file that encapsulates a short version of this bunny drawing lesson, designed for you to easily download and use anytime, even when you’re offline. This handy guide ensures that you can continue practicing and perfecting your drawing skills wherever you are, without the need for internet connectivity.
How to Draw a Bunny: Additional Techniques
I’ve developed multiple alternative techniques for drawing a bunny to give you ample practice and help to train your skills.
Alternative Technique
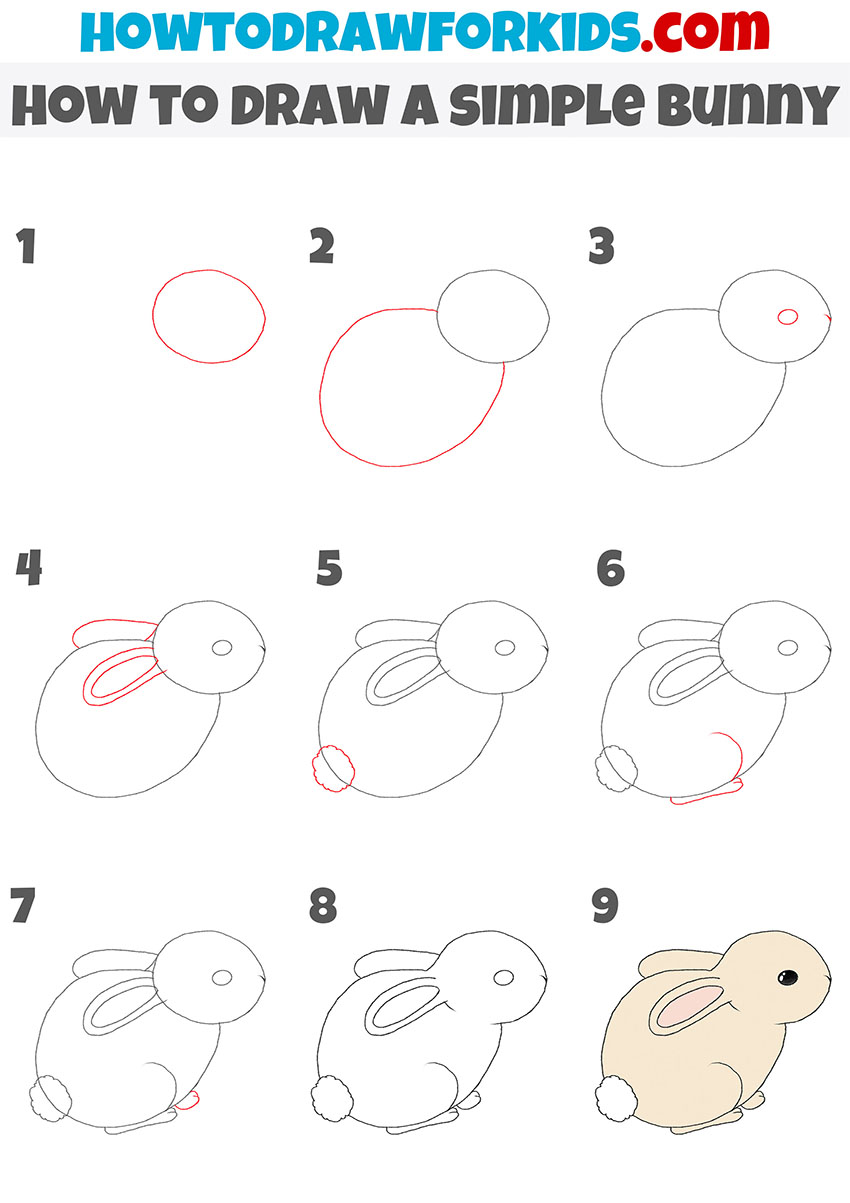
The drawing style in this tutorial is a bit simpler and more stylized compared to the previous one, offering a more cartoon-like appearance with a focus on basic shapes and minimal details. The bunny in this style is characterized by a rounded, almost spherical body and head, with small, simplified features such as large, oval eyes and minimal facial details. The overall effect is one of cuteness and softness.
To achieve this effect, focus on using smooth, flowing lines to create the bunny’s outline, emphasizing the roundness of the body and head. Keep the details minimal – only adding what is necessary to convey the bunny’s features. The use of basic shapes, like ovals for the eyes and simple curves for the ears and body, is key to maintaining the simplicity and charm of this style. The final step involves adding light shading or color to enhance the soft, gentle appearance of the bunny.
Alternative Technique 2
This tutorial differs from the previous one in that, instead of drawing the bunny’s lines directly without any preliminary steps, we start by sketching initial ovals to establish the basic shapes of the head and body. These foundational shapes help ensure that the proportions are correct from the beginning. After these ovals are in place, we gradually add the details, building up the bunny’s form step by step.
In terms of sequence, this additional tutorial is similar to the main tutorial where we also begin with basic shapes and then refine the drawing by adding details. However, despite following a similar process, this tutorial results in a very different final image, with a distinct style that emphasizes the bunny’s soft, rounded, and plush-like appearance.
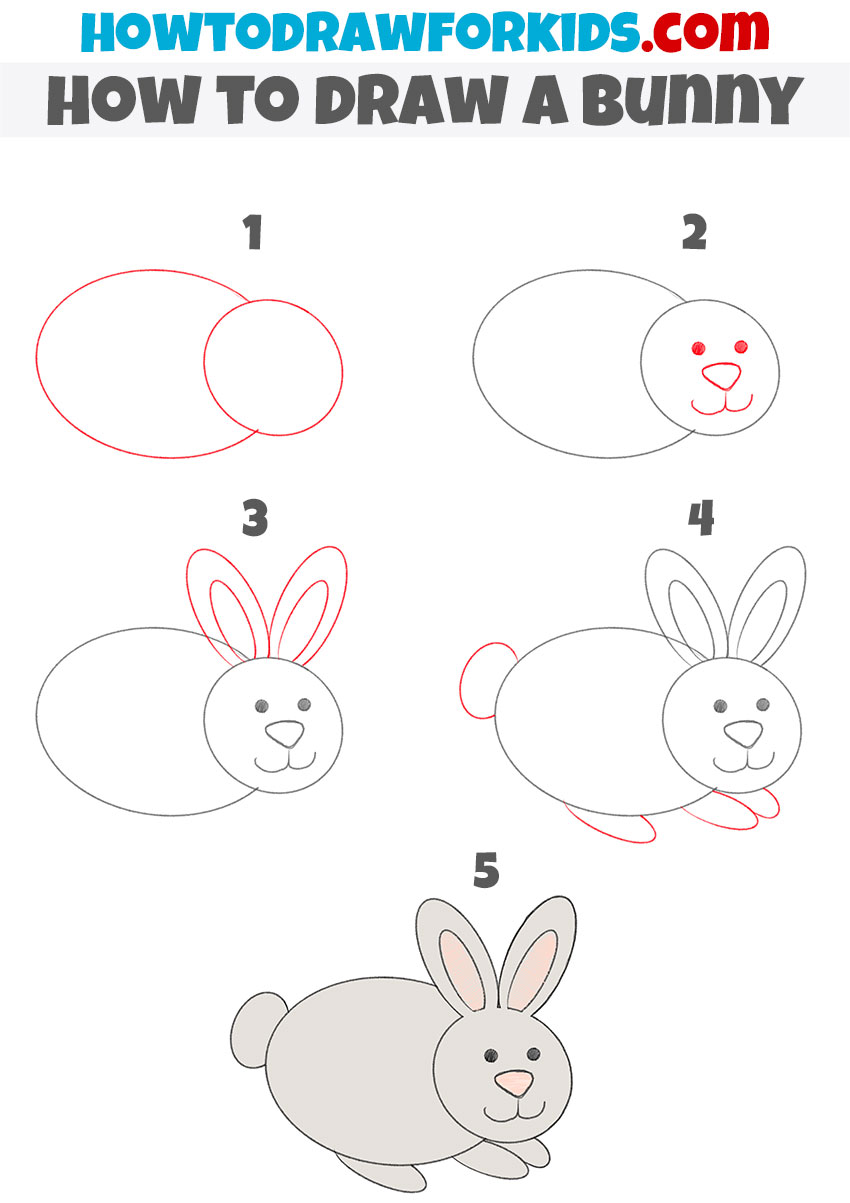
Drawing a Bunny From the Side
In this version, we approach the bunny from a different angle, adopting a more realistic shape. The head and body are crafted with attention to anatomical detail, giving the bunny a lifelike posture. The ears droop naturally, and the facial features are positioned to reflect a three-dimensional perspective.
The main difference in this tutorial compared to the previous ones is that this bunny is drawn from a side view rather than a three-quarter angle. This change in perspective requires a different approach to illustrating the bunny’s form and proportions. The side view emphasizes the overall shape and silhouette of the bunny, highlighting features like the ears, tail, and body contour more prominently.
To draw a bunny from the side, start by sketching the foundational ovals for the head and body, similar to the other tutorials. However, because the bunny is viewed from the side, the placement of these shapes is important to capturing the correct posture and balance.
The ears are drawn as overlapping shapes on top of the head, and the eye is positioned centrally on the face, with minimal visible facial features. The details are added carefully to ensure they align with the side perspective, resulting in a clean, simple, and easily recognizable bunny profile. This style is ideal for creating a cute and charming depiction of a bunny with a focus on its characteristic side silhouette.
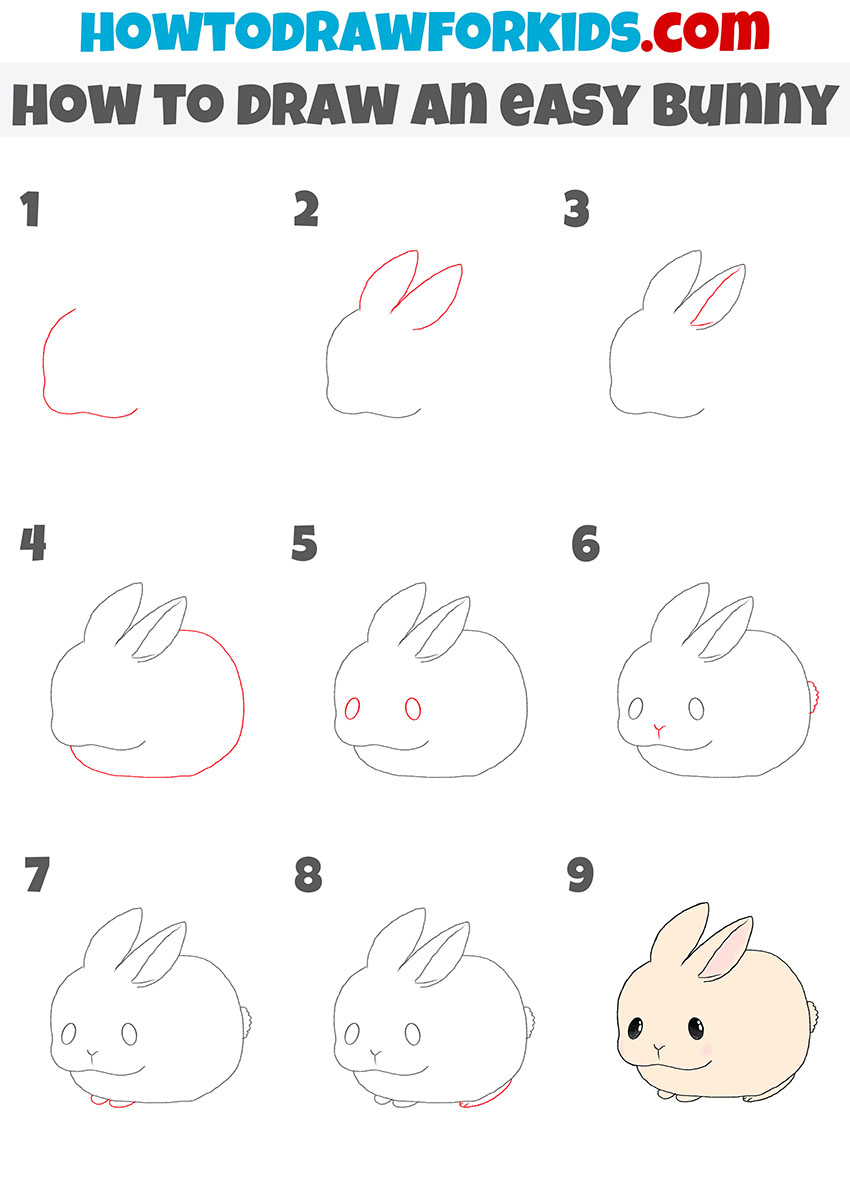
The Simplest Technique
This drawing style is the simplest technique among the ones presented so far. It focuses on basic shapes and simple lines to create a cute and easy-to-follow depiction of a bunny.
Unlike the previous tutorials, which may include more detailed forms or different perspectives, this method emphasizes the use of large, simple ovals for the body and head, with minimal details added later. The facial features are basic, with simple dots for the eyes and a triangle for the nose, making it really easy for beginners or young artists.
To draw a bunny with this method, start by sketching two overlapping ovals – one for the head and one for the body. Next, add the facial features using simple shapes. First, draw the eyes as two dots, then the triangular nose and simple mouth.
The ears and tail are also drawn using basic shapes, with no intricate detailing. The legs are represented by curved lines that are easily added to the lower part of the body. Finally, adding soft, light coloring completes the simple, friendly appearance of the bunny. This technique is ideal for those just starting out in drawing or looking for a quick, fun project.
How to Draw a Bunny: Conclusion
We’ve reached the end of our fluffy bunny drawing tutorial, and I hope you enjoyed every step of the guide! Remember, this is just one of the many exciting tutorials available on my website.
Don’t miss out on any new tutorials – be sure to follow me on social media for updates on the latest tutorials. Also, feel free to share this tutorial with your friends – you never know, you might inspire someone else to develop a passion for art.
hi
hi there
can you draw a cinnimin roll hello kitty
This was an excellent step by step drawing guide!!!
This was good
My rabbit literally looked like an avocado.
OMG!! I love you bunny so cute!!!
It was helpfull
I’m not going anywhere today
i did it in 10 min
i like that you can chose one
John Doe work I hack it