How to Draw a Cabbage
This simple tutorial shows how to draw a cabbage, a familiar vegetable that’s very easy to represent with a few smooth curves.

How to Draw a Cabbage: Introduction
In this drawing tutorial, you will learn how to draw a cabbage. I have specifically created this lesson simple enough that any child or novice artist can do it.
Cabbage is a well-known vegetable for all of us. Even though cabbage is very low in calories, it has an impressive nutrient profile. Smooth-leafed, firm-headed green cabbages are the most common. I suppose you’ve eaten this vegetable more than once and you like it.
This lesson will be very simple, almost as simple as the lesson on drawing an apple, which by the way also had a simple circle as its basis. So, now let’s begin a step-by-step drawing lesson.
Cabbage Drawing Tutorial
Materials
- Pencil
- Paper
- Eraser
- Coloring supplies
Time needed: 20 minutes
How to Draw a Cabbage
- Sketch the round cabbage base.
Cabbage is a large and complex circle, so to start, sketch a large circle that will represent the overall shape of the vegetable. This circle doesn’t need to be perfectly round, but it should look fairly even. In this step you are setting the boundary for the rest of the details.

- Draw the fold of the first cabbage leaf.
Inside the circle, draw a curved line that starts near the top and sweeps down to the bottom edge. This line creates the look of an inner cabbage leaf folding forward. The curve should have a very smooth and natural curve, so avoid sharp angles.

- Sketch the wavy outer edge.
Continue the drawing by sketching a wavy line to the right side of the circle, connecting to the inner curve you already made. This will create the folded edge of the leaf wrapping outward. The wavy line should look irregular and organic, because cabbage leaves are never perfectly smooth.

- Illustrate the left wavy fold.
Repeat the same process on the left side of the circle, sketching another wavy edge to show the opposite leaf folding outward. Pay attention to keeping the two sides symmetrical but not identical. Real cabbage leaves curve differently on each side, so some variation will make the drawing feel more natural.

- Draw the outer edge of the left leaf.
Sketch a wavy line, this time on the left. This new line represents another layer of cabbage wrapping outward. Keep the wavy edges loose and irregular to maintain the natural feel. Think of the leaves as fitting together like puzzle pieces, each one visible but still part of the whole.

- Add the central vein line.
Inside the central leaf, sketch a main vertical line running to the top edge, then branch off with several thinner curved lines spreading to the sides. These are the veins that give the cabbage its recognizable texture. Don’t draw too many, just a few branching lines are enough.

- Create a leaf edge at the top.
On the upper left side, draw a wavy contour to illustrate another outer leaf. This should overlap the circle slightly, showing that the cabbage is not perfectly round but built from layered leaves. Keep the curves uneven to imitate the natural folds.

- Draw the second top cabbage leaf shape.
Continue building the cabbage by adding one more wavy outline on the opposite side of the top. This creates another overlapping leaf. Just like the previous steps, make the edges irregular and varied, avoiding symmetry that looks artificial. The cabbage head now appears almost complete.

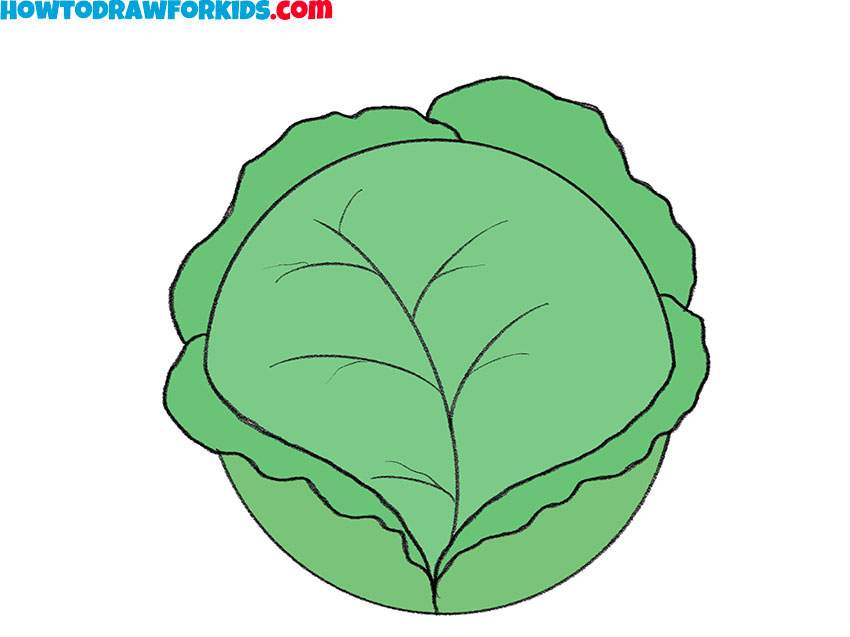
- Add green tones to the leaves.
Apply a rich green to the outer leaves and a bit lighter shade to the central inner leaf. Slightly darker tones can be added along the edges of the leaves. You can make your cabbage drawing look even more realistic by adding shadows to the bottom part.

Additional Content
This vegetable drawing lesson has come to an end. I hope this guide has helped you to improve your artistic skills. Do not forget to subscribe to us on social networks and share with your friends the lessons that you liked. As before, I have prepared a PDF file especially for you, in which you can see a short version of this tutorial.