How to Draw a Kimono
If you are here, you want to learn how to draw a kimono, and I’ll show you how to do it in just a few simple steps.
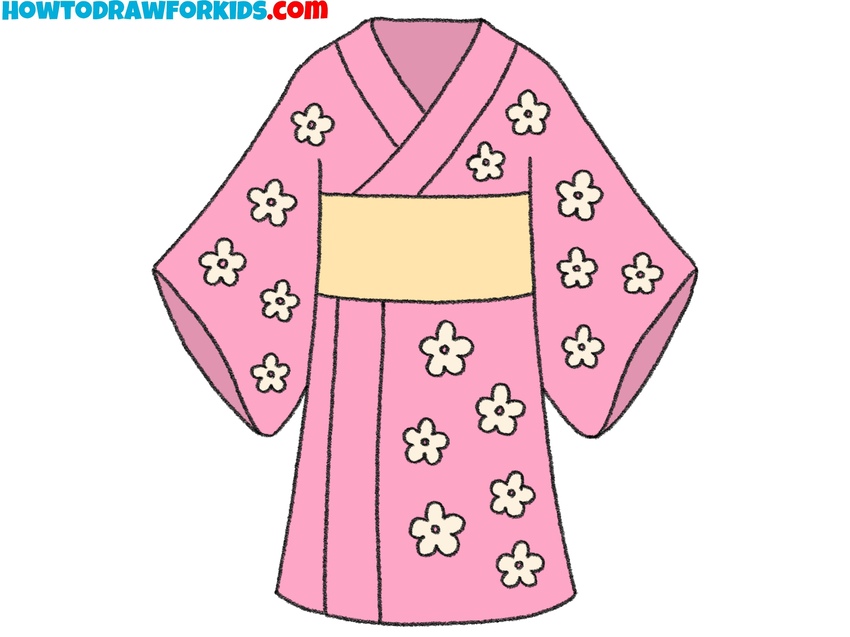

In this lesson, you will learn how to draw a kimono. This is a traditional Japanese dress that resembles a robe with very wide sleeves.
This type of clothing arose a long time ago, but over time, fashion has undergone great changes, and now in Japan, they wear completely different clothes, and kimonos are worn only during holidays and official events.
Kimono is a long garment that is fastened with a wide belt. In general, these clothes are comfortable and a person feels comfortable in such an outfit. The kimono is worn by both men and women, there is only some difference in the model.
Typically, a kimono pattern is rectangular in shape and consists of four strips of fabric, with two parts covering the body and sleeves sewn from two parts.
In the picture, you see a plain kimono with a contrasting belt. In your drawing, you can use the same colors, or you can choose any other shades at your discretion.
Materials
- Pencil
- Paper
- Eraser
- Coloring supplies
Time needed: 20 minutes
How to Draw a Kimono
- Sketch the kimono body shape.
To draw clothes, it’s better to start with its main silhouette, and the kimono is no exception. Sketch two long vertical lines that flare at the bottom. These lines represent the side edges of the creating an A-shaped structure that is typical of kimonos. Make the lines smooth and curved.

- Draw the wide kimono belt.
The kimono cannot be complete without its belt, known as the obi, which defines the waist and divides the garment into sections. Draw two horizontal lines across the center of the kimono to mark where the belt wraps around the torso. Try to make these lines parallel. In your drawing, it should look slightly wider than a normal belt, since the obi is meant to be a dominant visual element of the kimono.

- Sketch the overlapping robe edge.
To make the garment look like it is truly made of fabric, add lines to indicate folds. First, add a smoothly curved line across the bottom to represent the hem of the robe. After this, sketch a vertical line running down the front, to show where the fabric overlaps.

- Add the traditional sleeve form.
The sleeves are one of the most distinctive features of a kimono. First, draw the top edge of the kimono, defining the line of the neck. Then, from each side of the upper body, draw large, loose shapes that extend outward before curving down. They should look wide and flowing. Traditional kimonos often have sleeves almost as long as the body, while more casual ones have shorter versions, so you can adjust their size depending on the style you prefer.

- Draw the kimono neck fold.
To show how the robe is worn, add the neckline where the fabric folds across the chest. Draw two angled lines that meet in the center to form a shallow “V” shape, with one side crossing over the other. This overlap is really important, as it communicates how the kimono is wrapped.

- Sketch the openings of both sleeves.
Wide sleeves need openings to look wearable, so now sketch curved lines near the lower edges of each sleeve. These arcs demonstrate where the arm would fit through, and they make the fabric appear hollow. These lines should roughly mirror each other.

- Sketch traditional patterns.
Patterns give the kimono its authentic look, and floral motifs are the most common. Scatter small flower shapes across the fabric. Keep the flowers simple, with five rounded petals each, so they are quick to sketch and clearly readable. They don’t need to be perfectly symmetrical. If you want to experiment, you can change the decoration: try stars, waves, or geometric patterns to give a different cultural or personal look.

- Add traditional color scheme to the kimono.
The final touch is color, which brings the kimono its final look. Paint the central part and sleeves with a bright or soft tone, such as pink, red, or blue. Next, color the obi belt in a contrasting shade, for example yellow. Leave the floral patterns white or color them in lighter tones. You could also experiment with darker tones, like navy, black, or pastel shades.

Bonus: Easy Kimono Drawing Tutorial
The drawing begins with the neckline and collar, then the obi (belt) is added to shape the upper part of the garment. After that, outline the long rectangular body of the kimono.
Next, sketch the wide sleeves extending on both sides. Add more details to the collar by crossing the inner folds. Then, draw the folds and lines on the sleeves and lower part of the kimono to illustrate fabric texture.
Small details such as the overlapping layers around the collar and the creases of the sleeves make the kimono more natural. Finally, color the garment with a rich orange hue for the robe and a red accent for the obi, giving the design its traditional appearance.