How to Draw a Rose Heart
In this lesson I will demonstrate you how to draw a rose heart and a heart shaped rose using two simple and distinct methods.

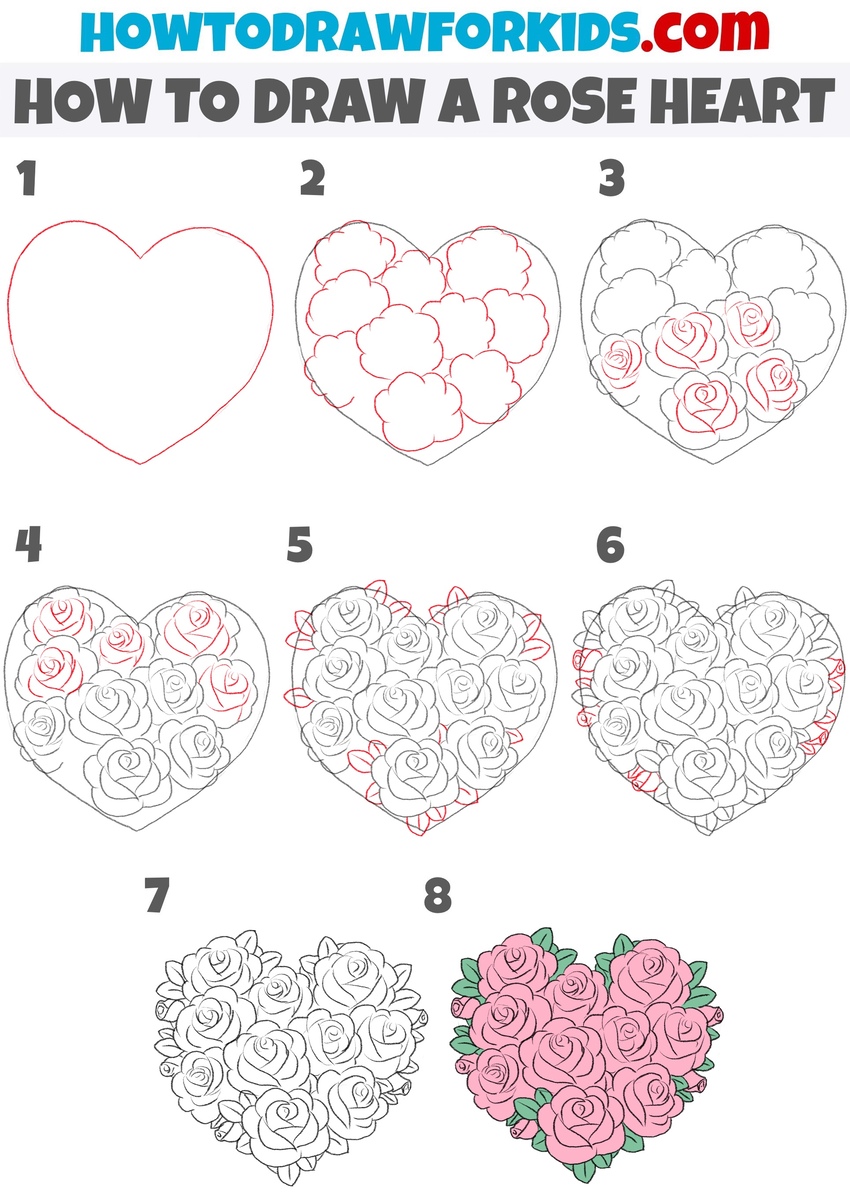
How to Draw a Rose Heart: Introduction
In this tutorial, I will demonstrate two methods to help you learn how to draw a rose heart. First, I will show you how to draw a large heart shape filled with roses and leaves. Then, I will show you how to draw a single large rose shaped like a heart.
Both of these guides are simple but present two different styles and types of rose hearts. If you already know how to draw a rose and understand rose shapes, this tutorial will be easier for you.
When learning how to draw a rose heart using both of these methods, ensure the symmetry is correct. Check the proportions and alignment consistently. The left and right sides of the heart shape and roses should be similar in size and form.
The knowledge provided in this tutorial will be useful for creating cards or other art projects. This tutorial is simple and should not present any difficulties. It consists of very clear steps. Follow each step carefully, and you will be able to draw a rose heart. Let’s begin drawing.
Rose Heart Drawing Tutorial
Materials
- Pencil
- Paper
- Eraser
- Coloring supplies
Time needed: 35 minutes
How to Draw a Rose Heart
- Draw the outline of the rose heart.
First, draw a heart with a smooth curved lines for the top, creating two symmetrical humps. Bring the lines down to meet at a soft point at the bottom of the heart. It doesn’t need to be perfectly smooth, but the sides should be fairly proportional. Use light pencil strokes at this stage.

- Sketch the outlines of the rosebuds.
Inside the heart outline, begin drawing the roses. These will look like fluffy, cloud-like circles or rounded blobs. Start from the center of the heart and work outward, filling the heart evenly with these shapes. Overlap the edges of some flower shapes to make the composition look full and natural.

- Detail the bottom rosebuds.
Focus on the flowers I at the bottom first. Start by sketching spiral-like shapes to represent the inner petals of each rose. From there, extend outward with curved lines, adding layers of petals. The petals should be slightly wavy and vary in size as they move outward. Keep your lines light and smooth.

- Detail the top rosebuds.
Now that the bottom roses are sketched, work on refining the remaining flowers. Draw curved petal lines within each placeholder shape, starting with the inner petals and building outward. Each rose should consist of layered petals, creating the classic rose shape. Vary the direction and angle of the petals.
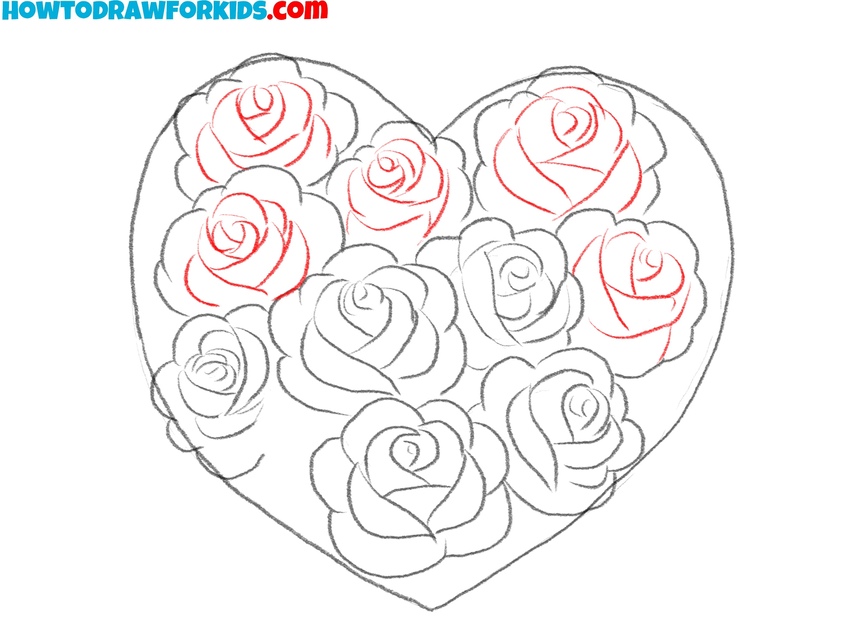
- Add leaves around the roses.
Sketch simple pointed oval shapes that peek out from behind the petals. Draw the leaves in areas where the space looks empty. Vary the angles and directions of the leaves to give a more natural look. The leaves don’t need to be overly detailed – simple outlines with a central vein are enough for this step.

- Add details to the rose heart.
At this point, refine the entire heart rose drawing, adding details. If any parts of the flowers or leaves look incomplete, carefully add finishing touches such as extra petals, leaf veins, or small overlaps to create more finished look. Double-check the roses and leaves to confirm there’s no empty space.
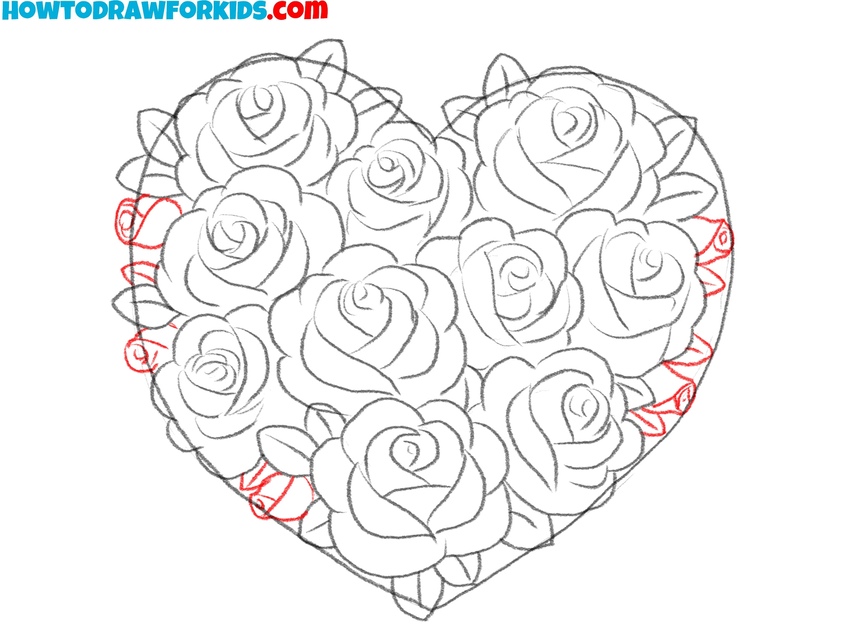
- Ease the conclusion lines.
Now it’s time to clean up your rose heart drawing. Carefully erase any unnecessary guidelines, overlapping lines, or faint marks that remain from earlier steps. Go over the final lines of the roses, leaves, and heart outline with a smooth, confident stroke to make them bold and clear.

- Add color to the rose heart.
Use pink, red, or any soft hues for the roses, applying even tones to each flower. You can shade the petals slightly darker at the edges or centers to add realism. For the leaves, use green shades. If you’d like, add subtle highlights to some petals to give them dimension.

Alternative Rose Heart Drawing Tutorial
In this version, only one large rose fills the entire heart, with its petals expanding outward, whereas the first tutorial consists of many smaller roses packed within the heart shape. Additionally, this tutorial includes fewer steps and focuses more on detailing a single, continuous rose rather than multiple individual flowers.
To draw a rose heart with this method, begin with a smooth heart outline using light, curved lines. Draw the center of the rose as a small spiral shape near the middle of the heart. From this spiral, add layers of curved petals expanding outward. Make each petal slightly wavy and uneven, following the contour of the heart. Continue adding petals in irregular layers, gradually filling the space inside the heart.
Ensure the petals grow larger as they move toward the edges of the heart shape. Refine the outer petals to meet the heart outline, creating a balanced connection between the rose and the heart shape. Clean up unnecessary lines to make the drawing crisp. Add detail to the petals if needed. Finally, color the rose heart with red or a preferred shade.
I have prepared a short version of this tutorial as a PDF file for you. You can download this file and return it to this tutorial at any time.

Conclusion
If this tutorial was helpful and useful for you, visit other guides available on my website. With my guides, you can learn how to draw a teddy bear or practice your skills in drawing other simple objects.
This rose heart drawing was clear and visually appealing. If you found this tutorial helpful, share it with your friends. Subscribe to our social networks and leave comments about this lesson.

