How to Draw a Rose
Do you want to learn how to draw a rose? In this step-by-step drawing tutorial, I will show you several simple ways to draw this beautiful flower.

Prepare to Draw a Rose
I have prepared a new drawing tutorial in which you will learn how to draw a rose step by step. This is a simple way to practice drawing a flower with overlapping petals.
First, you will draw a rose using detailed instructions. After that, I will show you eight additional methods. You can also download the main tutorial and its worksheets for free.
You can complete this drawing even if you have no previous experience. Gather your materials and follow the instructions to sketch the rose one part at a time.
You can choose red, pink, white, yellow, or another color for the rosebud. Keep the stem and leaves green, or use a different palette. You can also add shadows, highlights, or water droplets for more detail.
Rose Drawing Tutorial
Materials
- Pencil
- Paper
- Eraser
- Coloring supplies
Time needed: 25 minutes
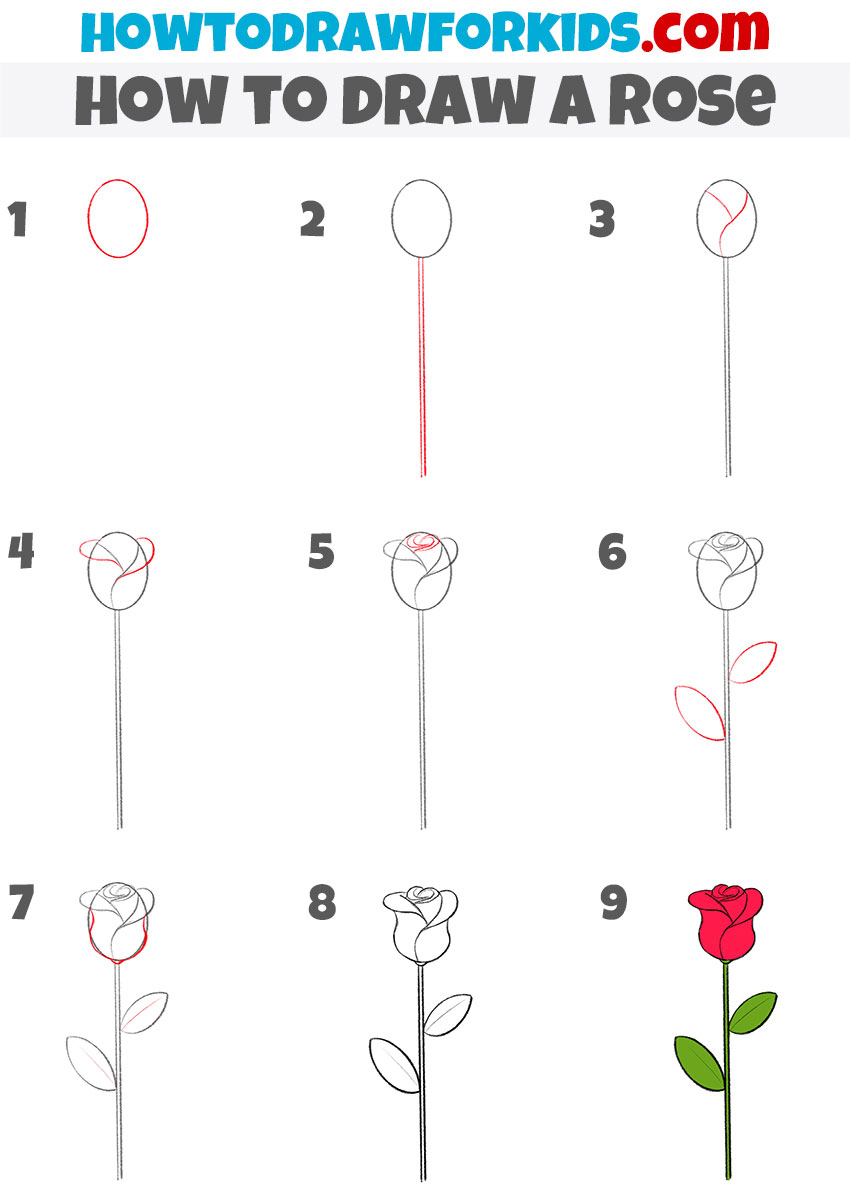
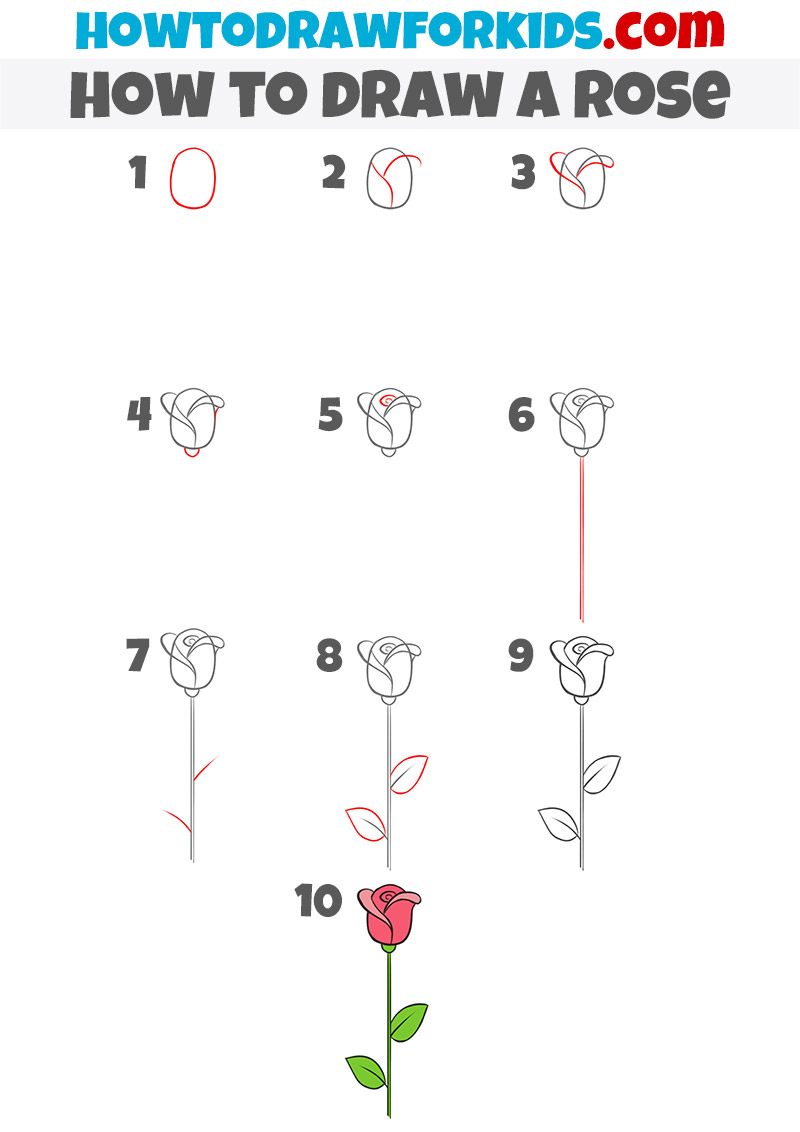
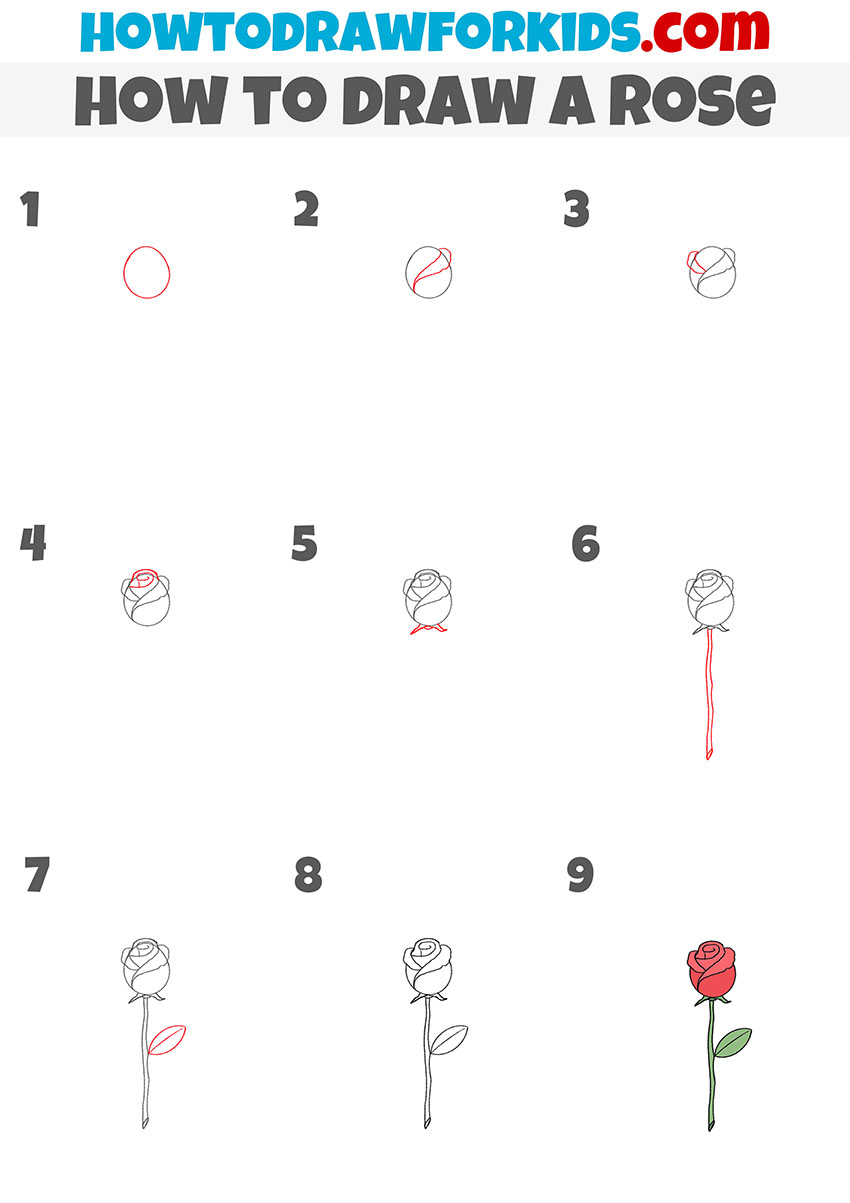
How to draw a rose step by step
- Draw the basic shape of the rosebud.
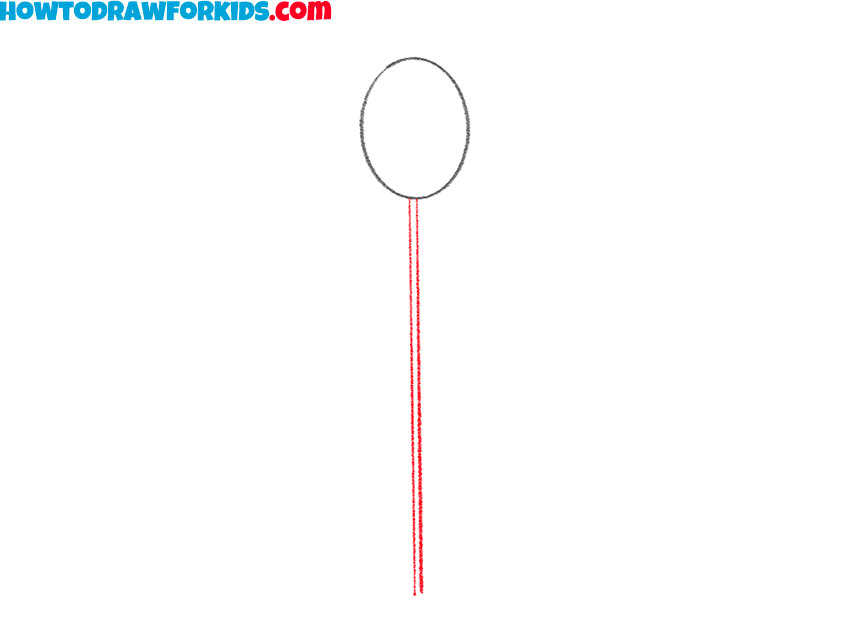
Start by drawing a slightly elongated oval near the top of the page. This shape will serve as the base of the rosebud. Use light pencil lines so you can adjust the outline in later steps.

- Add the flower stem below the bud.
Sketch two nearly parallel lines downward from the bottom of the oval to form the rose stem. Make the lines straight or slightly curved, and leave a narrow space between them.
- Sketch the first rose petals.
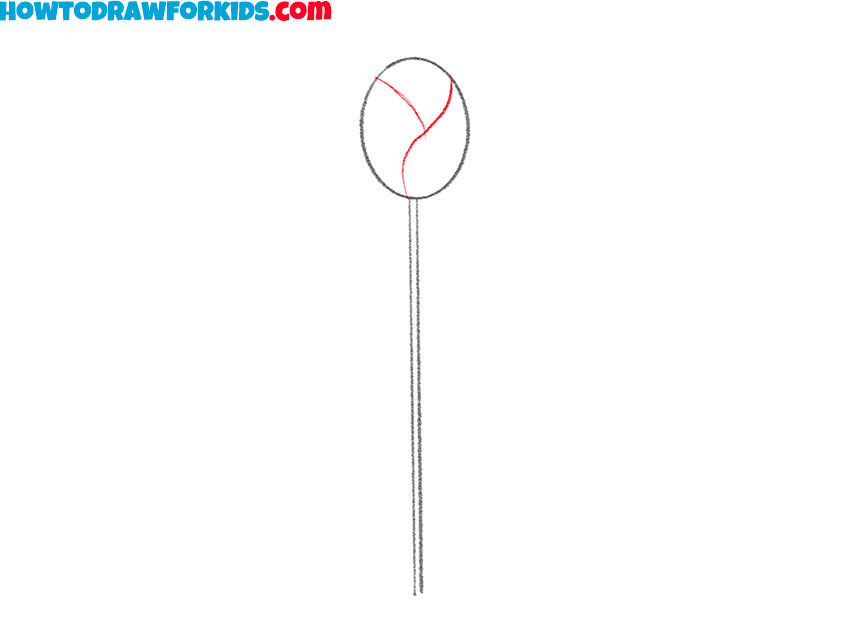
Inside the oval, draw two curved lines to mark the first petals of the rose. Give each line a gentle S-like bend so the petals appear to overlap inside the bud.
- Draw the outer petals of the rose.
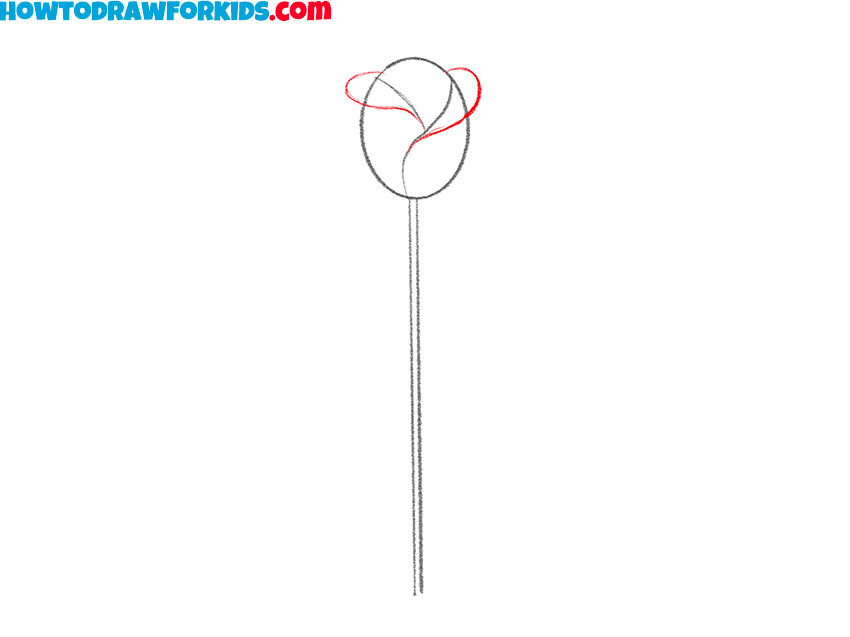
Use the previous guidelines to draw the large outer petals. Add smooth curved edges that overlap near the center and follow the outer shape of the rosebud.
- Add the central petals of the rose.
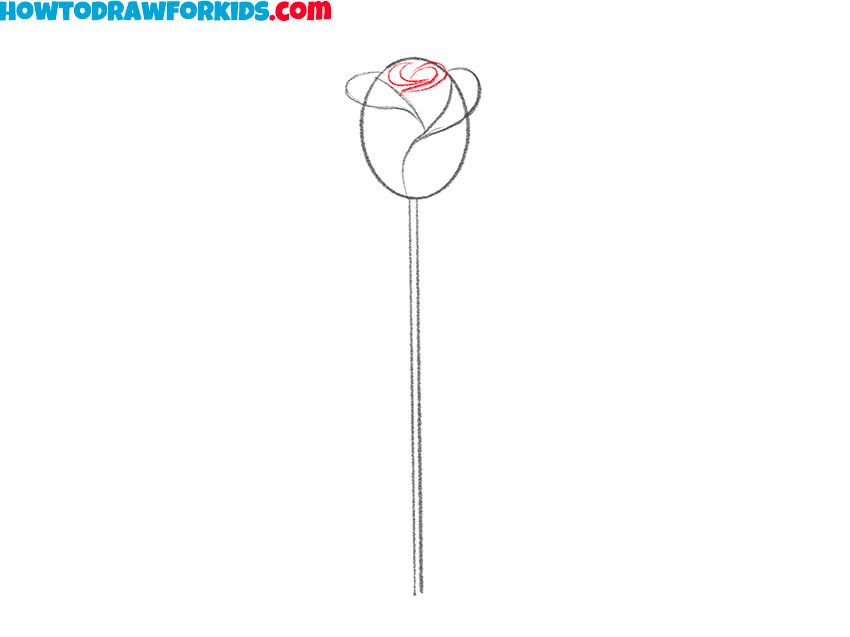
Draw several smaller curved petals in the center of the rosebud. Let the lines overlap slightly to create the tightly folded inner part of the flower.
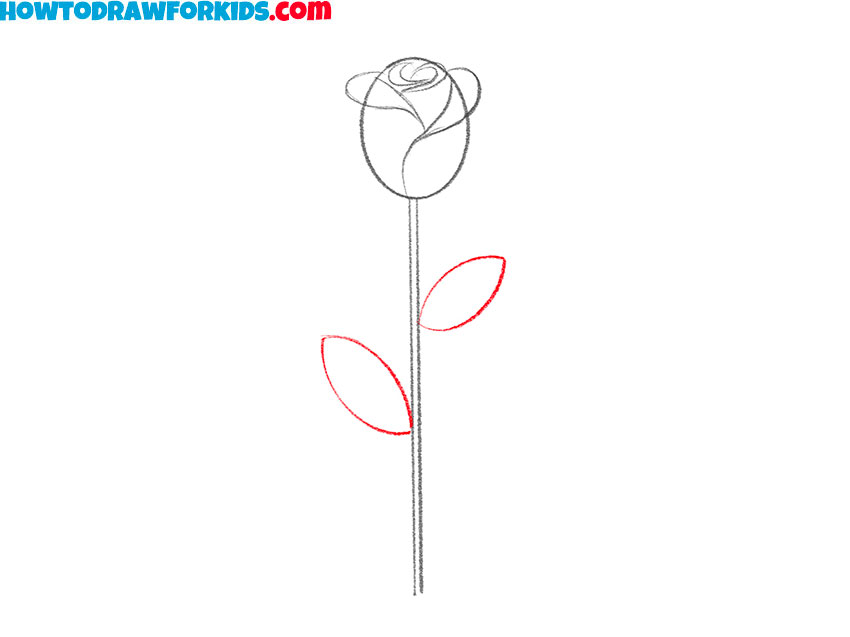
- Draw the rose leaves.
Add two leaves to the stem, placing one on each side at different heights. Draw each leaf with a pointed tip and gently curved edges, then connect it to the stem with a short line.
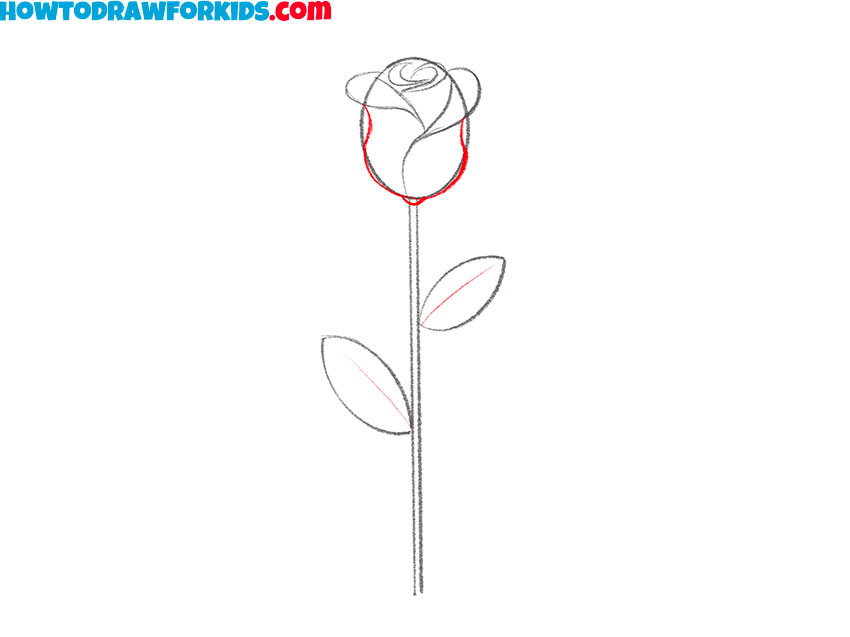
- Refine the shape of the rosebud.
Adjust the lower outline of the rosebud and connect it neatly to the stem. Use short curved lines to define the base of the flower and complete its outer shape.
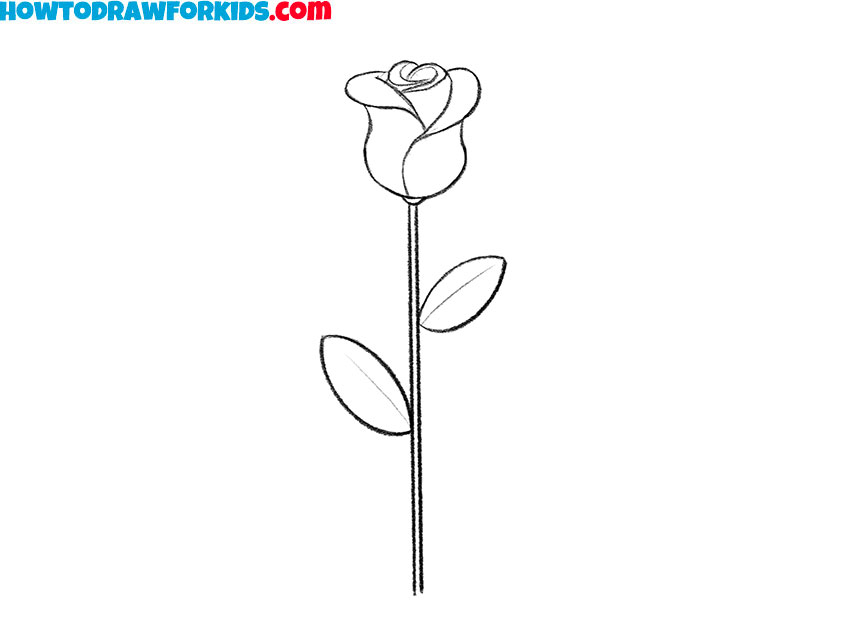
- Erase the guidelines and refine the line drawing.
Erase the original oval and any other unnecessary guidelines. Smooth the remaining contours, correct the petal shapes if needed, and darken the final lines of the rose drawing.
- Color the rose drawing.
Color the rose petals red or pink, then use green for the stem and leaves. Add a darker shade near the petal edges and a few lighter areas if you want more depth.

Free Rose Drawing Printables
I have prepared a PDF file with a shorter version of the rose drawing tutorial and additional worksheets. Download it so you can draw later or use the pages with friends.
More Ways to Draw a Rose
A rose can be drawn in many different ways, depending on the shape of the bud, the amount of detail, and the position of the stem.
Below are eight more rose drawing methods. Try several versions or choose the one that best matches your current drawing experience.
Detailed Rose Drawing Tutorial
This 10-step version uses more petal lines than the main tutorial. The order is slightly different, but you will still begin with the rosebud before adding the stem and leaves.
Draw an oval for the bud and add overlapping curved lines inside it. Extend the petal shapes toward the outer edge, then sketch the calyx below the flower and add a small spiral in the center.
Draw the stem below the bud and add short diagonal branches for the leaves. Outline each pointed leaf, erase the extra guidelines, and refine the petals. Color the flower red or pink and use green for the remaining parts.
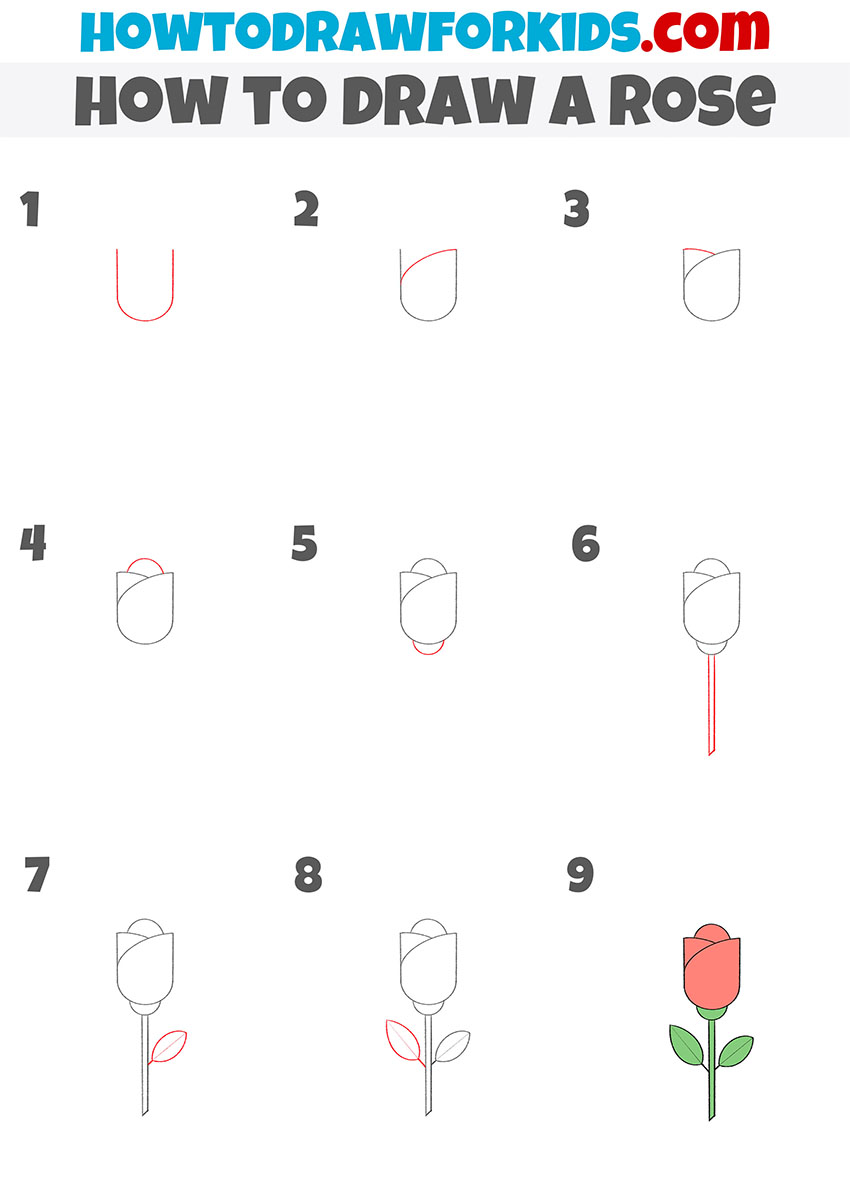
Simple Rose Drawing Tutorial
This rose drawing tutorial has fewer details than the previous method. It is suitable for beginners and uses a small number of curved lines to form the flower.
Begin with a U-shaped curve for the lower part of the bud. Add curved lines across the top to form the overlapping petals, then draw a small semicircle for the upper petal and define the base of the flower.
Extend two lines downward for the stem and add short branches for the leaves. Draw the pointed leaf shapes, erase unnecessary lines, and refine the outline. Finish with red or pink petals and a green stem.
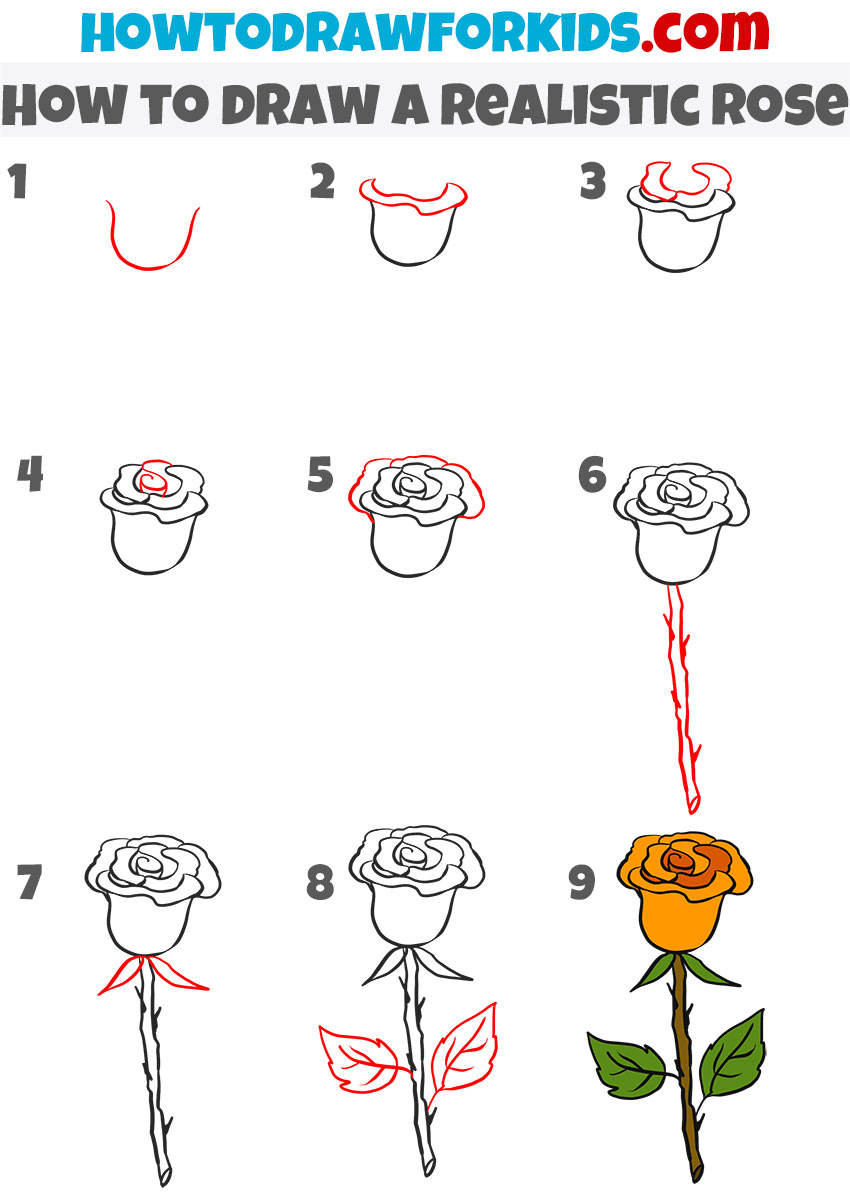
Advanced Rose Drawing Tutorial
This rose has more petal details and deeper shadows than the previous versions. The bud is also constructed with several uneven layers, giving the flower a more natural appearance.
Start with a curved line for the base of the bud. Add wavy, overlapping petals above it and continue outward with larger shapes. Draw a small spiral in the center and refine the uneven edges of the outer petals.
Outline the long stem and add small sepals below the flower. Draw pointed leaves with visible veins, then erase the guidelines and darken the final lines. Use red or orange for the petals and green for the stem.
Sketching a Rose With a Curved Stem
This method gives the rose a fuller bud and a noticeably curved stem. A single leaf on the side keeps the drawing simple, despite the additional detail inside the flower.
Draw an oval for the rosebud and add curved, overlapping petals inside it. Continue adding slightly uneven petal shapes, then draw a small spiral in the center and sketch the sepals below the bud.
Extend the stem downward with a long curve. Add one pointed leaf on the side, refine the outlines, and erase the remaining guidelines. Color the petals red or pink and make the stem and leaf green.

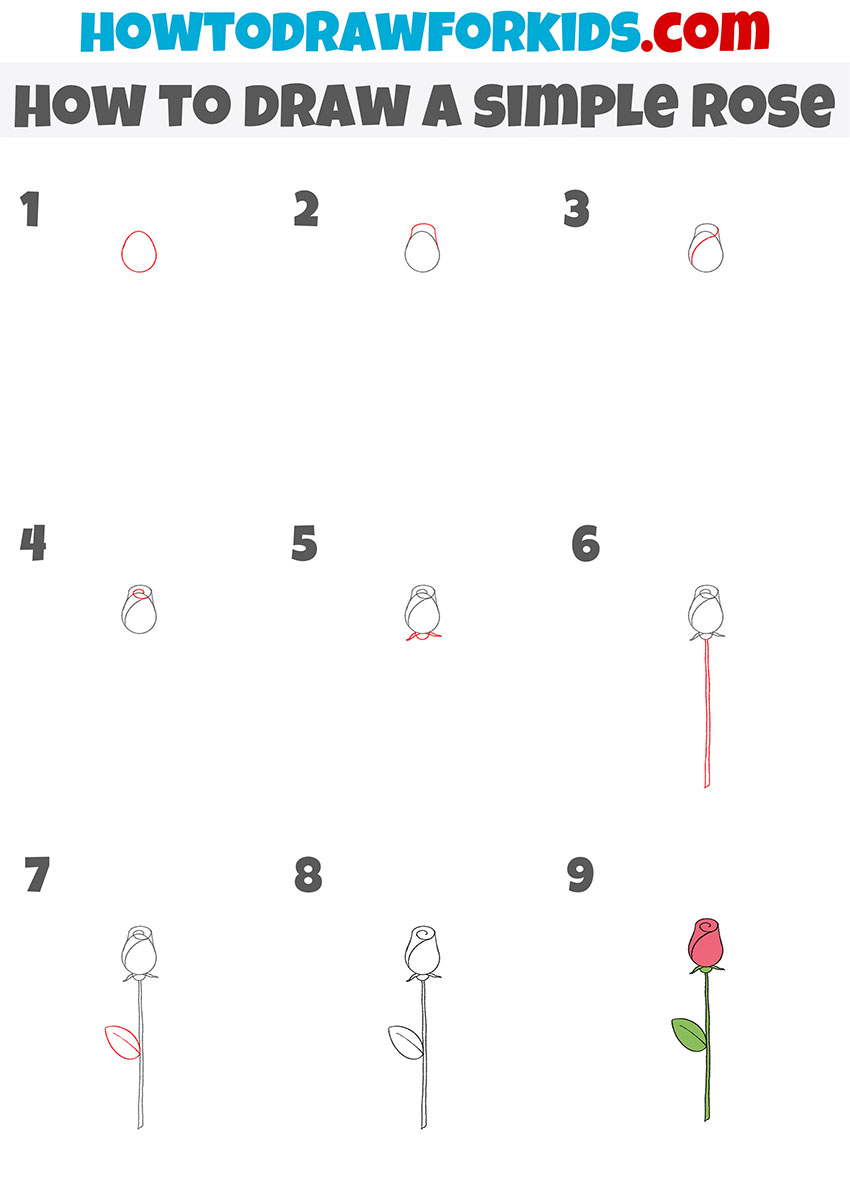
Easy Rose Drawing Tutorial
This method shows how to draw an easy rose with fewer details. Its bud is more open than the flower in the previous tutorial, and the stem has a gentle curve.
Draw an oval for the rosebud and fill it with overlapping petal lines. Add a small spiral near the center, then extend a slightly uneven stem below the flower.
Add the sepals and sketch one pointed leaf on the stem. Erase the guidelines, refine the petal edges, and color the completed rose with red or pink petals and green lower parts.
How to Draw a Rose With a Closed Bud
This next rose has a narrow, closed bud. The simple outline suggests the folded petals without showing each one separately, making this method easy to follow.
Draw a small teardrop shape for the rosebud. Add a curved line across the top, another fold along the side, and a short spiral inside. Sketch several small sepals below the flower.
Extend two slightly uneven lines for the stem and add one long leaf at the side. Refine the outline, erase the extra marks, and color the bud red or pink. Use green for the stem and leaf.
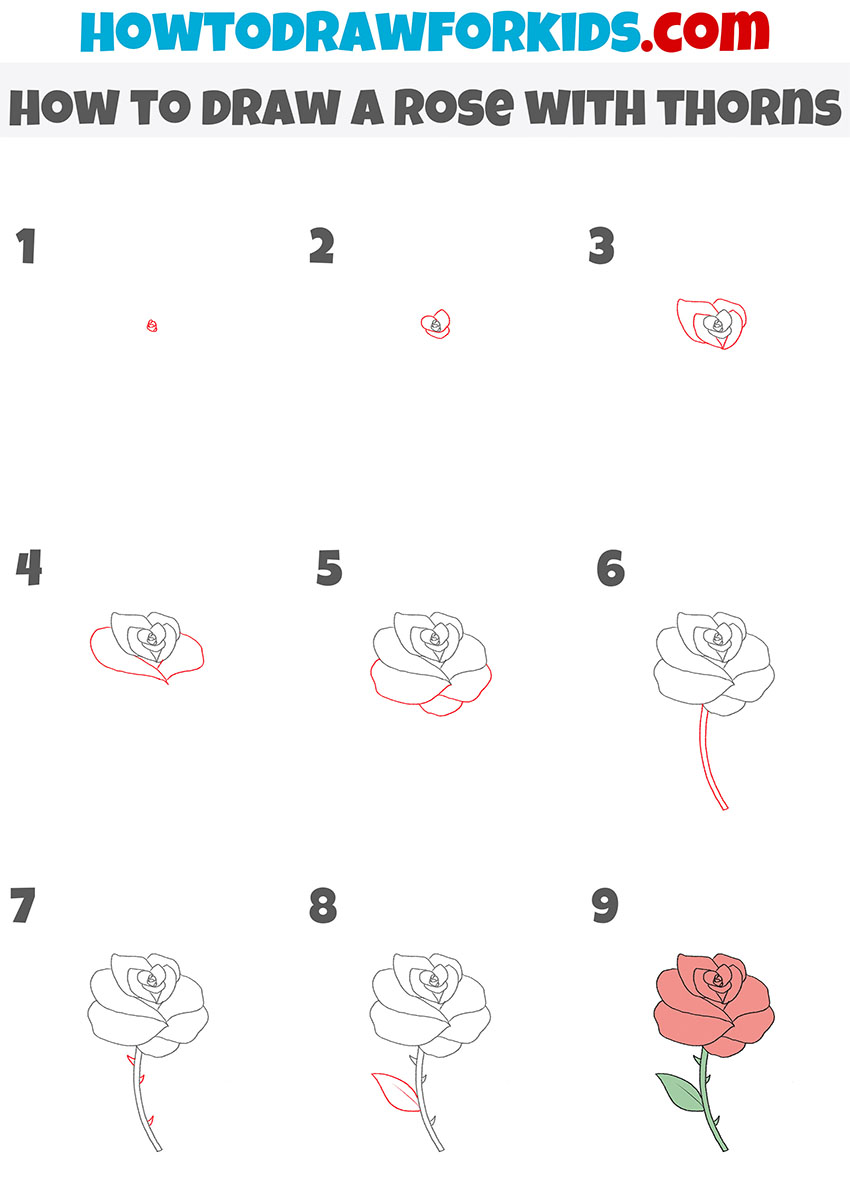
How to Draw a Rose With Thorns
This rose drawing focuses on the pointed thorns along the stem. They face in different directions and vary slightly in size, which makes this version distinct from the previous methods.
Sketch a small spiral in the center of the rosebud and add curved petals around it. Increase the size of each new petal as you work toward the outer edge, then draw the long stem below.
Add pointed thorns at irregular intervals and draw several leaves with tapered tips. Refine the outline and erase the guidelines. Color the petals red or pink, use green for the lower parts, and darken the edges of the thorns slightly.
Rose on a Stem Drawing Tutorial
The final method shows a closed rosebud on a long, thin stem. Unlike the previous version, this flower has no thorns and includes several leaves.
Begin with an oval for the rosebud. Add curved lines inside it to outline the overlapping petals, then sketch several pointed sepals at the base of the flower.
Draw two long lines for the stem and add short branches for the leaves. Outline the pointed leaf shapes, erase unnecessary guidelines, and refine the flower. Color the petals red or pink and use green for the stem and leaves.

Conclusion
Now you know several ways to draw a rose with different bud shapes and levels of detail. Try the method that feels most comfortable first, then use another version for your next drawing.
You can also combine several flowers by drawing a rose bouquet. Use buds of different sizes and place the stems at slightly different angles to make the composition more interesting.
Follow me on social media for new drawing tutorials and video guides. You can also share which rose method you chose and what color you used for the petals.