How to Draw a Rose
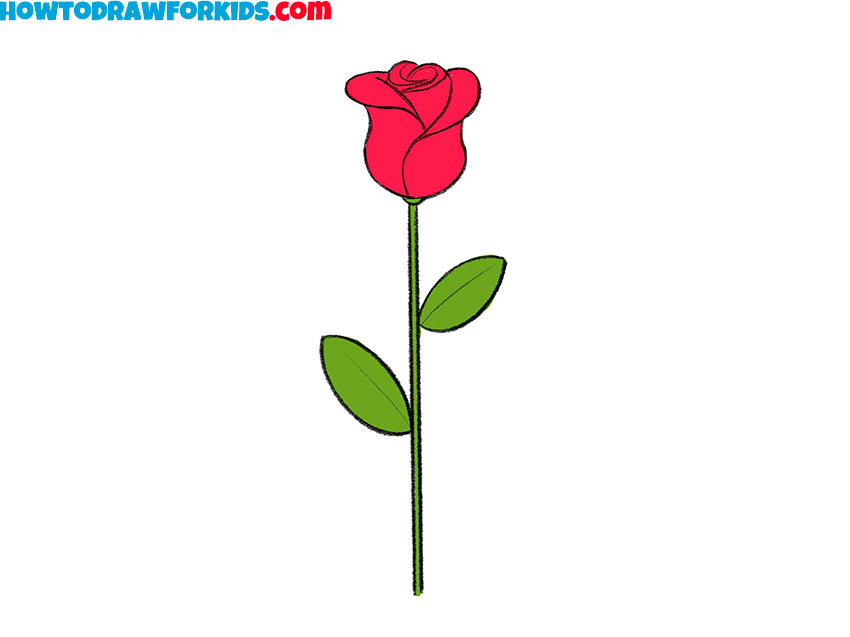
Do you want to learn how to draw a rose? If you’re here, you probably want to. In this drawing tutorial I will show you some very simple ways to draw this beautiful flower.
How to Draw a Rose: Introduction
I have prepared a new drawing tutorial for you, where you will learn how to draw a rose step by step. I am sure this lesson will be helpful to you.
First, you will learn how to draw a rose using step-by-step instructions, then I will show you 8 additional ways to sketch a this flower, and in addition, you can download this lesson and all additional materials for it absolutely free.
You can complete this drawing even if you have no prior experience. Gather your drawing materials and start following these simple instructions to draw the rose.
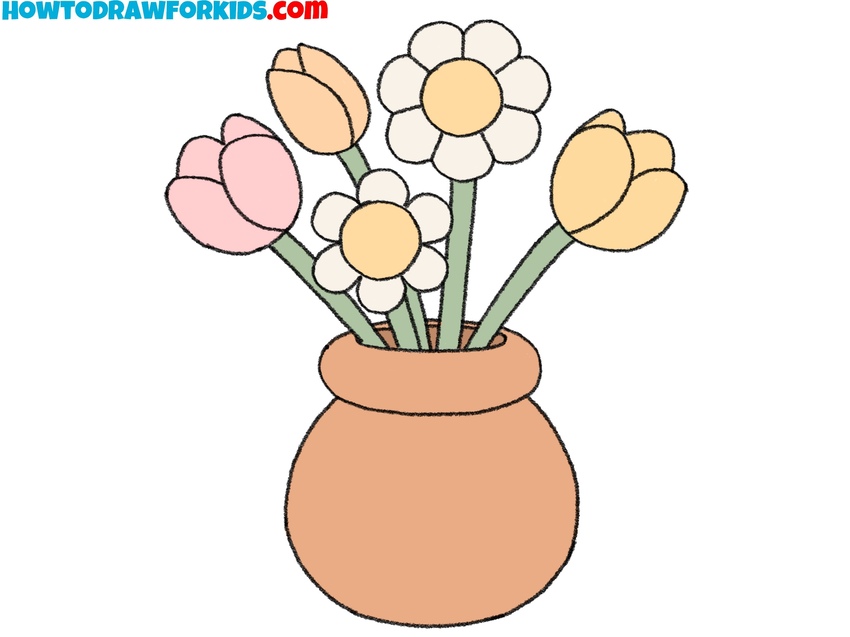
Of course, you can use different colors to paint the rose. For example, you can choose white, yellow, or any other beautiful shade for the bud, while all other parts remain green. You can also add shadows, highlights, and water droplets to make the artwork look more detailed and realistic.
Rose Drawing Tutorial
Materials
- Pencil
- Paper
- Eraser
- Coloring supplies
Time needed: 25 minutes
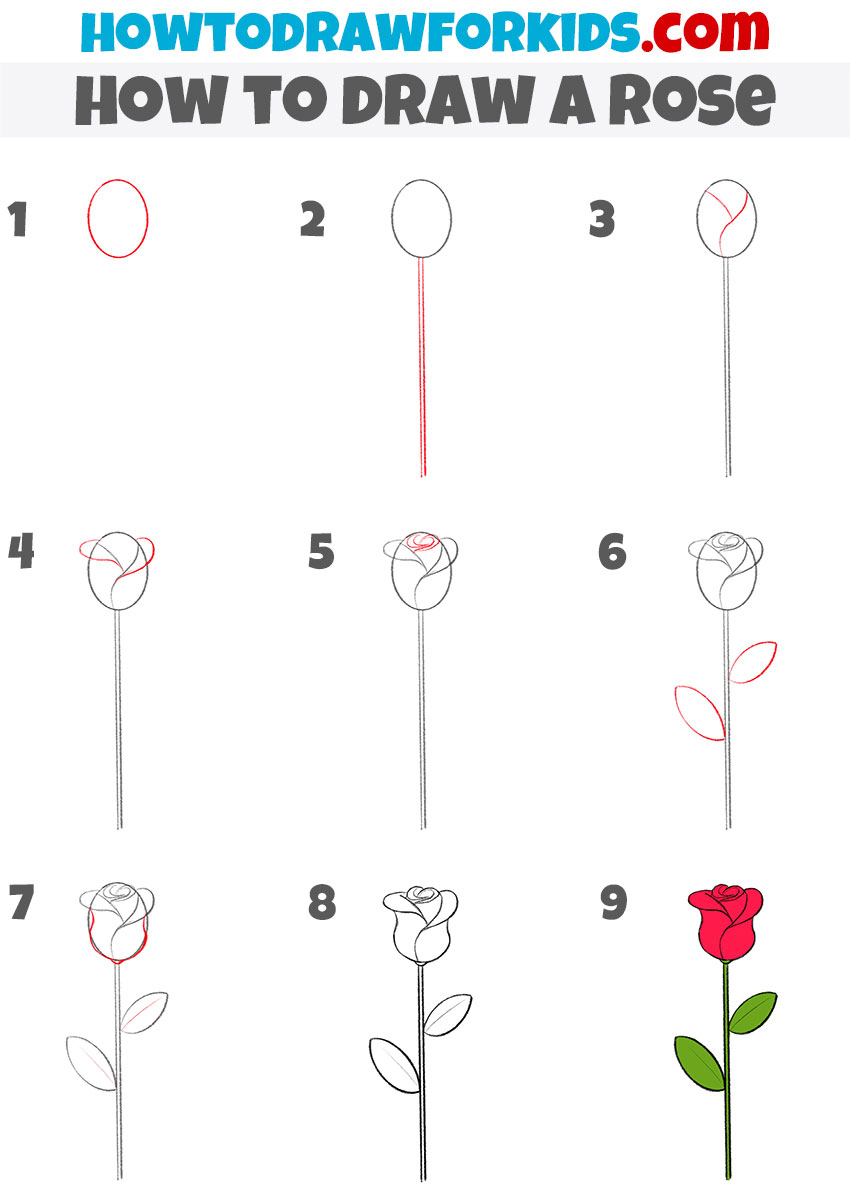
How to Draw a Rose
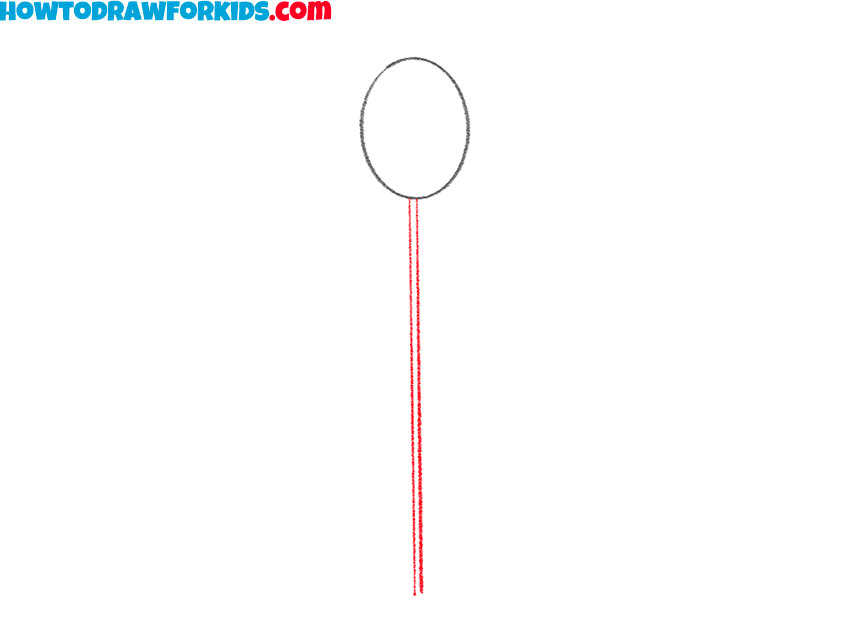
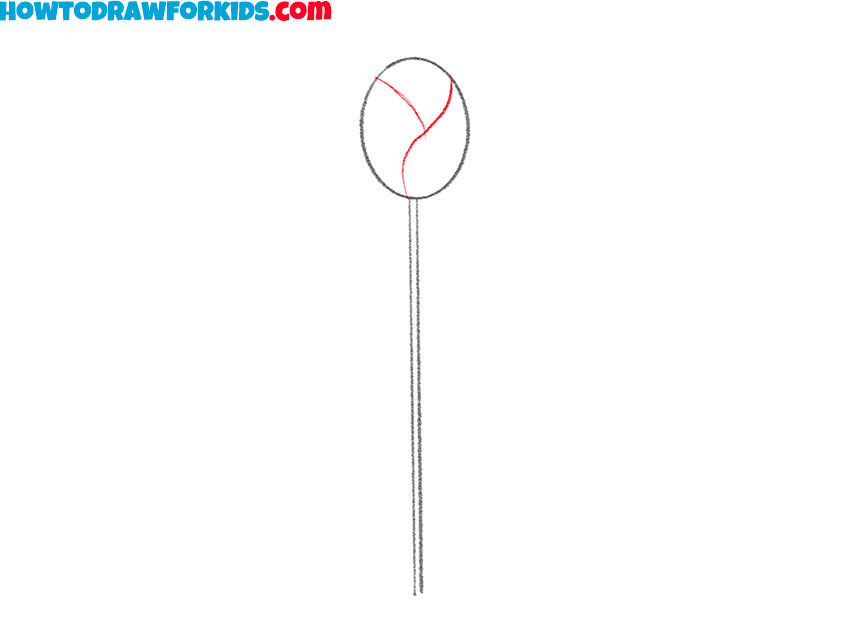
- Draw the basic shape of the rosebud.
Start by drawing an oval at the top of your page. This oval will serve as the base of the rosebud. Keep the shape slightly elongated to give the flower a more natural appearance. Try to draw with light pencil strokes so that you can make corrections later if needed.

- Add the stem below the rosebud.
Sketch two parallel vertical lines downward from the bottom of the oval. These lines can be straight or slightly curved. The length of the stem can vary depending on how tall you want the rose to be. Keep the lines close together but not touching.
- Sketch the petals of the bud.
Inside the oval, draw two curved lines to create the guidelines for the outer petals of the rose. These lines should slightly resemble the letter “S” or a flowing ribbon, forming a layered effect. The bud of a rose has a natural spiral shape, so keep your lines curved and smooth.
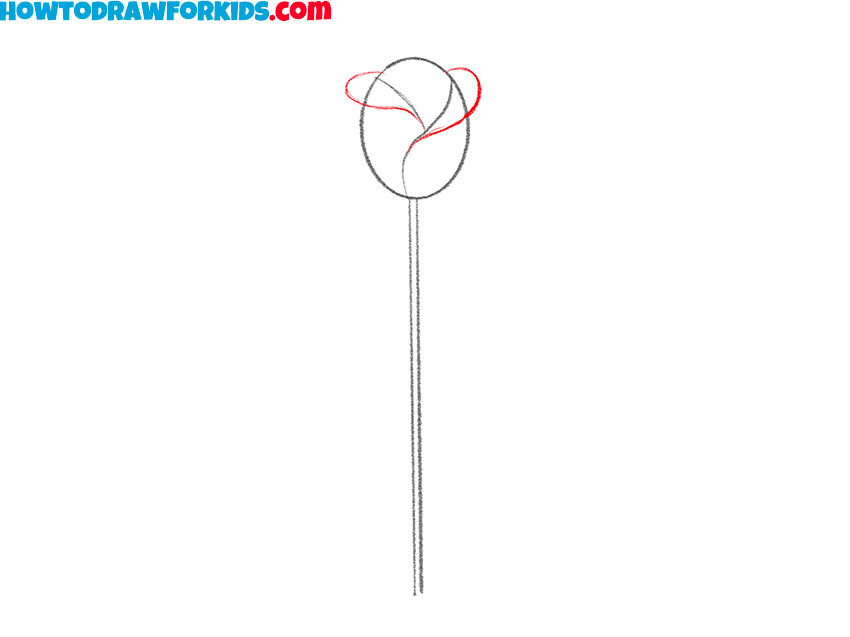
- Draw the outer petals of the rose.
Now, finish sketching the large outer petals of the rose, using the guidelines from the previous step. These petals should have a smooth, rounded shape. Use gentle, flowing lines to create a soft, natural look. The outer petals should wrap slightly around the top part of the bud.
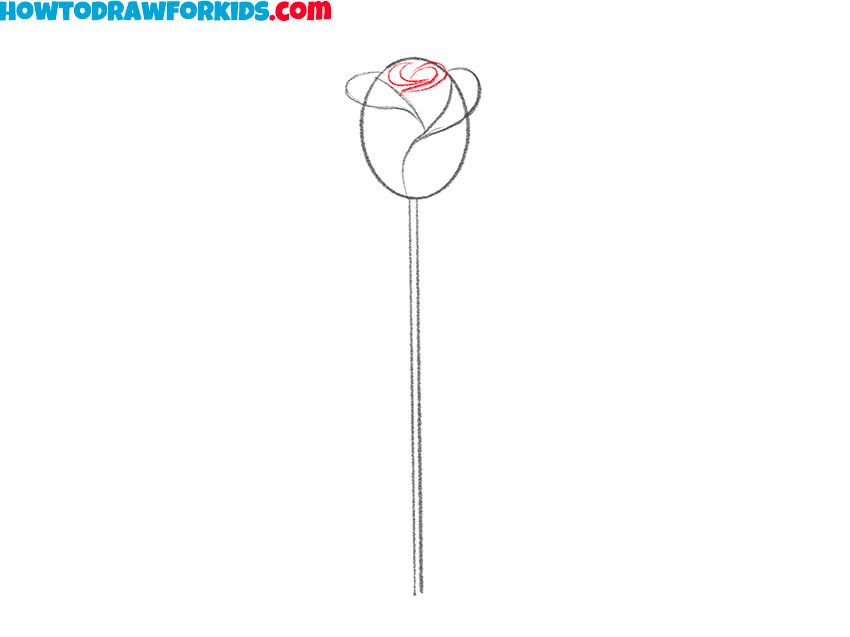
- Add the central petals.
To make the rosebud look fuller, draw a few more petals at the center of the flower. These petals should be slightly smaller than the outer petals but should still maintain a curved, rounded shape. They should overlap the center of the rose, giving the illusion of a tightly wrapped bud.
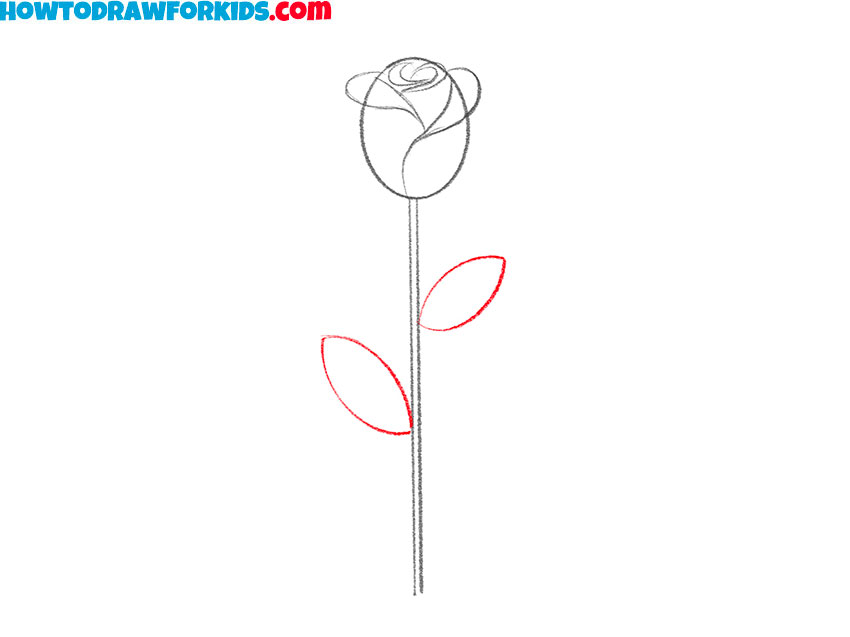
- Illustrate the leaves.
Draw two oval-shaped leaves attached to the stem. These leaves should be slightly tilted upward, positioned at different angles to create a more natural look. The leaves should have pointed tips and slightly curved edges. You can make them different sizes to add variety and realism.
- Finalize the shape of the bud.
Now, adjust the lower part of the rosebud to give it a finished look. The rosebud has a distinctive shape, with a broad base that gradually narrows toward the top. Your goal is to replicate this form. Use soft, curved lines to create a rounded effect.
- Erase the guidelines.
Now, take an eraser and go over your entire rose drawing, removing any unnecessary auxiliary lines. Then, darken and outline the essential lines to give them a more finished look. If you want to make any adjustments to your rose drawing, this is the perfect time to do so.
- Color your rose drawing.
Finally, color your rose drawing using red or pink for the petals and green for the stem and leaves. You can also add shading to make the drawing look more realistic. Also, you can darken the edges of the petals and add highlights in the center for a more dimensional look.

Additional Content
To make your drawing experience more comfortable, I have prepared a PDF file for you, where you can see a short version of this rose drawing lesson, download it and draw whenever you want. You can also complete these lessons with your friends.
How to Draw a Rose: Alternative Methods
Any object can be drawn in hundreds of different ways, and a rose is no exception.
Below, I want to show you a few more variations of how you can draw a rose. Try to practice all the methods or choose the one that suits you best.
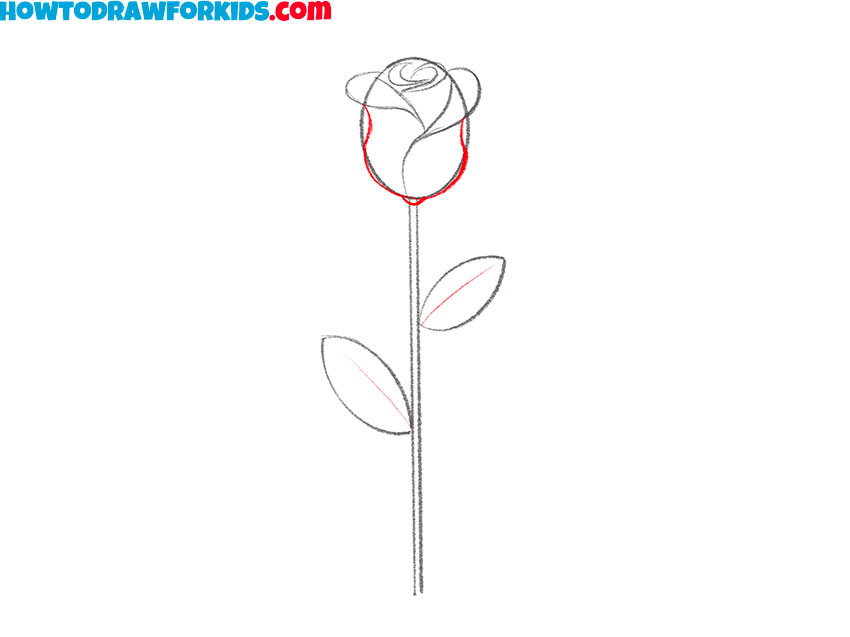
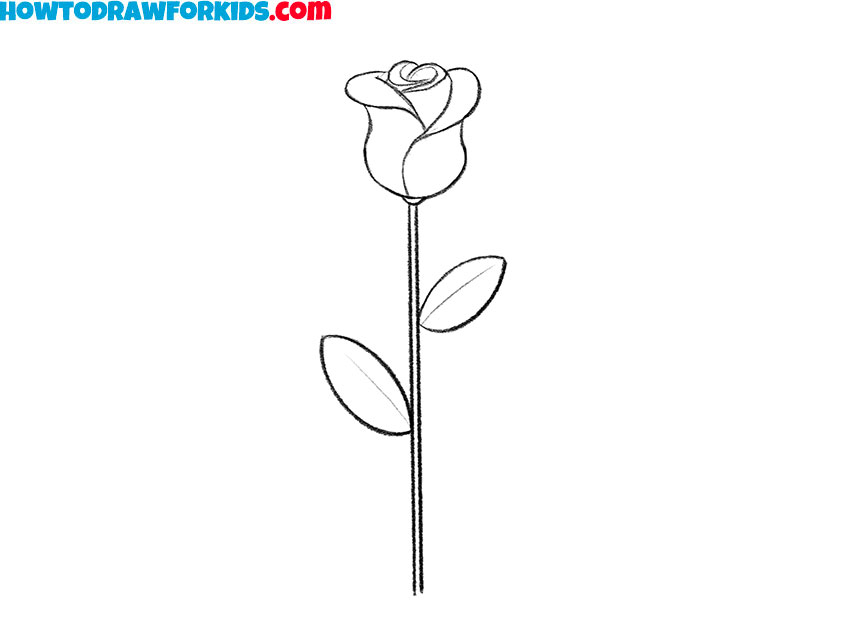
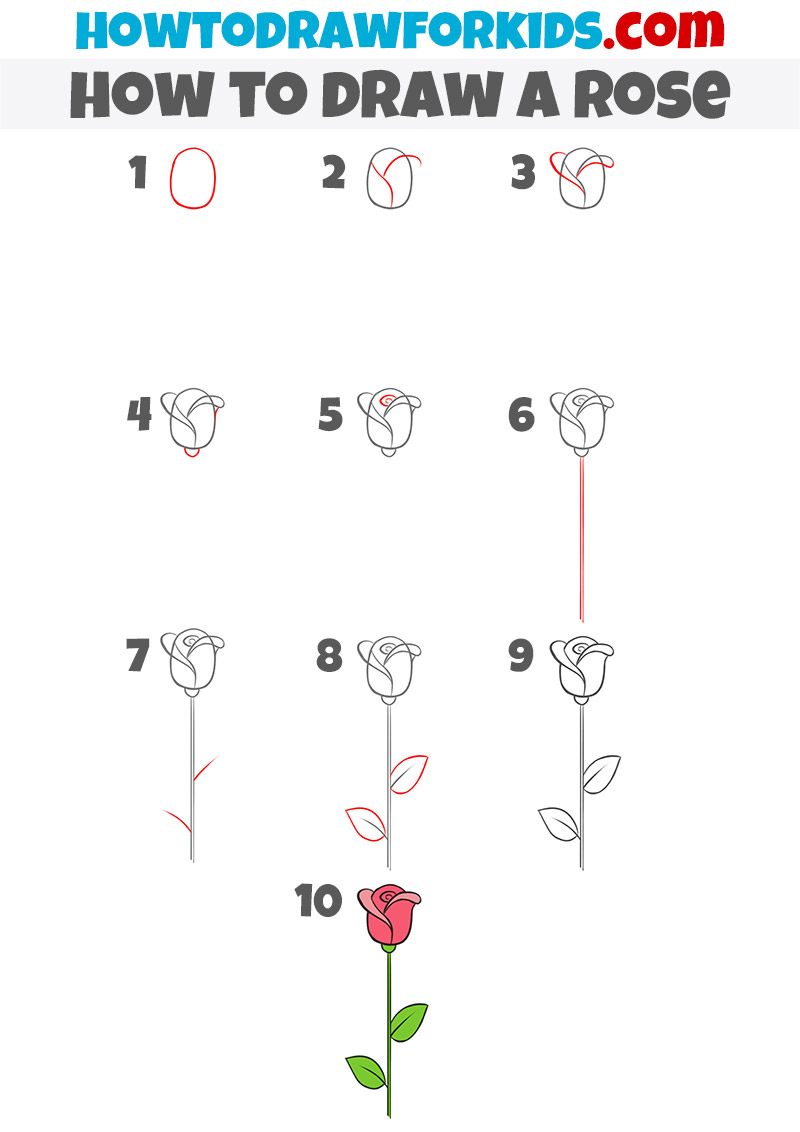
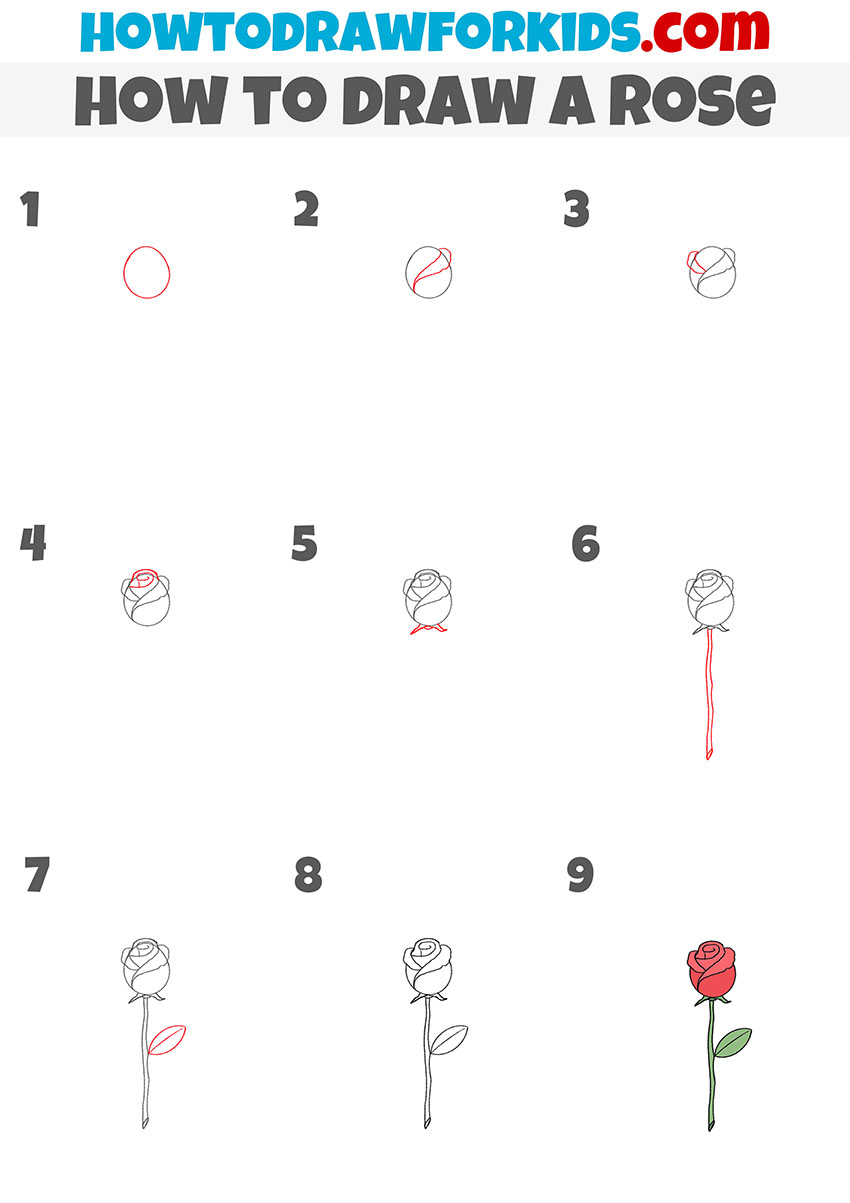
Detailed Rose Drawing Tutorial
This tutorial is divided into 10 steps, presenting a slightly more detailed approach to drawing a rose. I have slightly adjusted the sequencing of the steps, but the overall process remains similar to the previous lesson. You will still begin with the bud and then move on to the stem and leaves.
To begin, draw an oval to outline the rosebud. Inside this oval, add curved lines to shape the inner petals, ensuring they overlap naturally. Extend these curves outward to create the larger outer petals, giving the rose its characteristic shape. Add a small curved detail at the base of the bud to define the calyx. Draw a simple spiral inside the bud to create the central part.
Once the bud is complete, sketch a straight line downward to form the stem. Sketch short diagonal lines from the stem to guide leaf placement. Draw the leaves using smooth curved lines, making sure they are pointed at the ends. Complete the drawing by refining all lines, erasing unnecessary guidelines, and making adjustments where needed. The final step is to color the rose with red or pink for the petals and green for the stem and leaves.
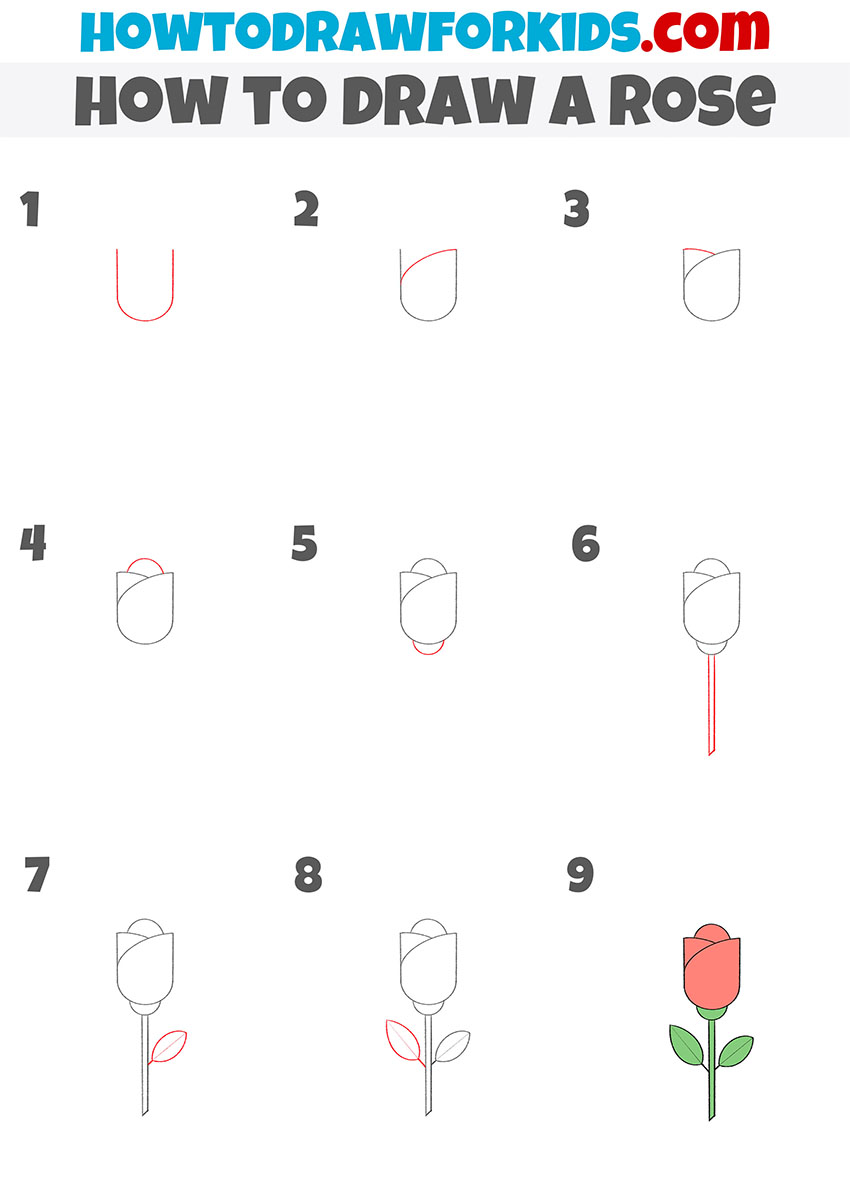
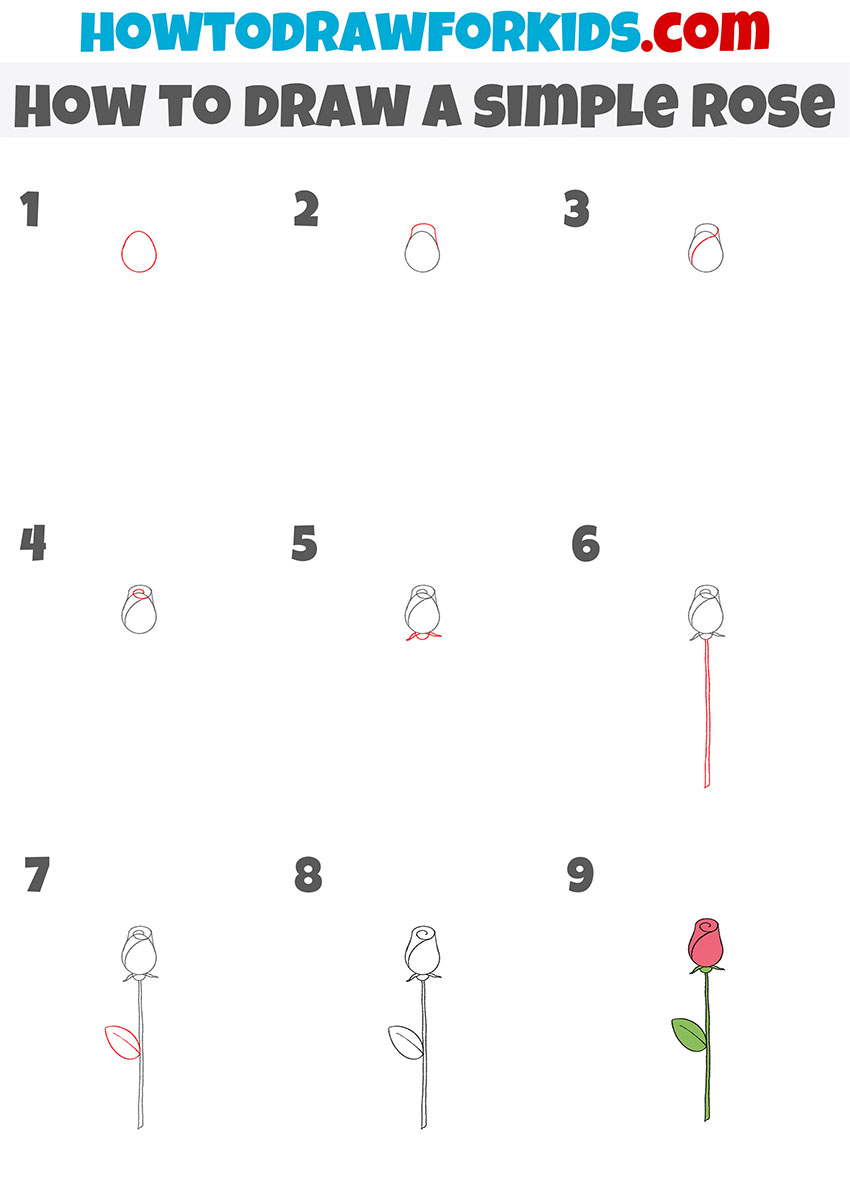
Simple Rose Drawing Tutorial
This rose drawing tutorial is much simpler than the previous two, with significantly fewer details. This lesson is ideal for those who are just beginning to draw and have little experience with a pencil. However, just like in the previous rose drawing tutorials, you will start with the bud and gradually work your way down.
To learn how to draw a simple rose, start with a U-shaped curve to outline the lower part of the rosebud. Add a slightly curved line across the top to form the upper petal. Next, draw another curved line on the opposite side to complete the overlapping petals. Sketch a small semicircle at the top of the bud to represent the top petal. At the bottom of the bud, draw a rounded shape to define the base of the flower.
Extend two straight lines downward to form the stem. Add short diagonal lines as guides for the leaves, then draw the leaves using smooth, curved lines with pointed tips. Finalize the drawing by outlining all the elements, erasing unnecessary guidelines, and making any necessary adjustments. Complete the lesson by coloring the rose, using red or pink for the petals and green for the stem and leaves.
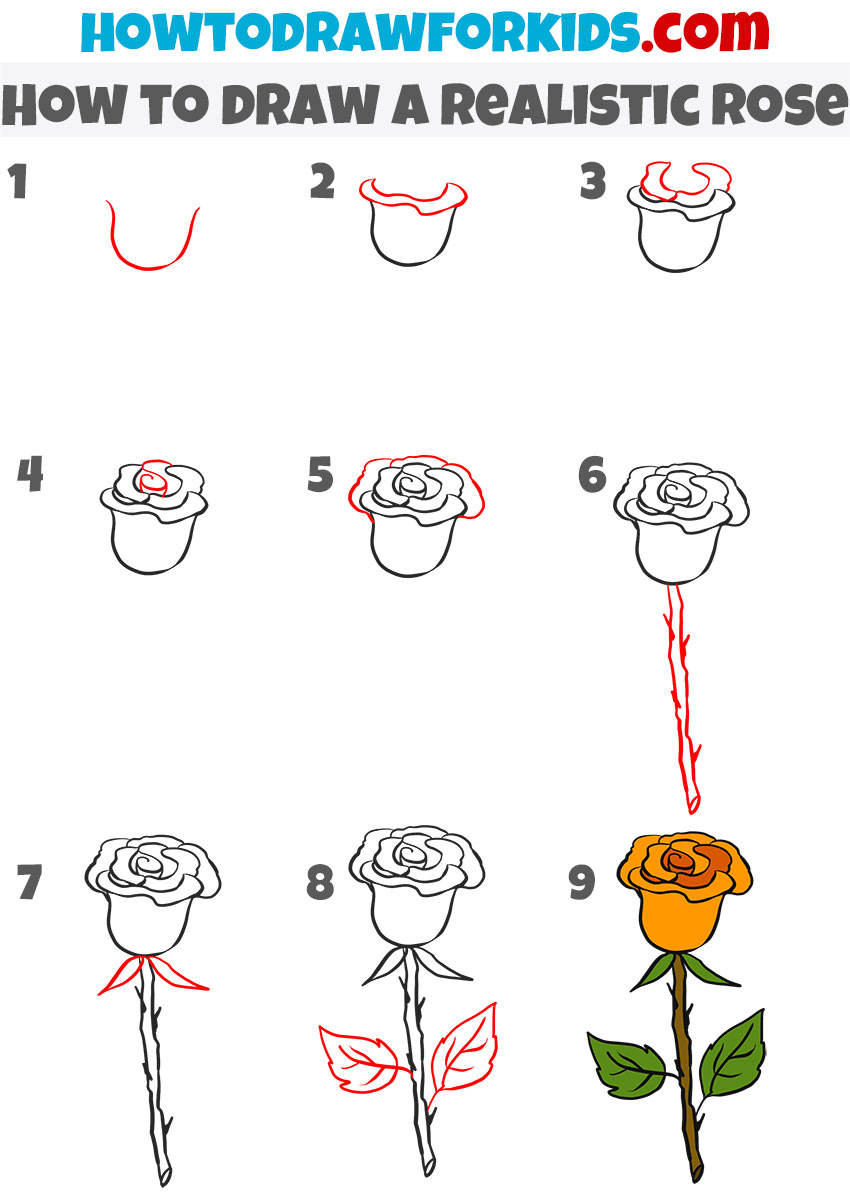
Advanced Rose Drawing Tutorial
This rose flower is drawn in a slightly more realistic style, as you can see. There are more shadows and details, and the method of shaping the bud differs slightly from other rose drawing lessons you have seen above. However, you can make this flower even more realistic by adding additional shadows and highlights. You can also include a background or a hand holding this beautiful rose flower.
Start this tutorial on how to draw an advanced rose by sketching the base of the bud using a curved line. Add the top petal layer with wavy, overlapping lines. Continue shaping the rose by adding additional layers of petals, making them slightly larger as they extend outward. Draw the central spiral inside the bud to give more realistic look. Refine the outer petals with more curved edges.
Extend two long, slightly curved lines downward to form the stem. Add smaller, jagged lines along the stem to create a more natural look. Draw small triangular sepals at the base of the flower. Sketch the leaves with pointed edges and visible veins. Refine all lines, erase unnecessary guidelines, and darken the final outline. Add color by shading the petals with red or orange and the stem and leaves with green.
Sketching a Rose With a Curved Stem
With the help of simple instructions, you can easily draw a rose and be pleased with the result. This rose has a full bud with visible petals. The stem has a natural curve, and a small leaf is placed on the side. Take your time during the lesson and follow each step in order. Freehand lines are acceptable, allowing you to slightly adjust the shape of the petals or reposition the leaf on the stem.
Draw an oval as the base of the rosebud. Inside the oval, add curved lines to outline the overlapping petals. Continue shaping the rose by adding more petals, making them slightly irregular to create a natural look. Draw a small spiral in the center of the bud. Sketch a few sepals at the base of the flower before extending a long, slightly curved line downward to form the stem.
Add texture to the stem with subtle bends and uneven edges. Draw a guideline for the leaf placement and sketch a single pointed leaf extending from the side. Refine all lines, erase unnecessary guidelines, and make any adjustments to the overall shape. Finalize the rose drawing by coloring the petals in red or pink and the stem and leaves in green.

Easy Rose Drawing Tutorial
This method will show you how to draw an easy rose for beginners. Like many other roses in this collection, this beautiful flower is divided into nine steps. However, unlike some other tutorials, this one includes fewer details while still making the flower appear more realistic than in the example titled “simple rose.”
Start by drawing an oval to outline the rosebud. Inside the oval, sketch curved lines to form the overlapping petals. Continue shaping the flower by adding more petals, keeping them slightly uneven to create a natural appearance. Draw a small spiral in the center of the bud. Extend a curved line downward to form the stem, making it slightly irregular to look more realistic.
Add small sepals at the base of the flower before sketching the leaf placement. Draw a single leaf extending from the stem with pointed edges and slight curves. Refine all lines, erase unnecessary guidelines, and make any needed adjustments. Once the outline is complete, finalize the drawing by coloring the petals in red or pink and the stem and leaves in green.
How to Draw a Rose With a Closed Bud
Now I will show you another way to draw a simple rose. I hope you like these beautiful flowers and find this lesson useful. This method uses simple lines that even a beginner can easily follow. The image features a closed rosebud. The flower is drawn schematically, so there is no need to sketch individual petals. It is enough to create a general outline, and the rose will still be easily recognizable.
First, draw a small, teardrop-shaped outline for the rosebud. At the top, add a slightly curved line to form the top petal. Draw another curved line on the side to indicate a folded petal. Sketch a small spiral inside the bud. Below the bud, add short, curved lines to represent the sepals.
Extend two straight, slightly uneven lines downward to form the stem. Draw a single, elongated leaf on the side of the stem, keeping its shape simple and smooth. Refine the overall outline by darkening the lines and making small adjustments where needed. Erase any unnecessary guidelines before coloring. Shade the petals with red or pink and the stem and leaves with green.
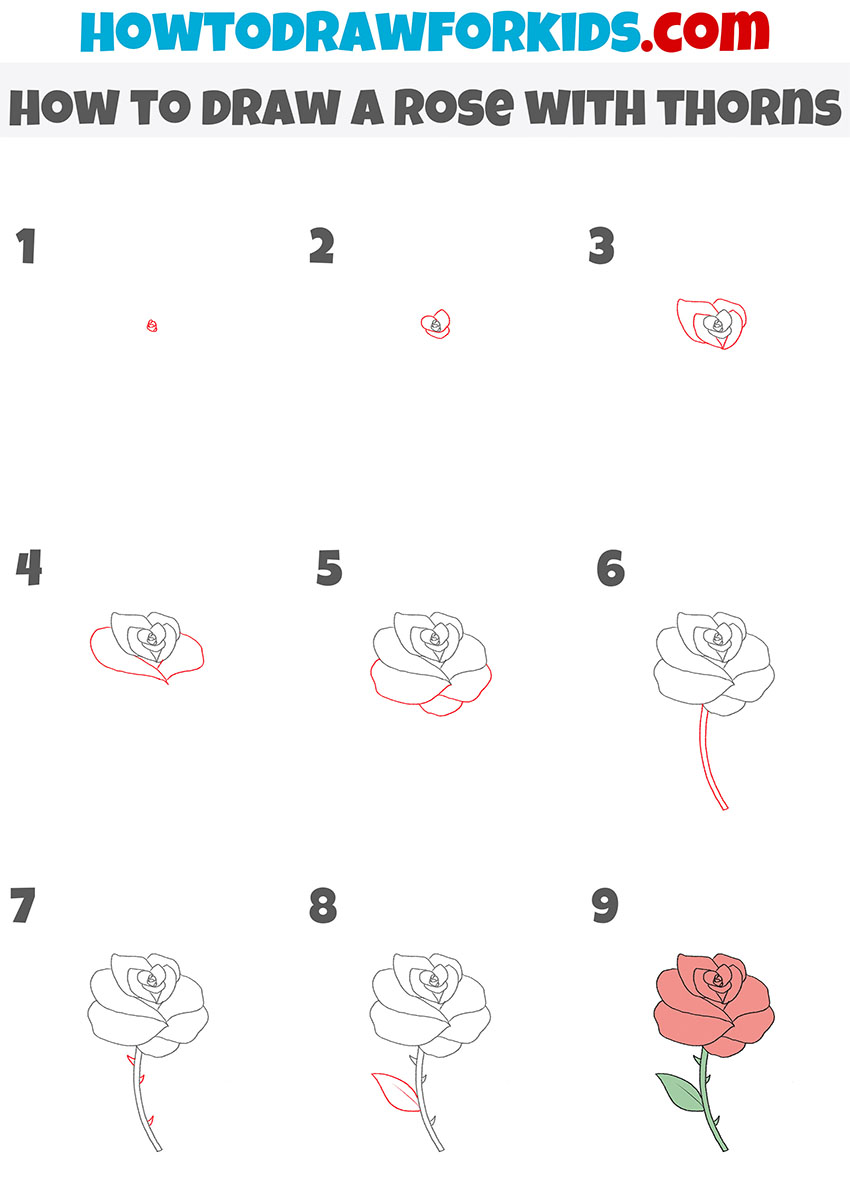
How to Draw a Rose With Thorns
No matter how simple it may seem, the rose is both beautiful and dangerous, as its stem is covered with sharp thorns. This rose drawing tutorial focuses specifically on the thorns. Pay close attention to their sharpness, positioning, and size, and try to represent them accurately on paper.
To learn how to draw a rose with thorns, sketch a small spiral at the center of the rosebud to outline the innermost petal. Gradually add curved lines around it to shape the overlapping petals. Continue expanding the bud by sketching larger, rounded petals that wrap around the center. Once the rosebud is complete, extend a slightly curved line downward to form the stem.
Add small, pointed thorns along the stem at irregular intervals, making sure they vary in size and direction. Draw a few leaves, ensuring they have smooth, curved edges and pointed tips. Refine the entire outline, adjusting the proportions if needed. Erase unnecessary guidelines before proceeding to color. Shade the petals with red or pink, ensuring the layers remain visible. Use green for the stem and leaves, adding subtle shading to emphasize texture. Highlight the thorns by darkening their edges slightly.
Rose on a Stem Drawing Tutorial
In the image, you see a closed bud and a long, thin stem. The composition looks neat and elegant. Follow all the drawing steps carefully and consistently, paying attention to accuracy to achieve a great result.
To learn how to draw a rose with this technique, start by sketching an oval to outline the shape of the rosebud. Add a slightly curved line inside the oval to define the first petal. Sketch another curved line on the opposite side to form the overlapping structure of the petals. Continue by drawing additional petal lines inside the bud to create a more detailed look. At the bottom of the bud, sketch small pointed sepals extending outward.
Draw two straight, slightly uneven lines downward from the sepals to form the stem. Add small curves along the stem to give it a more natural look. Extend short diagonal lines from the stem to guide leaf placement. Draw the leaves with smooth curved edges and pointed tips. Refine the entire outline, erase unnecessary guidelines, and adjust any details if needed. Complete the drawing by coloring the petals red or pink and the stem and leaves green.

Conclusion
This was a really detailed way to learn how to draw a rose, wasn’t it? Now that you’ve gone through all the steps and reached the end of this lesson, I’d love to hear your thoughts.
How interesting was it for you to learn how to draw a rose? Which part of the instructions did you like the most? Did you try all the approaches, or did you choose the one that suited you best? Be sure to share your thoughts, as your opinion is very valuable to me.
Additionally, I want to remind you that I’m always happy to see you subscribe to my social media pages. There, I share new lessons, my thoughts, and unique, interesting content.