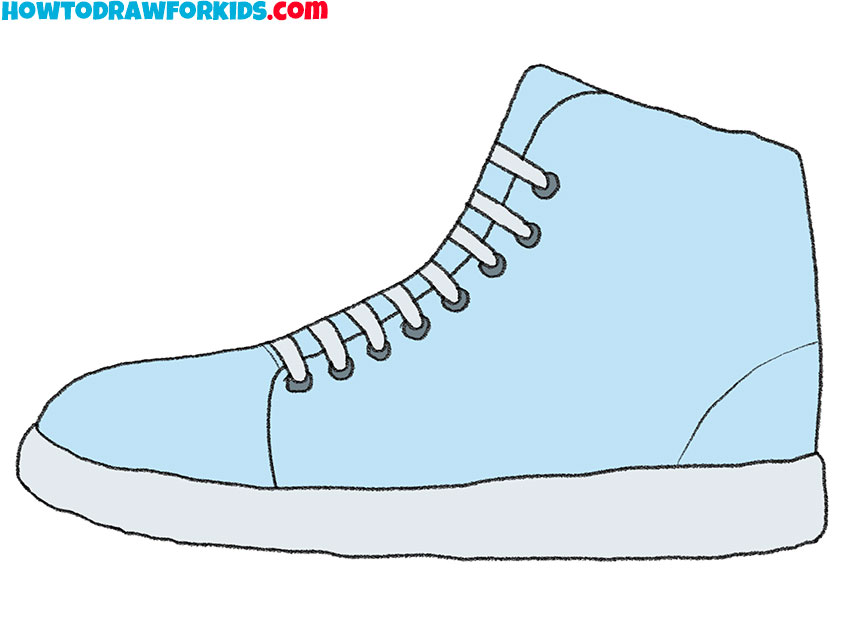
How to Draw a Sneaker
I’m delighted to offer you a detailed, incremental guide on how to draw a sneaker that I’ve meticulously crafted. This tutorial will break down the drawing process into clear, easy-to-follow segments, ensuring that the art of sketching sneakers is accessible and every nuance is within your reach.

How to Draw a Sneaker: Basic Information
Greetings, budding artists and sneaker aficionados! Today, I’m excited to share with you a guide on how to draw a sneaker, crafted with special attention. This lesson is your ticket to transforming ordinary sneakers into an impressive sketch. We’ll break down the process into simple steps so that every line and curve is easy for you to master.
These sneakers feature a classic high-top silhouette – a timeless style that transcends generations. I will guide you at every step, showing how to capture the distinctive shape of the sneaker, the gentle curve of the toe box, and the bold lines of the sole. With my method, you’ll learn to replicate this design and acquire the skills to create your own sneaker styles.
Let’s grab a pencil and draw a sneaker filled with personality. From the intricate lacing to the confident outline of the upper, we’re capturing a slice of fashion culture. Together, we’ll watch as your simple lines evolve into sneakers that appear to step right off the page.
Sneaker Drawing Tutorial
Materials
- Pencil
- Paper
- Eraser
- Coloring supplies
Time needed: 30 minutes
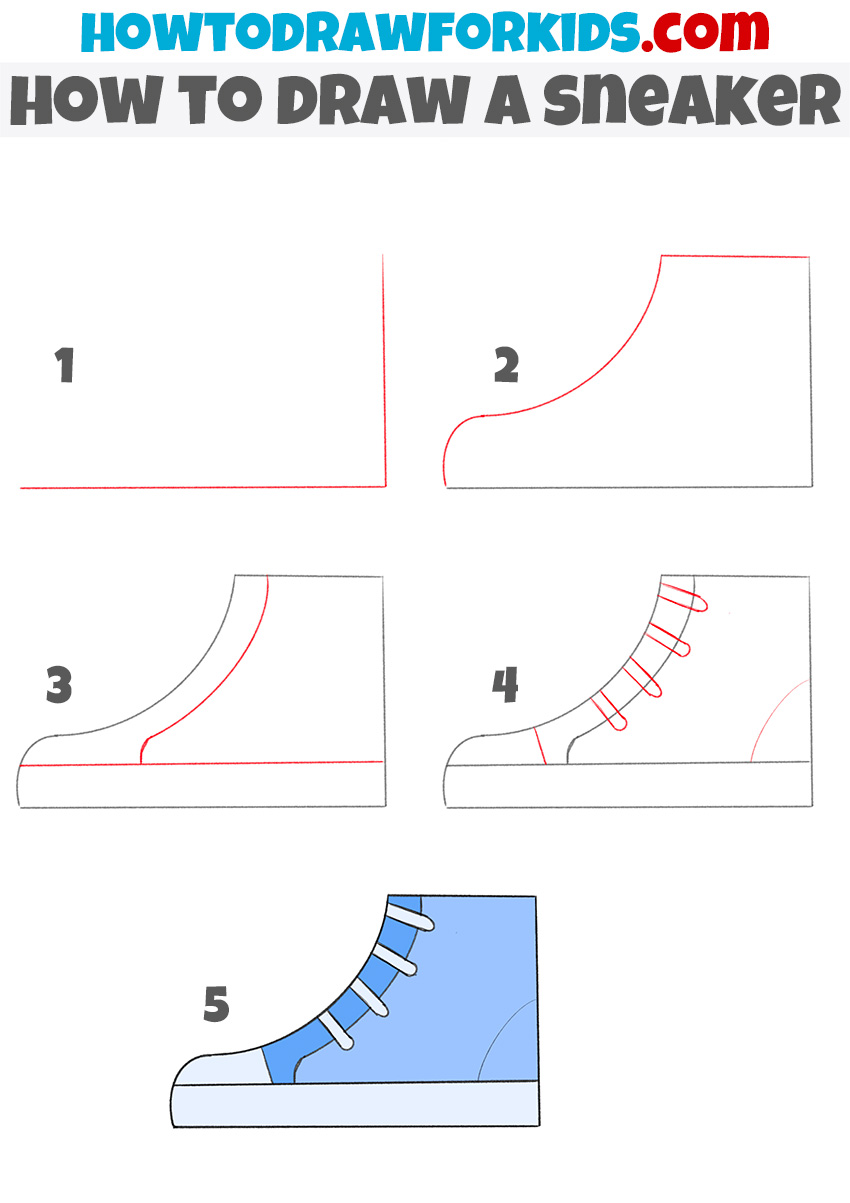
How to Draw a Sneaker
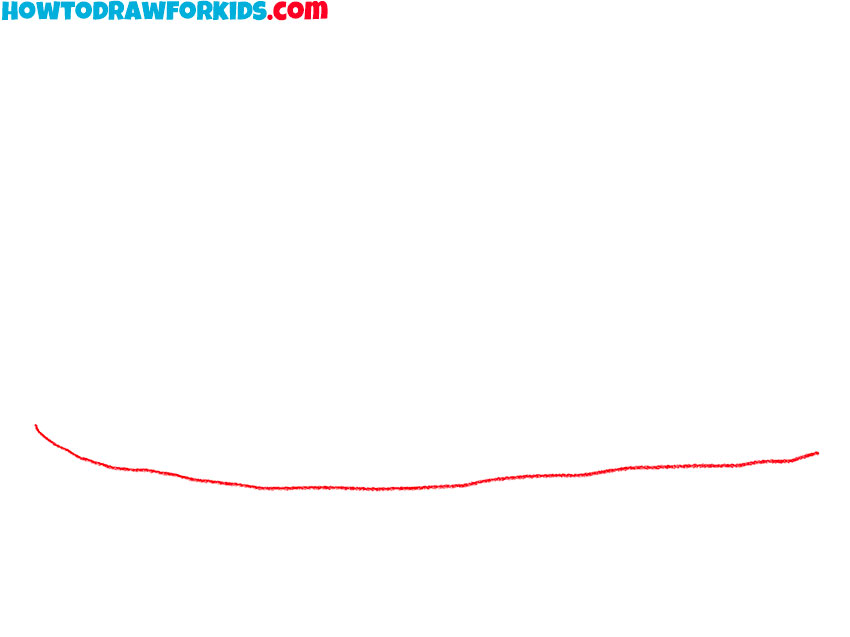
- Start drawing the sole.
This step will be easy for you, you only need to draw one curved line to complete it.
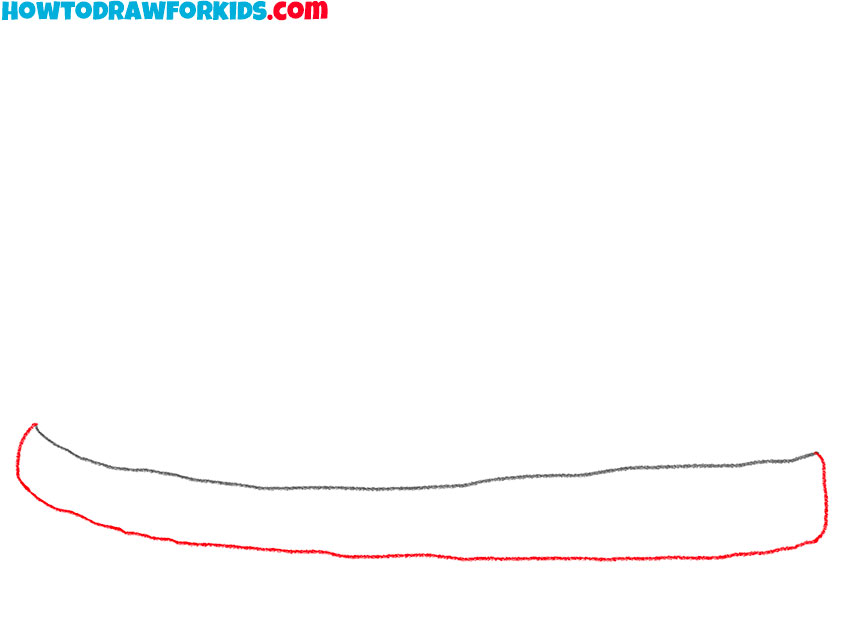
- Finish drawing the sole of the sneaker.
Now draw another curved line below the previously drawn line.
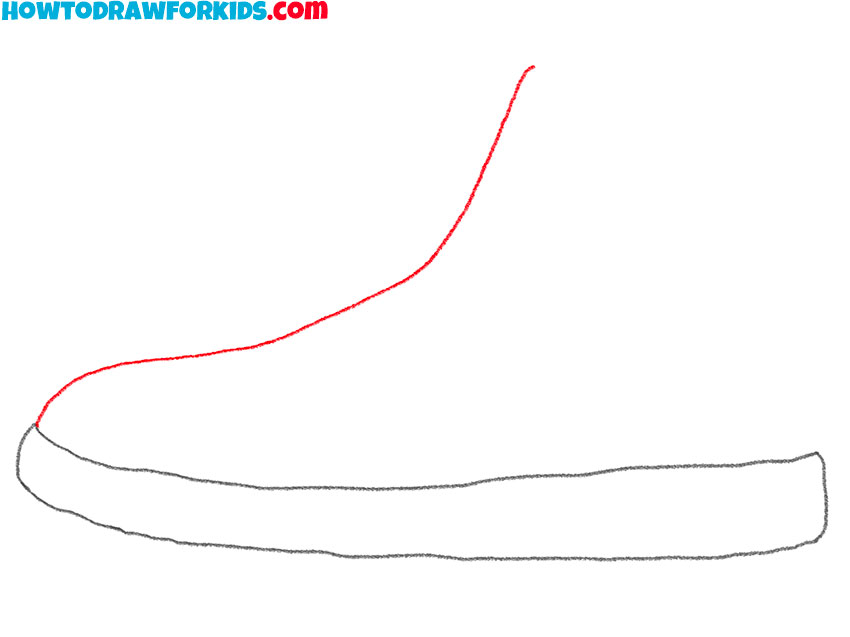
- Start drawing the top of the shoe.
To draw the toe of the sneaker, draw one long, curved line as shown.
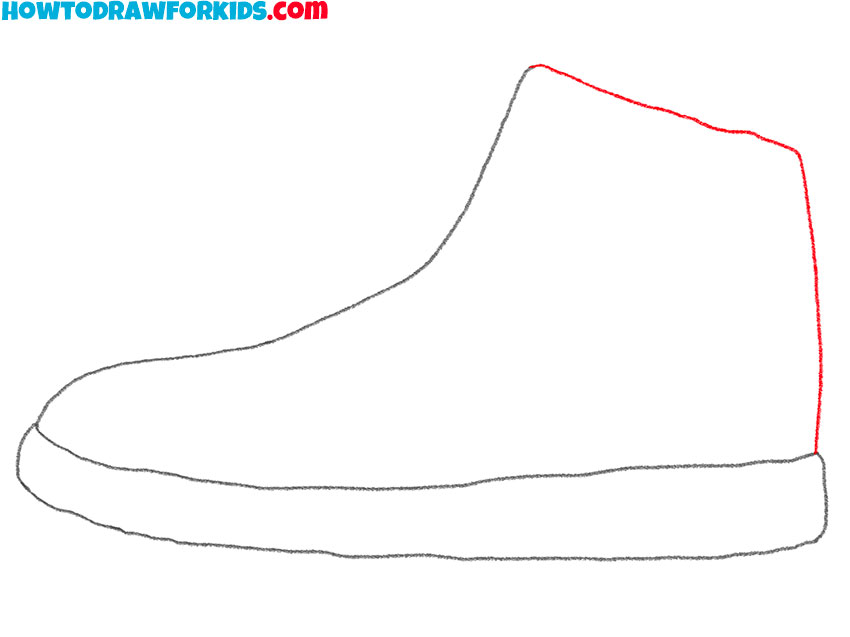
- Add the back of the sneaker.
Connect the previously drawn line to the back of the sole of the sneaker using a curved line.
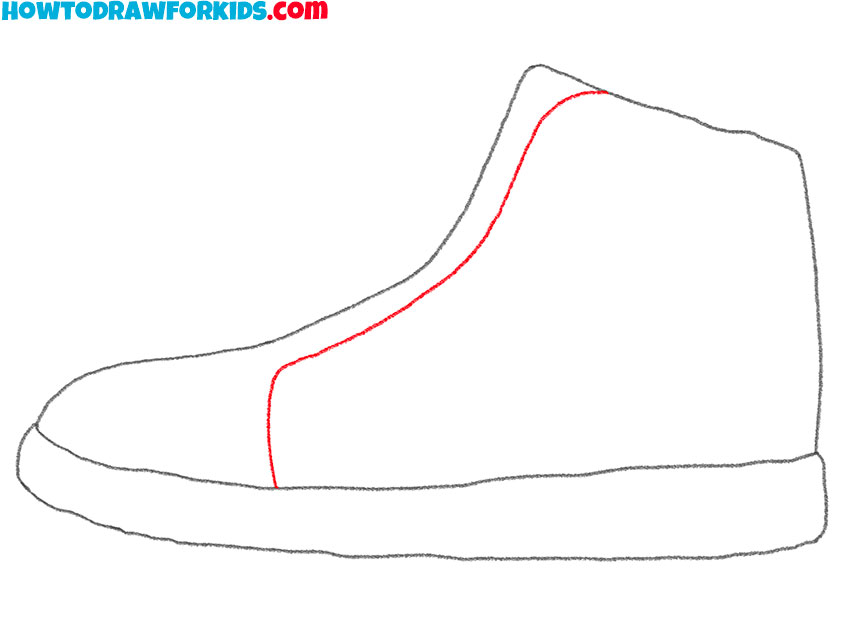
- Add details.
Sketch out one curved line along the shoe as shown.
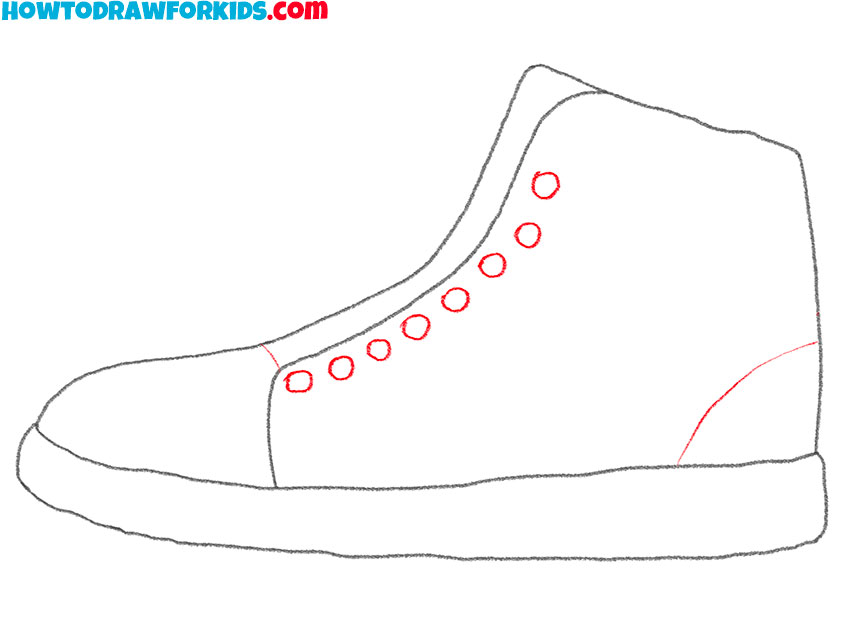
- Depict the lace holes and extra lines.
You can draw the holes for the laces in the form of circles. Add two lines of different lengths.
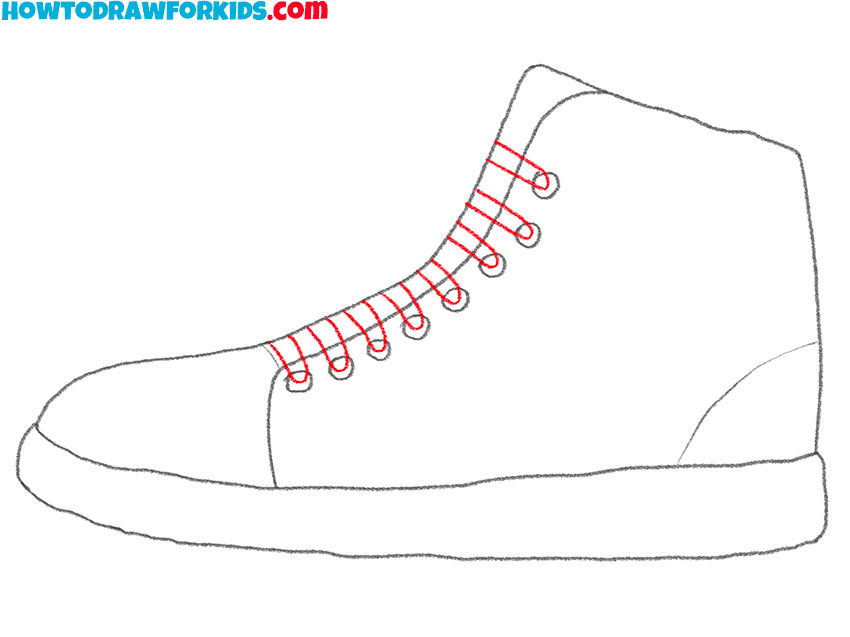
- Draw the lacing.
Beside each of the previously drawn circles, add a curved line as shown.
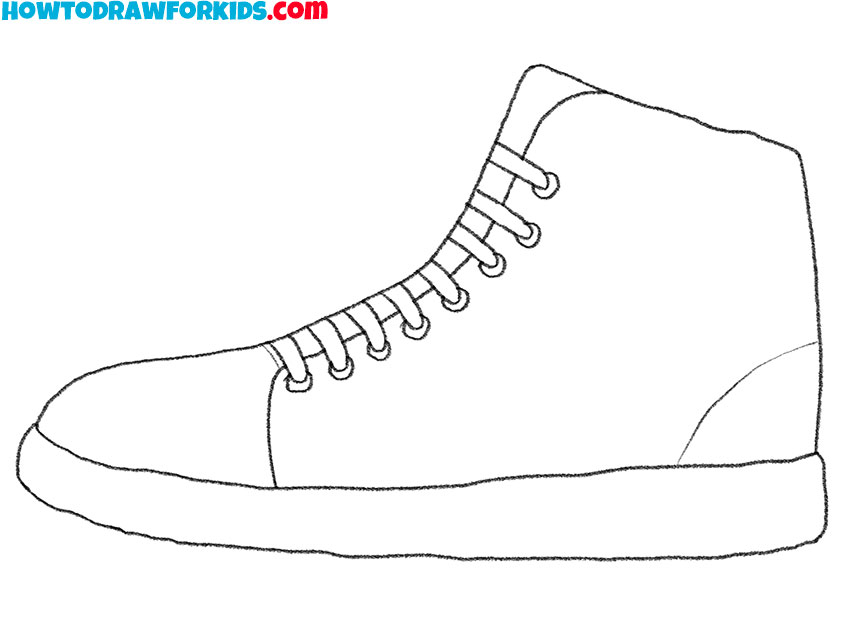
- Correct inaccuracies.
Use the eraser to remove all unnecessary lines.
- Color the drawing.
To color the sneaker, use shades of blue and gray.
Additional Content
To improve your learning, I’ve also created a free PDF file for this lesson. It’s a succinct supplement to the main guide, which you can download and use anytime and anywhere, even without an internet connection. Inside, you’ll find additional materials aimed at improving your drawing skills once you’ve mastered the basics.
While the online tutorial lays the groundwork, the PDF offers you a plethora of practice materials. It’s designed to help you transition from basic sneaker drawing skills to reproducing them in intricate detail, preparing you for more advanced drawing tasks.
Use this PDF to hone your technique, explore new textures and details, or to perfect the subtleties of sneaker design. It’s your personal toolkit for ongoing improvement, ensuring that your drawing journey continues, even when you’re offline.
Alternative Drawing Technique
In addition to the main lesson presented above, I have developed an alternative sneaker drawing technique that is intended for a simpler and more accessible approach. This new method focuses on basic shapes and a minimal number of lines, making it ideal for beginners or those looking to enhance their basic skills.
This alternative approach simplifies the complexities of sneaker design, emphasizing clarity and ease of execution. By focusing on key elements of the sneakers, this method allows you to practice effectively, gradually increasing your confidence in your drawing movements and understanding of shapes.
By introducing this simpler technique, my goal is to provide you with a diverse set of tools for artistic expression. Whether you are just starting out or refining existing skills, this method offers a fresh perspective on the art of sneaker drawing.
How to Draw a Sneaker for Kindergarten
This simplified five-step method of drawing sneakers is designed with the needs of young children in mind. To begin, kids draw two lines, one vertical and one horizontal, to outline the sole and side profile. It’s like assembling a picture from puzzle pieces, where each detail contributes to a complete image.
In the second step, the body of the sneaker is outlined, teaching children how to combine curves and angles to depict a high-top. This stage introduces the basic concepts of form and structure, paving the way for the details that will later bring the sneaker to life. It’s about making every stroke on the paper meaningful, turning simple shapes into something more complex.
During the third and fourth steps, the sneaker gains personality with the addition of the sole’s curve and the lacing. Finishing the sneaker with color in the fifth step not only adds visual appeal but also deepens children’s understanding of how colors can animate a drawing. Despite its simplicity, this method covers fundamental drawing skills.
Sketch Like a Pro: The Ultimate Sneaker Drawing Tips
In our artistic quest, every stroke carries the potential to create something extraordinary. Here, I offer a collection of tips and tricks to elevate your sneaker sketches from simple outlines to works of art that capture the eye and imagination.
- Start with light strokes: Begin your sketch with soft lines, so it’s easy to make adjustments or erase if needed. This also helps to prevent the final drawing from looking too rigid.
- Keep your lines flowing: When drawing the sneaker’s outline, strive for smooth, continuous lines rather than short, choppy ones. This will give your sneaker a more natural and cohesive appearance.
- Study real sneakers: Observe the structure and details of actual sneakers to understand how to capture them in your drawing. Notice where the light falls and how the shadows form.
- Practice symmetry: The beauty of a sneaker is often found in its symmetry. Pay close attention to the even spacing of the eyelets and the laces to maintain a balanced look.
- Use varied line weights: Employ a mix of thicker lines for the outer contours and thinner ones for the inner details. This technique adds depth and dimension to your drawing.
- Add shading to create volume: Lightly shade areas that would naturally be in shadow, such as under the lacing or inside the shoe’s opening, to give your sneaker a three-dimensional feel.
- Experiment with textures: Sneakers come in various materials. Use different pencil strokes to mimic these textures – short dashes for suede, smoother shading for leather, and so forth.
- Color inside the lines: When you add color, stay within the boundaries of your drawing. This helps to keep your work clean and sharp.
- Layer your colors: Start with lighter shades and gradually build up to the darker tones, especially if you’re working with colored pencils. This creates a rich, vibrant look.
- Be patient: Great art isn’t rushed. Take your time with each step, ensuring that every part of the sneaker is given due attention.
With these tips and tricks, you’re honing your skills, developing your style, and learning to appreciate the subtleties of what might seem like everyday objects. Carry these lessons with you as you move forward, and let them shape your path to becoming a versatile and skilled artist.
Conclusion
I hope you found this tutorial helpful and that it sparked your enthusiasm for drawing! If you’re eager to explore more, check out other interesting lessons on my website. Whether you want to learn how to draw a football or a turtle, there’s a variety of topics to choose from that can help you expand your artistic skills.
Don’t forget to subscribe to my social media channels to stay informed about new content and updates. Your engagement means a lot, and I’m always excited to hear from you. If you have any requests or suggestions for future lessons, please leave a comment below the lesson.