How to Draw a Tree
In this tutorial I have collected for you 7 different and simple techniques that will definitely teach you how to draw a tree step by step.

How to Draw a : Basic Information
Trees exhibit a variety of natural patterns, from the spiral arrangement of leaves to the roots textures. Drawing a tree helps young artists learn to recognize and replicate these patterns, training their ability to observe and interpret the nature.
Trees can be drawn with varying levels of detail, from detailed to simplified forms. Practicing both methods helps artists understand when to use detail and when to simplify, depending on the purpose and style of their drawing. As I said, on this page I’ve collected tutorials on how to draw trees with different levels of details, so you can study both really simple methods and bit more detailed.
Trees naturally exhibit both symmetrical and asymmetrical elements. Practicing drawing these aspects helps artists understand balance in nature. And the instructions that you will find on this page will teach you how create this balance on the paper.
Drawing Tutorial
Materials
- Pencil
- Paper
- Eraser
- Coloring supplies
Time needed: 1 hour and 20 minutes
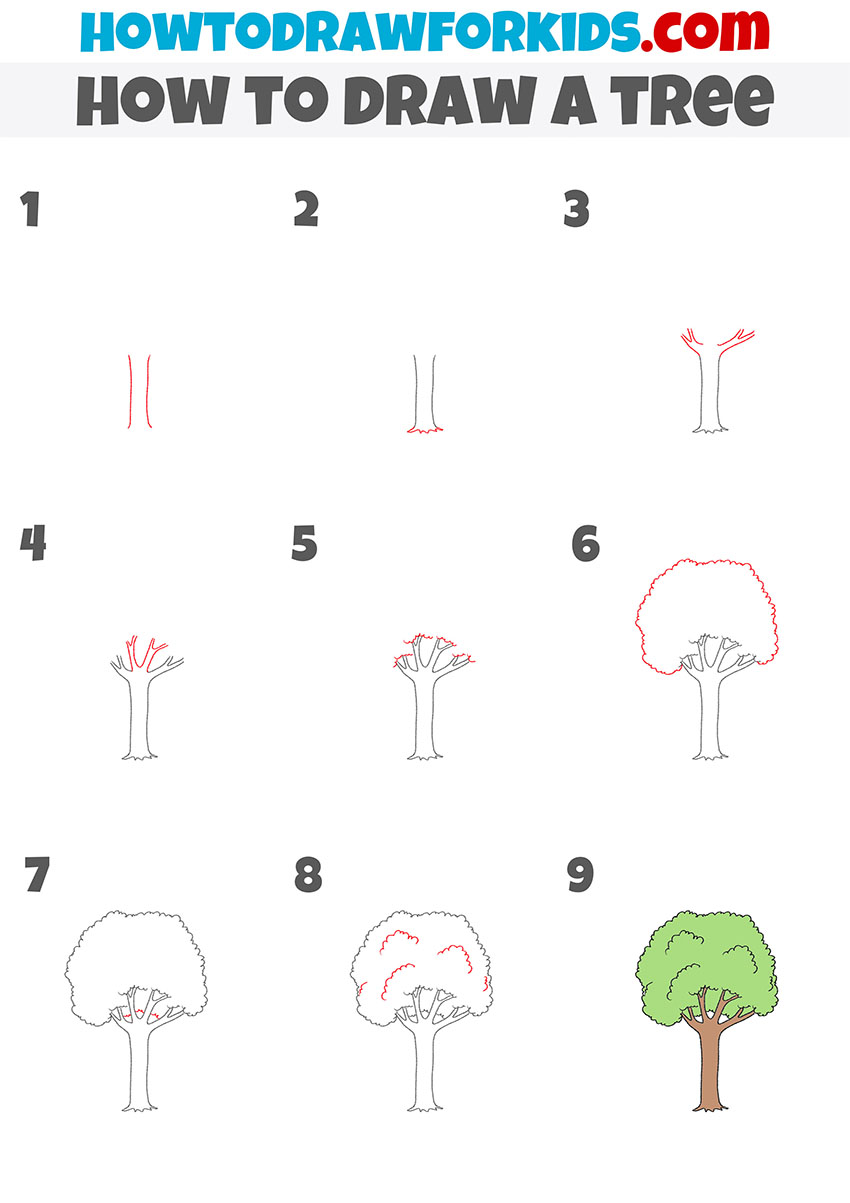
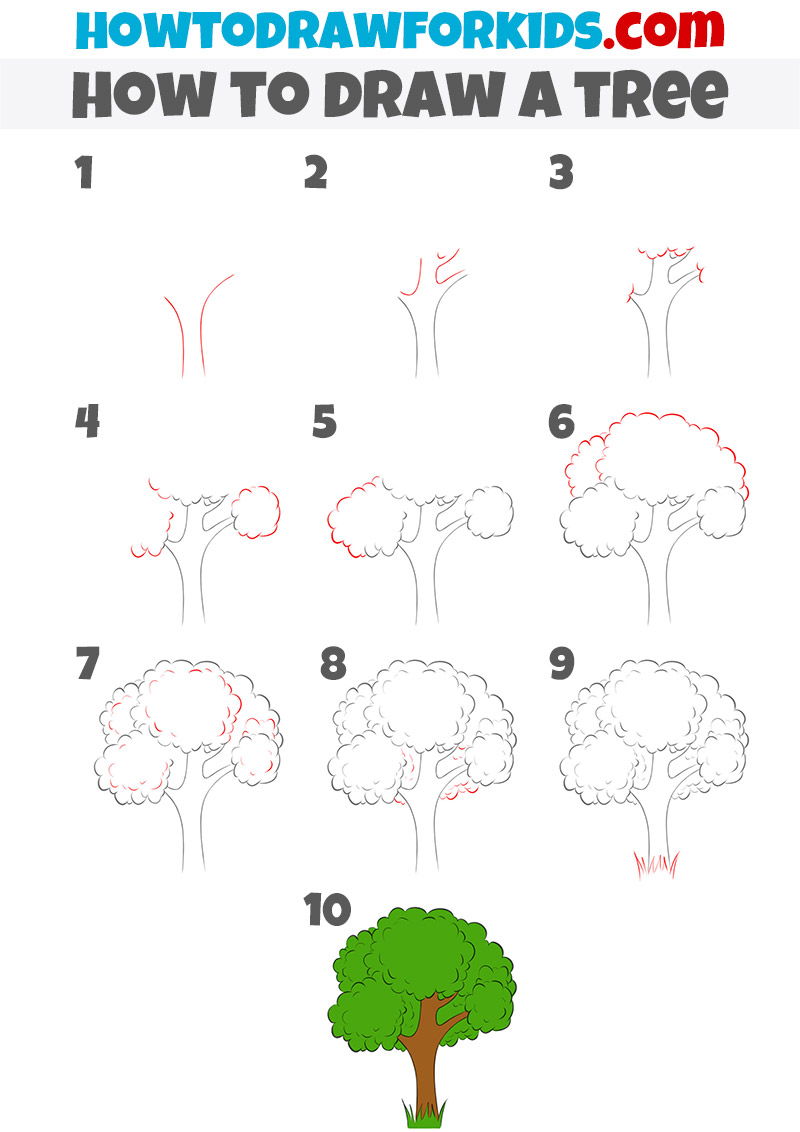
How to Draw a Tree Step-by-Step
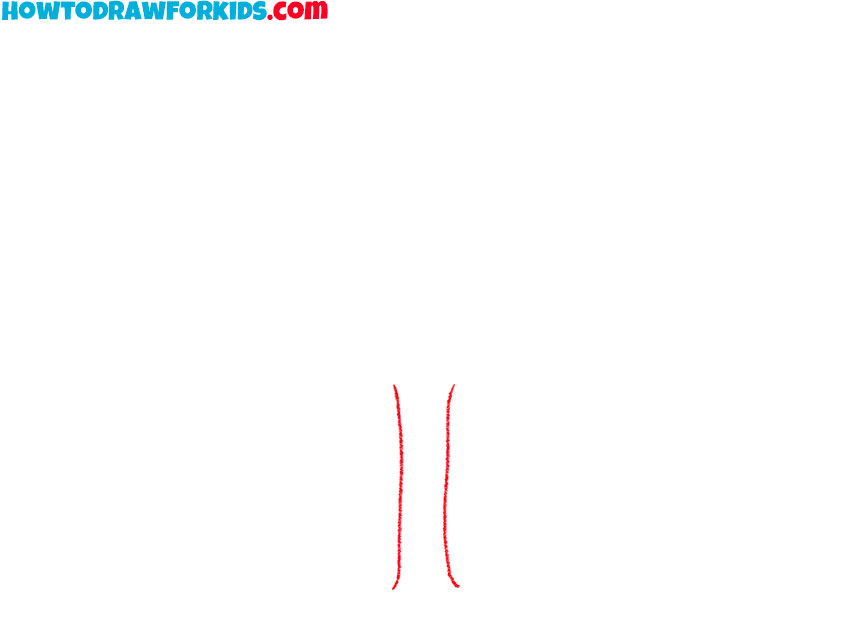
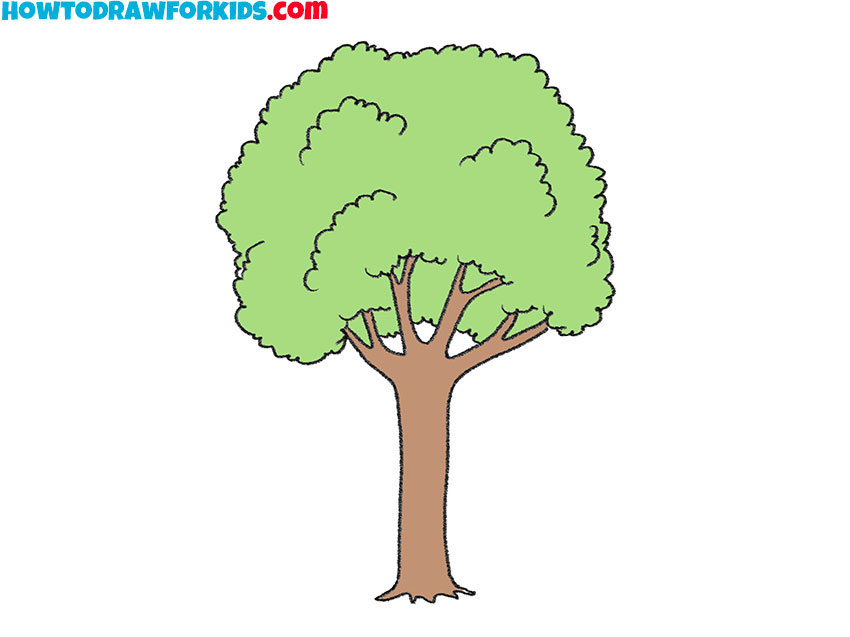
- Draw the tree trunk base.
Begin by drawing the base of the tree trunk. Strat with two simple curved lines for the side edges of the trunk. These lines should be parallel and not too far apart, representing the main structure of the tree. This initial step sets the foundation for the entire drawing.
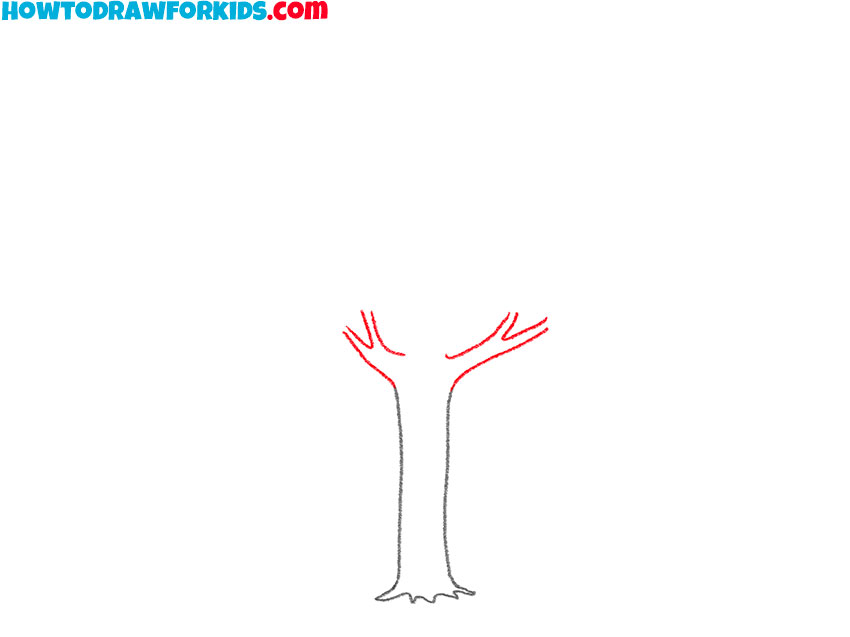
- Illustrate the roots.
Next, refine the shape of the trunk by adding more detail to the bottom. Draw a slightly wavy line connecting the two vertical lines at the base. This line should resemble the natural unevenness of the tree’s roots emerging from the ground.

- Add the primary branches.
Now, add the primary branches extending from the top of the trunk. Draw curved lines on each side of the top of the trunk, angled upwards and outwards. These lines should split from the top center of the trunk and curve gently to form the main branches.
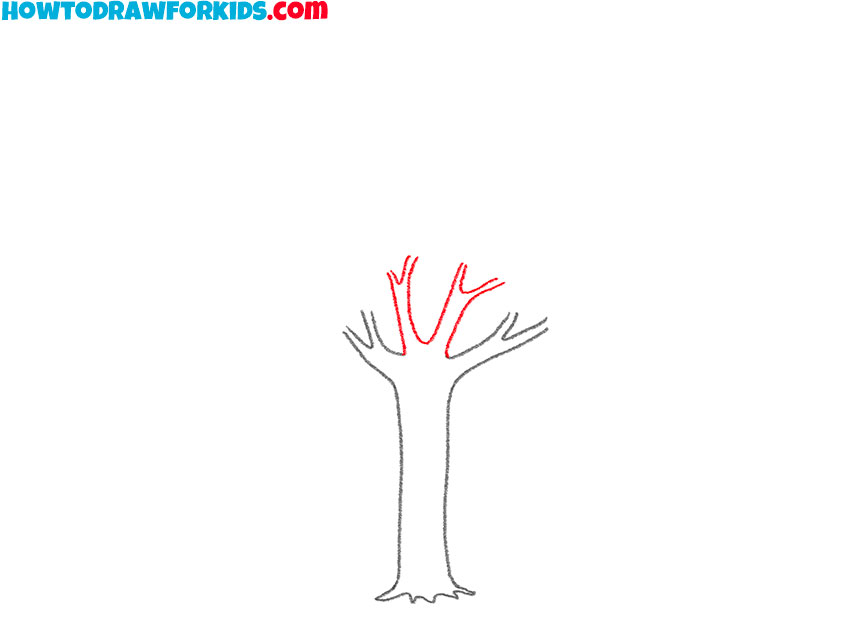
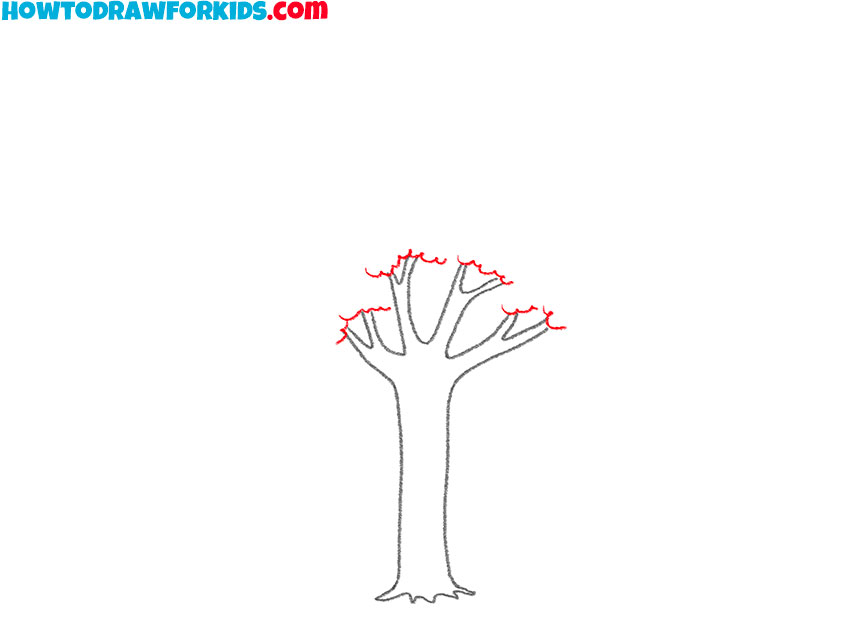
- Illustrate more branches.
From each primary branch, draw smaller branches that bifurcate outwards and upwards. These branches should be thinner and shorter, following the natural growth pattern of a tree. This layering of branches creates a more realistic structure, showing how the tree branches spread and divide.
- Start drawing the foliage.
Continue adding more detail to the tree by drawing the bottom edges of the tree crown. This is the part of the tree where the foliage meets the branches. To illustrate this part right, draw a series of curved lines of varying sizes at the ends of the branches from the previous steps.
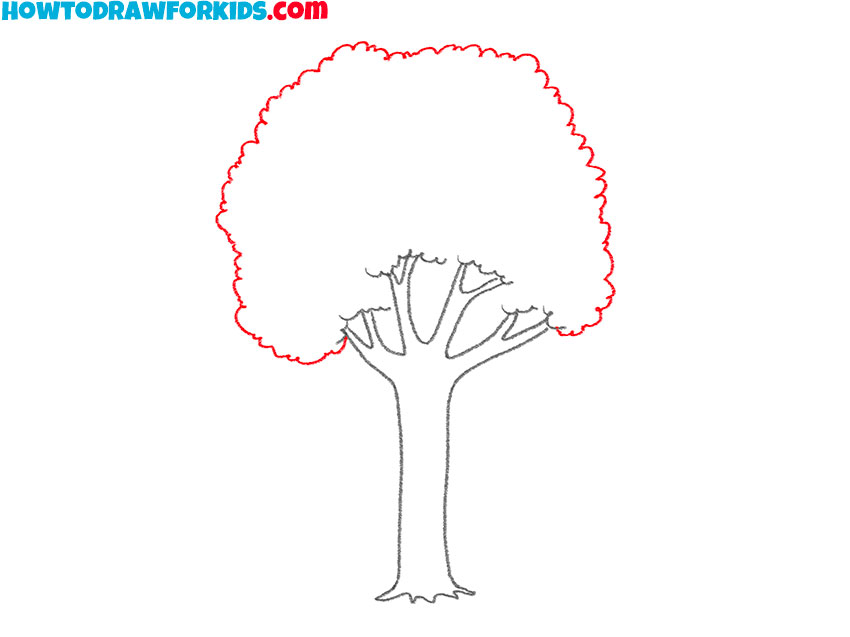
- Outline the foliage of the tree.
Begin outlining the foliage around the branches. Draw a large, cloud-like shape encompassing the top of the tree, starting from one side of the trunk and curving around to the other side. This shape should be irregular and wavy, mimicking the natural outline of leaf clusters.
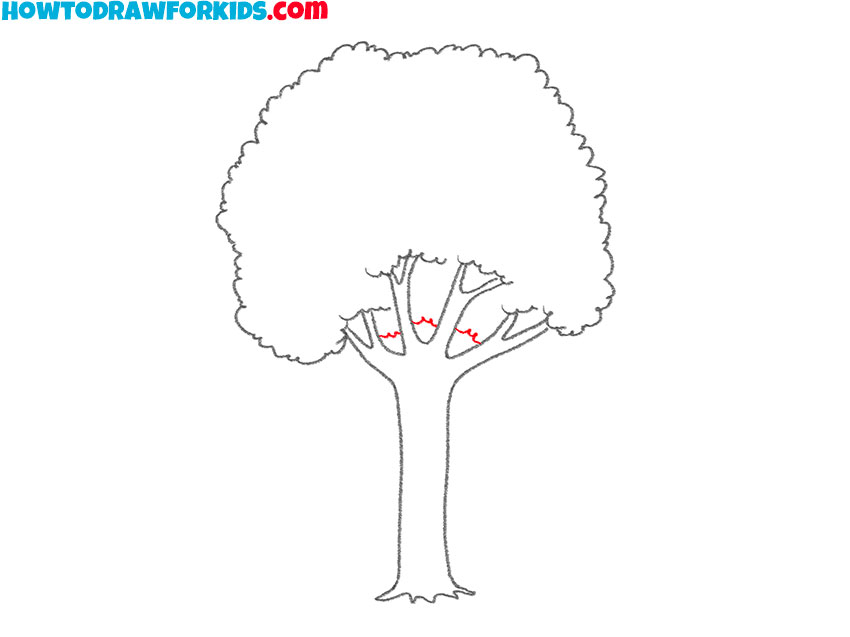
- Refine the foliage shape.
Now let’s give the tree drawing some volume using the simplest methods. To do this, depict the lower part of the tree crown located behind the branches using a series of short curved lines. These simple techniques will create volume in your tree drawing while maintaining a cartoonish look.
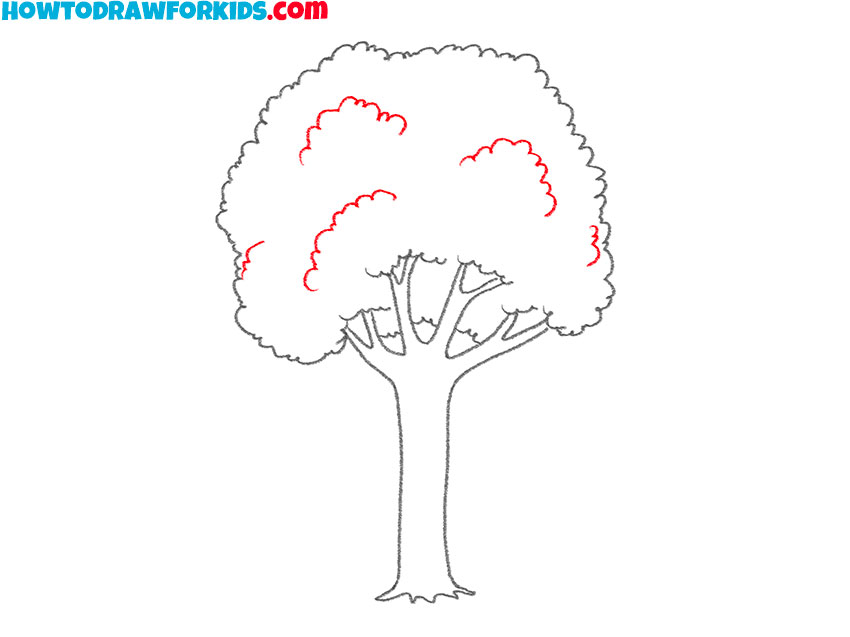
- Add details to the foliage.
Add further detail to the foliage by drawing smaller, curved lines within the larger leaf clusters. These lines represent individual leaves and clusters, adding texture to the canopy. Vary the size and direction of the lines to create a natural, varied appearance.
- Color the sketch.
Use shades of green for the foliage. You can use darker greens for shaded areas and lighter greens for highlights. For the trunk, use brown tones. You can add darker shades to indicate shadows and lighter ones for highlights.
Additional Content
I’ve also created a free PDF file of this lesson on how to draw a tree for your convenience. It’s a condensed version that encapsulates the essential steps of drawing a tree, designed for easy reference and offline use. Whether you’re nestled in your favorite cafe or sketching in the park, this PDF will be your portable guide.
How to Draw a Tree: Additional Techniques
Beyond the core tutorial, I’ve developed several alternative techniques for drawing trees to challenge and refine your skills. These variations encourage you to experiment with different styles of drawing, deepening your understanding of tree anatomy.
Each alternative technique introduces a unique aspect of tree drawing. But all these additional methods are still very easy to follow for kids and aspiring artists.
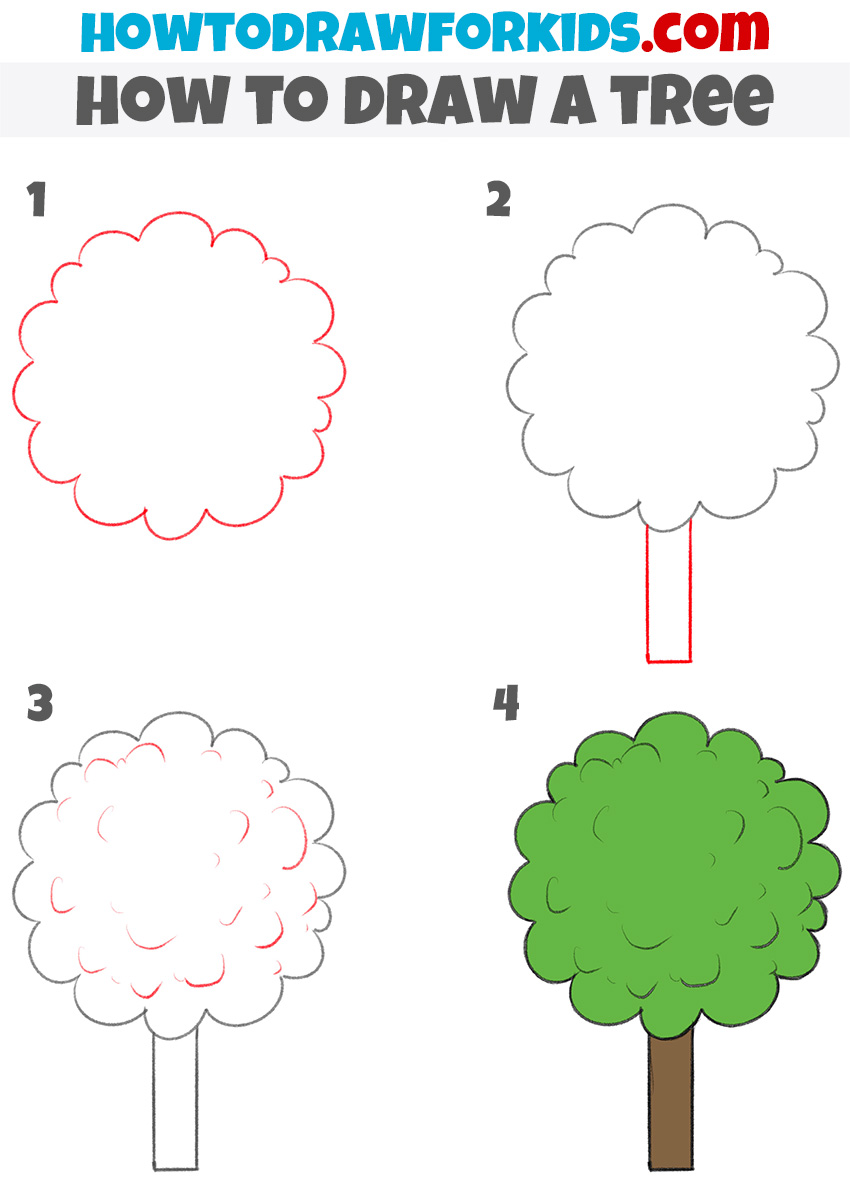
Drawing a Tree for Kindergarten
The process of learning to draw a tree can be a joyful and educational activity for children, and this tree-drawing method is perfectly suited for young artists in kindergarten. It uses basic shapes and motivates to study natural forms. This method is child-friendly, focusing on building confidence through simple, achievable steps that result in a recognizable tree.
This tutorial is essentially a basic one for those just starting out in art, as this method of drawing a tree only includes basic shapes.
We start with a fluffy cloud shape for the leaves. This initial shape sets a foundation helps the young artist understand the basic silhouette of a tree. Next, a simple straight line serves as the trunk. This trunk is much simpler than the one in the initial tutorial, as it has a more cartoonish look without any curves or extra details.
The final steps involve adding details such as branches peeking through the leaves and coloring the sketch.
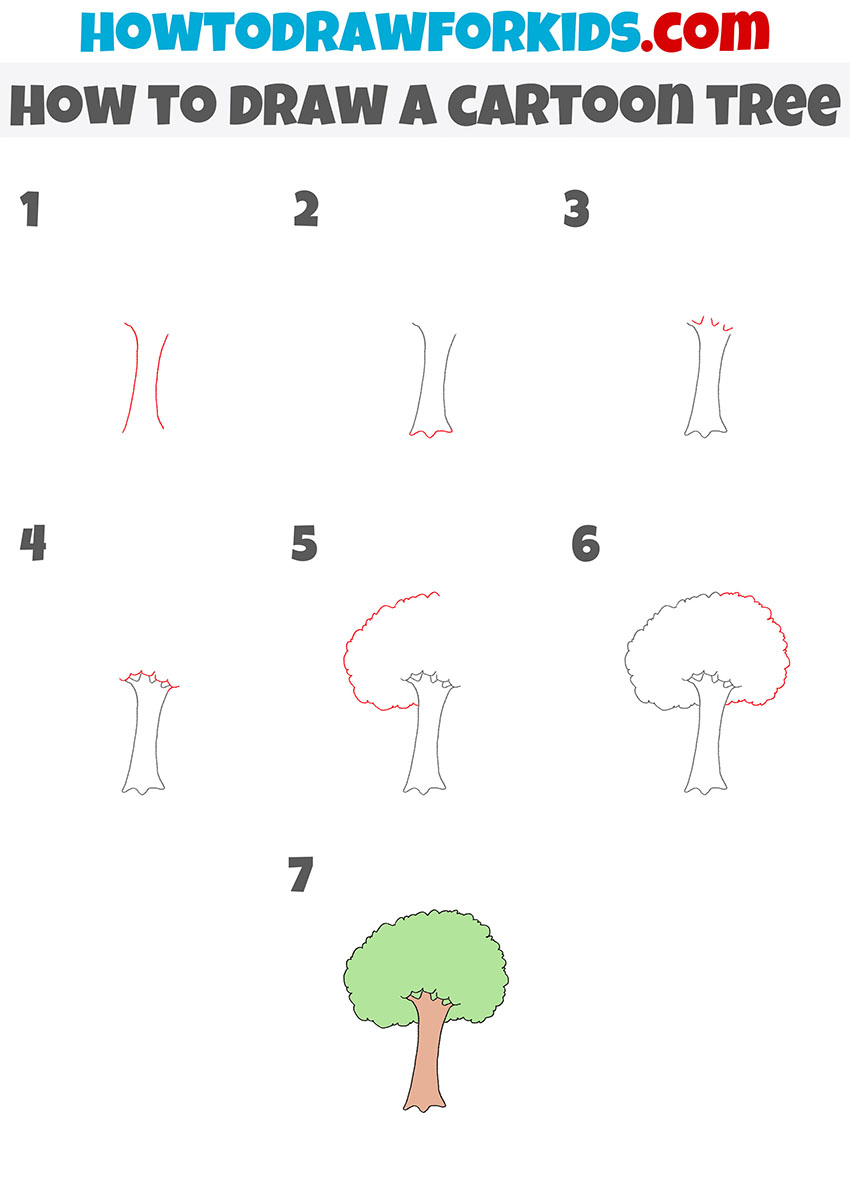
Drawing a Cartoon Tree
This tutorial on how to draw a tree in cartoon style provides more detail while remaining straightforward. The tree shape resembles a real one more closely, and the additional steps allow for creating a more detailed tree. Despite this, it remains simple and easy for kids to follow.
Start by sketching the trunk with two slightly curved lines that narrow at the top and widen at the base, adding a wavy line at the bottom for roots. Next, draw the primary branches emerging from the top of the trunk with simple curves. Outline the foliage by creating a large, cloud-like shape around the branches, ensuring it looks full and rounded.
Add more detail to the foliage with wavy lines to indicate leaf clusters, keeping the shapes consistent for a cartoon style. Finally, color the tree using a uniform green for the leaves and brown for the trunk.
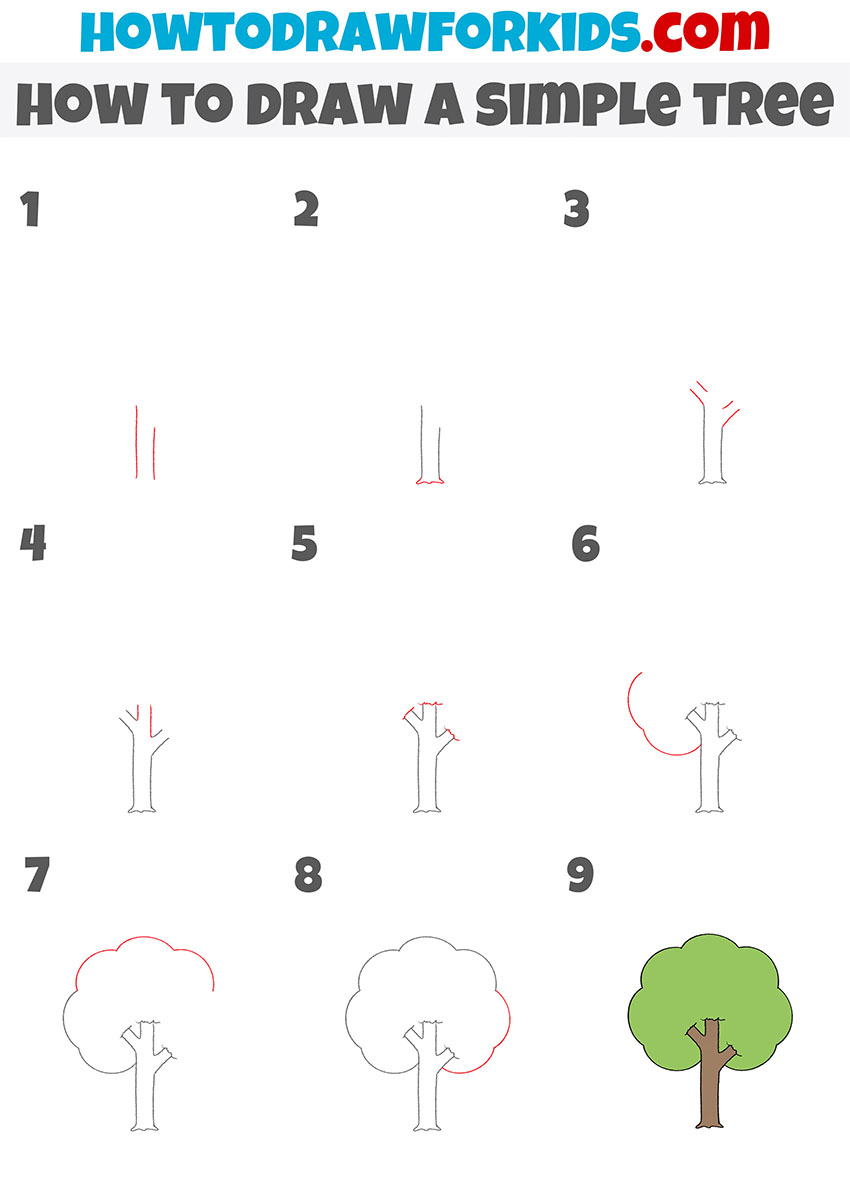
Drawing a Simple Tree
When introducing the art of drawing to newcomers, a simplified method often serves as the best gateway. In this lesson, the streamlined process of sketching a tree breaks down into approachable steps, starting with a singular vertical line that forms the trunk.
The subsequent phases involve adding primary branches, then a basic outline for the leafy canopy, all while maintaining simple shapes and lines. This distilled form of drawing taps into the essential elements of the tree’s anatomy without overwhelming with details. It’s about mastering the basics first.
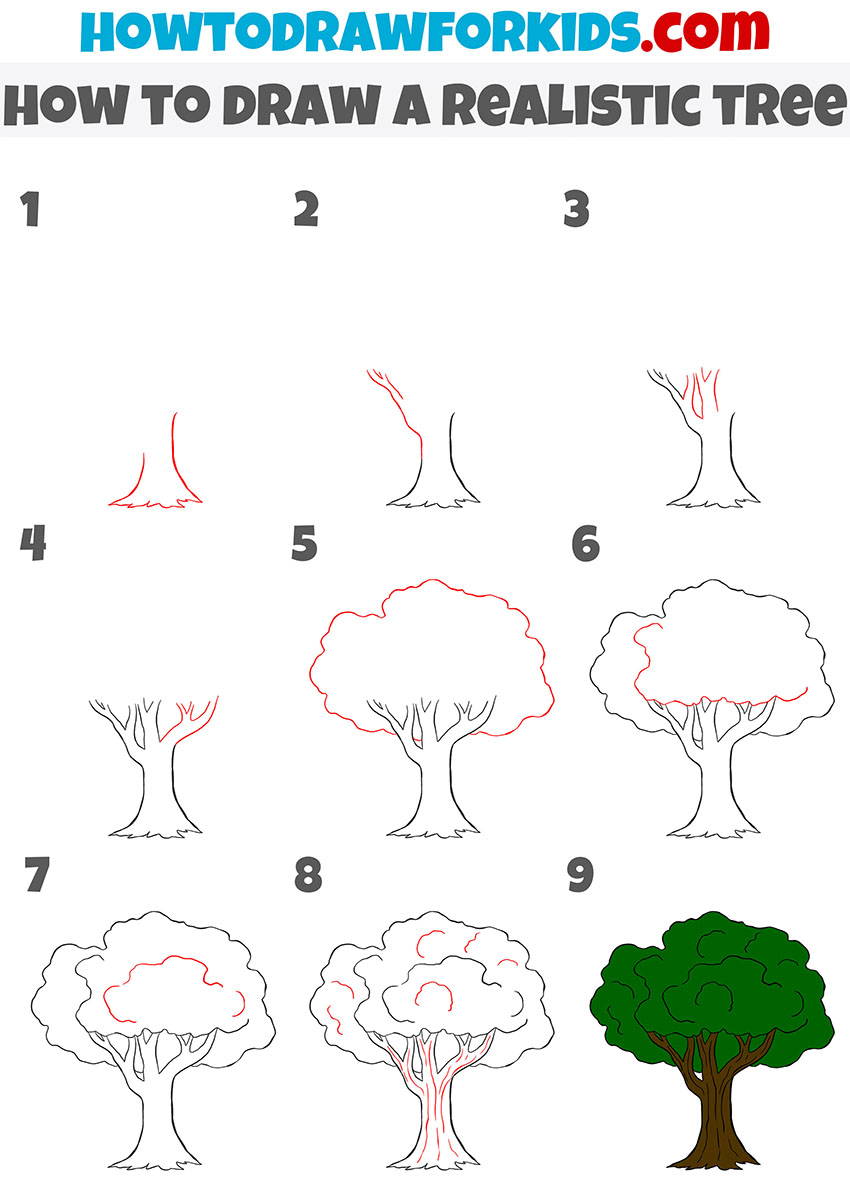
Adding Some Realism
This tutorial focuses on a bit more realistic approach to drawing trees. Key differences between this tutorial and previous ones include a bit more intricate detailing of the trunk and branches, and a more realistic shape of the foliage.
To begin, sketch a wide-based trunk with slightly curved lines and a wavy root line at the bottom. Add primary branches that extend naturally from the trunk, then outline the tree’s foliage with large, irregular shapes. Improve the foliage by drawing smaller lines within these shapes to represent leaf clusters. Pay attention to finer details on the trunk and branches to depict the texture of the bark accurately.
Finally, make your drawing finished with color: use various shades of green for the leaves and different browns for the trunk. You can incorporate shadows and highlights to create a realistic, three-dimensional appearance.
Adding More Different Details
Taking into account the familiar strokes of previous methods, this drawing technique serves as additional practice to refine your skills.
To start, draw the basic shape of the trunk with two curved lines that slightly diverge at the bottom, creating a sturdy base. Next, add the primary branches extending from the top of the trunk, ensuring they curve upwards naturally. Begin to outline the foliage by sketching small, cloud-like shapes around the branches, which will serve as the foundation for the tree’s canopy.
Continue to add more of these rounded shapes to fill out the canopy, creating a dense and voluminous appearance. Add further details by drawing smaller lines within the foliage to represent clusters of leaves, improving the texture.
Finally, complete the drawing by coloring the tree with varying shades of green for the leaves and brown for the trunk, giving it a lifelike look.
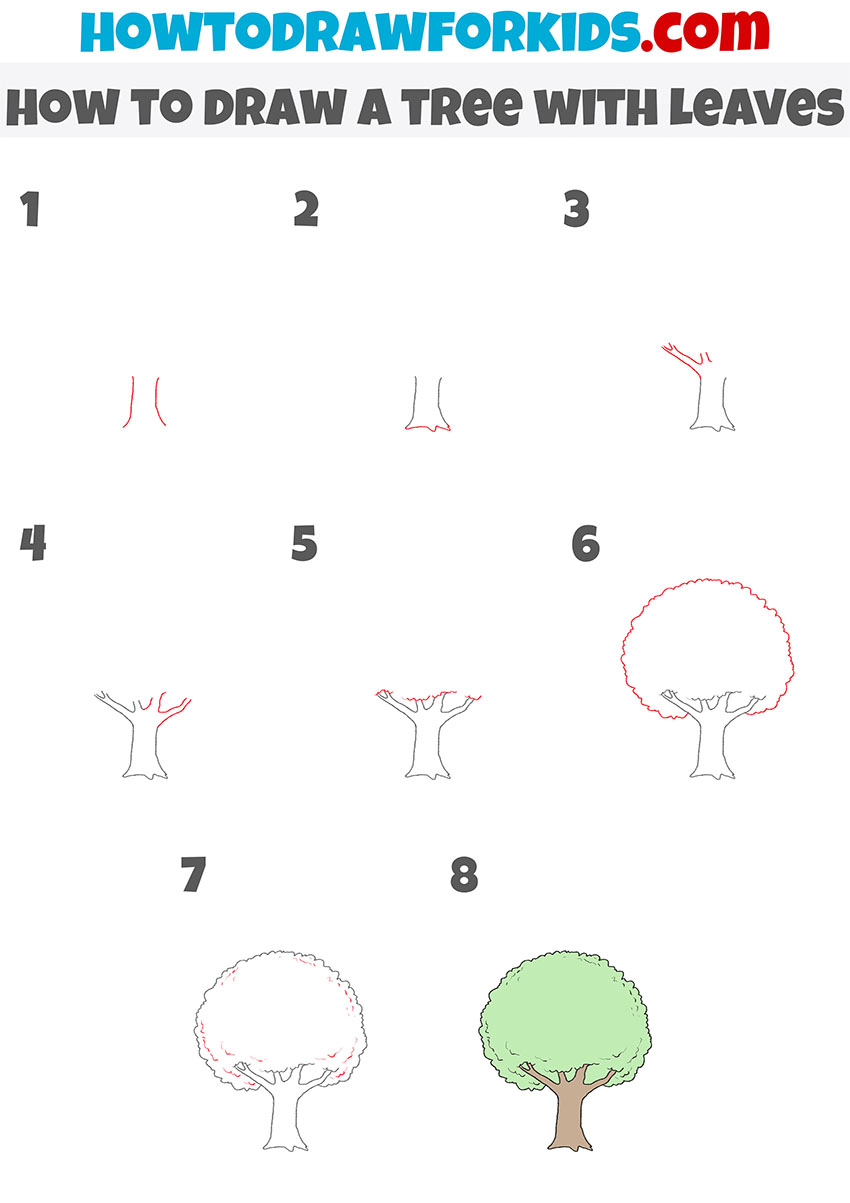
Playing with Shapes
As an artist, creating variations on familiar themes, like a tree, offers a refreshing challenge. This method presents a tree with a more expansive and grander form, a divergence from the slender portrayals typically taught. The broad base and thick branches suggest a maturity and robustness not seen in other styles.
Start by drawing the tree trunk with two slightly curved lines and a wavy base to represent the roots. Next, add a primary branch extending from one side of the trunk, followed by additional branches on both sides, maintaining a simple structure.
Then, outline the foliage with a large, cloud-like shape that encompasses the top of the tree. Add more detail to the foliage with wavy lines within the outline to create texture. Finally, add shades of green for the leaves and brown for the trunk, giving the drawing a natural appearance.
Conclusion
If today’s tree drawing tutorial has planted the seed of creativity within you, consider checking my other drawing tutorials. With my tutorials you can learn to illustrate everything from people to landscapes.
I invite you to follow me in social media for the latest updates. Your thoughts and suggestions are really important for me, so please, leave your comments and wishes for future lessons.


I’d truly needed for something Mural Art wall painting special in America & Canada as well.😀
That sounds interesting, David. I haven’t done mural-style lessons yet, but it could be a good idea for future content.