How to Draw a Windmill
This subject is a traditional building seen in many countries, which we will replicate in this tutorial on how to draw a windmill.
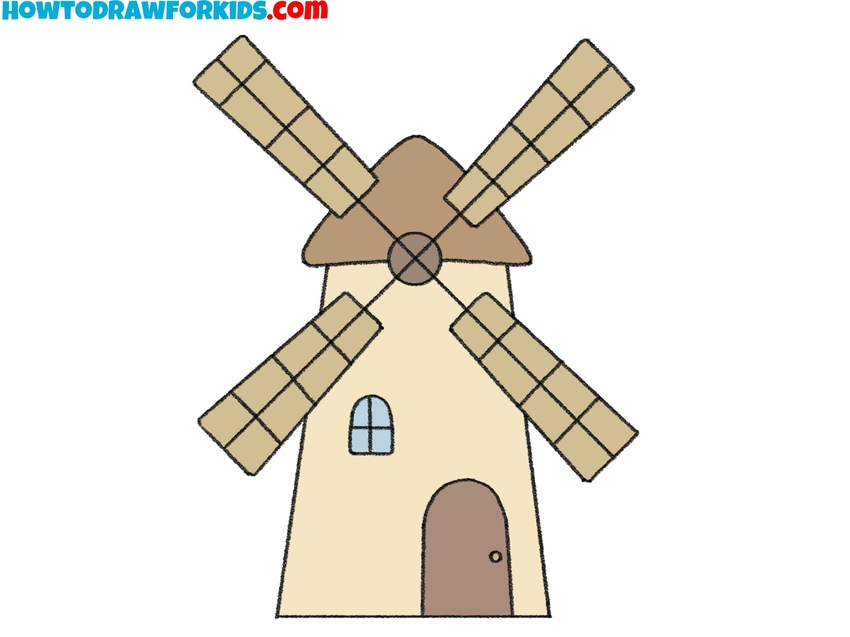

Now you will learn how to draw a windmill. An exciting new lesson awaits you. In the picture, you see a windmill in which the main mechanism does work due to wind energy.
The mill has a high tower and four wide blades, which are set in motion by the force of the wind. For a long time, such a mill was used for grinding flour, collecting water, processing seeds, and for other purposes. Usually, such mills were installed in the area where there were strong winds. Currently, windmills are not used, as other mechanisms have appeared that perform such work more efficiently.
The image of a windmill can often be seen in paintings. In this drawing, you see a simple windmill that any novice artist can easily draw. There is a tower and four blades, which are called sails. All these elements you can easily repeat.
- Pencil
- Paper
- Eraser
- Coloring supplies
Time needed: 20 minutes
How to Draw a Windmill
- Sketch the windmill tower base.
A windmill’s structure begins with its tall, narrow tower. To outline it, draw a trapezoid with a flat bottom and slanted sides that become narrower toward the top. Keep both slanted lines at the same angle.

- Add the rounded roof cap.
On top of the trapezoid, draw a rounded triangular shape to represent the windmill’s roof. Use smooth and curved shapes to draw this part of the windmill. To make this part look more interesting or unique, you can sketch it taller of flatter.

- Draw the windmill blade arms.
Before adding the actual blades, sketch two diagonal lines that cross at the center of the roof. These lines should form an “X” shape and extend far enough to leave space for the blades. Check that the arms of the “X” are the same length so the blades won’t look uneven.

- Sketch the windmill blades.
Using the “X” as a guide, sketch four long rectangles for the blades. Each rectangle should be equal in size, extending out from the center point. Keep the width of each blade narrow. If you accidentally make one blade larger than the others, lightly adjust until they match.

- Divide the blades into panels.
To make the blades look more realistic, divide each rectangle into smaller panels. Do this by sketching lines across each blade. Four or five panels per blade are enough to convey the wooden frames without overcrowding them. At the center where all four blades meet, draw a small circle, this represents the hub that holds them together.

- Sketch the narrow arched window.
Now add a small arched window to the body of the tower. Place it near the middle. Use a curved line for the top and straight lines for the sides and bottom. The window should be much smaller than the door you’ll draw later. After that, draw the separation of the windows using two intersecting lines.

- Draw the door of the windmill.
At the base of the tower, draw a tall door with a rounded top. Place it directly in the center. Add a small circle for a doorknob to make it more realistic. In my example the door is arched, but you can give it and a window the a rectangular shape.

- Refine the main drawing lines.
Carefully remove the unnecessary sketch marks, removing the overlapping construction lines that are no longer needed. Clean away any stray marks inside the blades, the window, and the door. Only the final outline of the windmill should remain. After this, you can trace over the important parts to finalize the linework.

- Use browns and creams for coloring.
With the outline finished, fill in your windmill drawing with color, using a pale beige or cream shade for the tower walls. After that, color the roof a medium brown to represent wood or shingles. The blades can be a lighter brown or beige. Shade the door a darker brown and paint the window frame in blue or gray.

Bonus: Simple Windmill Drawing Tutorial
To create the grain mill using this method, draw a square or rectangle to outline the main body of the windmill. Above it, add a triangular roof with a rounded top.
Place a small circle near the roof center to mark where the blades will connect. From this point, draw four long straight lines crossing through the circle to guide the blades. Next, shape the blades into long rectangles, keeping them even in size.
Add a simple arched door at the base and small window shapes above it for detail. Outline the final form by refining the edges and erasing extra construction lines. Then, color the windmill with a bright yellow body, brown roof, and blue blades, or choose your own colors to make it distinct.