How to Draw a Face
In this tutorial I will demonstrate you how to draw a face, share a few additional methods and tell you how to convey emotions and age on the face using simple techniques.

How to Draw a Face: Basic Information
In this easy-to-follow basic drawing guide, I’m going to demonstrate you how to draw a face. And as always, this tutorial is tailored specifically for kids.
It’s essential for every budding artist to learn how to draw a person and accurately depict different parts of the human body. Among these, the face is often considered one of the most challenging aspects to master.
Given that Howtodrawforkids.com is designed for children and beginner artists, this tutorial on drawing a face will be presented in the simplest and most straightforward manner possible. Below, I’ll demonstrate how to draw the face and all its features using an uncomplicated and easy-to-understand approach, making it accessible for everyone to follow.
I’ve also included some extra instructions at the bottom of the page to further enhance this tutorial and train your skills. These additional guidelines are intended to introduce you to the process of drawing the human face in a variety of different styles.
Face Drawing Tutorial
Materials
- Pencil
- Paper
- Eraser
- Coloring supplies
Time needed: 45 minutes
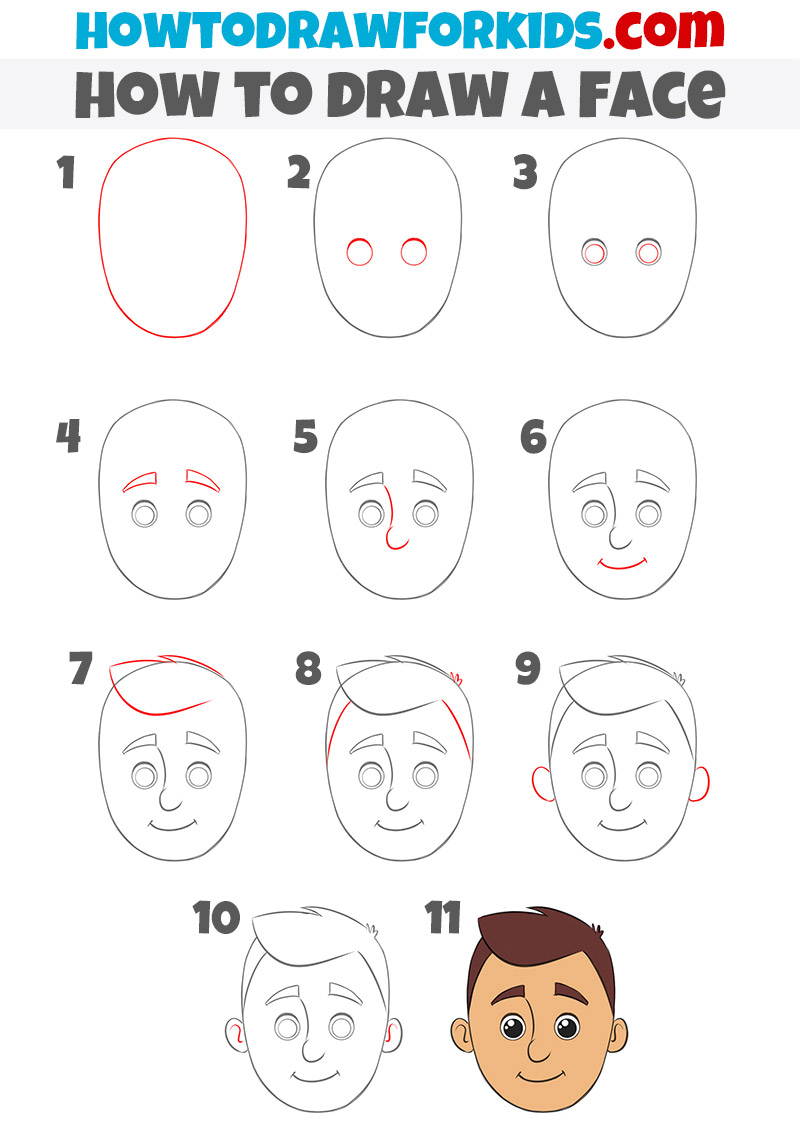
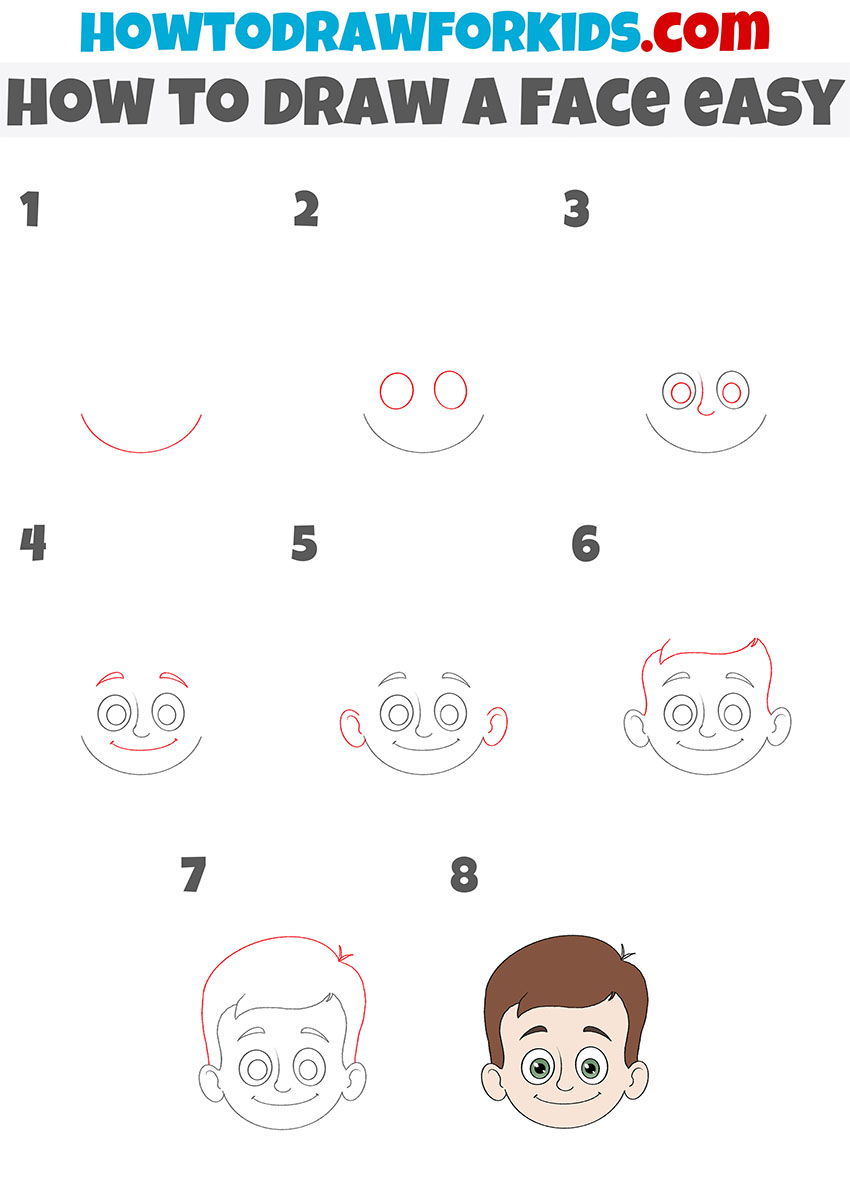
How to Draw a Face Step-by-Step
- Outline the face.
Start by creating an oval shape that tapers slightly towards the bottom, giving a natural shape that resembles a human face. This step sets the foundation for the rest of the drawing, providing a guide for placing the facial features. It’s essential to keep this outline light and fluid to allow for adjustments later on.
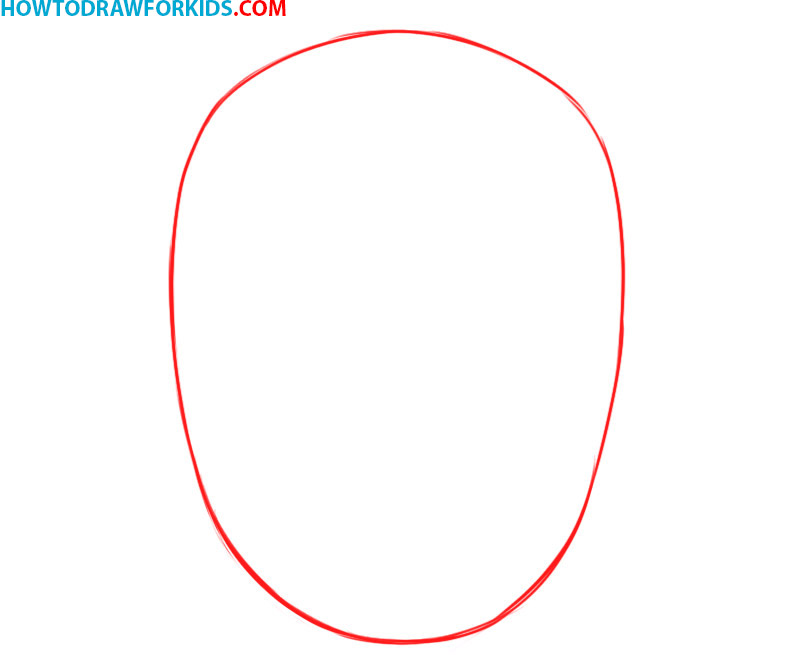
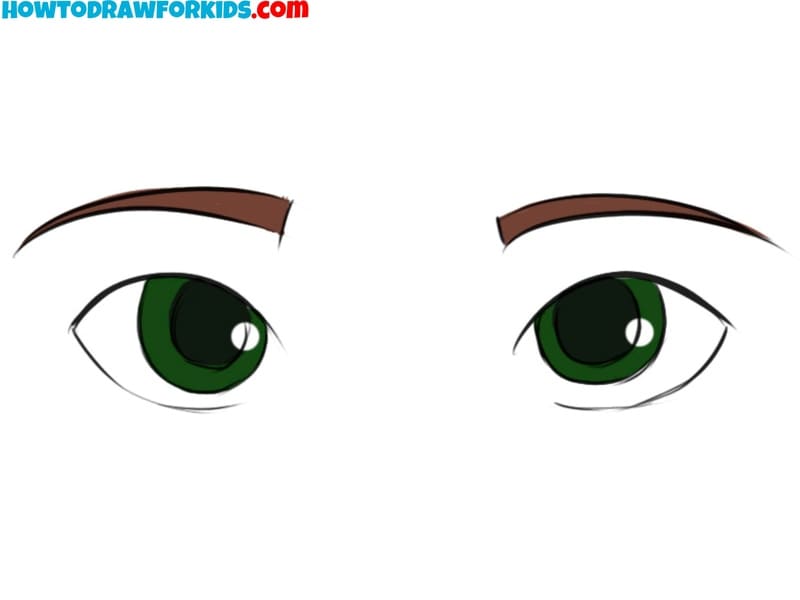
- Add the eyes.
Next, draw two circles inside the face outline to indicate the placement of the eyes. Position these circles evenly spaced horizontally, about halfway down the face. These circles will serve as guidelines for the eyes’ size and location. Make sure they are centered within the face outline.
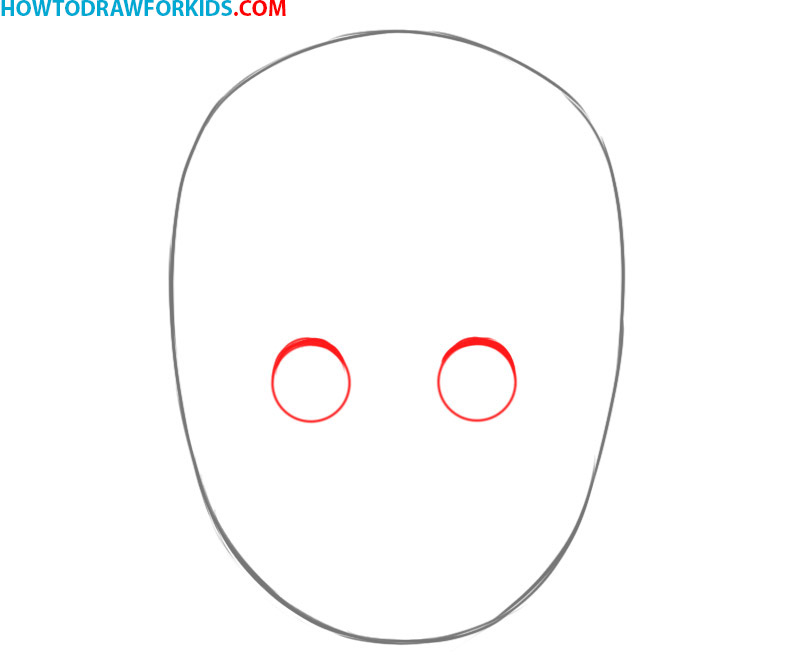
- Draw the pupils.
Inside the eye circles, draw smaller circles to represent the pupils. Place them centrally within the larger circles to give a natural look. These pupils will eventually define where the character is looking, so try to align them evenly. This step adds more detail to the eyes.
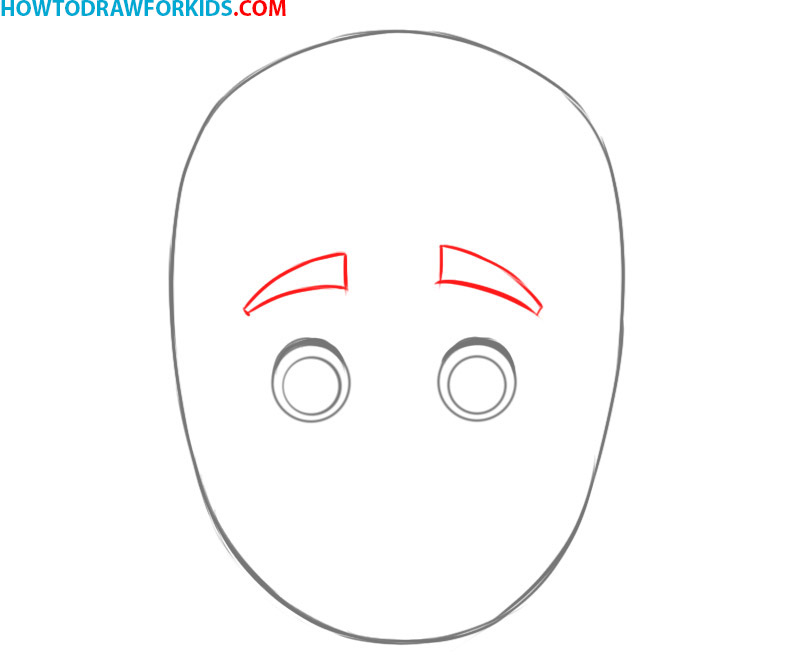
- Add the eyebrows.
The fourth step introduces eyebrows, which are drawn above each eye. Create a simple arch or curve above each eye circle, matching the shape of the eyes below. Careful placement of the eyebrows helps to create a balanced look and convey emotions such as surprise or neutrality.
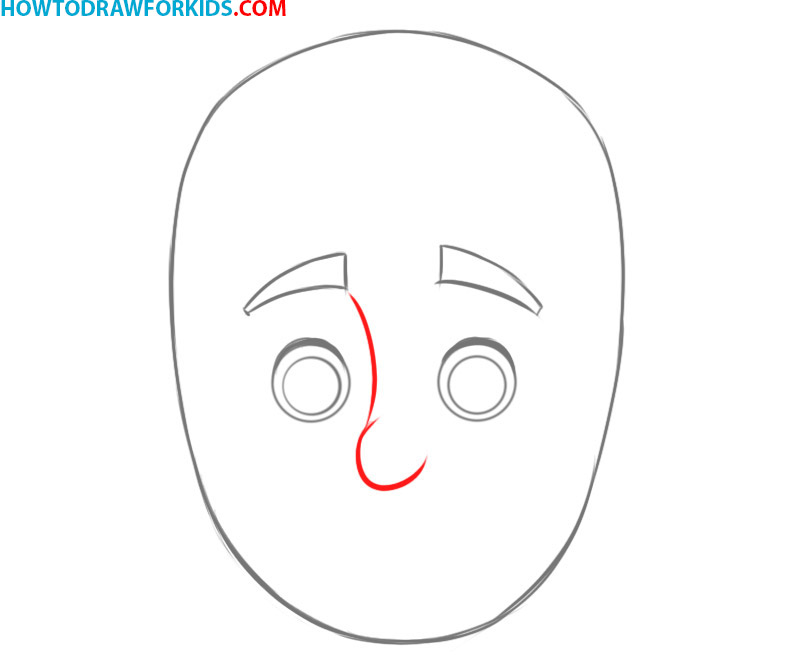
- Add the Nose.
Next, draw the nose in the center of the face. Begin by sketching a simple curved line starting from just below the eyebrows and extending downward toward the middle of the face. The shape should be subtle, just enough to indicate the presence of the nose without overwhelming the face.
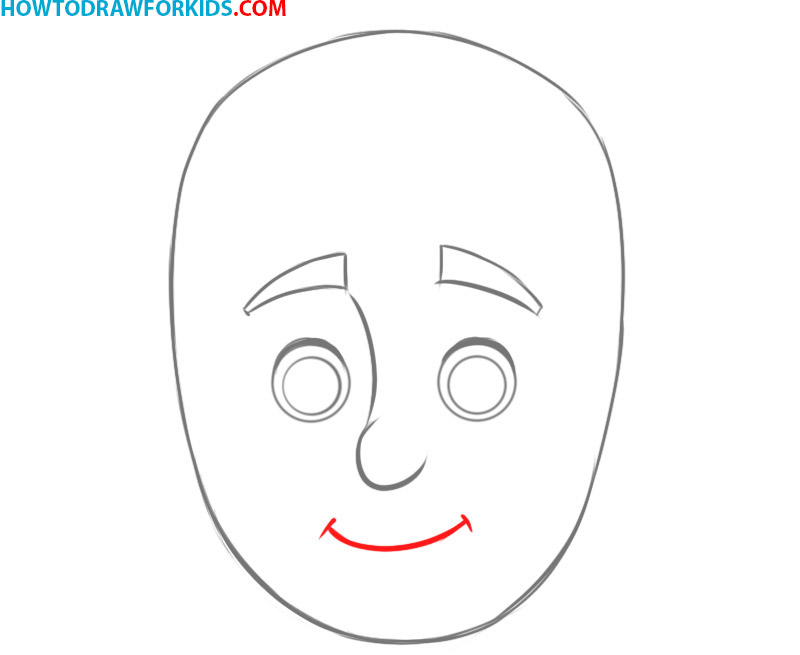
- Draw the Mouth.
Below the nose, draw a curved line to represent the mouth. The curve should have a gentle upward slope, giving the face a slight smile. Position it centrally beneath the nose, maintaining symmetry with the other facial features. By changing the curve of the mouth, you can change the expression of the face.
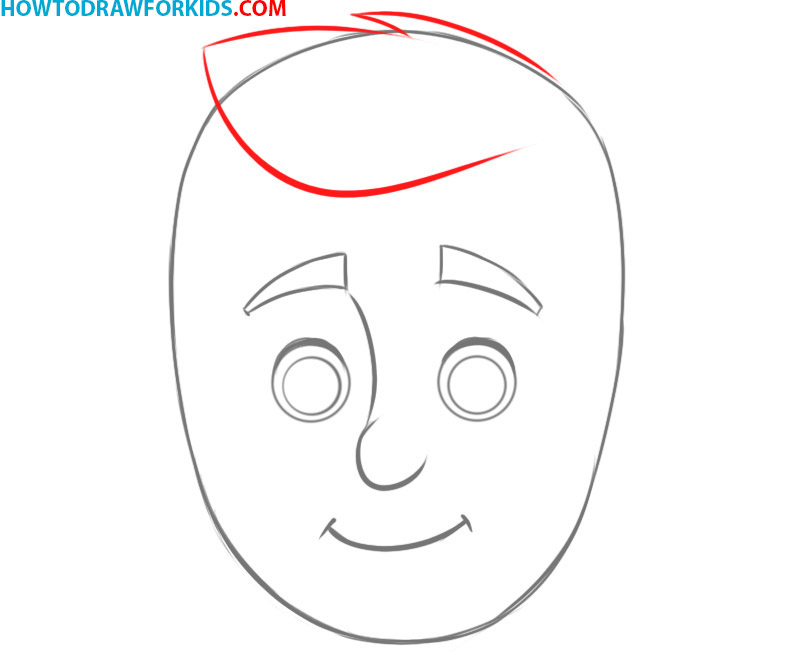
- Add the hair outline.
Start by sketching a curved line that begins near the top-left side of the head and swoops down across the forehead, ending near the middle. This line will represent the outline of the bangs, which should follow the contour of the face.
- Detail the hairstyle.
Start by sketching curved lines along the sides of the head, just above the ears, to define the hairline at the temples. These lines should follow the natural curve of the head and connect with the bangs. Next, add a few lines at the top of the head to represent individual hair strands.
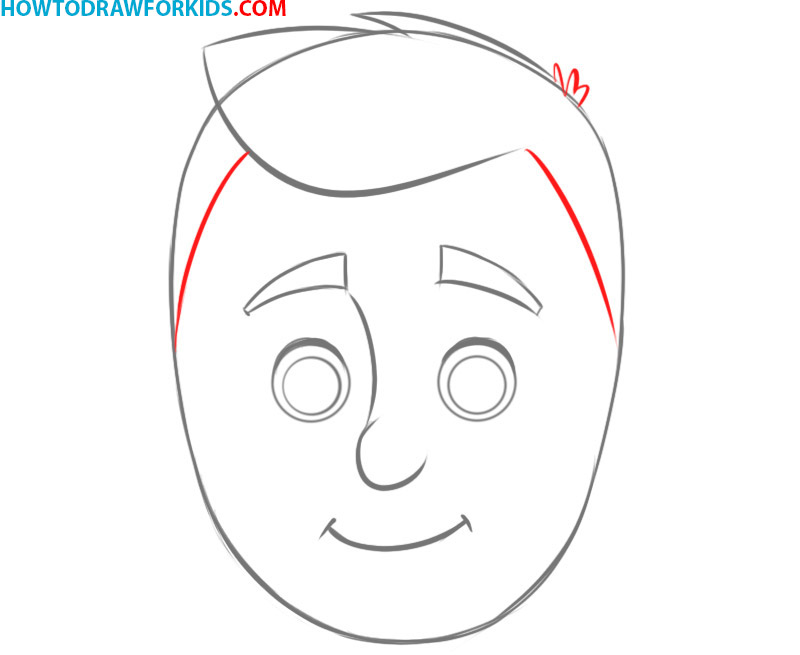
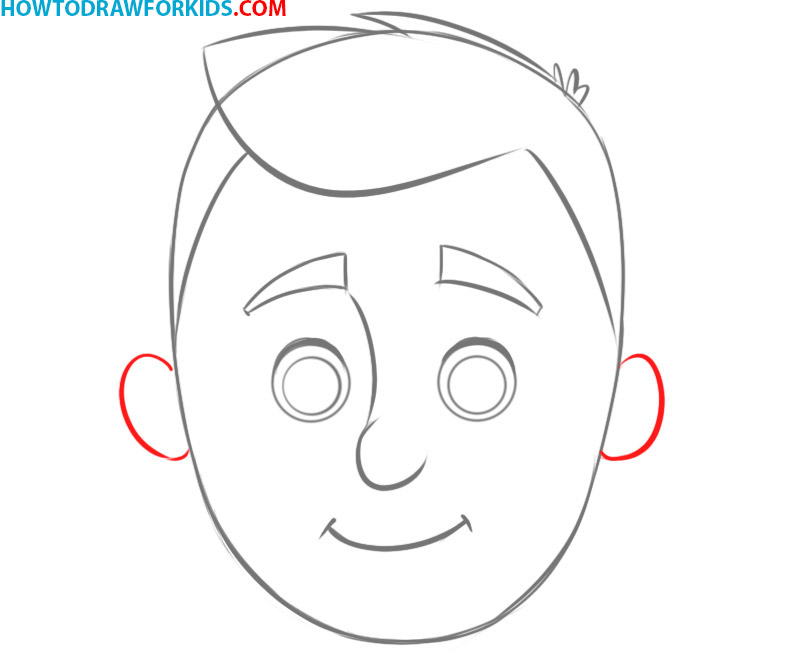
- Illustrate the ears.
Next, draw the ears on both sides of the face, aligning them with the top of the eyes and the bottom of the nose. The ears should be simple curved lines, extending slightly outward from the sides of the head. The ears, along with the eyes, nose and mouth, give recognition to the face.
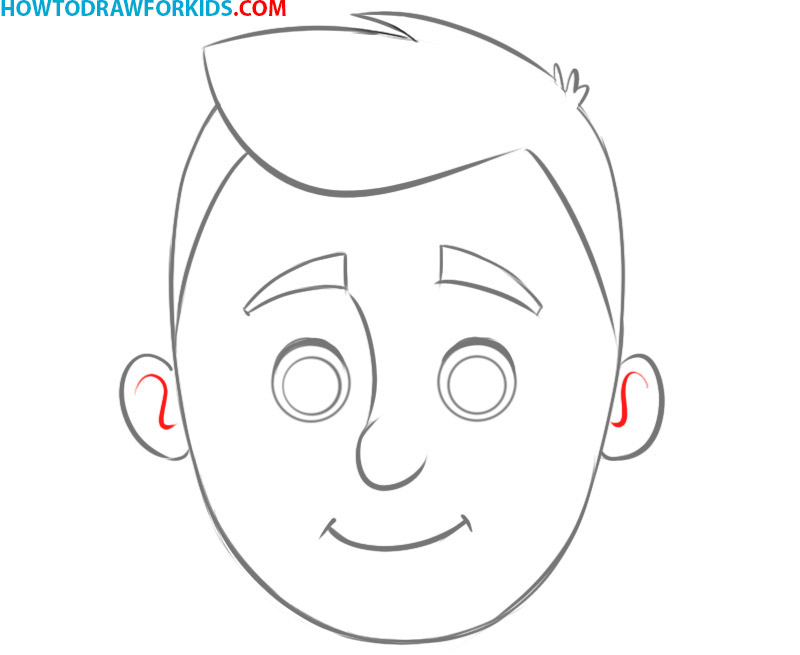
- Detail the ears and erase the guidelines.
Draw the lines inside the ears to make them look more natural. Finalize the face by refining any lines and ensuring all features are proportionate and symmetrical. This step involves going over the entire drawing, making minor adjustments where necessary to ensure everything is polished.
- Color the face drawing.
Finally, color in the face to complete the drawing. Choose skin tones for the face, shades for the hair, and color the eyes. The eyebrows and pupils can be darker or lighter, while the lips can have a subtle color. To give the face drawing more realism, you can draw highlights in the eyes and add shadows.

How to Draw a Face: Additional Tutorials
Drawing the human face is a very important skill for any artist. To master this skill as much as possible, let’s learn a few additional ways to draw a face.
Alternative Method
In the first instructions on this page, we first drew a circle as a base for the face, then we gradually added details. Now let’s try to draw a face without any preliminary step.
To draw an easy face with this method, start by sketching a wide, curved line for the lower part of the face, resembling a smile. Above this, draw two evenly spaced circles for the eyes. Inside these circles, add smaller circles to represent the pupils. Next, draw a small, curved line between the eyes for the nose.
Add eyebrows above the eyes by drawing two short, curved lines. Then, draw the ears on either side of the face, making sure they align with the top of the eyes and bottom of the nose. Sketch the hair by outlining the hairline and adding a few strands at the top to give it a natural look. Finish by refining the lines, and then color the face, eyes, and hair to complete the drawing.
Detailed Method
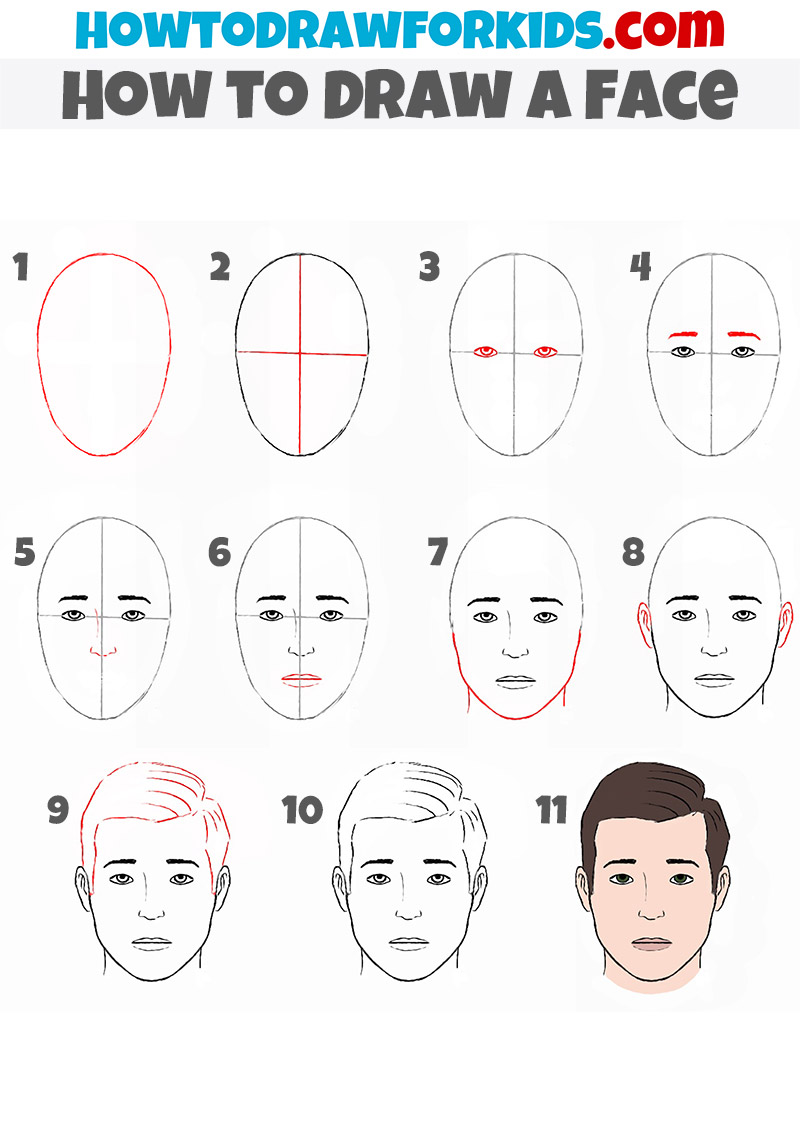
Now let’s try to look at the process of drawing a face using a more detailed method. In this instruction you can see 11 steps in which I will show in detail the entire process of depicting this part of the human body.
To draw a more realistic face with this technique, begin by sketching an oval shape for the head, ensuring it’s symmetrical. Next, draw a vertical line down the center and a horizontal line across the middle to establish guidelines for the facial features.
Start by drawing the eyes on the horizontal line, then add the eyebrows slightly above. Position the nose along the vertical guideline, below the eyes. Sketch the mouth beneath the nose, ensuring it aligns with the vertical guide. Draw the jawline, refining the face’s shape, and add the ears, aligning them with the eyes and nose.
Once the basic facial features are in place, draw the hair by outlining the hairline and adding texture and direction to the strands. Finally, clean up any unnecessary lines and add shading or color.
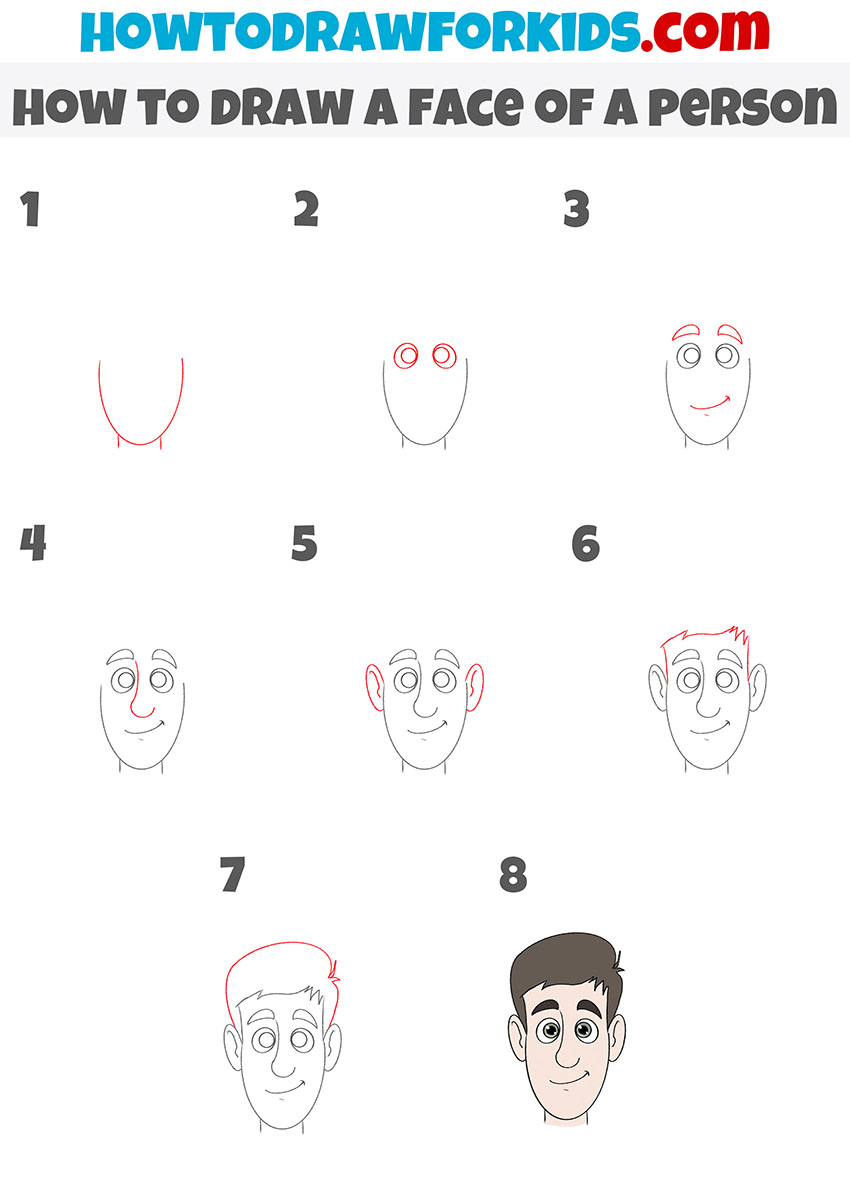
Conveying Facial Features
The drawing is made in a cartoon style and the face looks very funny. There are no complex lines and preliminary markings, so you can quickly complete this task.
Start by sketching a U-shaped curve for the lower part of the face, forming the chin and sides. Next, add two circles near the top for the eyes. Draw smaller circles inside the eyes for the pupils. Above the eyes, sketch the eyebrows with slightly curved lines, and below the eyes, draw a small curve for the mouth.
Add a curved line for the nose in the center. Then, draw the ears on each side, aligned with the eyes and nose. Sketch the hair by outlining the hairline. Finish by refining the lines and adding color.
To convey different emotions, adjust the position of the eyebrows, the shape of the mouth, and the angle of the eyes – raising eyebrows and widening eyes can express surprise, while a downturned mouth can suggest sadness.
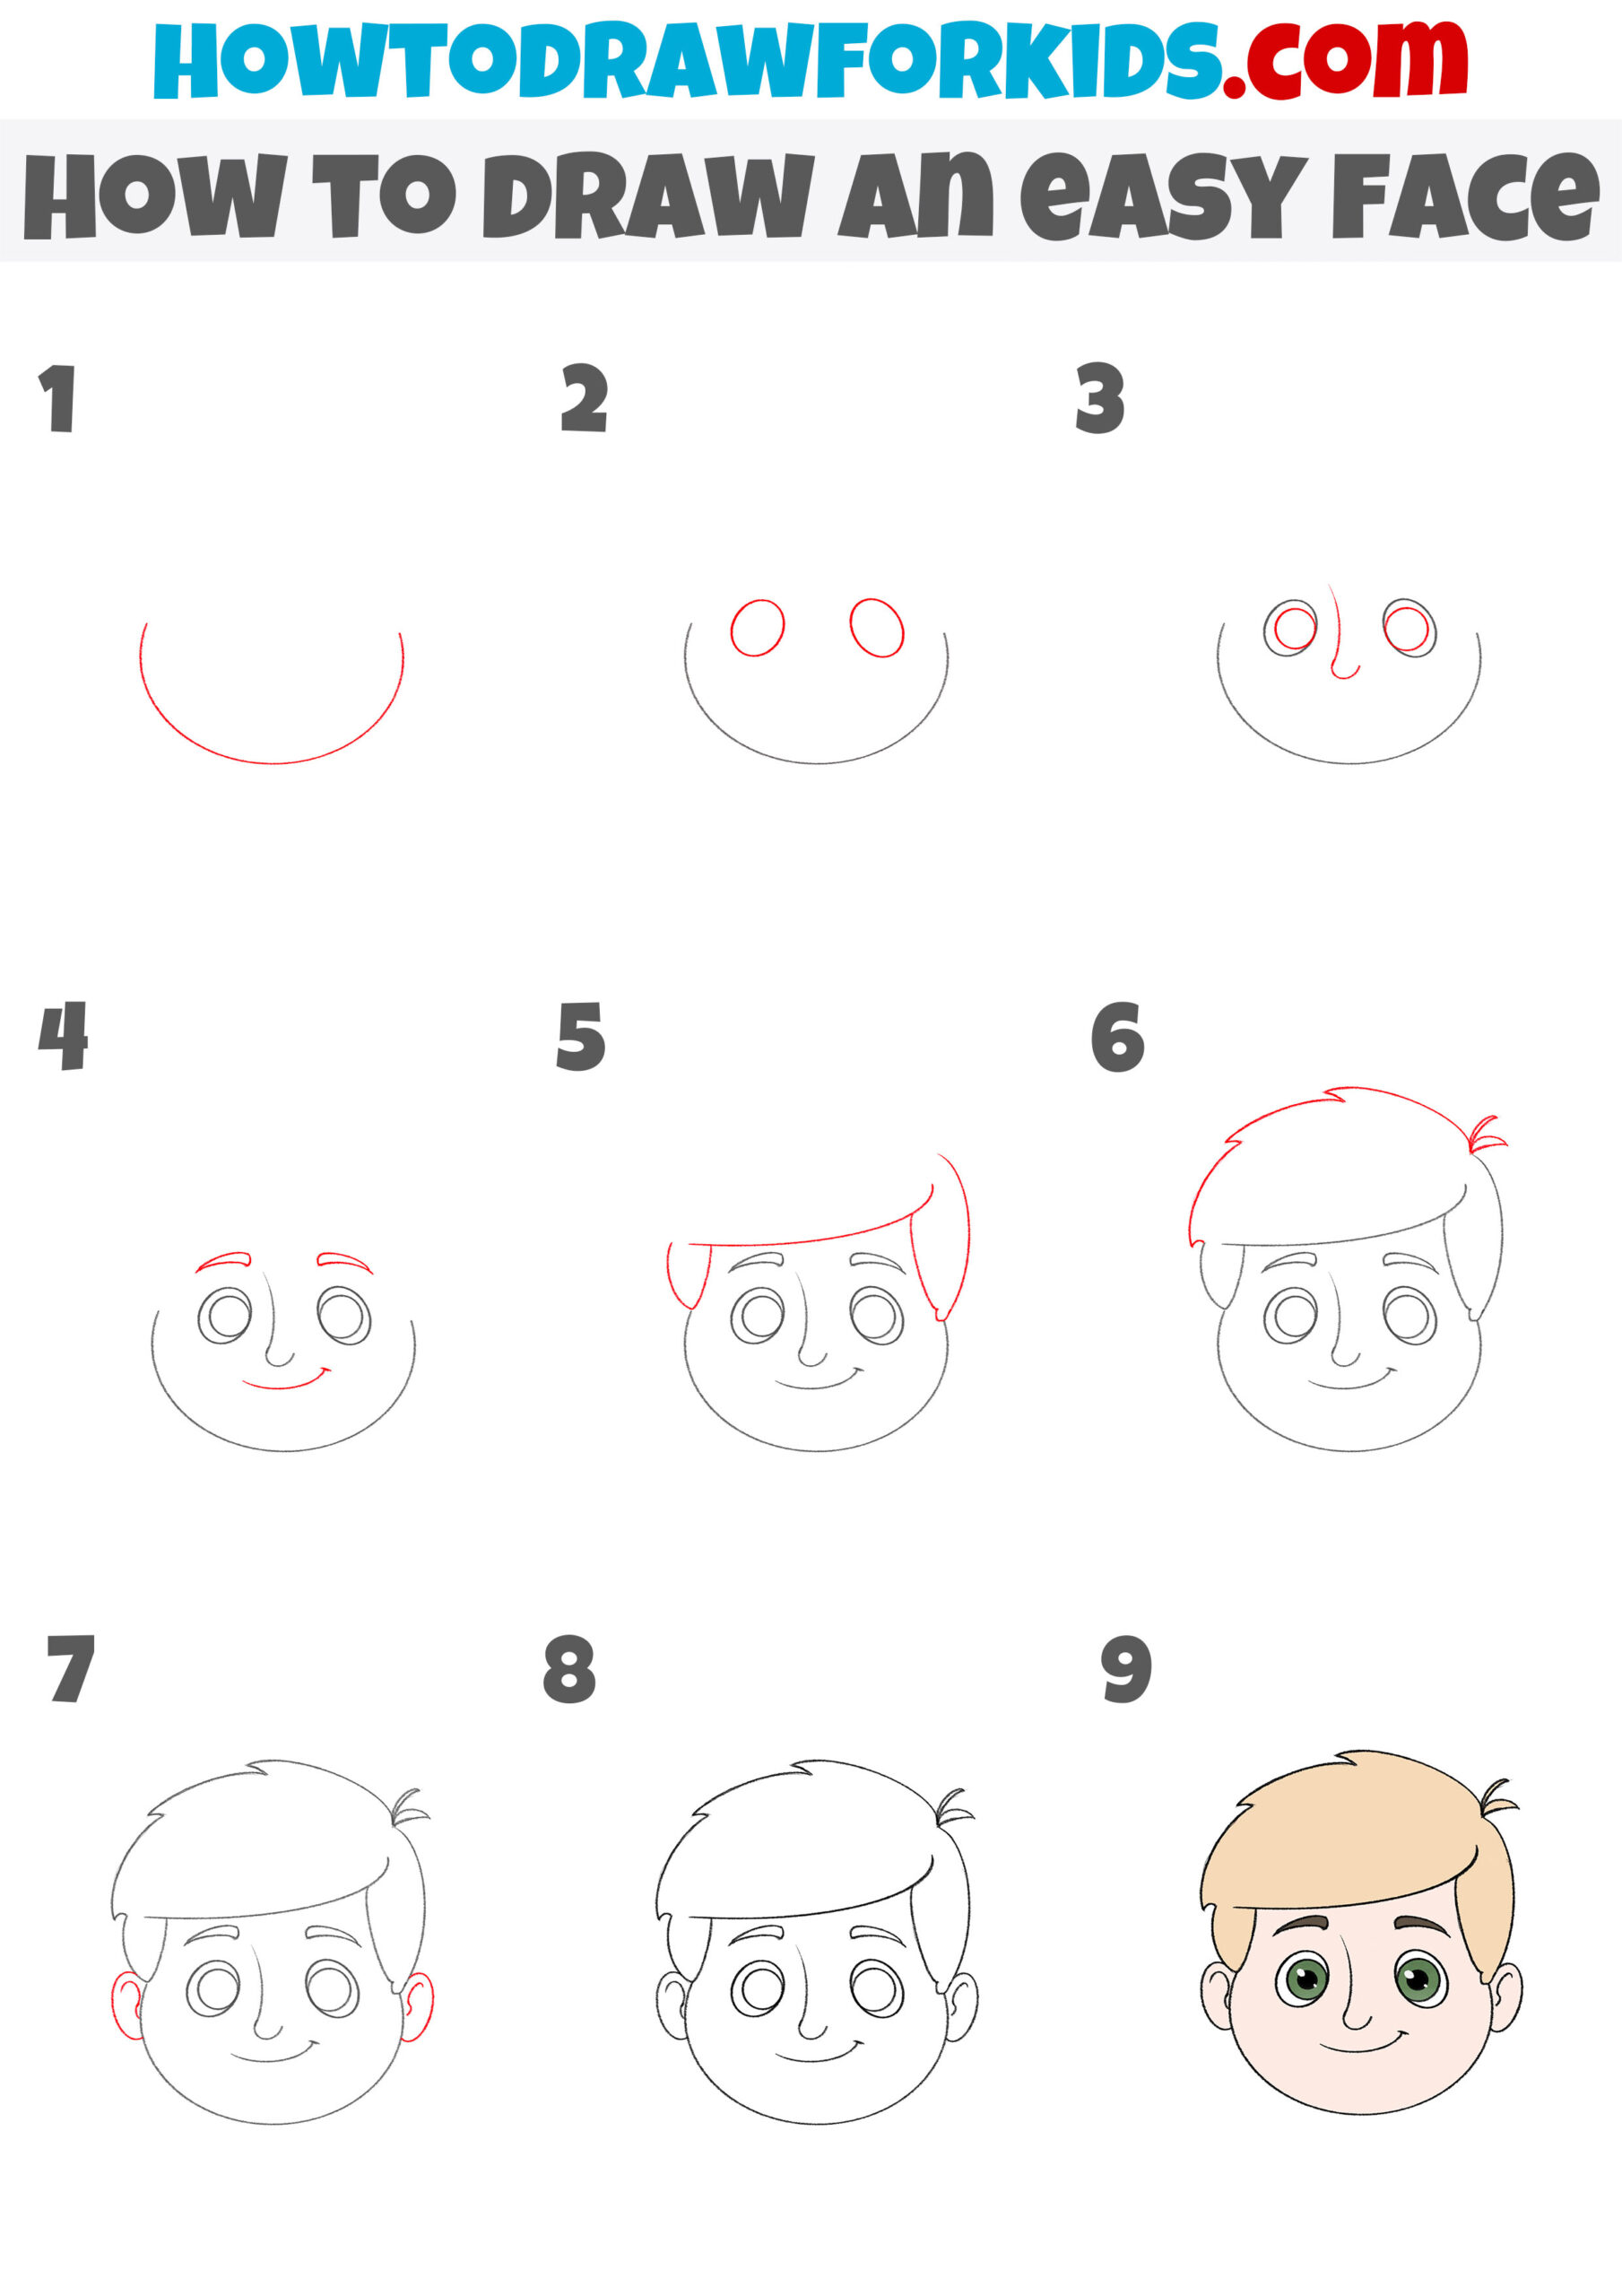
Conveying the Age
As an example, I chose the face of a boy. The drawing is made in a cartoon style and contains simple elements that you can easily repeat. During the lesson, observe all proportions, and try to make the same lines as in the instructions.
Start by sketching a wide, curved line to represent the lower part of the face. Then, draw two circles above this line to place the eyes. Add smaller circles inside these for the pupils. Next, draw a small curved line between the eyes for the nose, and another curved line below for a smiling mouth. Add short, curved lines above the eyes for the eyebrows.
To create a youthful appearance, keep the facial features rounded and soft, as larger eyes and a smaller nose typically convey a younger age.
Draw the hair by outlining the bangs and adding side hair that covers the upper part of the face, emphasizing a childlike look. Finish by drawing the ears on each side of the head and refining the lines. Finally, add color, focusing on gentle, light tones for a youthful look.
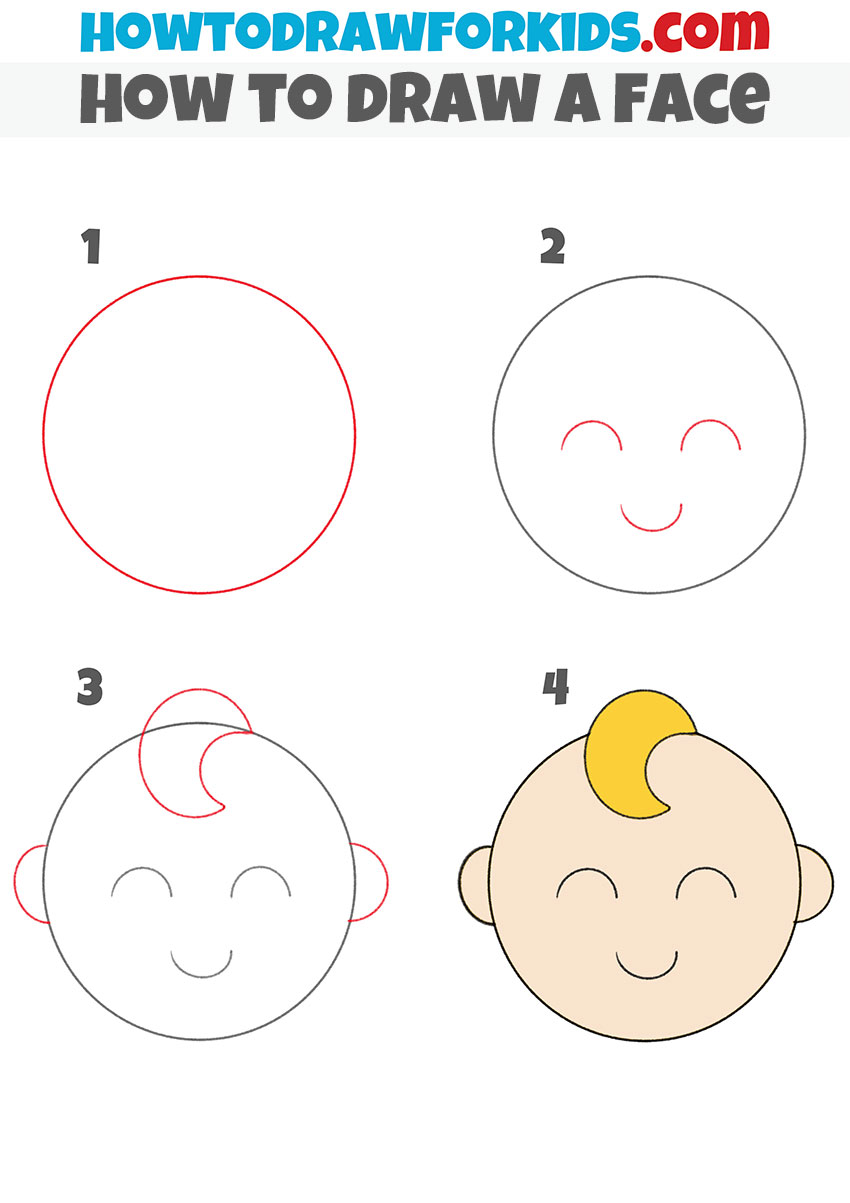
The Simplest Method
So, if the instructions you saw above were difficult for you, let’s learn an easier method. In this tutorial we will try to draw a face using just 4 steps. In addition, we will greatly simplify the details and make the drawn character much younger.
To draw a face in the simplest way possible, start by sketching a large circle for the head. This basic shape forms the foundation of the face. Next, draw two curved lines within the circle to represent closed, smiling eyes, and a small curved line below for the mouth.
These minimal lines convey a a human facial features with minimal effort. Then, add a curved line at the top of the head to represent a simple curl of hair, and draw small, rounded shapes on each side of the head for the ears.
This approach is extremely straightforward, focusing on basic shapes and minimal details to create a cute, cartoonish face. Finally, color the face with a soft skin tone and add a bright color to the curl of hair to complete the drawing.
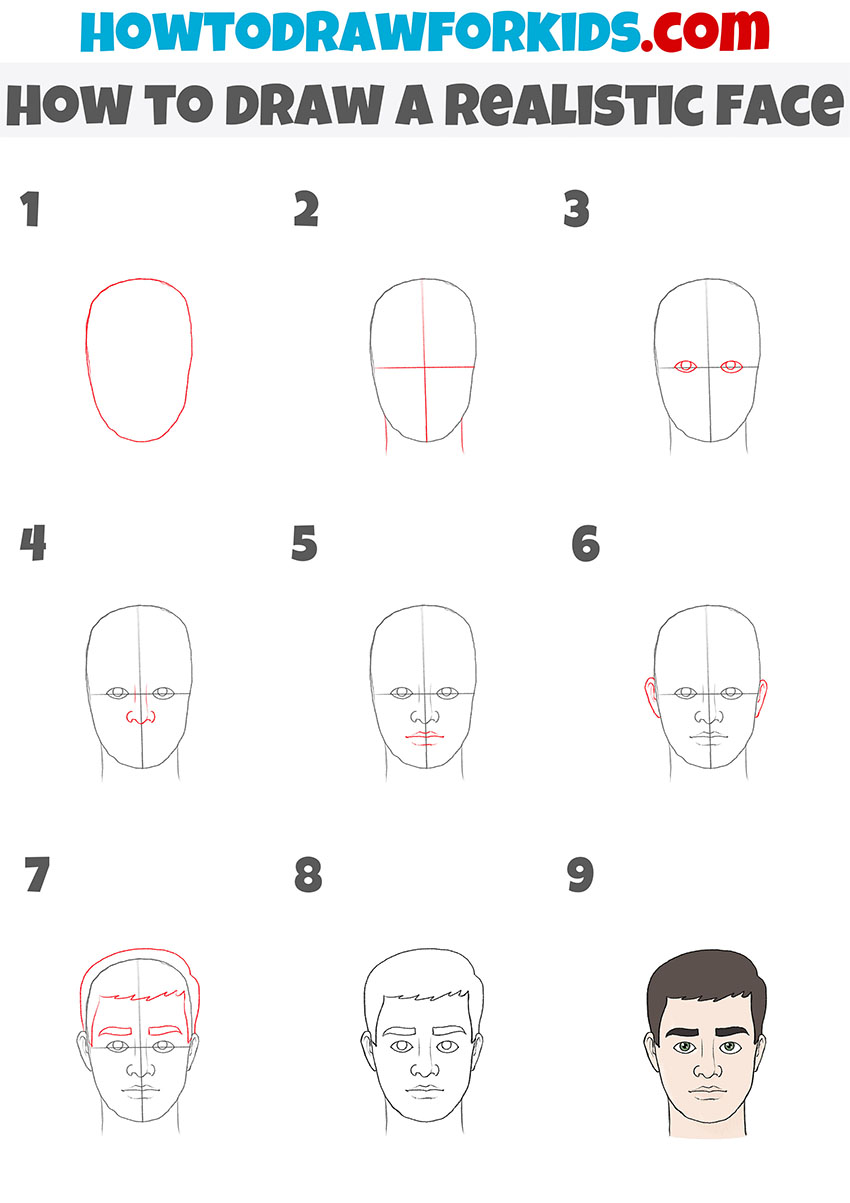
Realistic Method
But perhaps all the lessons above were too simple for you. Or perhaps you want to draw a more realistic face. In this instruction, we will try to depict a face that is more similar to the real one.
To draw a realistic face with this method, start by sketching an oval shape for the head, ensuring it’s slightly elongated to resemble a natural head shape. Draw a vertical line down the center and a horizontal line across the middle to establish guidelines for the facial features.
Position the eyes on the horizontal line, making them more almond-shaped for a realistic appearance. Add the nose beneath the eyes, with careful attention to its contours and structure, including the nostrils. Below the nose, draw the mouth, paying attention to the proportions and the subtle curve of the lips.
Add the ears on either side, aligned with the eyes and nose. Draw the hair, using multiple strokes to create a natural texture. The realism in this face comes from the detailed attention to proportions, the natural shape of the features, and the careful placement of each element.
How to Draw a Face: Conclusion
So, the face drawing lesson for kids and beginners has come to an end, and I really hope that my tutorial was really interesting and useful to you. I have tried to convey this important skill to you using the simplest methods possible.
Did I succeed or not? Were you able to learn how to draw a face using my tutorial? Write about it in the comments or send your work to me on social networks.


cool…
I love your art ! You are a true artist!
From, Chase Vance