How to Draw Chucky
Follow this easy guide on how to draw Chucky to sketch the full figure of this scary doll with recognizable horror features.
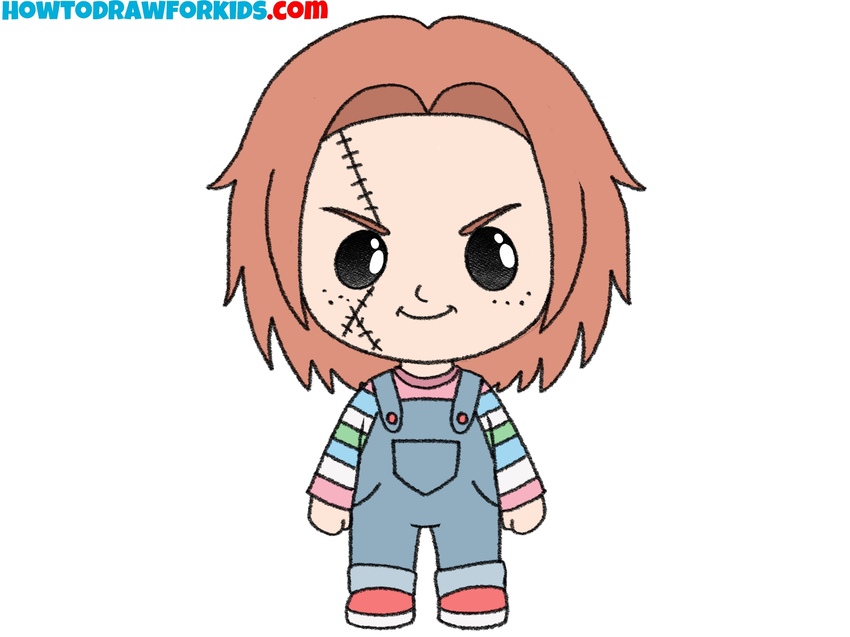
How to Draw Chucky: Introduction
This tutorial on how to draw Chucky shows the popular character in a really stylized form that combines cartoon features with his recognizable horror elements. The wide face, stitched scar, and overalls are simplified but still keep the character authentic and recognizable.
While drawing Chucky’s face, pay attention to the placement of the facial features. The eyes are large, and the eyebrows are tilted downward to create his angry expression. The mouth has a curved, mischievous shape that’s easy to adjust depending on the mood you want to show.
The stitched scar is one of the most recognizable details and should follow the curve of the face. While learning how to draw Chucky, keep the shape simple and clean, using small stitches along a jagged line. The hair can be drawn as a solid shape with pointed ends.
You can customize this drawing of Chucky by changing the color of his clothes or sketching a knife or other item in his hand. Once you’re comfortable with the shapes, try to draw Chucky with different facial expressions or outfit details.
Chucky Drawing Tutorial
Materials
- Pencil
- Paper
- Eraser
- Coloring supplies
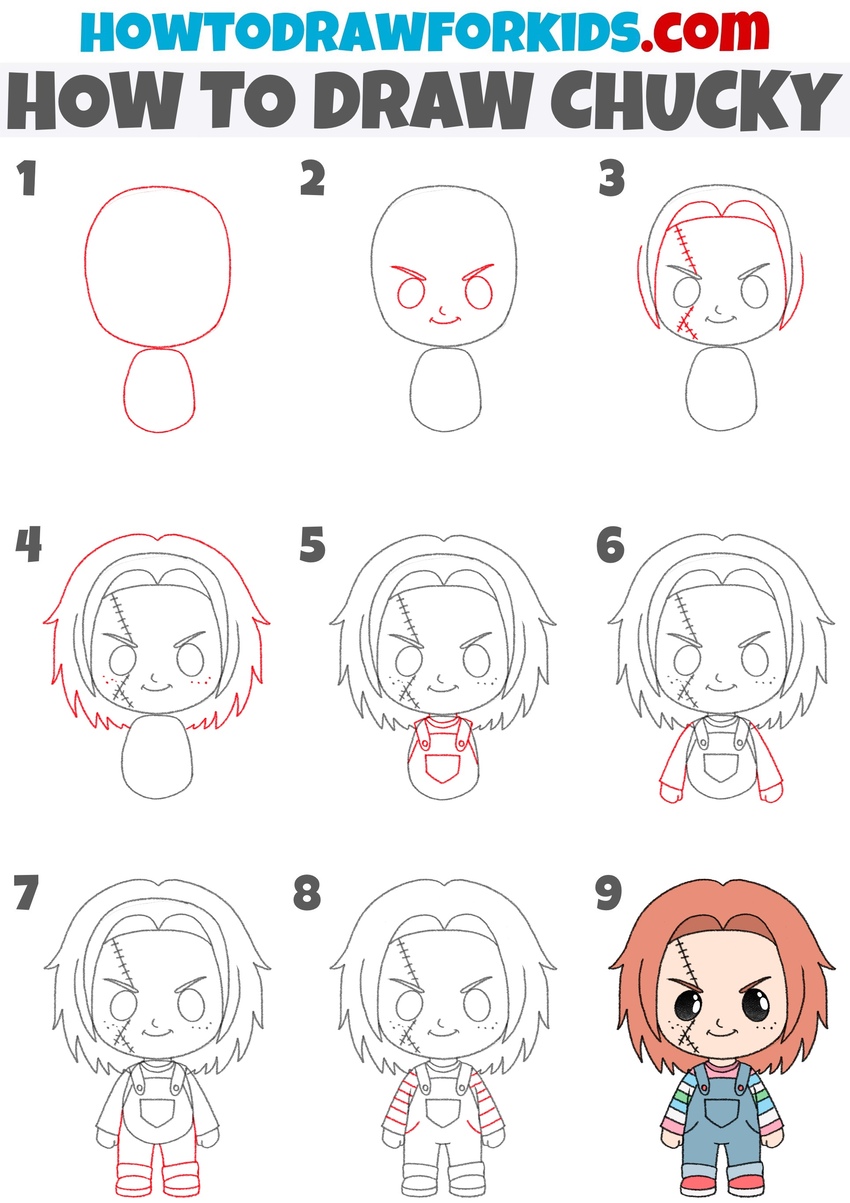
Time needed: 45 minutes
How to Draw Chucky
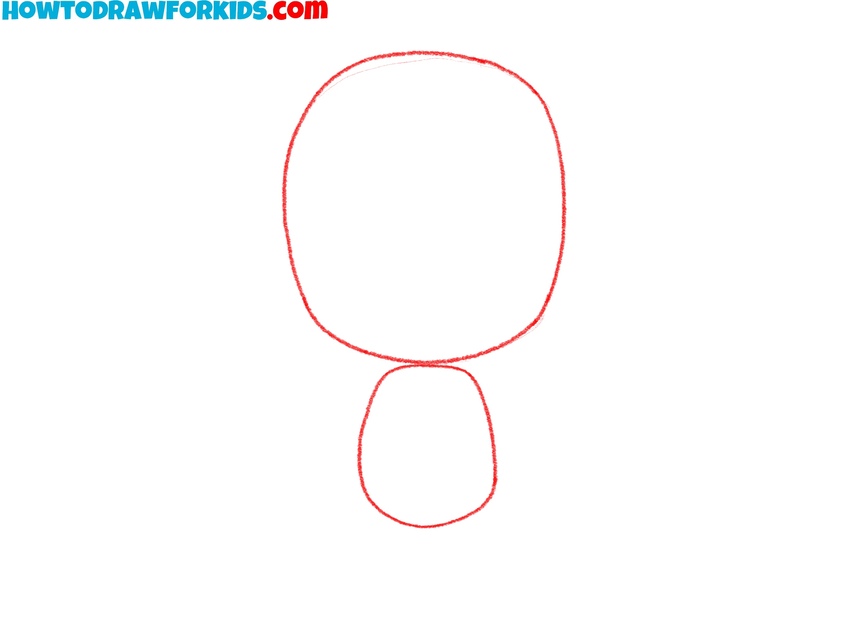
- Create the main figure parts.
To draw Chucky, sketch the basic outline of the character’s figure. First, sketch a large oval for the head. Just below the head, add a smaller, vertical oval for the body. These base shapes won’t appear in the final version, but they’re important for getting proportions right before adding features and details.
- Form the main facial elements.
Now, draw two circles for the eyes in the middle of Chucky’s face. Below the eyes, sketch a small upward curve for the mouth, giving him a mischievous or smug expression. Next, sketch the nose above the mouth and below the eyes. For the eyebrows, draw thick, angled lines slanting downward toward the middle.

- Draw Chucky’s scar and front hair.
Draw Chucky’s stitched scar running down the right side of the face. Use jagged lines that zigzag from the top of the forehead down to the cheek, and add short cross-stitches along it to resemble thread or staples. Next, sketch the front part of his hair, creating the hairline above the forehead.

- Complete the character’s hairstyle.
Now sketch the rest of the hair around the head of the character. Add jagged, pointing strands to the left and right. Let the hair extend slightly below the chin level. Use quick, sharp lines to make the edges look uneven. If you want to experiment with variations, try making the hair longer, curlier, or styled differently.

- Draw Chucky’s overalls.
Start sketching Chucky’s iconic overalls by sketching two straps coming down from the neck area and attach them to atop overall part. Add small circles for the straps’ fasteners and draw an angular pocket on the center of the chest. The chest pocket can be decorated with a logo or symbol later.

- Sketch the sleeves and hands.
Now, sketch the sleeves of Chucky with simple lines. Then draw his hands poking out at the bottom. The arms should hang straight down, symmetrical on both sides. If you want to vary the pose, try drawing one arm raised or holding an accessory like a knife or doll part. You’ll add the stripes in a later step.

- Draw Chucky’s legs and shoes.
Now complete the body by drawing Chucky’s legs as simple lines, coming from the bottom of the overalls. Add small rectangles across the lower legs to illustrate the cuffs at the bottom of the pants. The shoes of the character should be round and simple, with a flat base.
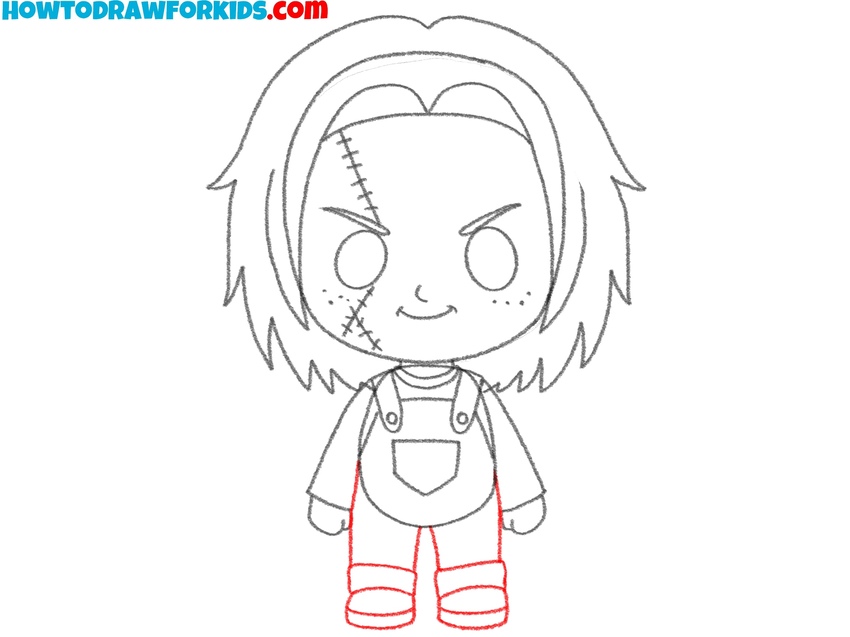
- Complete the costume details.
With the main figure complete, it’s time to add visual details to the costume. First, sketch horizontal stripes on the sleeves to represent Chucky’s colorful shirt. Then add simple curves to indicate the pockets on the overalls. You can vary the number or spacing of the stripes depending on your preferred style.

- Paint the completed figure.
Now color the hair of Chucky in a red-brown color, use a pale skin tone for the face and hands, and black for the eyes. The shirt sleeves should alternate between blue, red, pink, and green stripes. The overalls are usually a denim blue with red accents for buttons and shoes. Use a red color for the shoes.

Conclusion
This step-by-step tutorial on how to draw Chucky demonstrated you the process of creating a simplified version of the character while keeping all of his most recognizable features – large stitched scar, sinister facial expression, striped shirt, overalls, and messy hair.
Even in a cartoon style, details like the cross-stitch pattern, the angular brows, and the proportions help retain Chucky’s distinct look. The proportions were deliberately exaggerated, but you can make your drawing of Chucky look more realistic, adjusting the proportions.
Once you’ve finished this version, try to draw Chucky in a different pose or with one arm raised holding a knife. You can also create your own variation of the face – add more damage, change the hairstyle, or make him look slightly older or more toy-like.
To keep practicing in the same theme, check out my Pennywise drawing tutorial or try the lesson on how to draw a zombie. These guides use similar steps and proportions, and work well together if you want to build a collection of horror characters or a collection for Halloween in the same style.