How to Draw Kyle Broflovski
Here, I’ll demonstrate how to draw Kyle Broflovski from South Park and provide practical tips to make your drawing even more impressive.
How to Draw Kyle Broflovski: Basic Information
One of the critical elements to focus on is the balance between Kyle’s head and torso. The larger head and smaller body are characteristic of the “South Park” style, teaching students about exaggeration and how it can be used effectively in character design.
Attention to symmetry is another important aspect. Kyle’s hat, earflaps, and facial features must be drawn symmetrically to maintain his recognizable appearance. This practice helps kids improve their observational skills and precision.
Drawing Kyle’s simple yet expressive face helps young artists understand the power of minimalism in character design. This reinforces the idea that even with limited details, strong emotions and recognizable traits can be conveyed.
Practicing drawing Kyle’s hands and feet, even though they are simplified, helps students improve their ability to draw human anatomy in a stylized manner. This skill is essential for creating believable cartoon characters.
Kyle Broflovski Drawing Tutorial
Materials
- Pencil
- Paper
- Eraser
- Coloring supplies
Additional Materials
Time needed: 30 minutes
How to Draw Kyle Broflovski
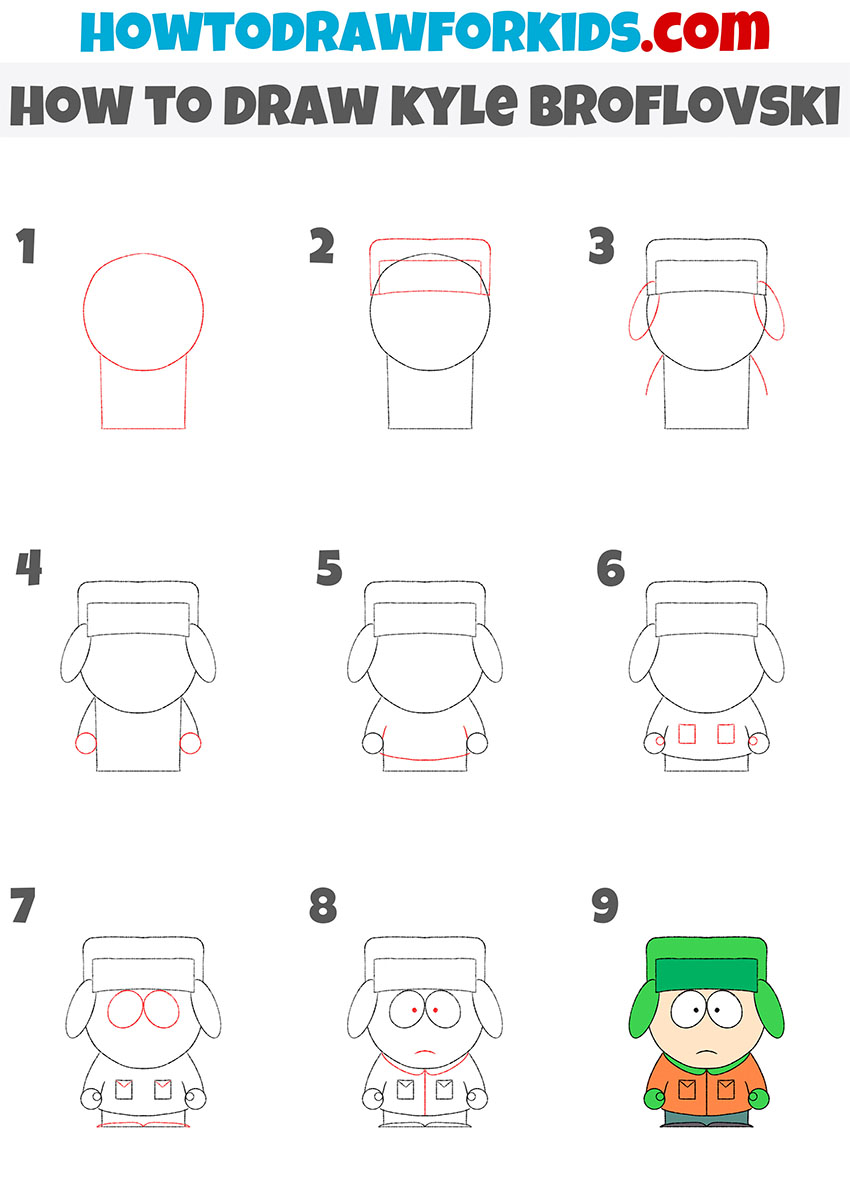
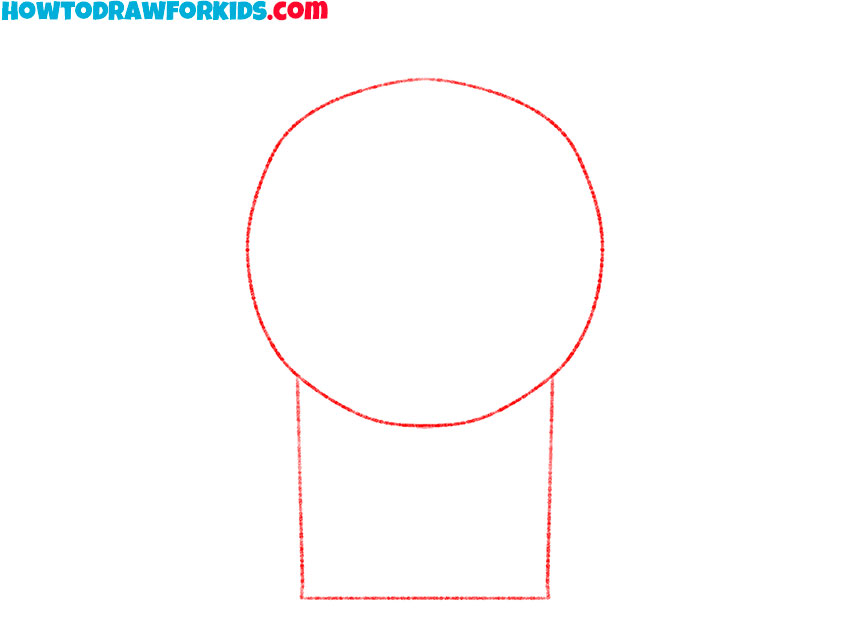
- Draw the Kyle Broflovski head and torso.
Begin by drawing a large circle to represent Kyle’s head. Below the circle, draw a smaller rectangle to form his torso. This basic structure will serve as the foundation for Kyle’s body. Make sure the head is significantly larger than the torso to capture the distinctive proportions of the character.
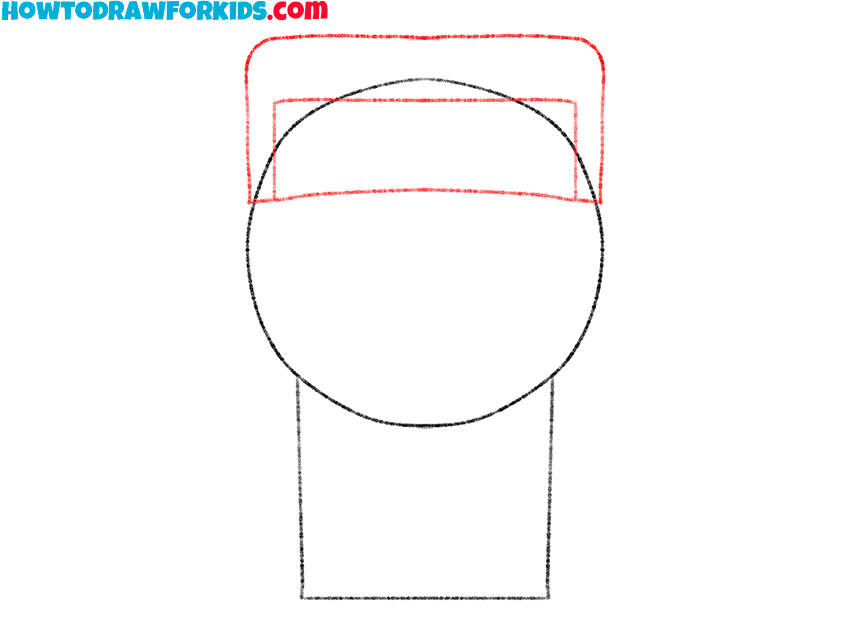
- Sketch the top of the hat.
Next, draw the top part of Kyle’s iconic green hat. Create a rectangular shape that slightly overlaps the top of the head circle, extending outwards to capture the hat’s width. This rectangle represents the main body of the hat. Inside this rectangle, draw a horizontal curved line to indicate the brim of the hat.
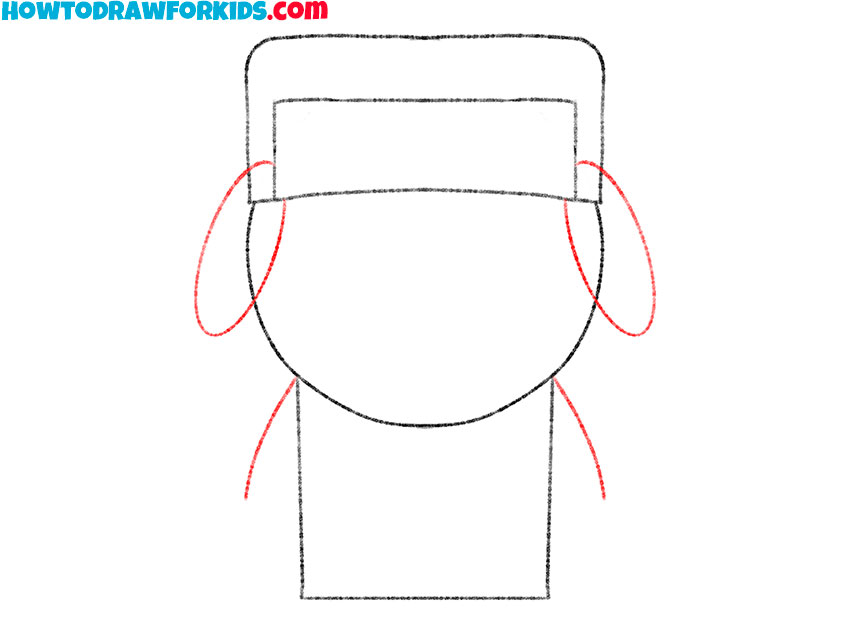
- Add the shoulders and earmuffs of the hat.
Now, add the earmuffs and the outer contours of Kyle’s arms. Draw two elongated ovals on either side of the head to form the earmuffs. Then, draw slightly curved lines extending from the top corners of the torso rectangle to outline the outer parts of the arms.
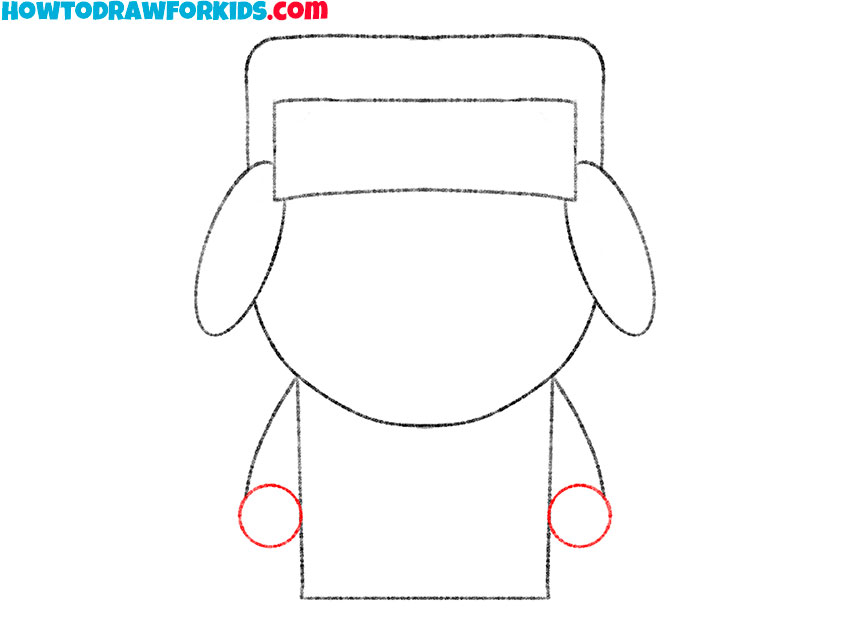
- Draw Kyle Broflovski’s hands.
At the end of each arm outline, draw small, rounded shapes to represent his hands. These should appear mitten-like, capturing the simple, cartoonish style of the character. To draw the hands as rounded shapes, visit my tutorial on how to draw a circle.
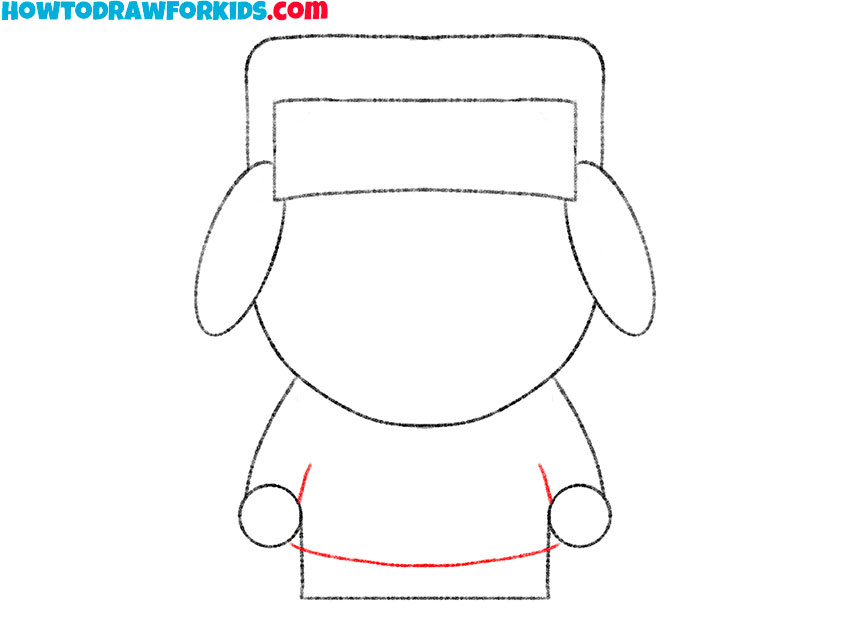
- Detail the arms and clothes.
Now, add the inner contours of Kyle’s arms to complete their shape. Draw curved lines from the shoulders down to the hands, inside the previously outlined outer contours. These lines should be slightly curved, following the natural bend of the arms.
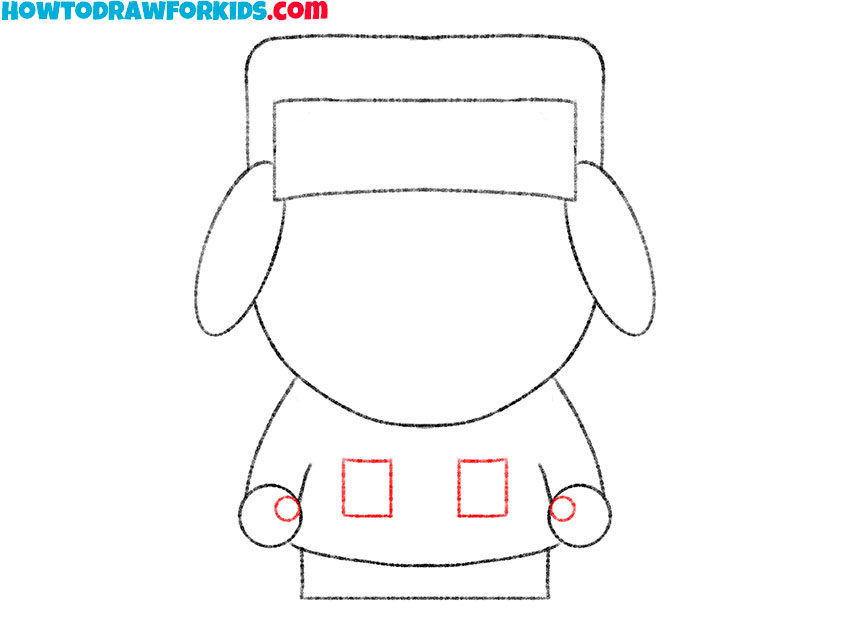
- Add the thumbs and pockets.
Draw small, curved lines at the inside of each hand to indicate the thumbs, making sure they are positioned naturally. Then, draw two small squares on the front of the torso to represent the jacket pockets. Ensure the pockets are symmetrical and evenly spaced.
- Draw the eyes, shoes, and detail the pockets.
Draw two large ovals on his face for the eyes, positioning them evenly spaced and towards the upper part of the head. Below the torso, draw two small, rounded shapes to represent Kyle’s feet. Next, detail the pockets by drawing two inverted triangles inside their outlines.
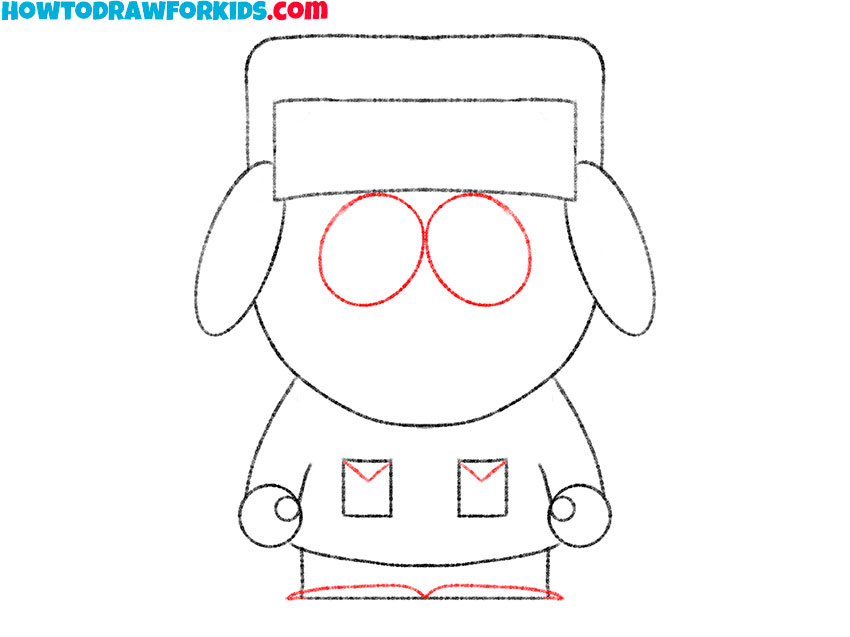
- Detail the clothing, draw the mouth and pupils.
Now, add finer details to Kyle’s face and jacket. Inside the eye circles, draw the pupils as smaller dots. Below the eyes, draw a simple curved line to indicate Kyle’s mouth, capturing his typical expression. On the jacket, add the collar and zipper line for more detail.

- Color your Kyle Broflovski drawing.
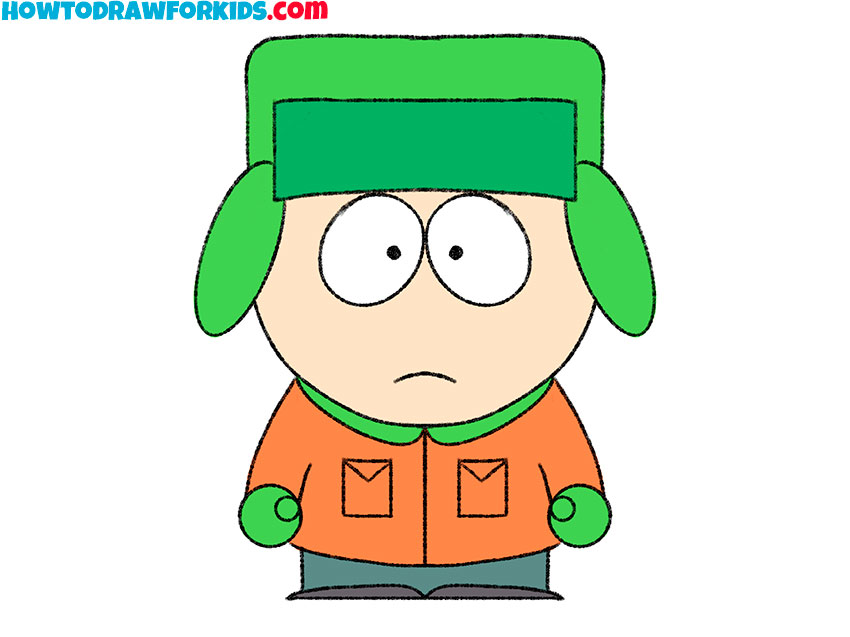
Use green for his hat, earflaps, collar and mittens, orange for his jacket, dark green for the pants and black for his shoes. Color his face with a light flesh tone. Ensure the colors are bold and vibrant, matching the iconic look of Kyle Broflovski from the animated series.

I’ve created a complimentary PDF file containing a summarized version of this drawing lesson. What’s more, with this PDF downloaded, you’ll be able to continue drawing even without an internet connection.
Not to mention, this feature is especially useful for continuous learning and entertainment, no matter where you are.
Tips and Tricks
Drawing Kyle Broflovski, it’s really important to keep in mind that attention to detail can make your art better significantly. Below are some cool tips and tricks that will streamline the process as you draw Kyle Broflovski and enhance the quality of your finished artwork.
When drawing Kyle Broflovski, pay close attention to his unique proportions. His head is significantly larger than his body, which is a hallmark of his character design. Mastering this proportion will make your drawing instantly recognizable.
Kyle’s expressions are often simple yet very expressive. Focus on his large eyes and slight mouth movements to convey his emotions accurately.
Kyle’s green hat is an iconic part of his appearance. Pay special attention to the hat’s shape and the way it sits on his head, including the brim and earmuffs, to ensure it looks authentic.
Use the correct colors for Kyle’s outfit. His green hat and orange jacket are key elements of his character. Accurate coloring will make your drawing more recognizable and true to the original.
Pay attention to the small details like the pockets on Kyle’s jacket and the buttons. These small elements add authenticity and completeness to the drawing.
Keep a reference image of Kyle Broflovski nearby while drawing. This will help you compare your work to the original and make necessary adjustments to ensure accuracy.
Conclusion
As this Kyle Broflovski drawing session comes to a close, I look back on the various stages we’ve mastered. Initially, we started with basic outlines, and subsequently, we added details.
Moreover, we learned a variety of advanced techniques that will significantly enhance your drawing of Kyle Broflovski, making it much more authentic. These methods will improve the overall look of your artwork and provide you with skills that can be applied to other drawings.
Also, I invite you to browse other tutorials on my website. You’ll also find lessons on other “South Park” characters among my tutorials. This allows you to create drawings featuring multiple characters.
Furthermore, for the latest updates and extra tips, make sure to follow my social media profiles.
Hello I’m Kyle and I’m at south park