How to Draw a Cornucopia
The cornucopia, or horn of plenty, is a classic harvest symbol, and this tutorial shows you how to draw it filled with fruits and vegetables.
How to Draw a Cornucopia: Introduction
In this tutorial, I will show you how to draw a cornucopia. This object is sometimes referred to colloquially. This expression comes from ancient Greek mythology.
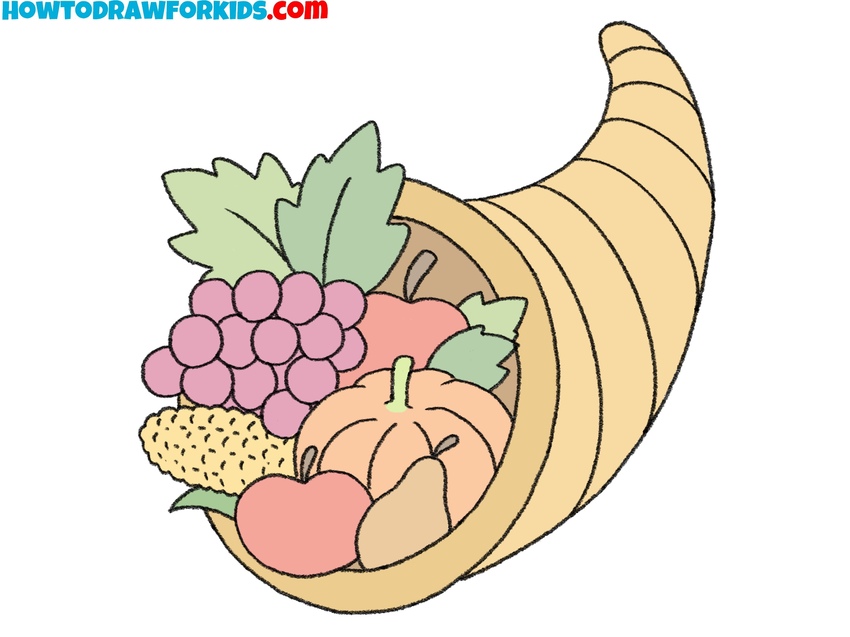
This object is a curved horn with its wide part turned down. Various fruits and vegetables emanate from this horn, sometimes there may be beautiful flowers or gold coins. The cornucopia symbolizes fertility, prosperity, and wealth.
In the picture, you can see a wicker basket in the shape of a horn and some fruits of different colors. The picture looks very voluminous and saturated, but you can easily draw it because the lesson consists of several very simple steps. There will be a little hint at every step. Follow all the steps in sequence and be careful at each step.
I recommend that you choose the brightest colors for your cornucopia. As a result, you should have a bright, beautiful drawing. So, prepare all the necessary supplies. Get in the mood for creative work and start drawing a cornucopia.
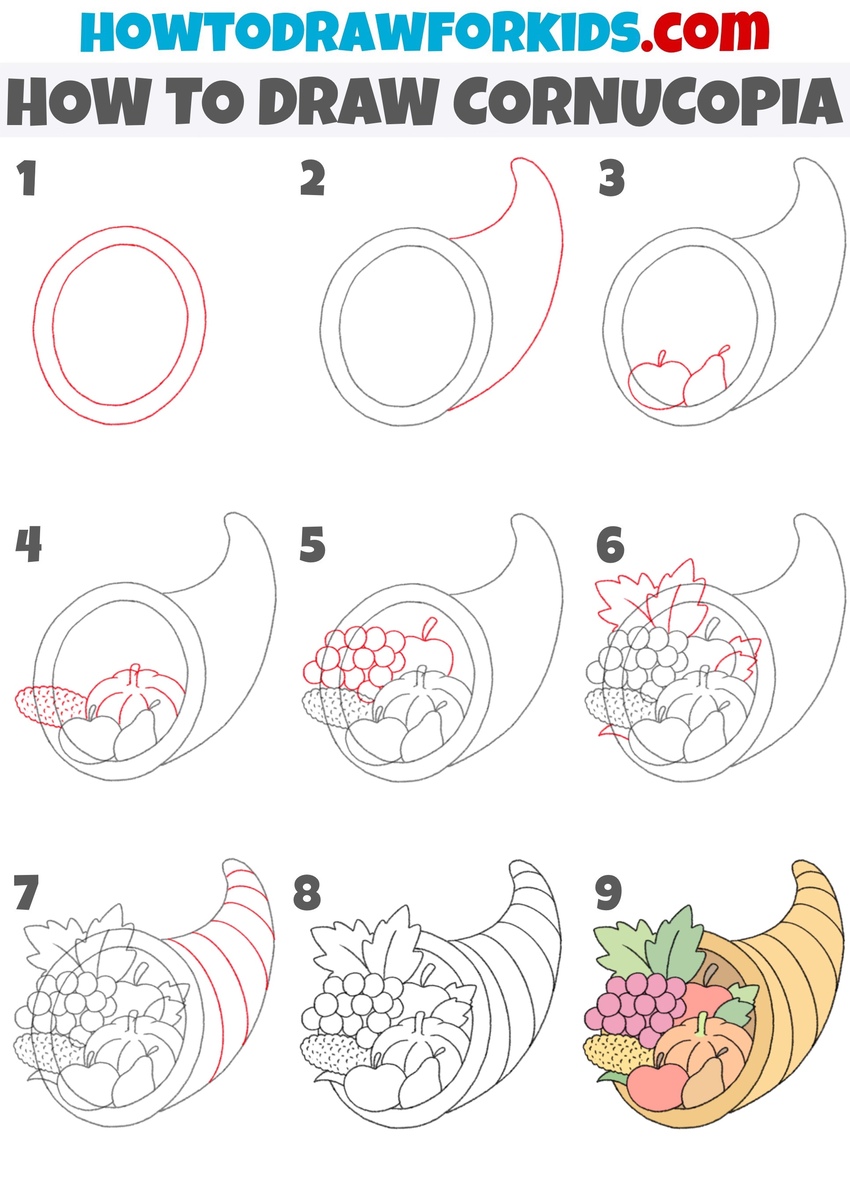
Cornucopia Drawing Tutorial
Materials
- Pencil
- Paper
- Eraser
- Coloring supplies
Time needed: 30 minutes
How to Draw a Cornucopia
- Sketch the cornucopia opening
Every cornucopia drawing begins with its wide opening, since it’s the part where all the fruit and vegetables spill out. Sketch a large oval, then draw another oval inside it to convey the thickness of the basket’s rim. Keep the distance between these two shapes consistent.

- Outline the cornucopia horn.
The cornucopia is traditionally shaped like a curved horn, so draw a long line from the rim you just created and curl it upward. Add another line alongside it to make the form look tubular, connecting both ends at a point. This shape should look like a horn or a seashell.

- Place small fruits in front.
To show that the horn is overflowing, begin by sketching a couple of rounded fruit shapes at the opening. Apples or pears are good choices here because their simple round forms are easy to recognize and help set the scene. So draw an apple and pear so they slightly overlap the rim of the cornucopia, as if resting inside it.

- Add a pumpkin and corn.
Since the cornucopia often symbolizes abundance, it’s common to include a pumpkin. Draw a pumpkin of a medium size tucked just behind the first fruits, using curved segments to convey its ribbed surface. Beside it, add another rounded form, such as a corn or squash.

- Draw grapes inside the cornucopia.
Grapes are a classic way to show abundance because they can be drawn as a cluster of many small circles. So draw grapes emerging from behind the pumpkin. Vary the sizes a bit to avoid a repetitive pattern; real grapes are not all identical. At the very background, draw an apple or other fruit.

- Sketch leaves around fruit.
To make the cornucopia look complete, sketch several large leaves around the fruit. Place them at different angles so they frame the arrangement naturally. Use jagged or pointed edges, since leaves are rarely perfectly smooth. Don’t try to make them identical.

- Create basket weave effect.
The cornucopia is usually woven like a basket, so showing texture helps the drawing feel more realistic. Sketch several curved lines across the horn, following its shape. These lines should be at equal distance from each other, wrapping around the horn’s curve.

- Correct overlapping lines.
Before adding color, take a moment to refine your drawing. Erase any construction marks or unnecessary lines that are no longer needed, especially inside the fruit and along the horn. Darken the important outlines to make them look clear and finished. Also, check proportions of your cornucopia drawing.

- Add harvest colors to the cornucopia.
A harvest drawing wouldn’t feel complete without color. Paint the horn in light brown or yellow tones. The pumpkin can be orange, the apples red, the grapes purple, and the leaves green. Try to use different shades rather than one flat color, since variation makes the drawing more interesting.

Easy Cornucopia Drawing Tutorial
Continuing with the theme of the main cornucopia tutorial, this version saves the same clear and simple drawing style, but shows a different sequence of steps and style of drawing.
Create the main outline of the horn of plenty by sketching a wide curved shape that bends upward. Add the inner curve to create the open mouth of the cornucopia, then draw wavy lines along the edge to give it a woven texture.
Illustrate the first large fruit inside, such as a pumpkin. Add details like the stem and ridges. Place a few smaller fruits and vegetables in front, such as apples and grapes, making sure they overlap slightly. Add some leaves and stalks.
When drawing overlapping shapes, keep the closer objects darker and cleaner, while erasing extra guidelines carefully. Add texture lines on the surface of the cornucopia. Once the outline is complete, check proportions. After finishing, the drawing can be colored with shades of brown for the cornucopia and different tones for the harvest items.

Conclusion
To continue practicing similar themes, you may also want to look at my tutorials on how to draw a pumpkin, how to draw grapes, and how to draw a basket. Each of these will help reinforce the same skills and offer slightly different challenges in shape and detail.