How to Draw a Fence
Fences come in different types, but in this tutorial I’ll show you how to draw a fence that’s made up of of vertical and horizontal boards.
How to Draw a Fence: Introduction
In this drawing tutorial, you can learn how to draw a fence. This guide will help you practice drawing straight lines. My drawing lessons are sure to help you improve your artistic skills, and this guide will also help you to draw a house in more detail.
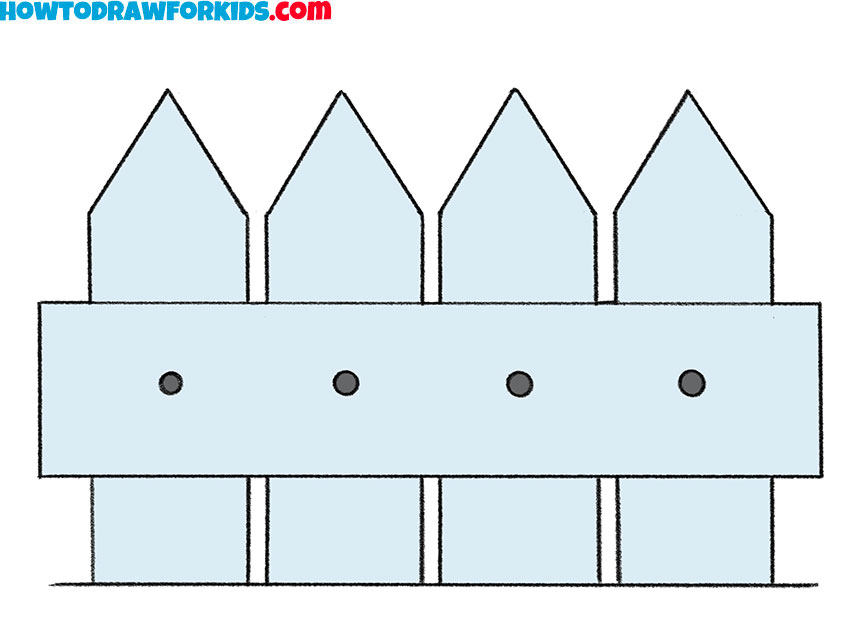
A fence is a structure that encloses an area, typically outdoors, and is usually constructed from posts that are connected by boards, wire, rails, or netting. I’m sure you’ve seen many different fences made from different materials. This time you can draw a fence with planks pointed at the top.
I think you already want to start drawing that beautiful fence. Then get your drawing materials ready and get to work!
Fence Drawing Tutorial
Materials
- Pencil
- Paper
- Eraser
- Coloring supplies
Time needed: 30 minutes
How to Draw a Fence
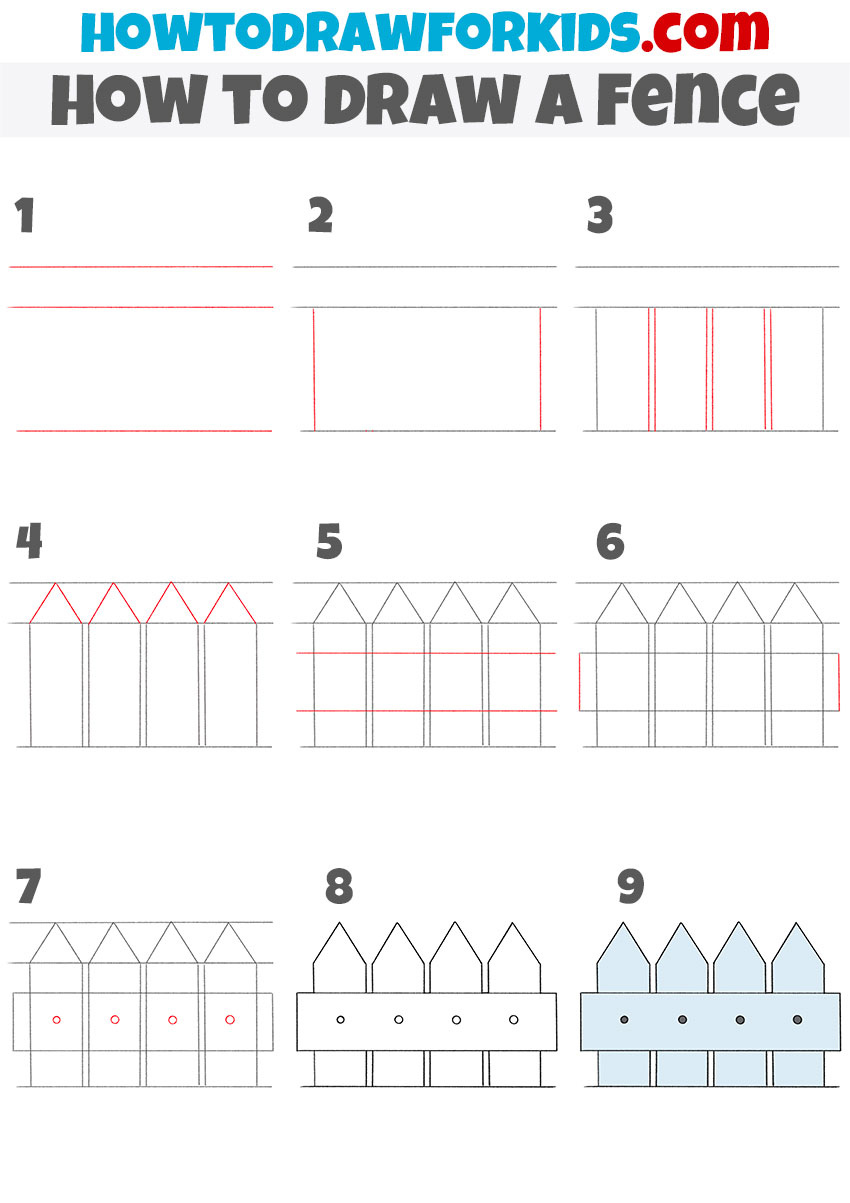
- Sketch horizontal guidelines.
Place three long horizontal lines across the page. The top and bottom lines will serve as guides for the height and proportions of the fence boards. The middle line will define the place where the vertical boards will start tapering. Keep the lines parallel and straight.

- Define the frame of the fence.
Next, sketch two vertical lines to close off the rectangle formed by the guides. This shape will determine how wide the fence section appears in your drawing. Getting the spacing right now will make the placement of boards much easier later. Measure with your eye how far apart the verticals should be.

- Divide the fence into boards.
Inside the rectangle, draw several vertical lines to divide the space into sections. These will represent the planks of wood that make up the fence. Count the planks first and then lightly marking where each line should fall. This prevents one side from looking too wide or too narrow.

- Draw the fence triangular peaks.
At the top of each board, sketch small triangular shapes to create pointed tips. These are typical in many traditional wooden fences and give the drawing a more recognizable look. To avoid mistakes, you can first mark a small dot above each plank as a guide for the peak, then connect it with slanting lines.

- Sketch the horizontal supports.
Now, draw two more horizontal lines across the fence, one near the middle and another lower down. These represent the crossbars that hold the vertical planks together. If you want a neat sketch, use the existing guidelines to keep the lines parallel.

- Finalize the side edges of the horizontal bar.
Now close the shape of the horizontal bar from the previous step with a pair of short vertical lines. These lines should be equal in height and parallel to the vertical lines of the bars. As with other straight lines, start with light pressure then darken them.

- Add small round nails.
On the crossbar, add small round circles to represent nails or bolts holding the fence together. These small details might seem minor, but they make the fence drawing more convincing. These circles should be located exactly in the center of the intersection of the vertical and horizontal bars.

- Leave the final contours.
Erase all extra guidelines and leave only the clear outlines of the fence. Redrawing over some lines can also help create more confident strokes. Take a moment to check the proportions. Fix anything that feels unconvincing and unnatural before moving on to coloring.

- Paint the fence surface.
A light gray or blue tone, as shown in this example, works well, but you could also choose brown to represent natural wood. If you prefer a more dimensional look, you can add shadows on one side of each plank. Also, you can add wooden texture for an even more realistic look.

Additionall Content
This concludes the fence drawing lesson. I hope you enjoyed it and would love to see your feedback in the comments. Don’t forget to become our social media subscriber to keep up to date with all updates. I have prepared a PDF file in which you can see a summary of this lesson and return to it at any time.