How to Draw a Fist
Learn how to draw a fist in different positions and angles, and improve your hand-drawing skills using four easy and effective drawing methods.

How to Draw a Fist: Introduction
This tutorial on how to draw a fist is part of a larger series of person drawing tutorials and also serves as a follow-up to the hand drawing tutorial. I intentionally created a separate tutorial for the fist to provide a more detailed explanation without overloading the already complex hand drawing lesson.
Being able to draw hands in different positions and states is a crucial skill for any artist. It’s important to know how to draw open hands, clenched fists, or even hands pointing in a specific direction. That’s why I decided to create this tutorial on how to draw a fist and include additional examples of clenched fists drawn from different angles and in various positions.
Besides the angles at which the fists are shown, they also differ in shape and detail. This variety allows you to study the process of drawing a fist more thoroughly and understand how subtle changes affect the overall appearance.
Despite the detail in these examples, all instructions follow a simple style and are made up of basic lines and shapes. This makes the tutorial easy to follow while still offering a very detailed guidance.
Fist Drawing Tutorial
Materials
- Pencil
- Paper
- Eraser
- Coloring supplies
Time needed: 25 minutes
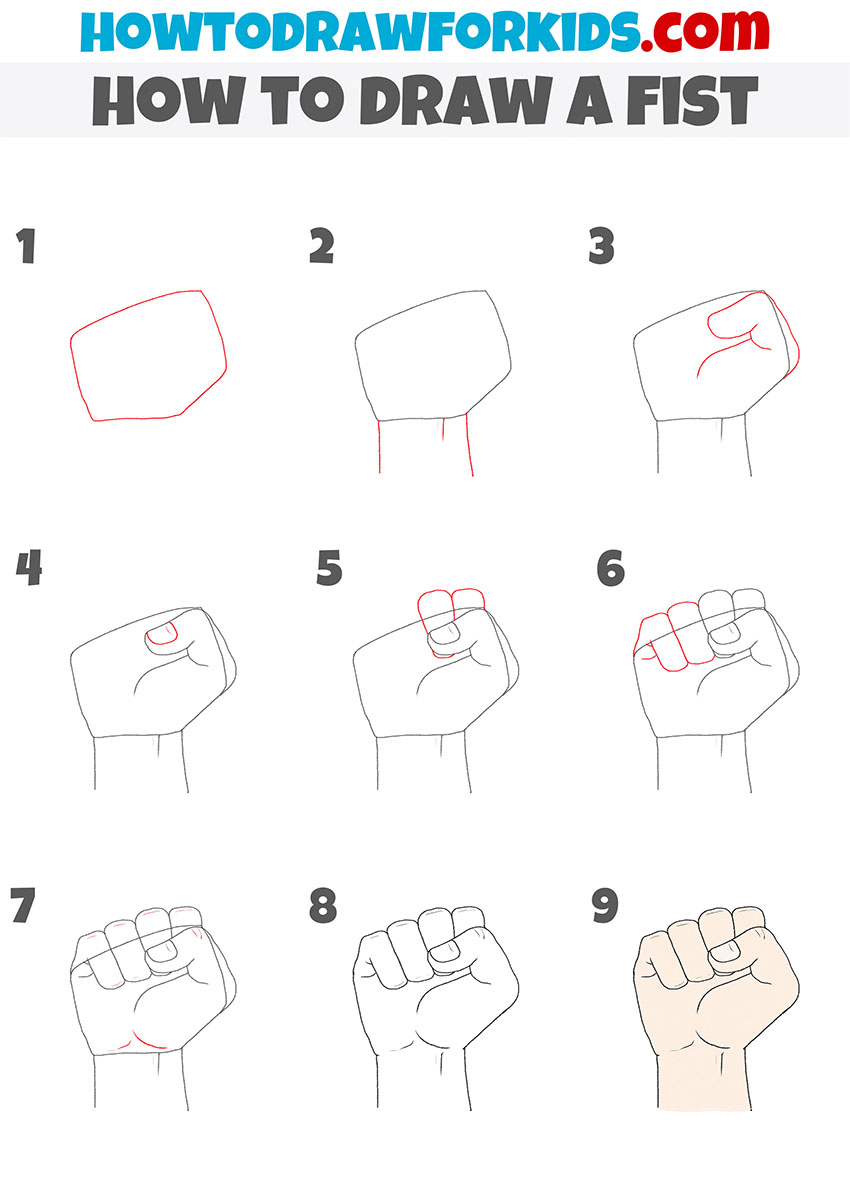
How to Draw a Fist
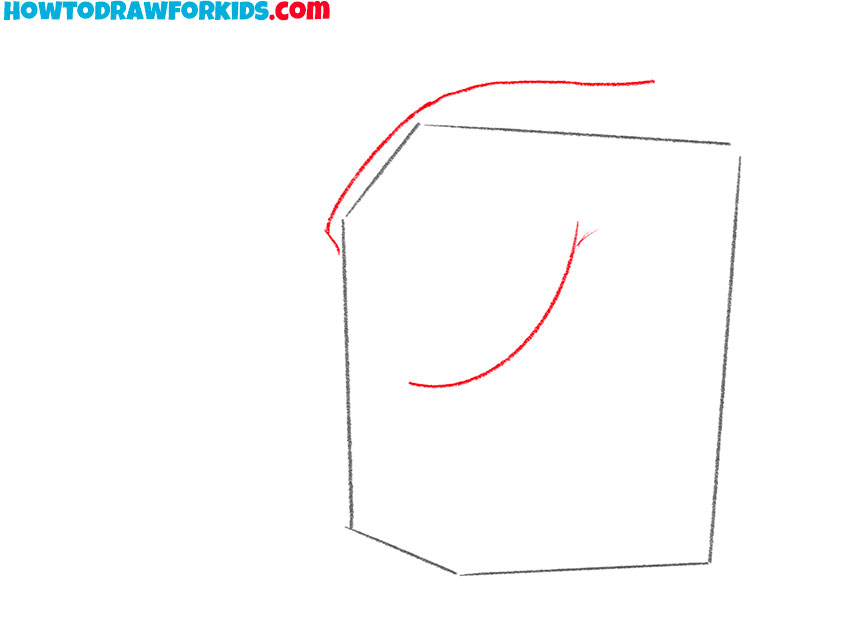
- Draw the base shape of the fist.
First, draw a simple angular shape for the base of the fist. Don’t worry about perfect symmetry – this is just a guide. Keep your lines light so that you can easily make changes or erase later. The left part should be noticeably narrower, as it will later go into the wrist.

- Add the base of the thumb.
Begin shaping the thumb by drawing a short curved line at the top-left corner of the hand shape. This line represents the base of the thumb where it connects to the palm. Use very smooth lines to indicate this part of the hand.
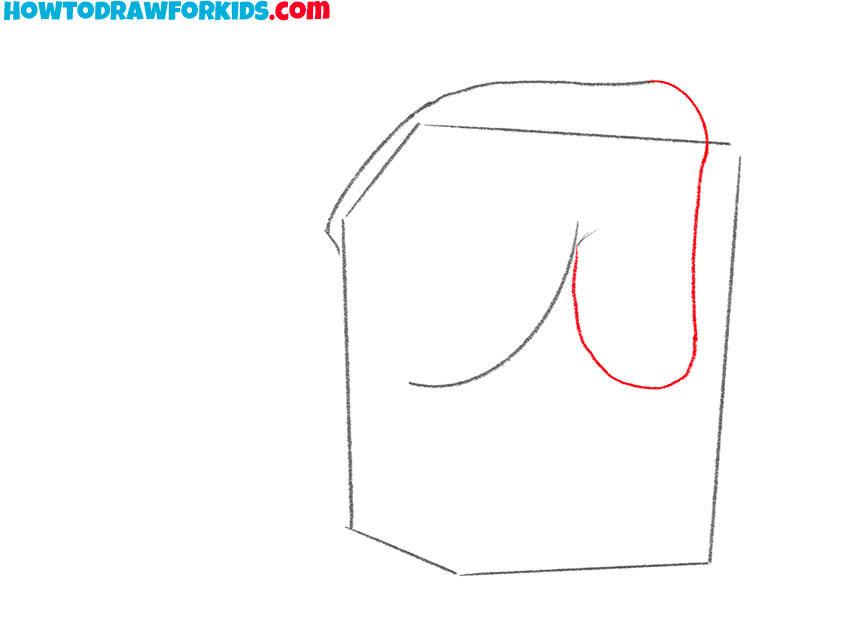
- Finish the thumb shape.
Complete the outline of the thumb by extending the curved shape downward along the right edge of the basic hand shape. Follow the side of the initial shape to show how the thumb folds tightly across the fingers. This simple shape finishes the overall contour of the thumb.
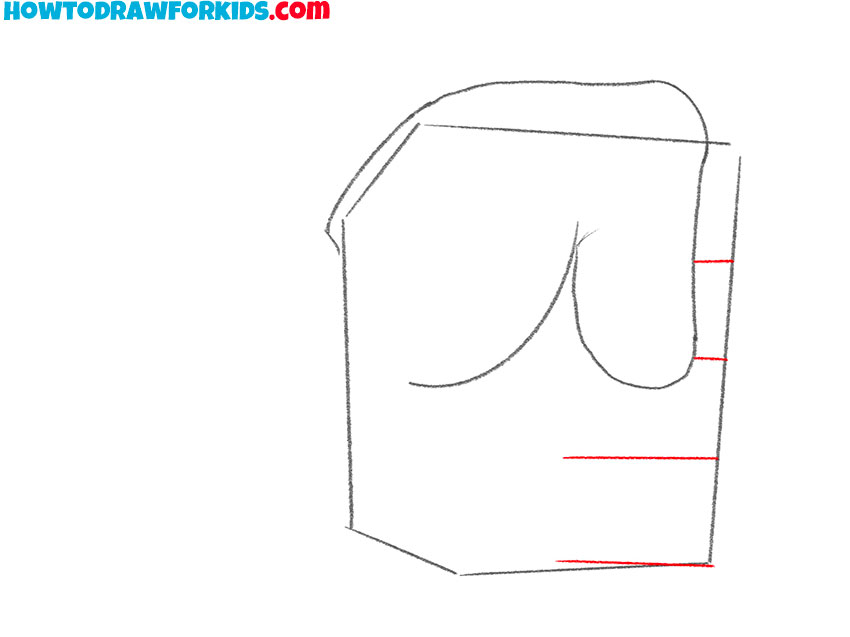
- Divide the four fingers.
Use four short horizontal lines across the right part of the hand shape to divide the space into four equal sections for the fingers. These guidelines help you position the fingers accurately and show how they stack while curled inward.
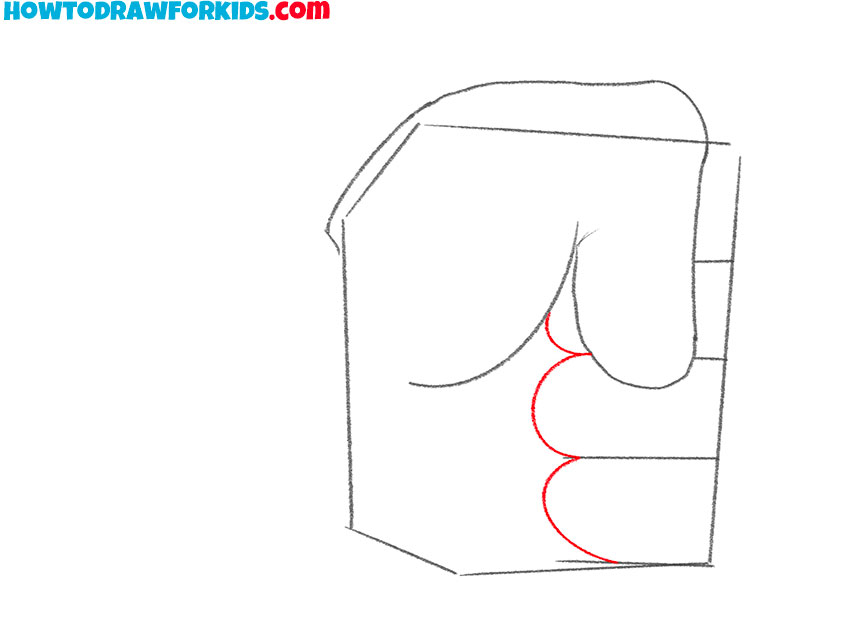
- Draw the finger edges on the inner side.
Now draw the inner edges of the fingers by sketching the curved sides of each one. These lines connect to the guidelines you drew in the previous step and help show how the fingers fold and rest tightly against one another inside the fist.
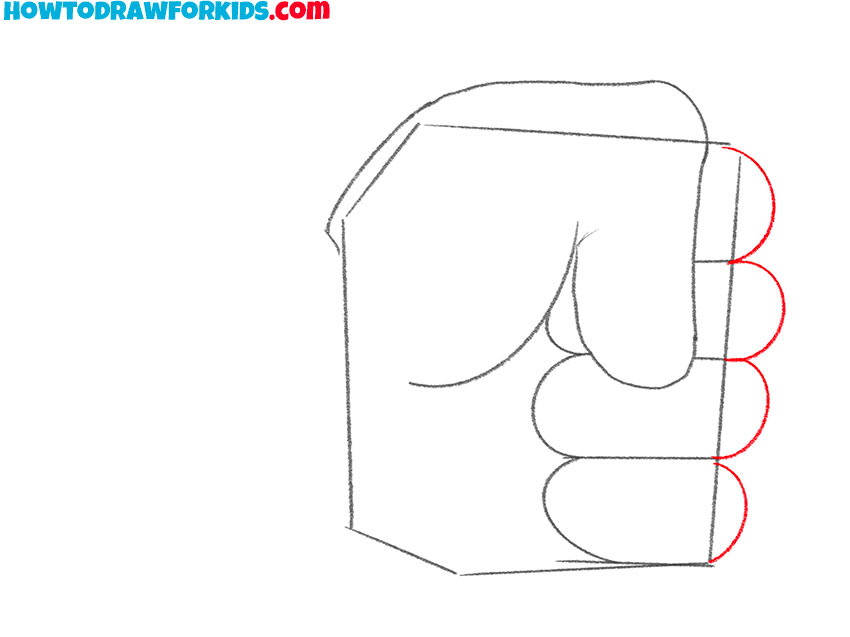
- Finish the finger shapes.
In this step, you’ll complete the full shapes of all four fingers by drawing the curved outer edges. Starting from the top finger, use a smooth arc to connect the side edge of the finger to the front. Repeat this for the remaining three fingers below.
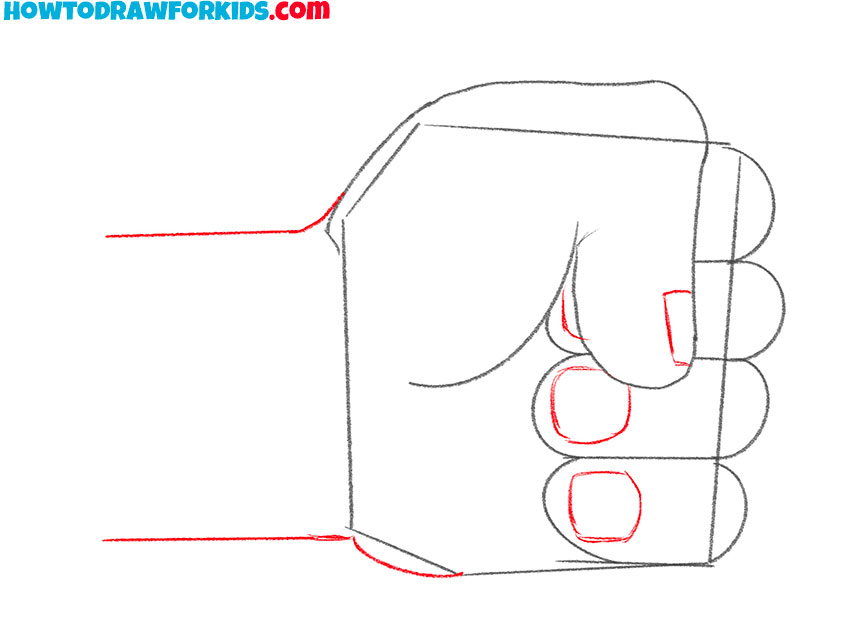
- Add the wrist and fingernails.
Now it’s time to finish the overall hand shape by adding the wrist and small details like fingernails. Now, draw two horizontal lines extending out from the left side of the hand. These lines form the wrist. Then, move to the right side of the fist and draw small, curved shapes on the tips of each finger to represent the fingernails.
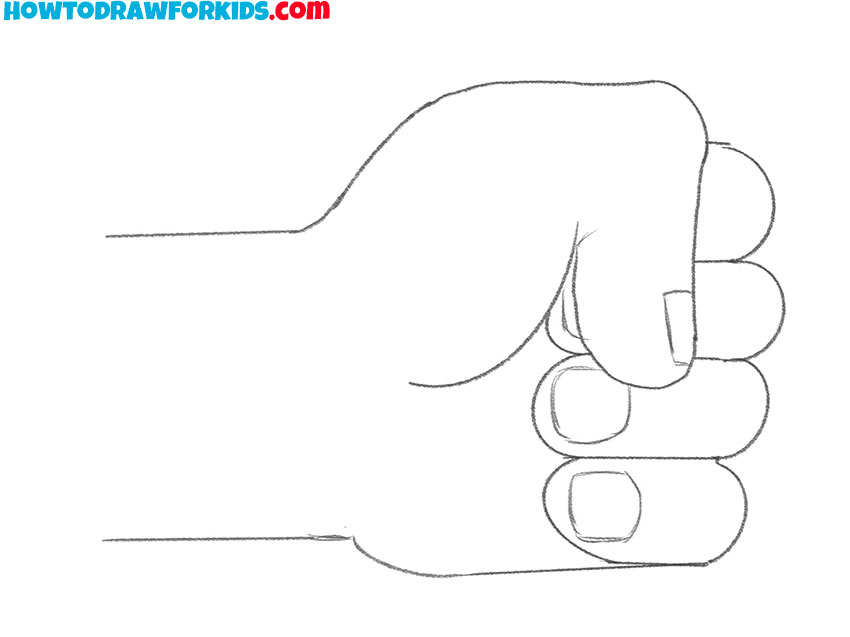
- Finalize the outline.
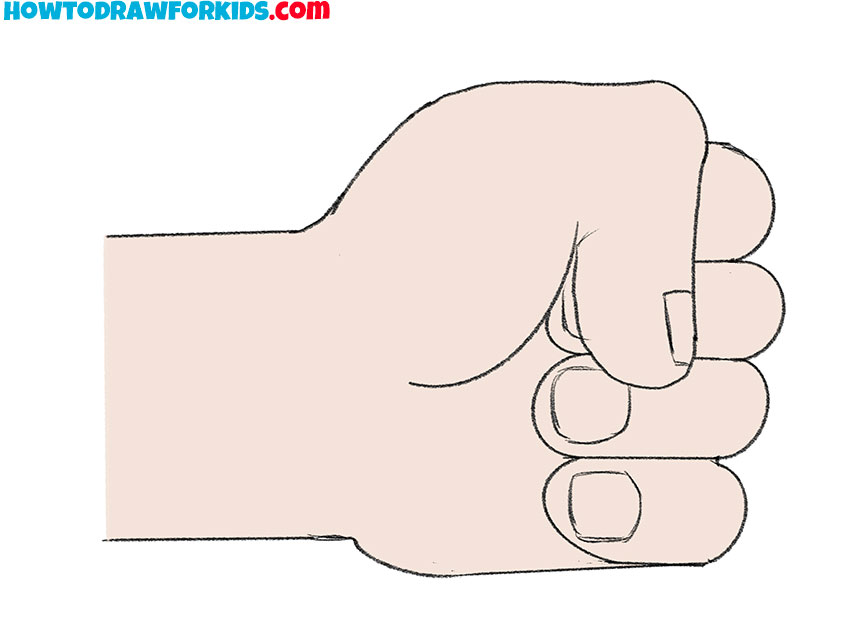
At this stage, darken the main lines of the fist drawing and erase any remaining construction guides. Trace over the outlines of the fingers, thumb, palm, and wrist. Adjust the curves if needed. This is your opportunity to clean up the entire sketch and make it look like a polished final drawing.
- Color the fist drawing.
Use a skin tone that matches your preference, and carefully fill in the entire fist. You might also want to add slight shading around the creases of the fingers, edges of the thumb, and where the hand meets the wrist to give the drawing more a more realistic look.

Additional Content
At this point, the main fist drawing tutorial is complete. I hope you did a great job and didn’t run into any difficulties. You can now download a shortened version of the lesson in PDF format, which I’ve prepared for your convenience. It’s a helpful way to revisit the tutorial anytime.
How to Draw a Fist: Additional Tutorials
Detailed Fist Drawing Tutorial
This method on how to draw a fist differs noticeably from the first tutorial in both structure and angle. It shows the fist from a slightly tilted frontal view. The step sequence is also different with more anatomically correct shapes and details.
Start by drawing a rough five-sided base shape that will represent the front plane of the clenched fist. Extend two straight lines downward to create the wrist. Add the thumb curve on the right, following the edge of the shape. Inside the fist, draw curved lines to define the folded thumb and the palm crease.
Sketch the thumb nail. Begin drawing the index finger and gradually add each finger next to it, stacking them closely and using curved lines to define the finger segments. Add the knuckles and finish shaping the palm. Refine the entire outline. Erase guidelines. At the end, color the drawing if needed. You can repeat the steps of this guide on how to draw a fist for practice.
Easy Fist Drawing Tutorial
Let’s try another method and train fist drawing skills. This version stands out by offering a simpler look than the second tutorial while providing more detail than the first. It presents a front-facing view of the fist and introduces the fingers before the thumb, which reverses the usual order seen in other drawing sequences.
Begin this tutorial on how to draw a fist by sketching a slightly curved rectangular shape to represent the front surface of the fist. Extend two slightly curved lines downward to form the wrist. Begin shaping the fist by drawing the index and middle fingers first using two rounded rectangles. Add the remaining two fingers to complete the top row.
Next, draw the folded thumb wrapping across the lower part of the fingers and connecting to the side of the palm. Add lines to define the palm creases and thumb joint. Refine the outer edges of the wrist and hand. Clean up the sketch by erasing extra lines. Add outlines to finalize the shape. Optionally, color the drawing. Repeat the steps of this tutorial on how to draw an easy fist to improve accuracy.

How to Draw a Clenched Fist at an Angle
This version of the tutorial on how to draw a clenched fist is the most complex and detailed among all the guides. It features a complex perspective from the bottom side of the fist, which makes the thumb, palm, and finger segments more visually foreshortened.
Unlike the first tutorial, which uses straight-on symmetry and basic shapes, this method requires more curved lines, overlapping parts, and subtle angle adjustments to achieve a convincing look. It includes detailed folds on the palm and thumb placement, making it better suited for those who want to go beyond basic shapes and study more natural hand positions.
First, draw a rounded, slightly tilted shape that will serve as the main part of the clenched fist. Extend two lines from the lower sides to form the wrist and forearm. Sketch a long curve across the front surface of the shape to mark the fingers. Draw the thumb curled over the front, with the nail visible.
Inside the palm area, add four short, stacked lines to indicate the tucked-in finger segments. Complete the overall shape of the hand by drawing the outlines of the knuckles and finger curves. Refine the shapes of the wrist, thumb, and finger edges. Add light lines for folds. Erase construction lines. Color the clenched fist to complete the drawing.

Conclusion
This tutorial was quite detailed, and I believe that’s justified – after all, the hand, including the fist, is one of the most difficult parts of the human body to draw. It’s made up of many complex, interconnected parts, and it’s important to know how to draw each of them correctly. That’s exactly why I made this how to draw a fist lesson a separate, highly detailed tutorial.
If you’re interested in further improving your skills in drawing human body parts, be sure to check out my tutorial on how to draw eyes, and don’t forget to practice drawing a face as well. And of course, make sure to follow me on social media so you don’t miss any upcoming drawing lessons.


THANK YOU TOO MUCH
Thank you too!