How to Draw a Lion
Learn how to draw a lion, the king of beasts, with my collection of really easy drawing tutorials, created for kids and beginners.
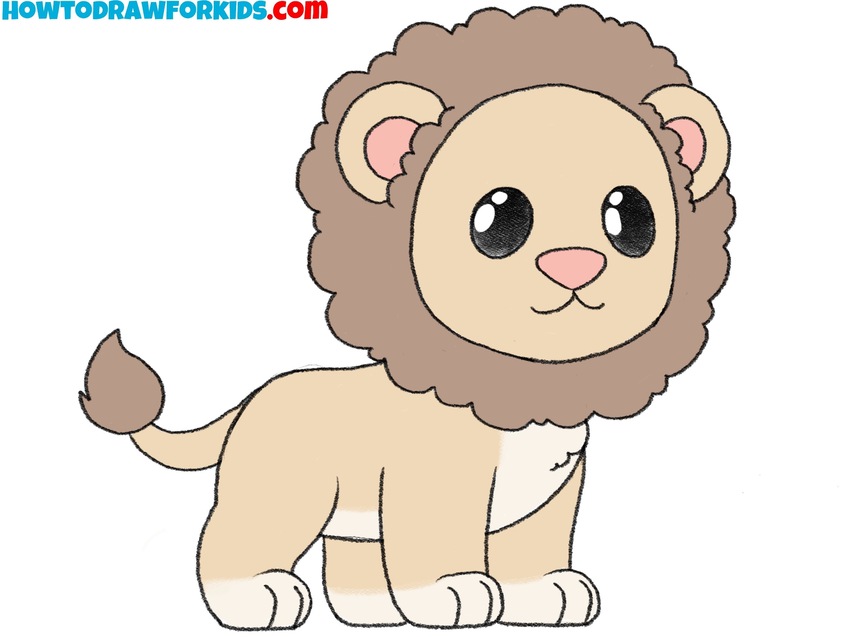
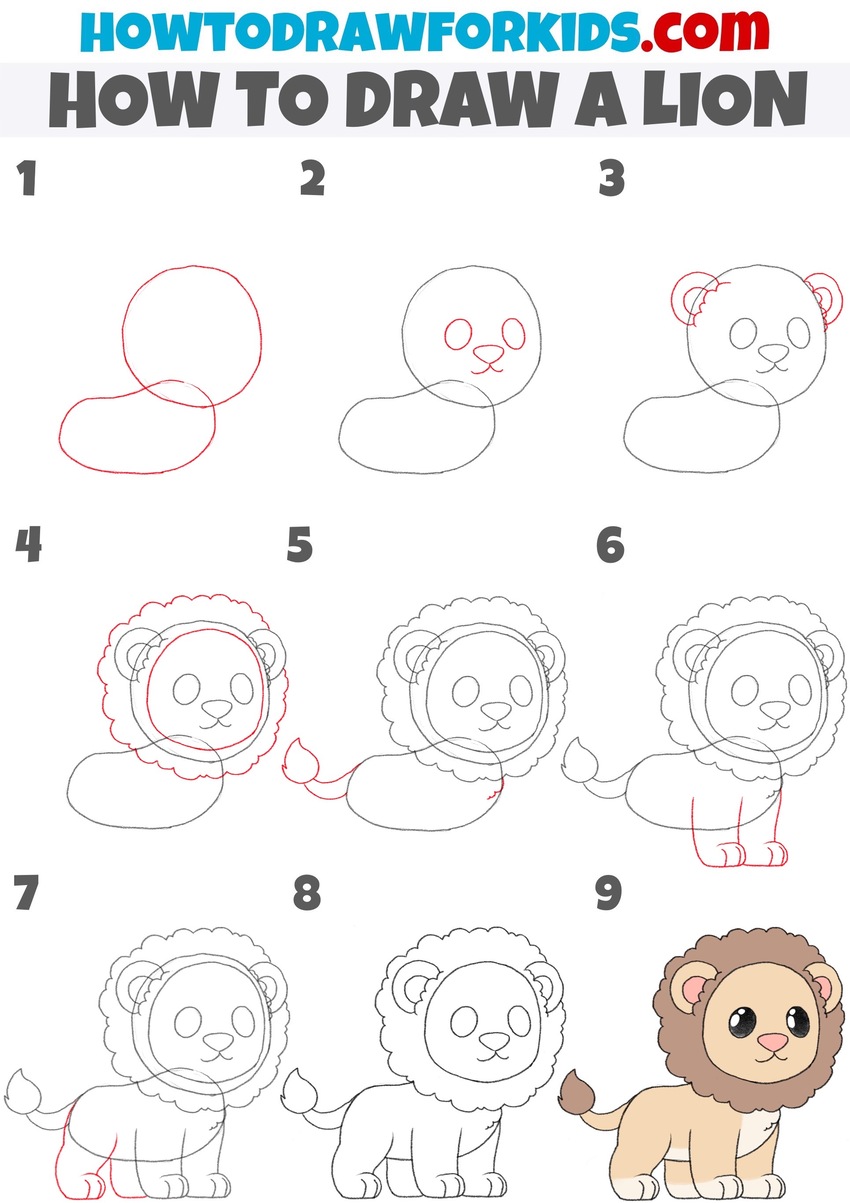
How to Draw a Lion: Introduction
In this tutorial on drawing a lion, we will cover how to create a clear and distinctive image of the king of the savannah on paper. Before starting, here are some important points to consider when drawing a lion.
Firstly, when drawing a lion, remember that it is essentially a large cat with a mane and a tail tuft, so the principles of drawing a cat covered in another lesson are also applicable here.
And of course, these distinctive features, such as the mane and the tuft on the tail, are important when drawing a lion. Including them accurately in your drawing will make the lion easily recognizable. The color palette also plays a significant role in the recognizability of a lion, so use a combination of brown, beige, and orange for your drawing.
It is also important to keep proportions in mind. Even though we are drawing a lion in a simplified, cartoonish style, proportions remain important. Elements such as the head, torso, and limbs should be depicted in a balanced and accurate manner, with some parts slightly exaggerated relative to others. By adjusting these proportions to realistic ones, you can also depict a more lifelike lion.
Lion Drawing Tutorial
Materials
- Pencil
- Paper
- Eraser
- Coloring supplies
Time needed: 35 minutes
How to Draw a Lion
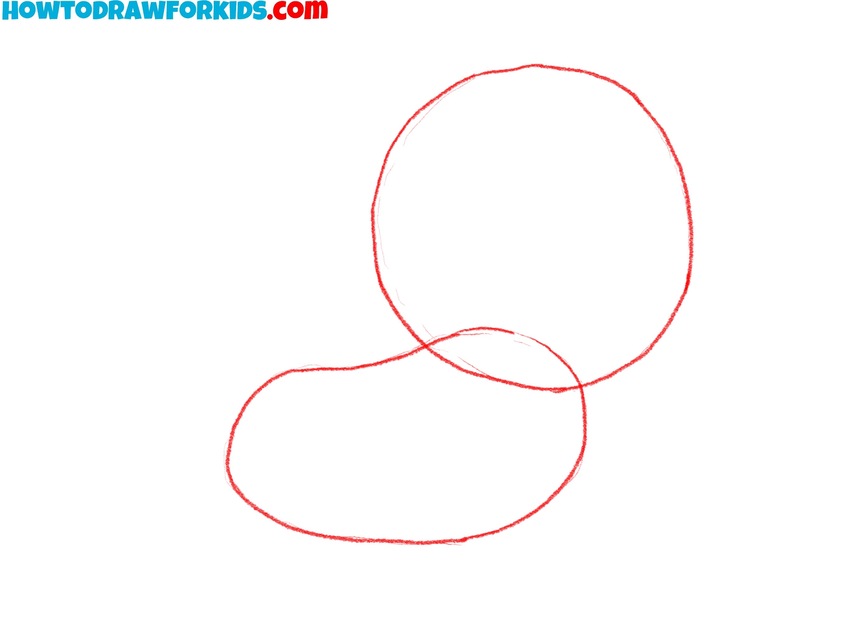
- Sketch the head and body outline.
To start drawing a lion, sketch a large circle to represent the lion’s head. Then, draw a slightly smaller oval below the head to outline the lion’s body. Place this oval so it overlaps the lower part of the head circle; this overlap connects the head and body naturally.
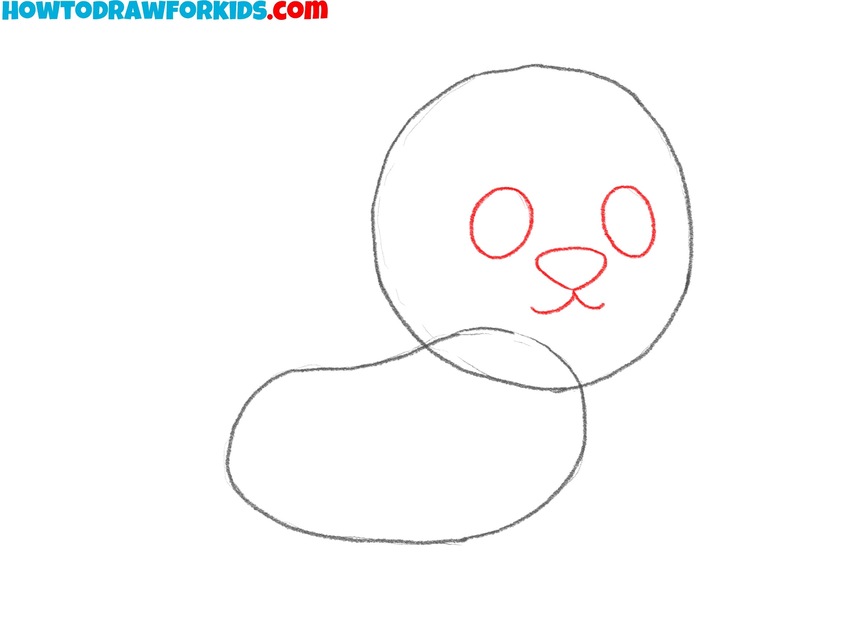
- Add the facial features.
Sketch two small circles inside the head circle; these will serve as the lion’s eyes. Position them symmetrically, leaving a little space between them. Underneath the eyes, sketch a small oval for the nose, and then draw a gentle curve extending down from the nose to form the mouth.
- Illustrate the ears.
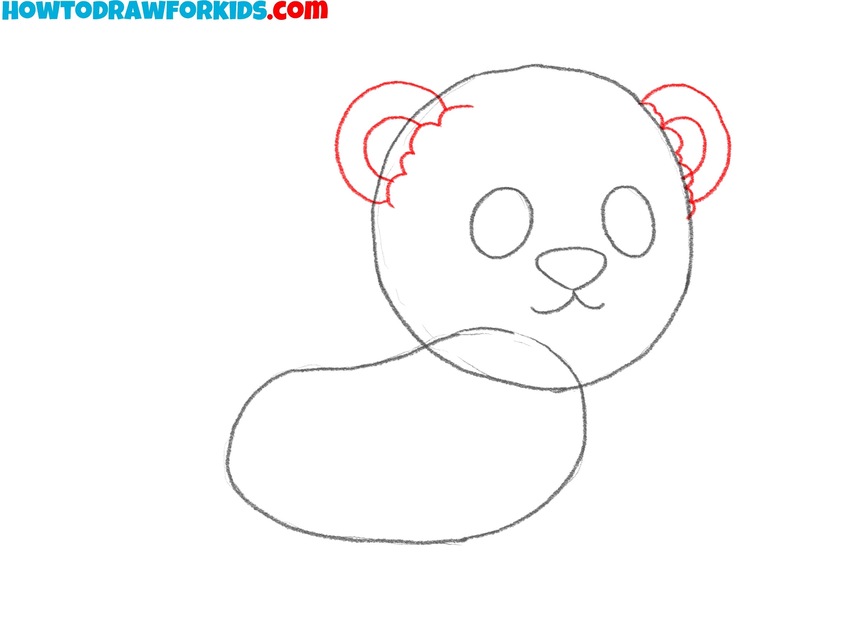
Next, add two rounded ears on top of the lion’s head. Draw each ear as a small semicircle or round shape. Inside each ear, add a smaller curved line to illustrate the inner part of the ear, giving them a bit more realism. The rounded shape of the ears is another feature that distinguishes the lion from many other cats.
- Outline the mane of the big cat.
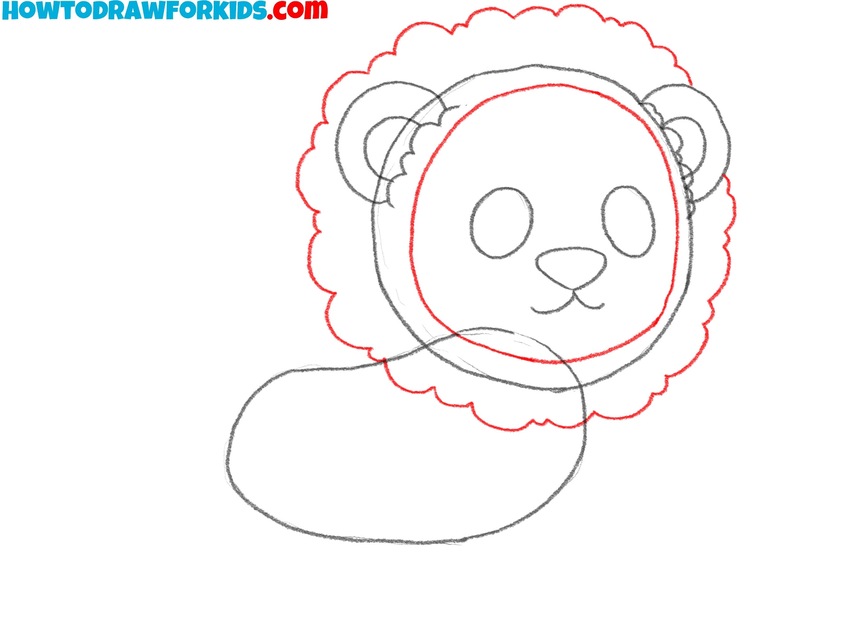
Now, let’s outline the lion’s most defining feature. Starting from the top of the head, draw a large, wavy line around the head and ears to represent the mane. Make the outline look fluffy by adding small, curved waves or scallops along the edges to resemble fur.
- Add the fur on the chest.
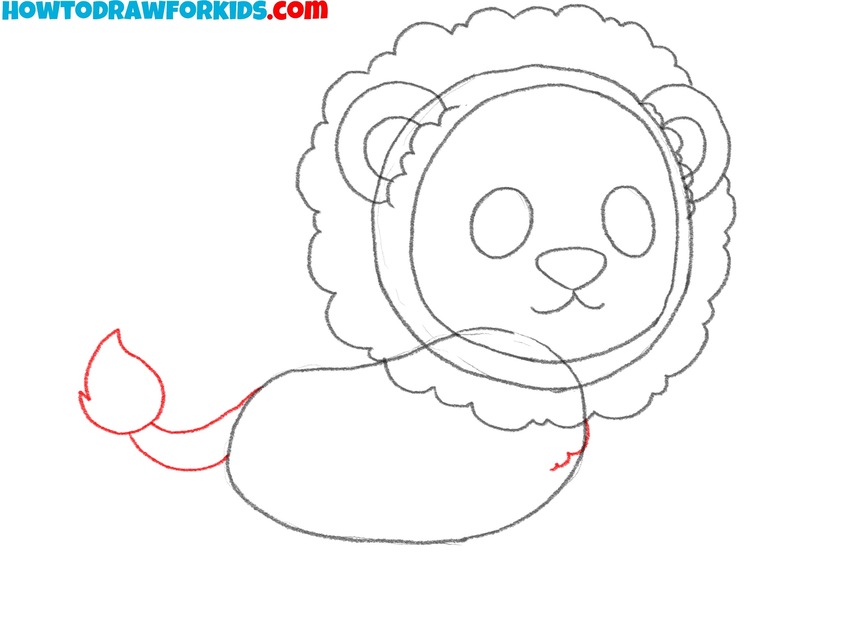
Draw the lion’s tail by sketching a curved line extending from the back of the body. At the end of the tail, draw a small teardrop or flame-like shape to represent the tuft of fur at the tip. Make the tuft slightly larger than the width of the tail itself. Then, sketch fur on the chest using short lines.
- Illustrate the front legs.
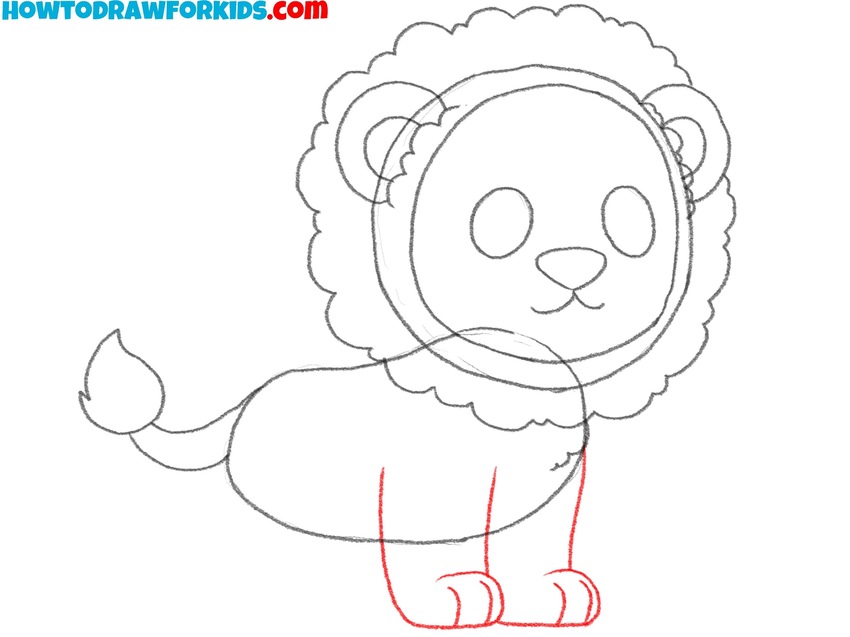
In this step, add two front legs by drawing straight, parallel lines extending down from the body oval. Position these legs close together near the front of the body. Keep the legs slightly thicker at the top and narrow them towards the bottom. At the end of each leg, add small ovals or rounded lines to represent the paws.
- Add the back legs and paws.
Now, add the back legs by drawing shapes similar to the front legs, but with a slight curve. Position the back legs towards the end of the body. Draw the paws similarly to those on the front legs, with small ovals or rounded shapes at the base.
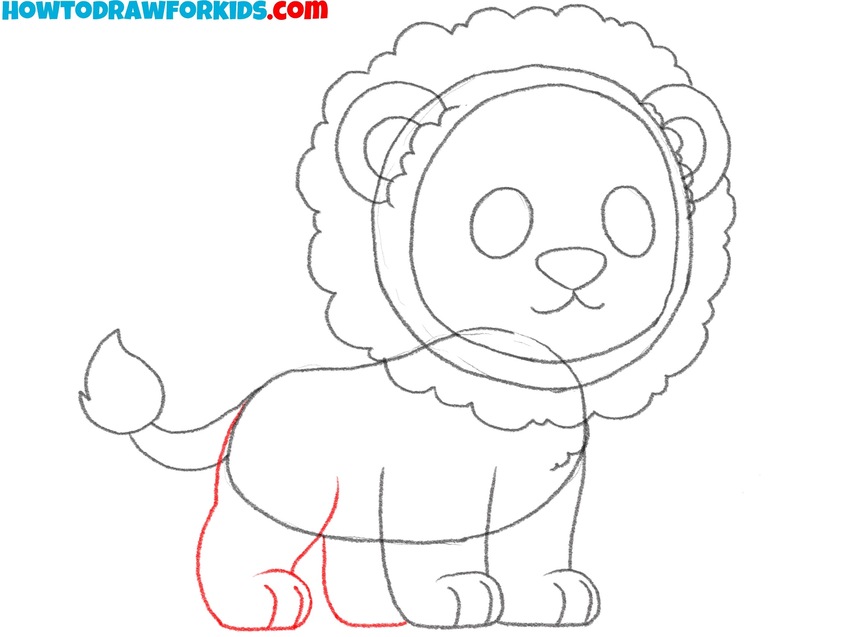
- Erase the guidelines and polish the sketch.
Carefully erase any extra guidelines or unnecessary lines used to build the head, body, and limbs of the lion. This will leave you with a cleaner outline of the lion. Go over any remaining lines to refine and smooth them out, especially around the mane, face, and legs.
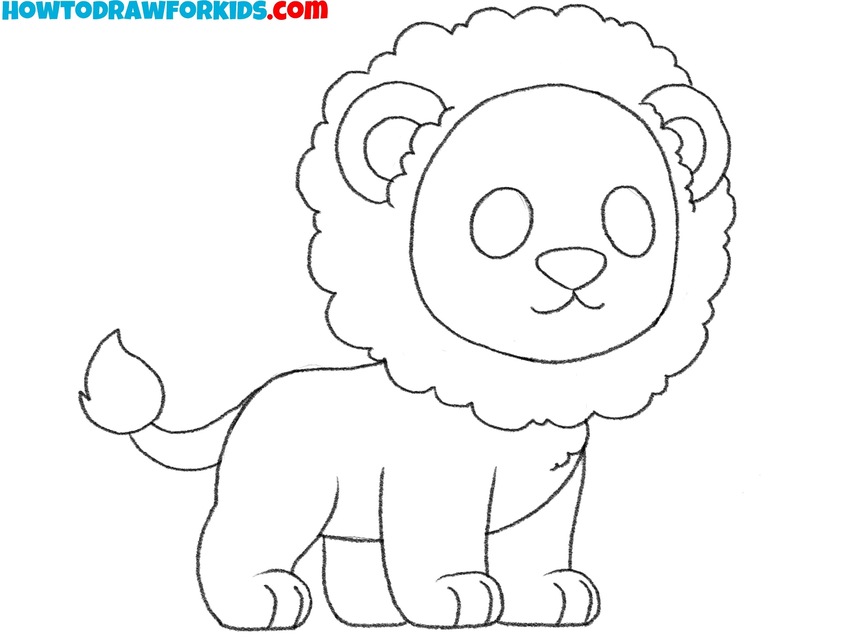
- Color the lion.
To finish, paint the king of beasts using a combination of brown, beige, and orange. Color the mane brown to give it a rich, deep look, and use beige or light tan for the body and face. Apply a soft pink to the nose and inner parts of the ears.
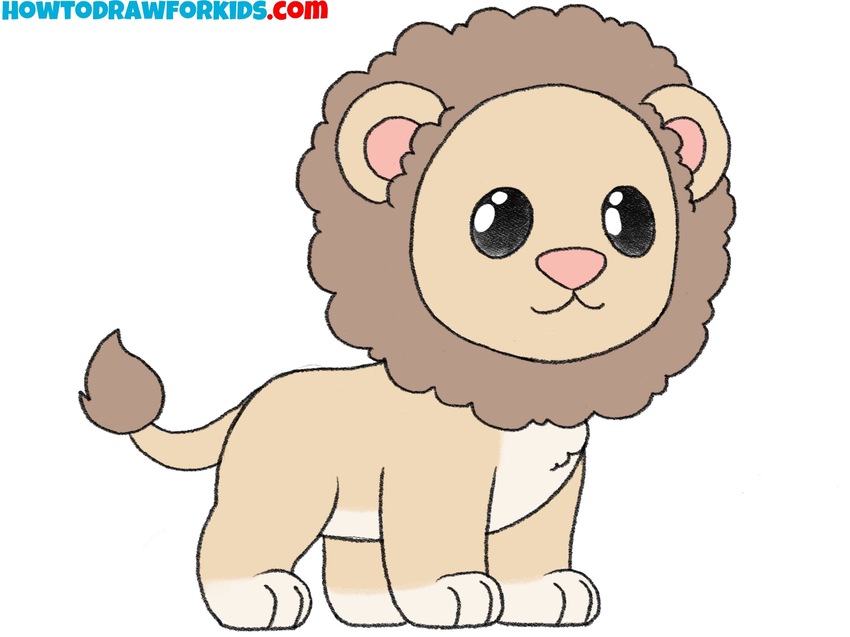
How to Draw a Lion: Additional Tutorials
The basic lesson has been completed, and it is now time to proceed to additional instructions to reinforce knowledge and learn how to depict the king of beasts in various positions and styles.
Detailed Lion Drawing Tutorial
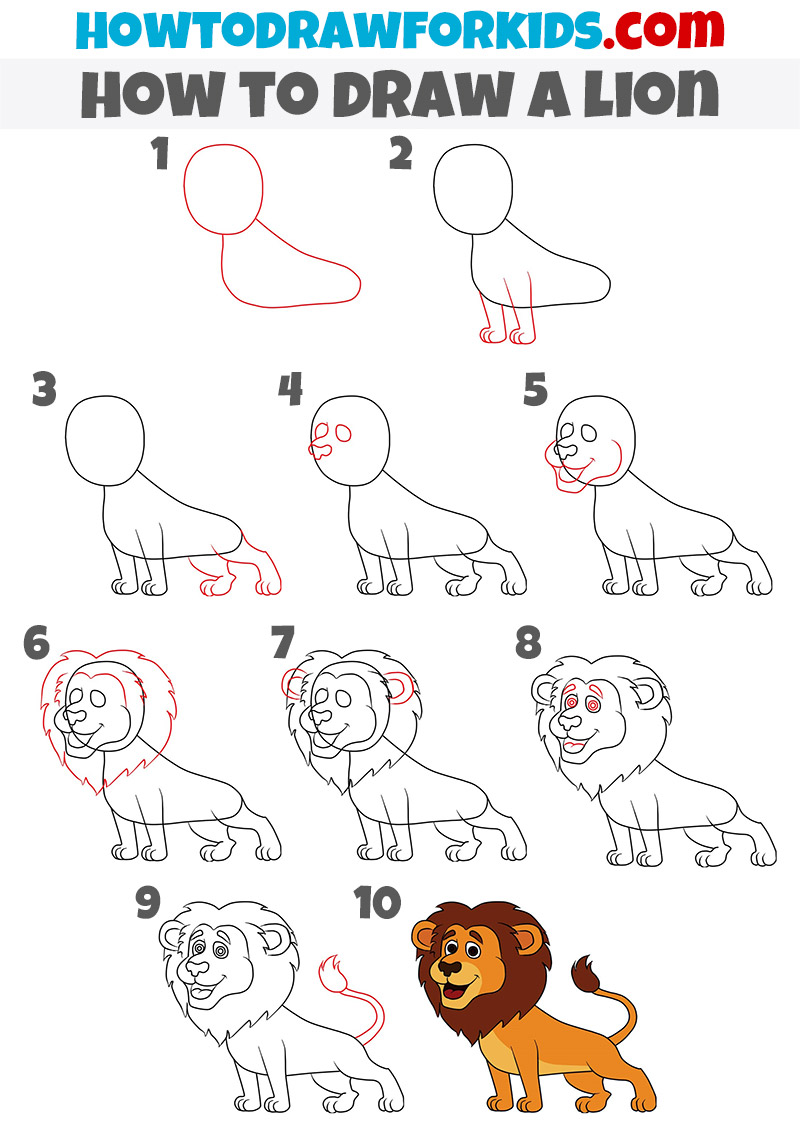
This elementary instruction will be divided into ten steps in which very simple lines will be applied. This tutorial will show you how to draw a lion in a more detailed manner, while still keeping the simplicity and cartoonishness of the execution.
To draw a lion in this detailed but cartoon style, begin by sketching a large circle for the head and an oval shape below it for the body, connecting the two with a smooth curve. Add two straight, parallel lines for the front legs and finish with small, rounded paws. Next, draw a backs leg positioned at the end of the body, also with small curves for the paws.
Inside the head, add two ovals for the eyes and a small rounded shape for the nose, with a short line below to form the mouth. Outline the lion’s mane with wavy lines around the head, then add two rounded ears on either side. Refine the facial features by adding pupils, eyebrows, and slight curves for the mouth of the lion. Complete the lion drawing with a curved tail and a tuft at the end. Finally, color the mane brown, the body tan, and add pink inside the ears and red on the mouth.
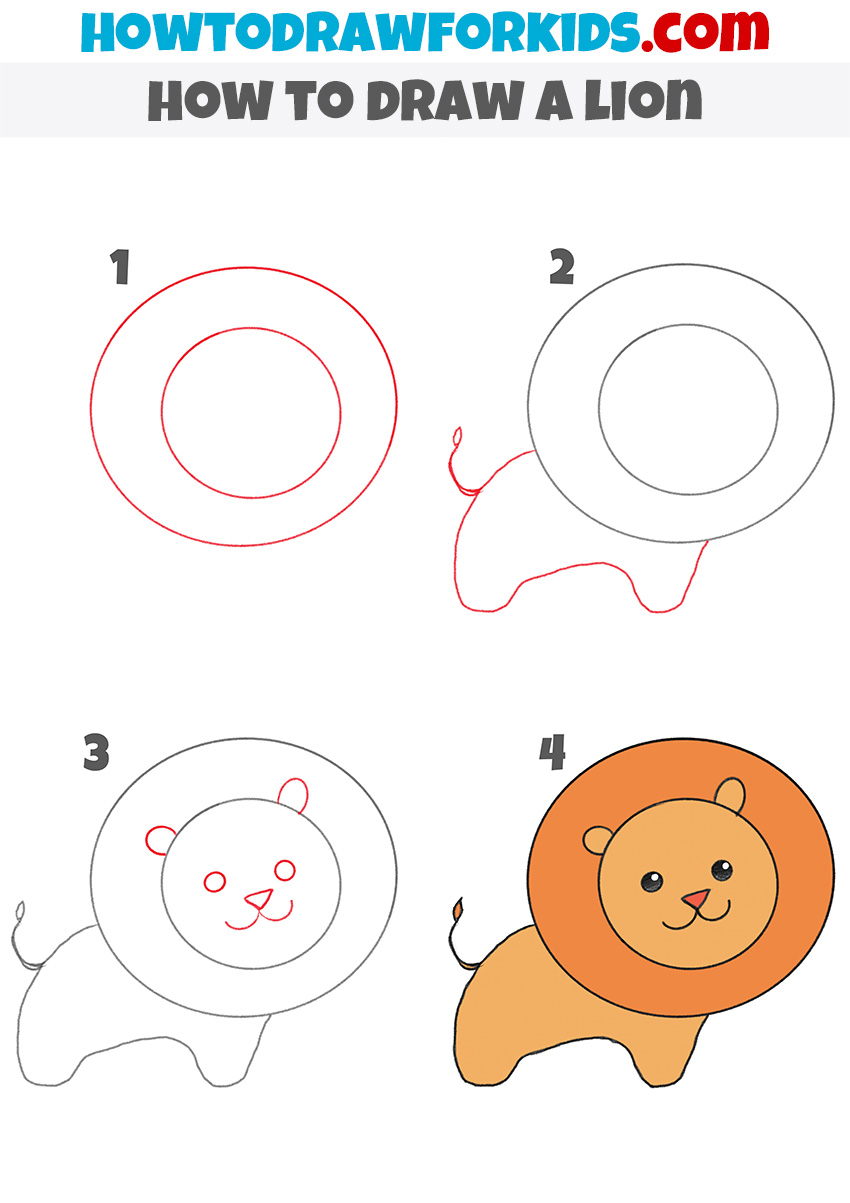
How to Draw a Lion for Kindergarten
In this tutorial, you can see several rounded shapes and really simple details that will create a lion drawing. It will be ideal if you draw the king of beasts without any auxiliary tools. This will greatly help develop your drawing skills from lesson to lesson.
To draw a simple lion suitable for preschoolers, start by creating two concentric circles in the center of the paper. The smaller inner circle will be the lion’s face, and the larger outer circle will form the mane. Next, draw the lion’s body by adding a curved line that extends down from the mane, forming a rounded body shape. Add a small tail on the left side, curving it outward and ending it with a tiny tuft.
Inside the smaller circle, draw two eyes, a triangle nose, and a curved line for the mouth to complete the face. Add two small, rounded ears at the top of the head. To finish, color the mane in orange or brown, and use lighter colors like tan or beige for the face and body. This simple lion drawing activity is ideal for young children learning basic drawing skills.
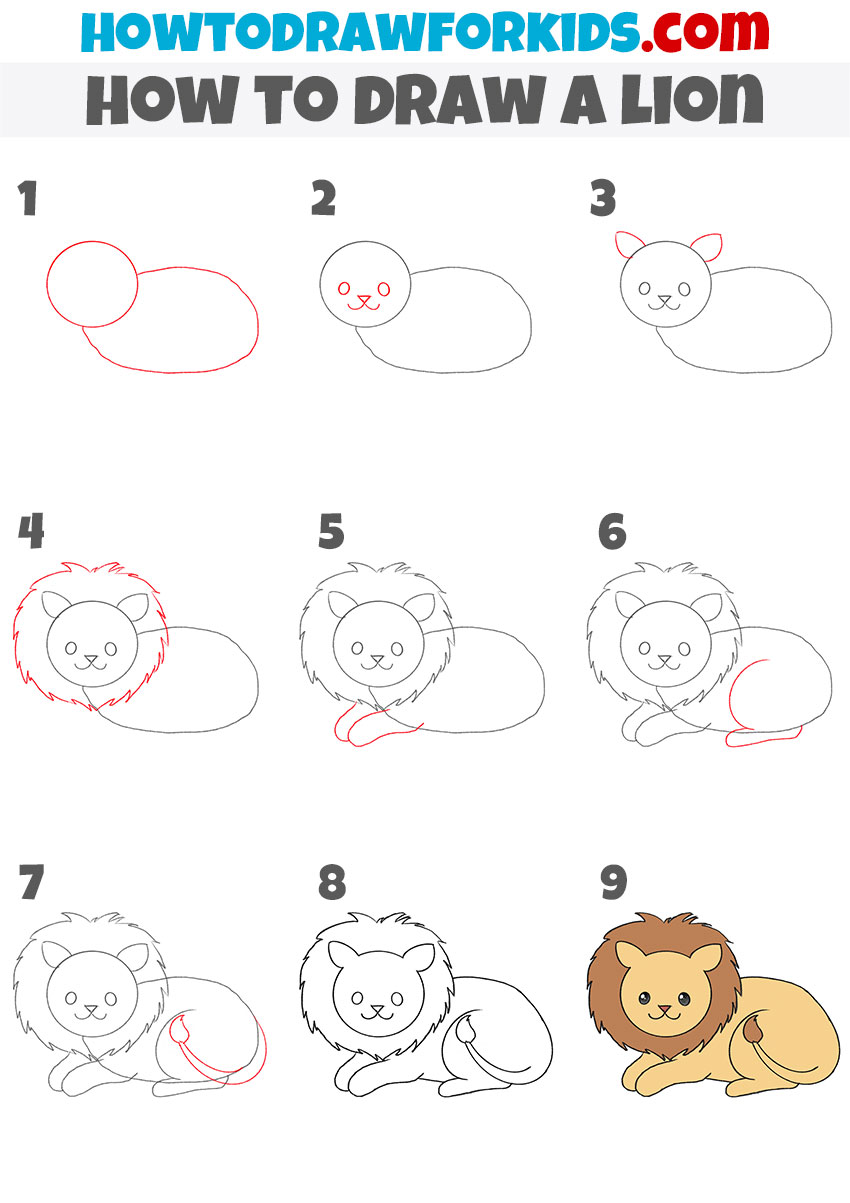
Lying Lion Drawing Tutorial
Any artist should be able to sketch a lion, or any other animal, in any position, such as lying down. So let’s get our art supplies ready again and try to sketch a lying lion.
To draw a lying lion, begin by sketching a small circle for the head and a larger oval for the body, placing the head circle slightly overlapping the body. Inside the head, draw two small circles for the eyes, a small triangle for the nose, and curved lines to form the mouth. Next, add two pointed ears on top of the head. Outline the mane around the head using jagged lines for a furry texture.
Then, sketch the front legs with simple curved lines. Then, add a rounded shape at the back to form the hind leg. Sketch the tail curving along the body, ending with a small tuft. Refine the mane and body shape to illustrate the lying position. Finish by coloring the mane brown and the body in light tan or beige, completing this easy lion drawing tutorial.
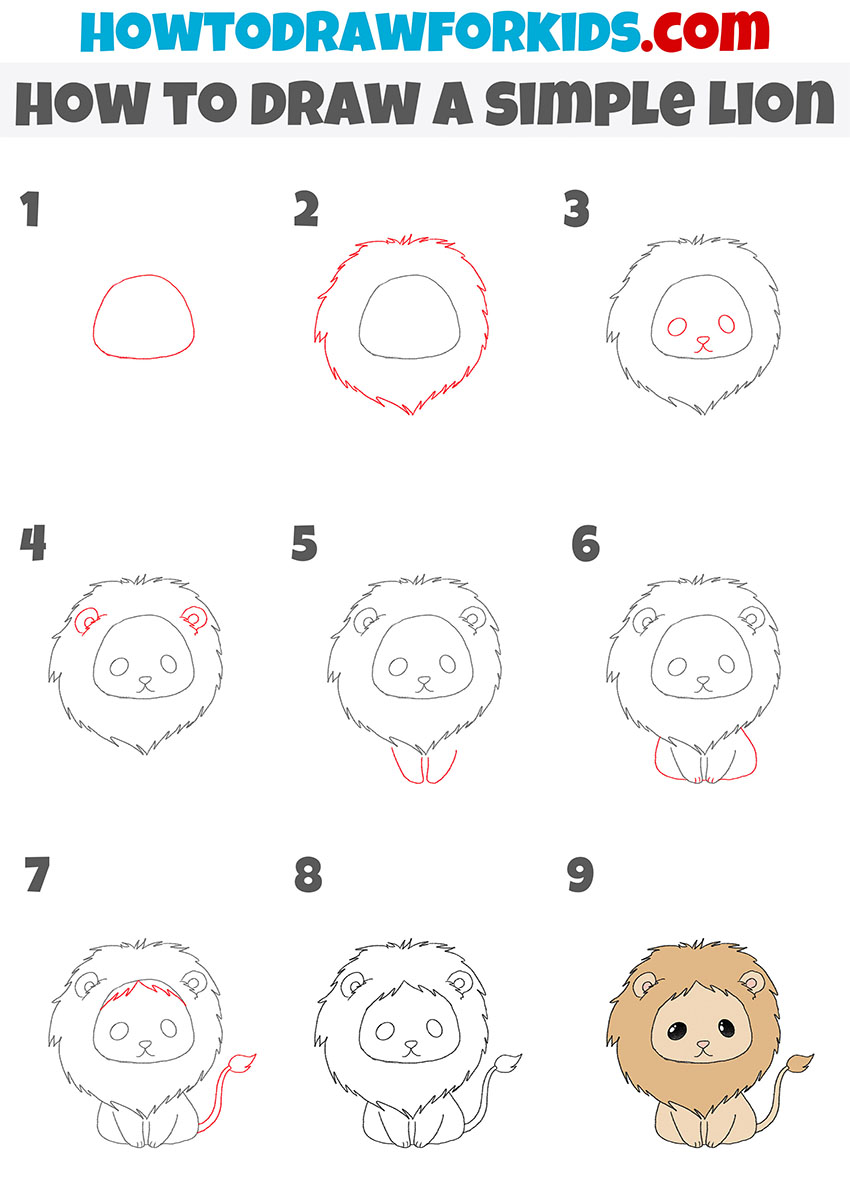
Sitting Lion Drawing Tutorial
Continuing with the theme of the lion’s various positions in space, we will study how to draw a lion sitting. In this guide, the lion is presented in a cartoon style and looks very cute and funny. As the king of beasts is depicted in a sitting position, you can see only the front of the torso.
To draw a sitting lion in simple style, sketch an oval shape for the head. Around this, draw a larger, jagged outline to form the mane, giving it a fluffy, textured look. Inside the head, add two small circles for the eyes and a small triangle for the nose, with a simple curve below to represent the mouth. Next, add two rounded ears on each side of the mane, drawing an inner curve in each ear for detail.
Below the head, sketch two parallel, oval shapes to represent the lion’s front paws, positioned close together. Extend a curved line down from each side of the body to form the hind legs, and add a curved tail with a small tuft at the end. Complete the lion by adding some simple lines within the mane and coloring the mane brown and the body tan or beige, creating a friendly sitting lion drawing.
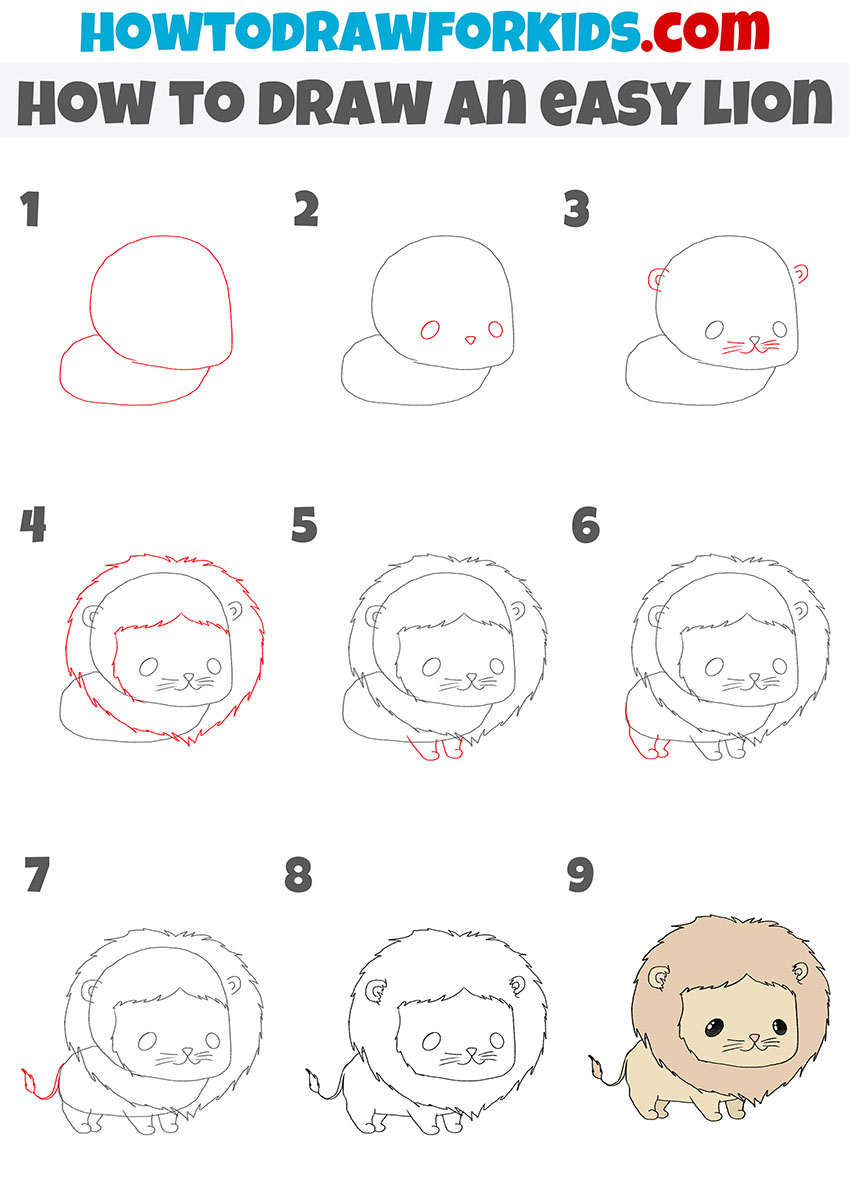
Easy Lion Drawing Tutorial
If the basic lion drawing lesson was too complicated for you, and the version for preschoolers was too easy for you, then this simple guide will be just right. Here are presented really simple details and body parts that even the youngest artist and reader of my site will be able to do.
To draw an easy lion, start by sketching an oval for the head and a smaller, overlapping oval below it for the body. Inside the head, draw two circles for the eyes and a small triangle for the nose. Add simple whiskers extending from each side of the mouth area. Draw two small rounded shapes on the sides of the head for the ears. Outline the mane around the head with a jagged line to give it a fluffy look.
Add two small oval shapes below the body to form the front paws. Sketch two curved lines behind these for the back legs, slightly larger to show the lion’s stance. Draw a thin tail with a tuft at the end on the left side. Complete the drawing by coloring the mane brown and the body tan.
Alternative Lion Drawing Technique
So, here we come to the last but not the least important lesson, in which I will show you an alternative way to draw a lion. This method is very different from the previous ones, and instead of drawing the king of beasts starting from basic shapes, we will depict his body part by body part.
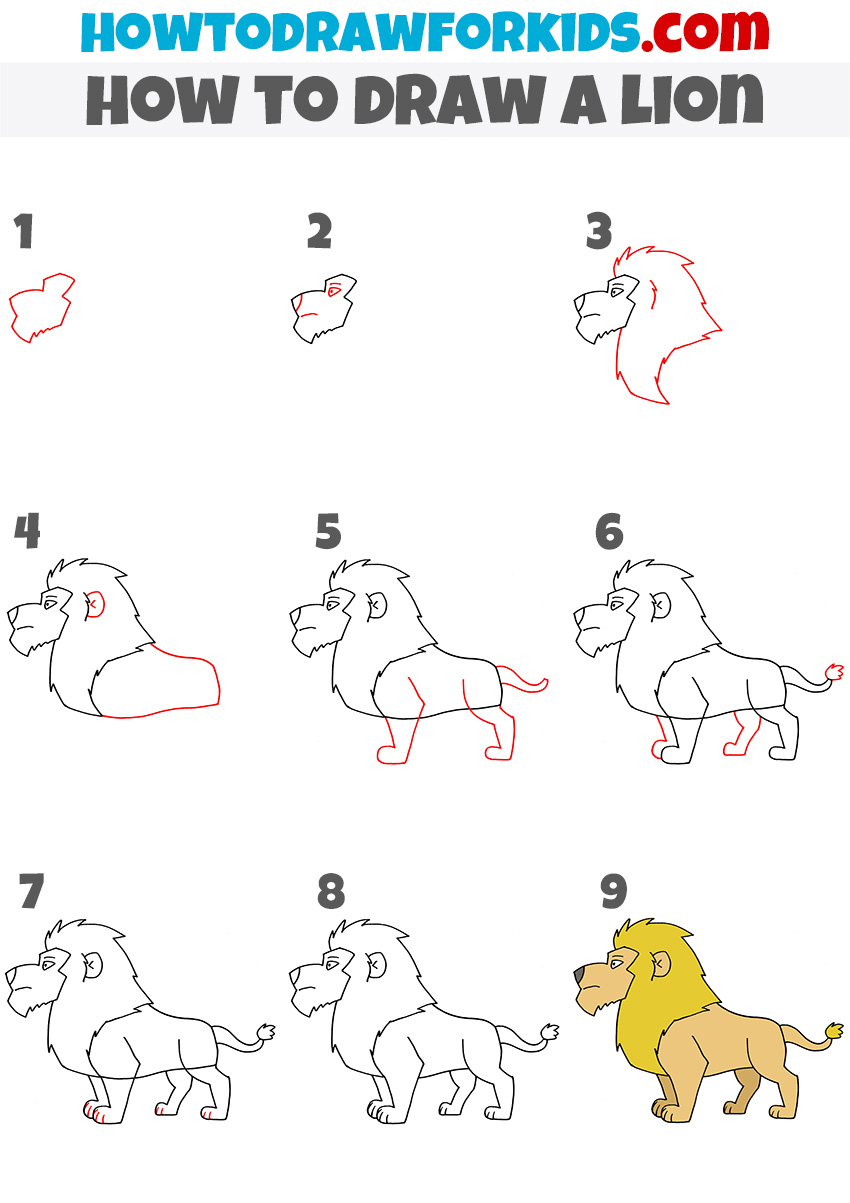
Sketch the head with a distinctive jawline and slightly angled lines to form the face shape. Then sketch a small eye and nose. Draw a pointed ear on the side of the head. Next, outline the mane around the head using jagged lines for a rugged appearance, extending it down towards the neck.
Form the lion’s body by drawing a slightly curved line for the back and adding a rounded chest. Sketch the front and back legs with rounded paws at the bottom. Add a long, thin tail with a small tuft at the end. Refine the mane and add simple line details for the legs and paws. Finally, color the mane a dark golden color and the body light tan to complete this alternative lion drawing tutorial.
Conclusion
So, this was a lesson on drawing a lion, and we depicted this animal using several methods. First, we depicted the lion using the basic method, then we learned several additional methods, including the lion in different positions and using different styles and sequences of steps.
I hope you found this tutorial helpful and informative. If so, consider following me on social media platforms such as Pinterest for announcements and YouTube for video versions of my tutorials. Additionally, you’re welcome to leave a comment with your thoughts or any questions you may have.

how do draw a banaananananana