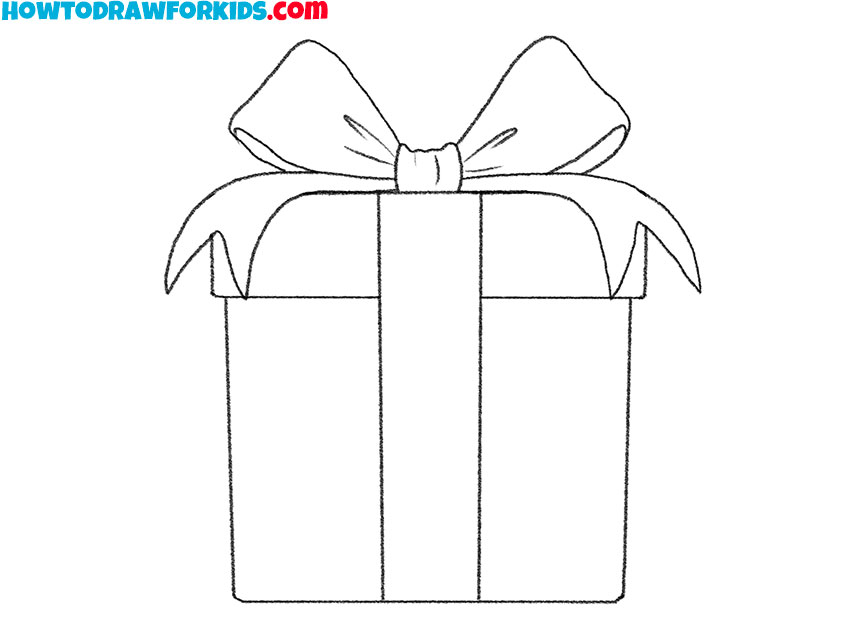
How to Draw a Present
Learn how to draw a present box with my fun and easy tutorial, perfect for adding a personal touch to any special occasion.

How to Draw a Present: Basic Information
The initial stages of drawing a present involve creating the straight edges of the box. This is an essential skill in art, as straight lines form the basis for many other shapes and objects. By focusing on the precision of these lines, young artists learn to control their hand movements, which is really important for accuracy in all forms of drawing.
A present box is a cube or cuboid, which makes this a perfect subject for exploring perspective. Learning to draw a three-dimensional box on a two-dimensional medium helps artists understand how to depict depth. This skill is vital for making drawings appear more lifelike and is a foundational principle in the visual arts.
Once the basic cube shape of the present box is established, the next steps involve adding more complex details, such as the ribbon and bow. This progression from a simple cube to a more detailed object introduces young artists to the concept of building upon basic forms.
This drawing tutorial is also a perfect for ,earning to make a birthday card, a Christmas decoration. At the end of this tutorial I will tell you how to use your present drawing in art projects for school or kindergarten.
Present Drawing Tutorial
Materials
- Pencil
- Paper
- Eraser
- Coloring supplies
Time needed: 30 minutes
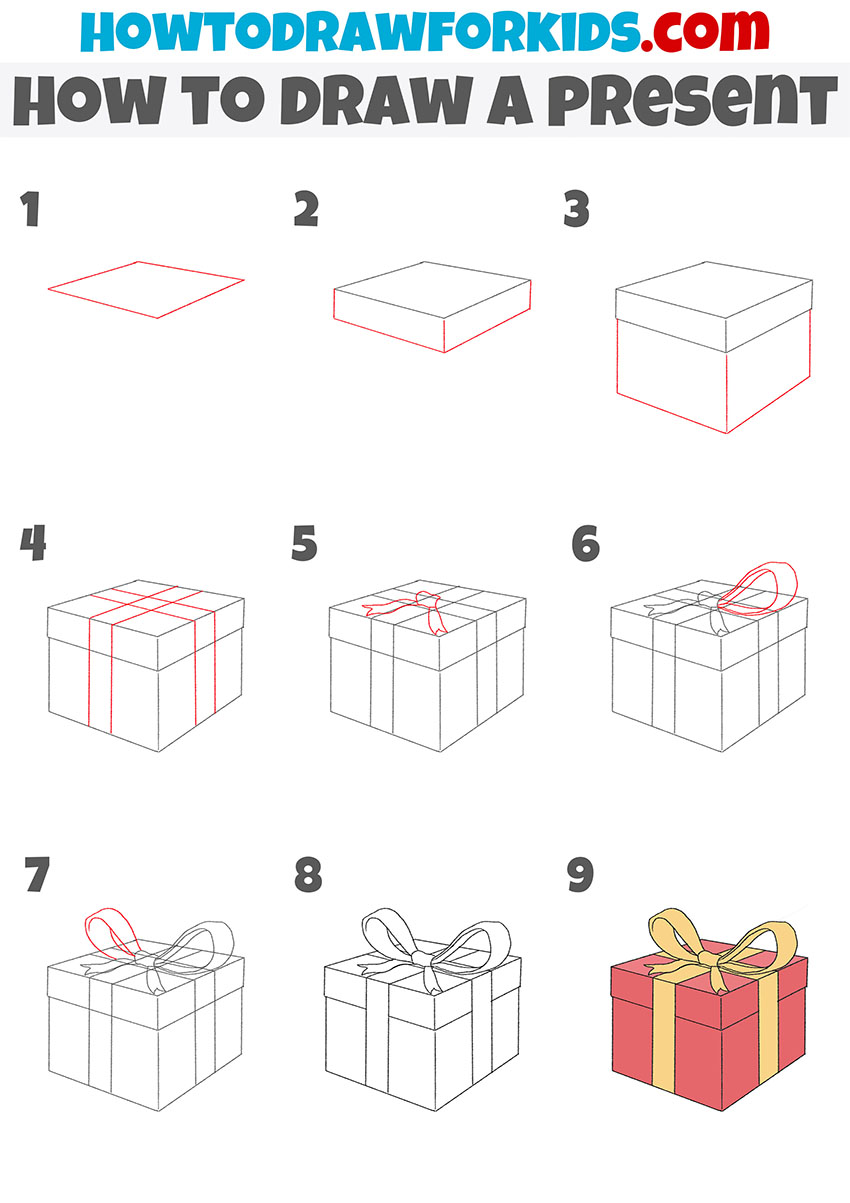
How to Draw a Present
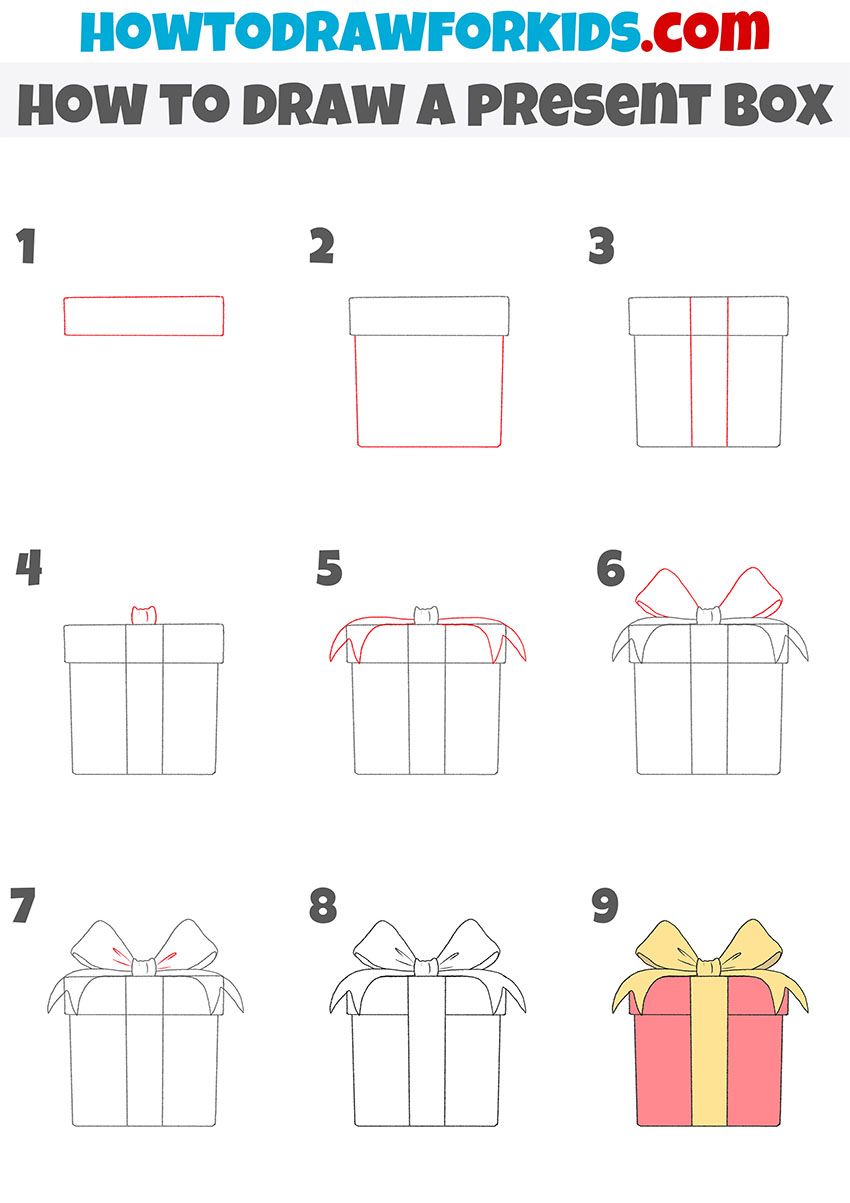
- Draw the top of the present.
Begin by drawing a narrow horizontal rectangle near the top of your page. This rectangle represents the front-facing edge of the gift box’s lid. This step establishes the width of your box, so choose a size that leaves ample space for the body and decorative elements of the box below.
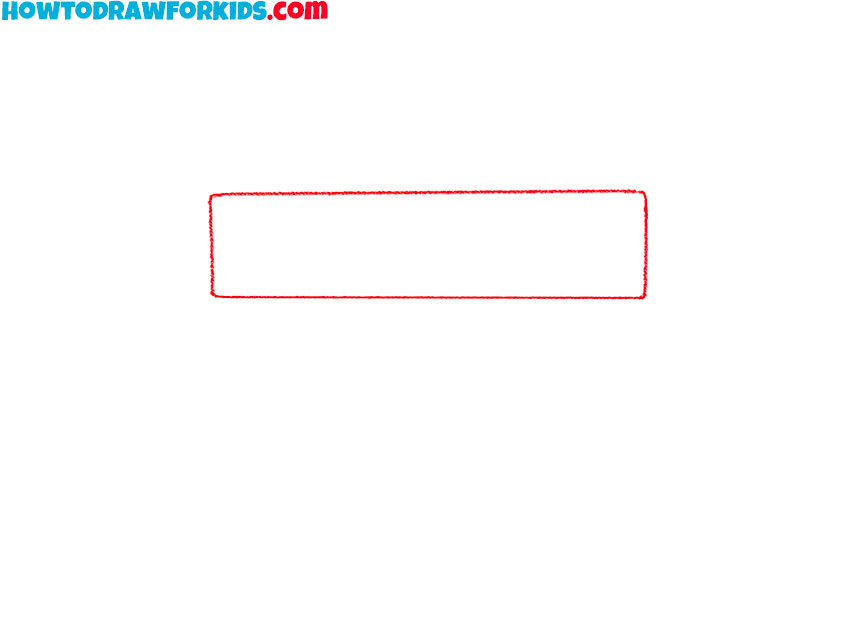
- Draw the main part of the present.
Directly beneath the top cover, draw a larger rectangle to form the body of the gift box. The upper edge of this rectangle should align seamlessly with the bottom edge of the top cover, ensuring that the lid appears to sit flush with the box.
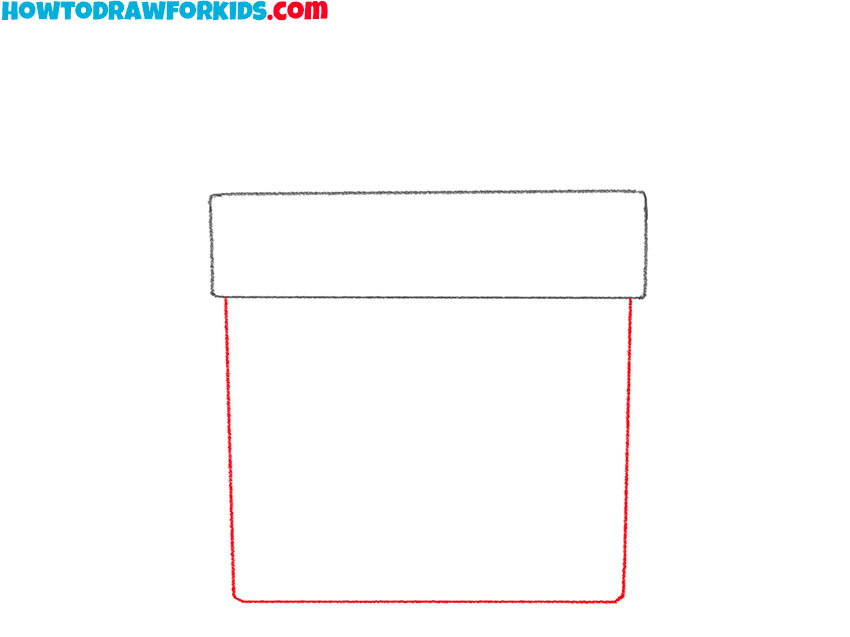
- Sketch the ribbon.
Draw two thin, vertical lines that divide the box’s front face into thirds. These lines represent the ribbon wrapping around the gift box. They should start from the top of the cover and extend all the way to the bottom of the box.
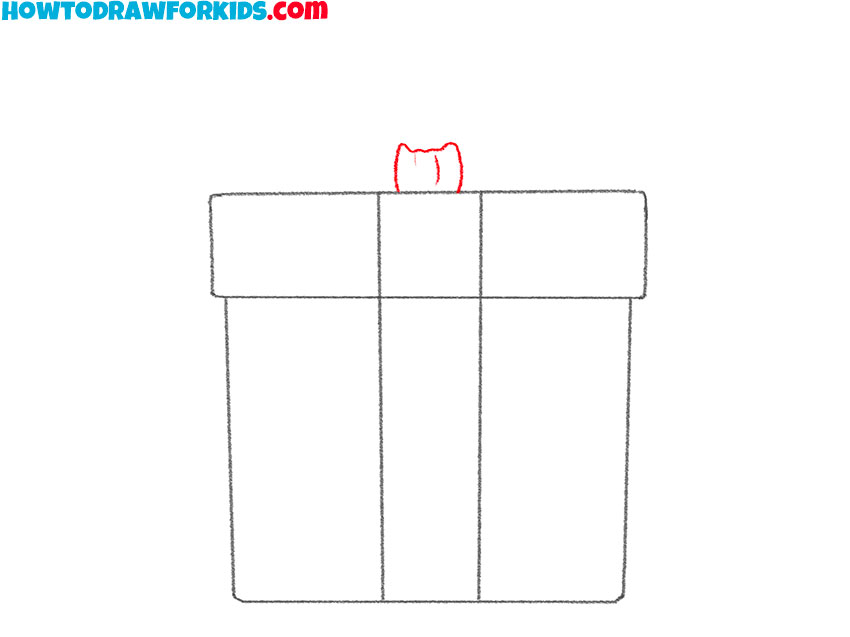
- Start drawing the bow.
At the intersection of the ribbon lines on the top cover, sketch a small, horizontal rectangle. This piece represents the central part of the bow and should be centered precisely where the vertical ribbon lines meet the horizontal line of the top cover.
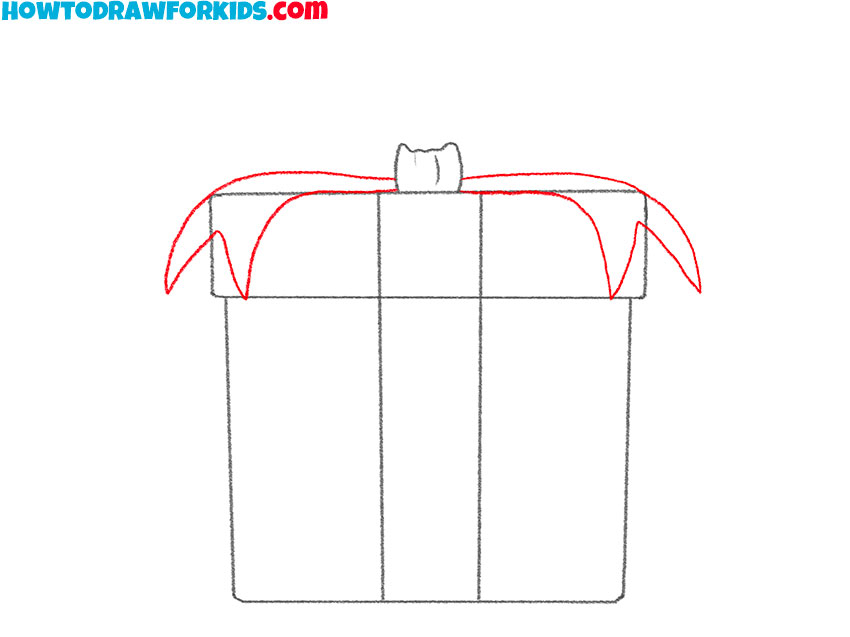
- Add the tails of the ribbon.
From the bottom edge of the central bow rectangle, draw two ribbon tails. These should extend downward, curving outward slightly towards the base of the box. The ribbon ends should appear soft and flowing, adding a naturalistic touch to the drawing.
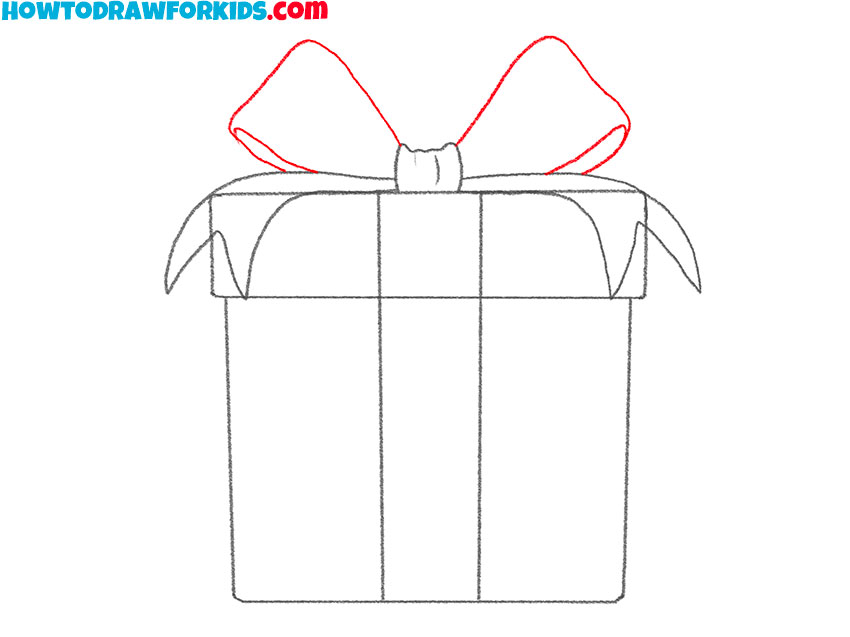
- Detail the bow.
Add two large, rounded loops starting from the top of the central rectangle to create the bow. These loops should be symmetrical and bulbous. The ends of these loops should taper back towards the center, merging subtly with the top of the central rectangle.
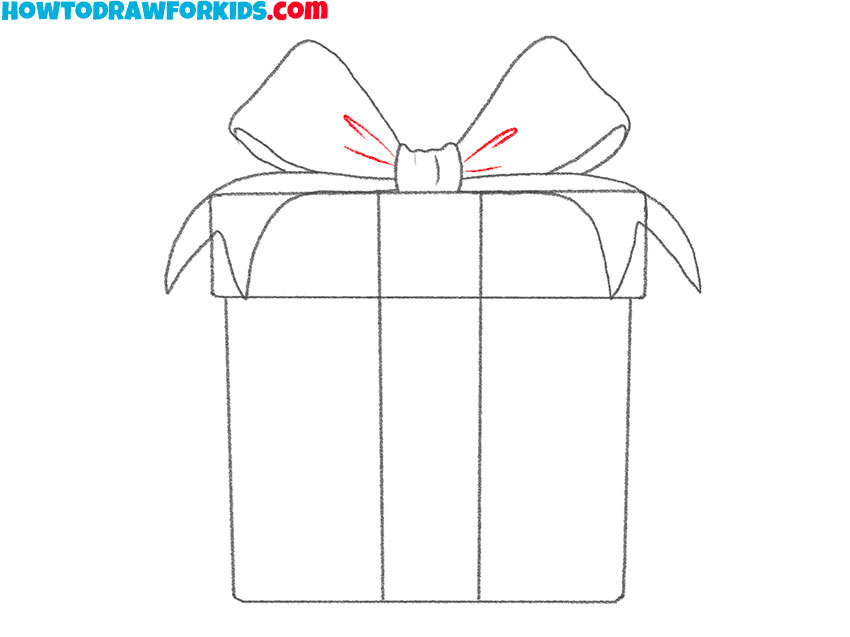
- Add folds to the bow.
Within each loop of the bow, draw additional lines to illustrate the folds, showing the three-dimensional appearance of the bow. In addition, you can add other details, such as patterns on the box or a congratulatory inscription.
- Correct any mistakes.
Carefully erase any initial guidelines that are no longer needed, such as the lines within the bow loops or any stray marks around the box. This step cleans up your drawing, preparing it for final presentation by ensuring that only the essential lines that define the shapes and details remain visible.
- Color the present drawing.
Choose colors to fill in your gift box, selecting contrasting shades for the box and the ribbon to make the design stand out. Color the box in a solid, vibrant hue, and use a different, complementary color for the ribbon and bow.

Additional Content
I’ve prepared a free PDF file that contains a concise version of this present drawing lesson. Additionally, by downloading this file, you can enjoy drawing anytime, even when you’re offline. Furthermore, this convenience ensures that you can practice your drawing skills wherever and whenever it suits you best.
Alternative Way to Learn How to Draw a Present
I’ve put together another amazing drawing lesson on how to draw a present, designed to give you even more opportunities to develop your artistic talents. This new lesson is assembled with extra care to ensure that you have all the tools necessary to elevate your drawing abilities.
This instruction serves as an expanded version of the first drawing lesson, introducing more detailed steps for creating a present box with a three-dimensional appearance.
Begin with sketching a simple top face of the box and then extend it downwards to form the body. Then add lines to represent ribbons wrapping around the box, both vertically and horizontally.
The bow itself is constructed in several phases, starting with the central knot, adding loops, and finally detailing the tails that hang from the bow.
Next, paint the box using the most suitable colors. for a more dimensional look, you can add shadows in the right places and highlights on the raised parts of the edges and bow.
Art Project With Your Present Drawing
Drawing a present box is not just an endpoint but a gateway to a variety of art projects that can broaden your drawing skills. Use your drawings to craft personalized holiday greeting cards, develop unique wrapping paper designs, or transform them into three-dimensional paper models. These activities allow you to experiment with different mediums and techniques.
- Use your present box drawings as the central theme for handmade holiday cards. Experiment with different color schemes, add festive messages, and try various sizes to create a collection of unique designs that can be gifted to friends and family during the holiday season.
- Create a collage that integrates your present box drawings with other elements such as photos, magazine clippings, or fabric pieces. This project encourages experimentation with different textures and materials, creating a rich, multi-layered piece.
- Transfer your present box designs onto fabric using screen printing or iron-on transfers. Use these fabrics to create unique items like tote bags, t-shirts, or pillowcases, introducing the concept of art in everyday objects.
- Use your drawings as templates to construct actual gift boxes. This project involves translating your two-dimensional art into three-dimensional forms, experimenting with various materials and assembly techniques.
- Create unique party invitations with the present box as a central design element. Customize each invitation with different color schemes or additional decorative elements that hint at the theme of the party or gathering.
Conclusion
This lesson focused on developing basic drawing skills, teaching young artists to effectively create shapes and add detail through the construction of a present box.
If you found this tutorial interesting and useful, I offer you to try a variety of holiday-themed lessons, ranging from twinkling stars to delightful Santa illustrations. These lessons continue to build on the skills learned today and introduce new techniques.
To stay updated with new tutorials and improve your drawing skills, follow my social media channels. These platforms provide regular updates, additional tips, and creative ideas to refine your artwork.