How to Draw a Puppy
According to the tradition on my website, this page provides several tutorials on how to draw a puppy, along with additional PDF materials.
How to Draw a Puppy: Introduction
In this tutorial, I’ll show you how to draw a puppy. This puppy has a cute and smooth appearance with simple colors. In many ways, this tutorial will be similar to my previous dog drawing tutorial, but the final result will be even cuter.
Pay attention to the features puppies typically have. The most important aspect is body proportions. All puppies have large heads and short legs. They also have a small, almost flat nose, which changes shape as they grow.
This puppy has a short, smooth coat. You don’t need to precisely follow the shape of each contour or detail; you can use more relaxed lines. In this lesson, focus on maintaining simple body proportions. Remember the sequence of steps in this tutorial, as you can apply these skills to other drawings.
To help you draw puppies more confidently, I’ve included a few additional tutorials. Each one is as simple as the main tutorial but introduces different styles and techniques to achieve the final result.
Puppy Drawing Tutorial
Materials
- Pencil
- Paper
- Eraser
- Coloring supplies
Time needed: 40 minutes
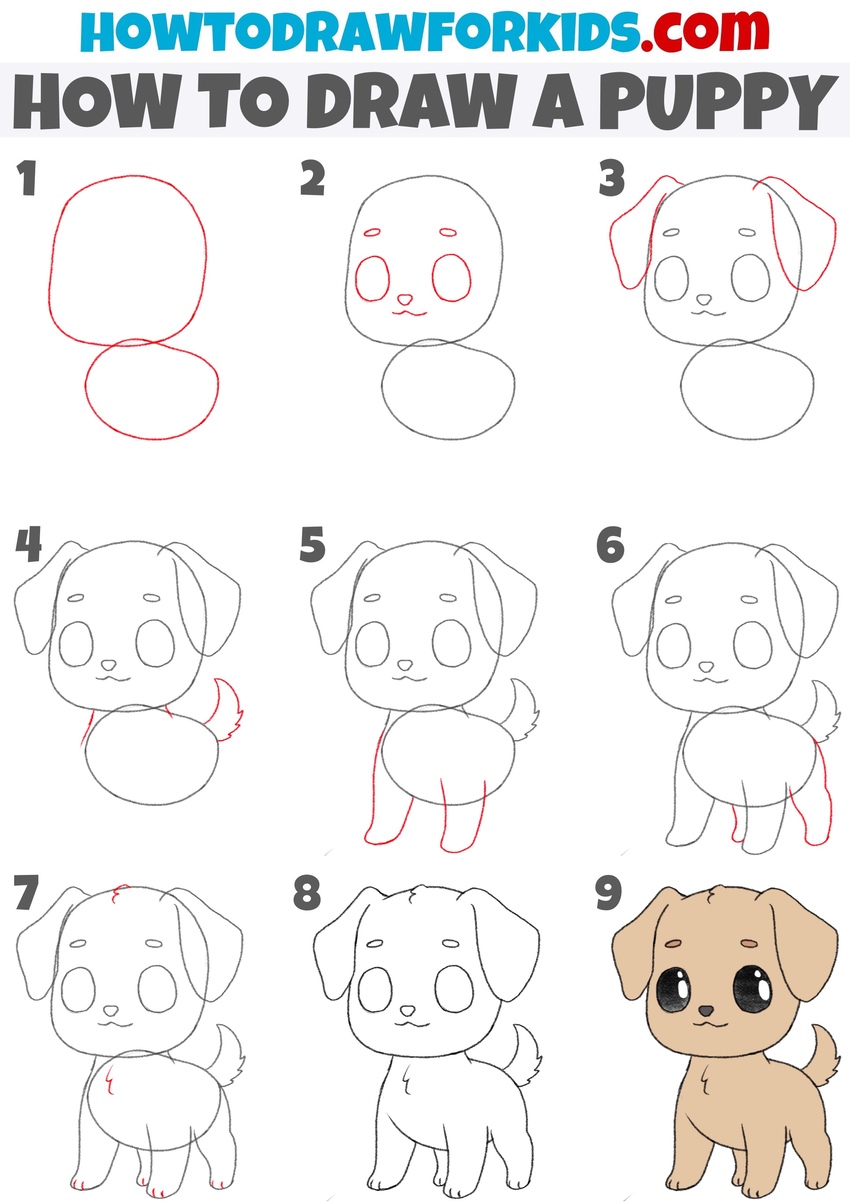
How to Draw a Puppy
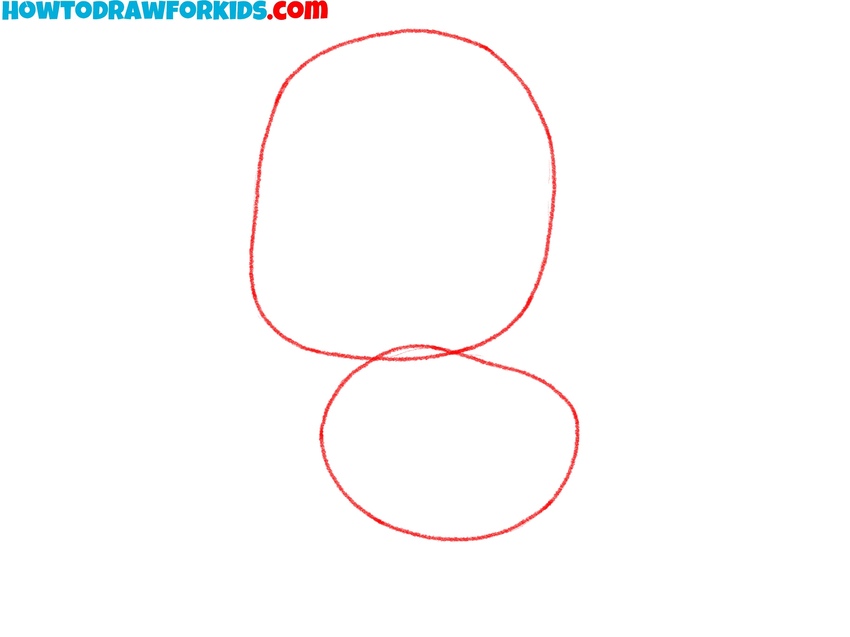
- Outline the head and torso.
Sketch two simple shapes to outline the puppy’s head and body. Begin with a larger oval for the head, placed slightly above a smaller, rounder oval for the body. These shapes will act as the basic outlines to ensure proportions are right. Keep the lines light and simple, as this is just a guide for the final drawing.
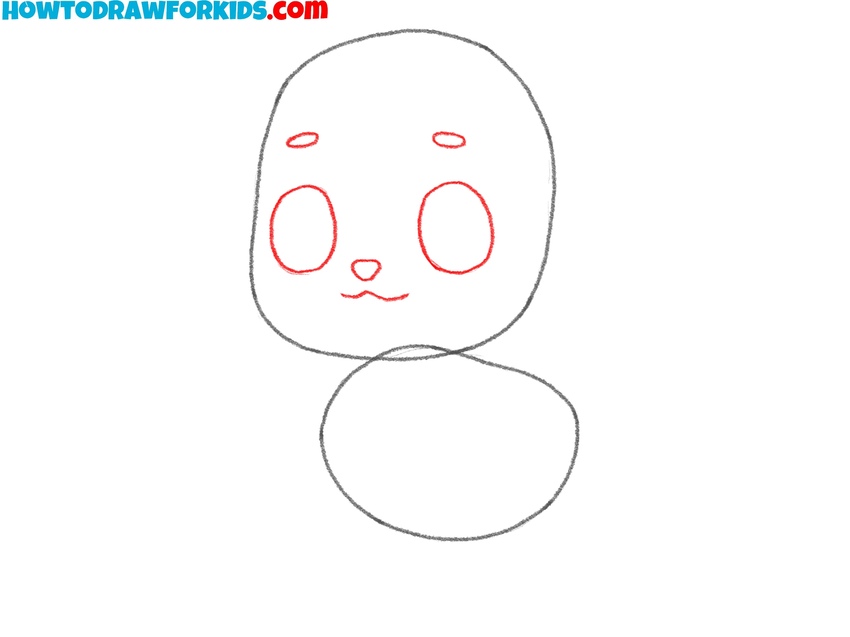
- Illustrate the puppy facial features.
Draw two large oval eyes within the head. Below the eyes, draw a small rounded triangle for the nose, followed by two slight curves for the mouth just underneath. Keep the shapes of the face soft and simple. You can adjust the placement of the details for more unique look.
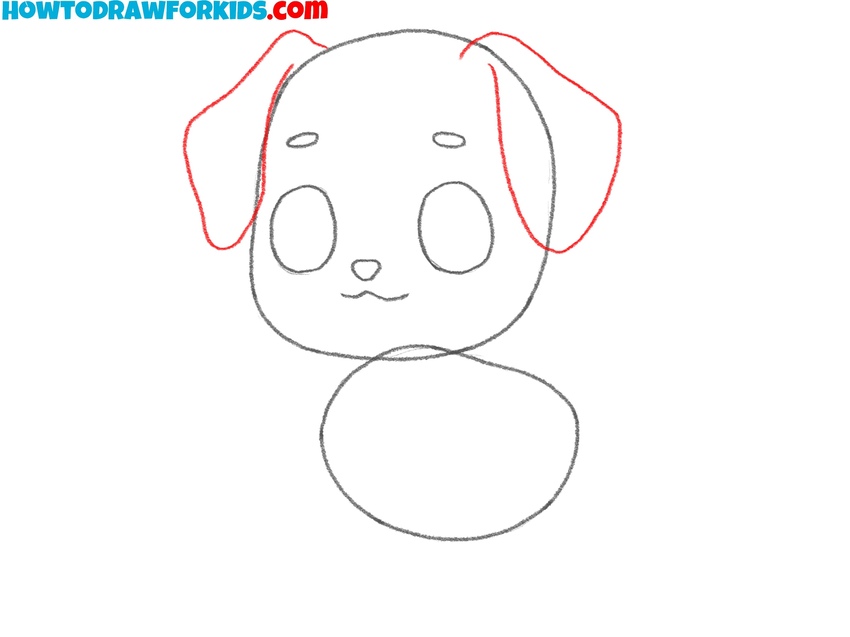
- Outline the ears of the animal.
Now, draw two elongated, slightly curved shapes that extend from the sides of the head, giving the ears a gentle droop. Use smooth, light lines as you outline the ears. The shape of the ears depends directly on the breed of the puppy, so you can give them a different shape.
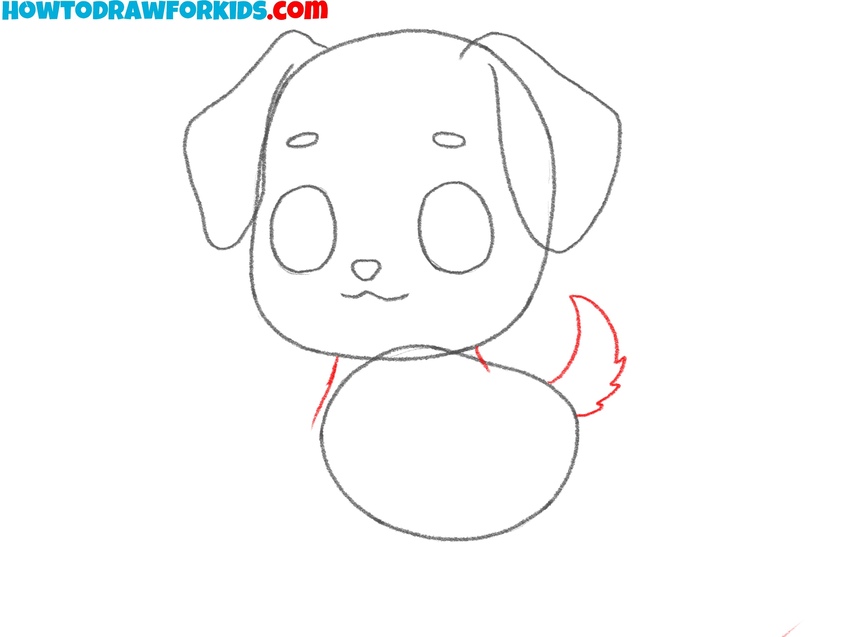
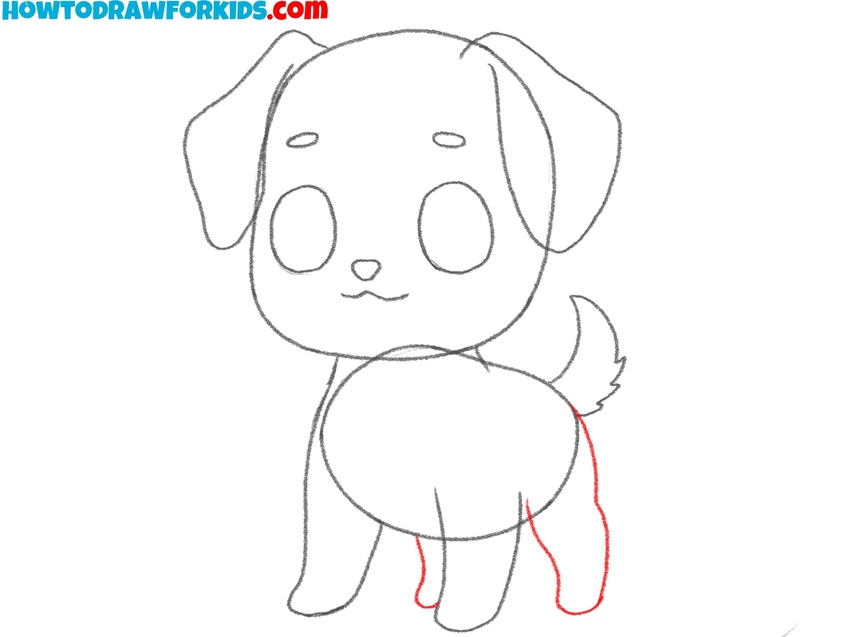
- Draw the tail and neck of the puppy.
Start from the right side of the puppy body shape and add a short, curved line with a slight point at the end, giving it a wagging look. By making the tail small and smooth, you will give your puppy drawing a cuter, more childish look. Use a couple of short lines to draw the neck and connect the head and torso.
- Sketch the front legs of the little dog.
Start by sketching two parallel, slightly curved shapes from the bottom of the puppy body shape. Make the legs short and rounded at the ends to represent small paws. Keep the lines of the legs and paws smooth to give to puppy a cute look.
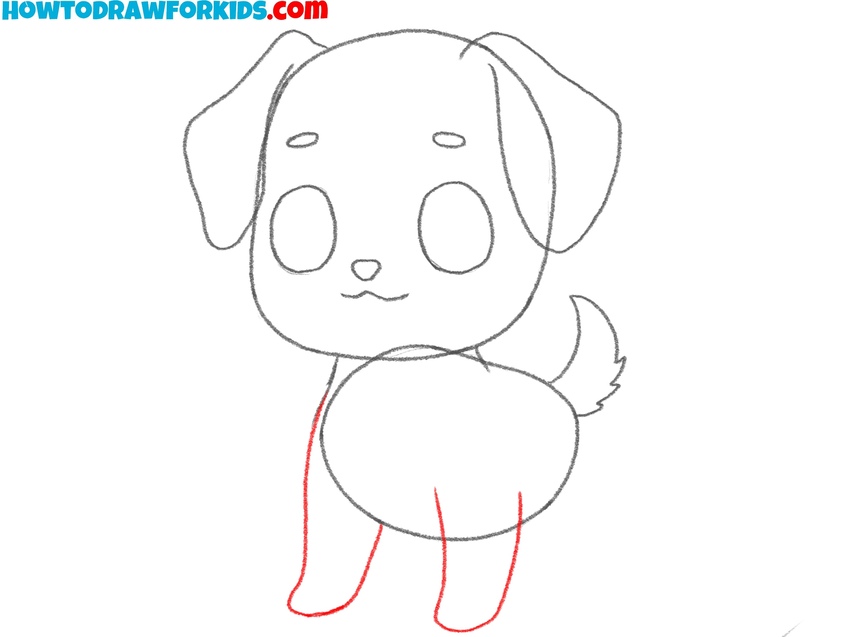
- Add the back legs and paws.
These should be positioned slightly behind the front legs, with a similar short and rounded shape. The ratio of the head, torso, and legs can make a dog’s drawing appear more adult or childlike. For a youthful look, the legs should be noticeably smaller than those of an adult dog.
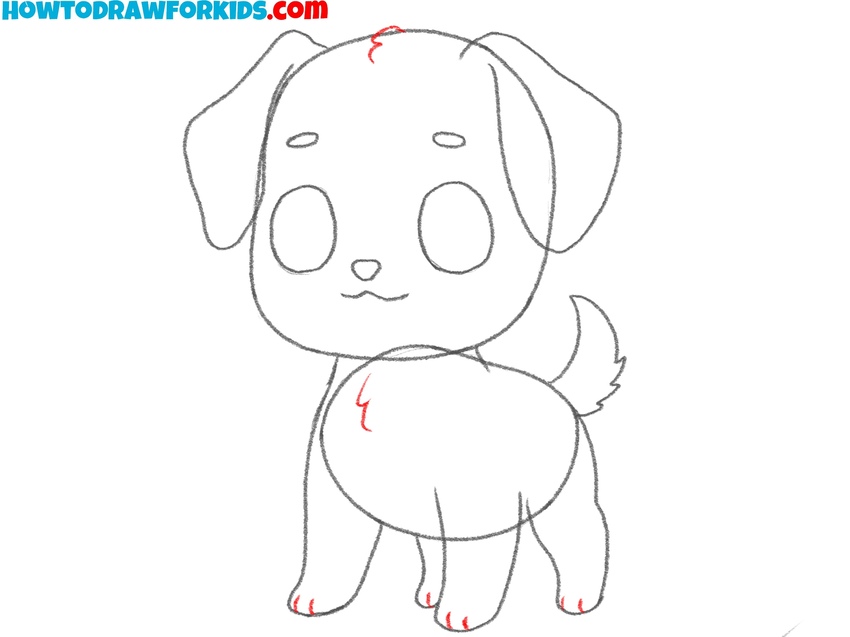
- Add details to the head and body of the dog.
Draw small lines inside the ears and a few fur lines on the head and body to give the puppy drawing more detailed look. Draw the puppy’s toes using a few short, curved lines. To give your puppy drawing a more unique look, you can add fur texture or pattern.
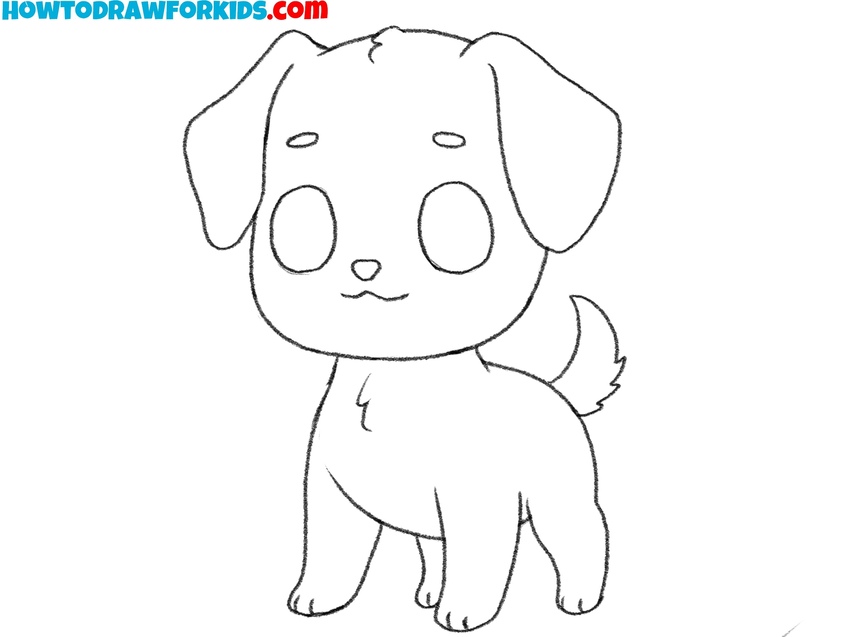
- Refine the outlines of the sketch.
Erase any extra guidelines or overlapping lines from previous steps, smoothing the edges for a clean look. Make sure all parts are proportionate and adjust as needed. This refinement gives the puppy a polished appearance, preparing it for coloring.
- Color the puppy.
Use light brown for the body, and darker shades for the nose and eyes. Add some white highlights in the eyes for a glossy effect. The colors should be soft and warm, giving the puppy drawing more cute look. You can depict patterns of fur on the body or shadows for a more unique look.

Additional Puppy Drawing Techniques
To deepen your knowledge and learn how to draw a puppy even better, I have prepared some additional instructions for you. Each of them will help you look at the process of sketching a a little dog from a new angle. Also, don’t forget to download the PDF versions of the tutorials prepared for you. Thus, you can complete the drawing lessons at any convenient time.
Alternative Puppy Drawing Tutorial
This puppy drawing tutorial differs from the first one in style and features. In this tutorial, the puppy has a more fluffy and rounded appearance. The legs and face structure are simpler, with fewer lines and softer shapes.
To draw a puppy using this alternative method, start by sketching the outline of the head, including a rounded shape for the top and slight curves on the sides to mark the back of the head and face. Next, add the chest and ear, following with rounded shapes to create the fluffy body.
Draw the legs with slightly curved lines. Add a small, bushy tail at the back, making sure to keep the fur lines rounded and soft. Then, add details like the puppy’s nose and mouth. Draw a large oval shape on the face for the eye. Once the outline is complete, add color to your puppy drawing.
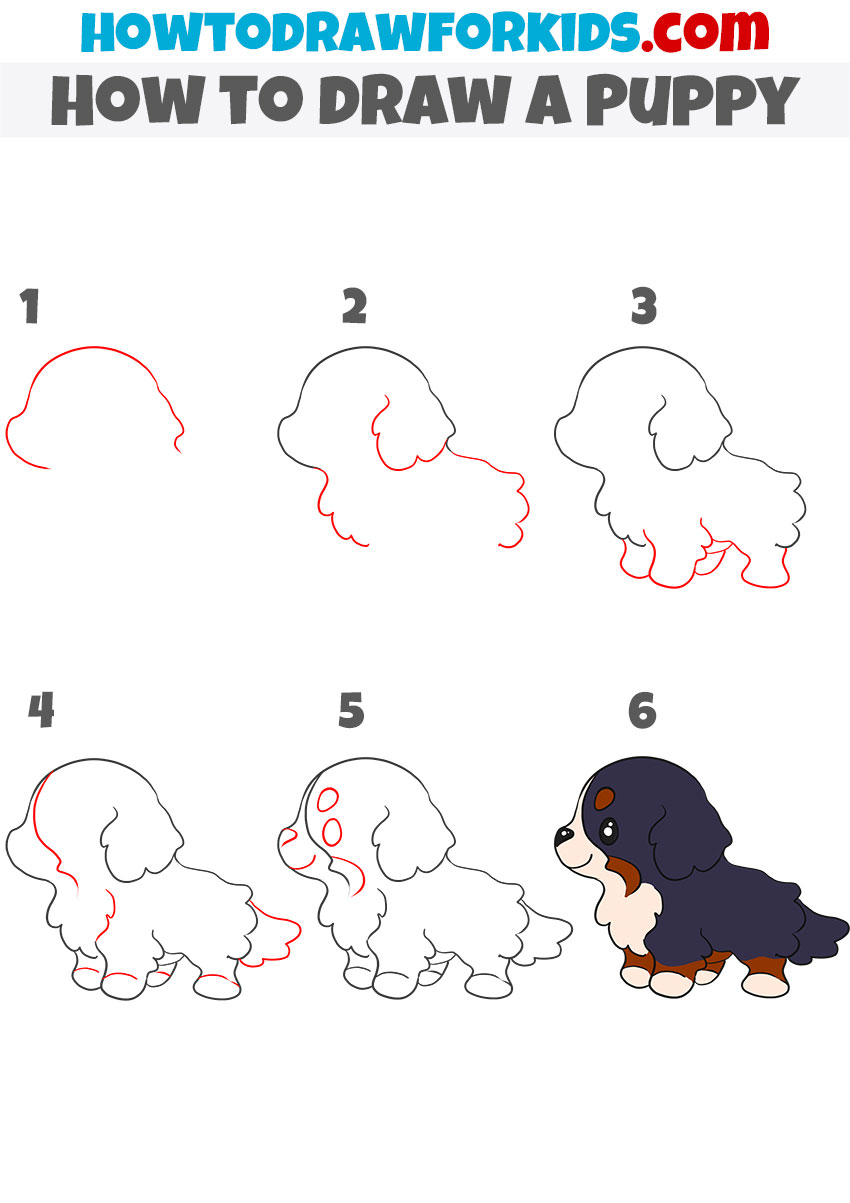
How to Draw a Puppy From the Side
This tutorial differs from the first one by showing how to draw a puppy from the side view, providing a simple profile perspective. The side view allows for a clear depiction of the puppy’s head, body, and limbs in profile. Here you can see a simplified profile of a puppy. First you will sketch the basic shapes, then add details following the steps in the instructions.
To draw an easy puppy from the side, start by sketching two ovals, one for the head and another for the body, positioned slightly overlapping. Next, add the ear, using a curved line on the head, and draw a circle for the eye. Outline the puppy’s snout and nose in front of the head, adding a small circle for the nose tip. Draw the tongue slightly below the snout.
Add the front leg by sketching small, slightly curved lines below the body, then draw the back leg towards the rear end. Complete the outline by adding the tail with a short, curved line extending from the back of the body. Erase any unnecessary lines, smoothen the outline, and finish drawing a puppy from the side by coloring in the little dog, using light shades.
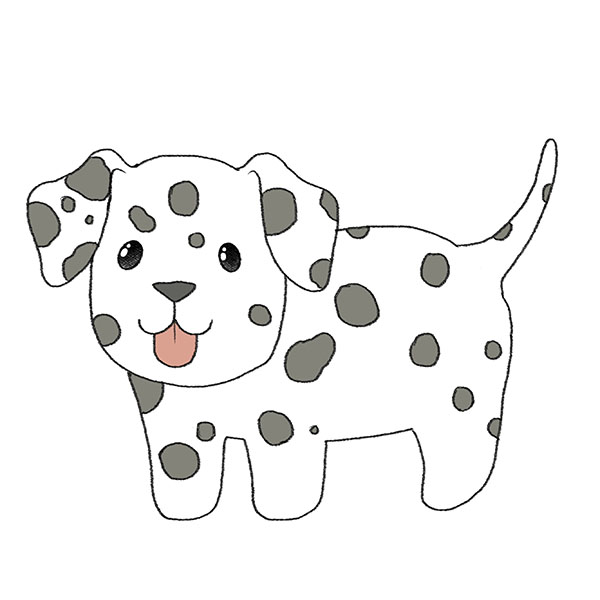
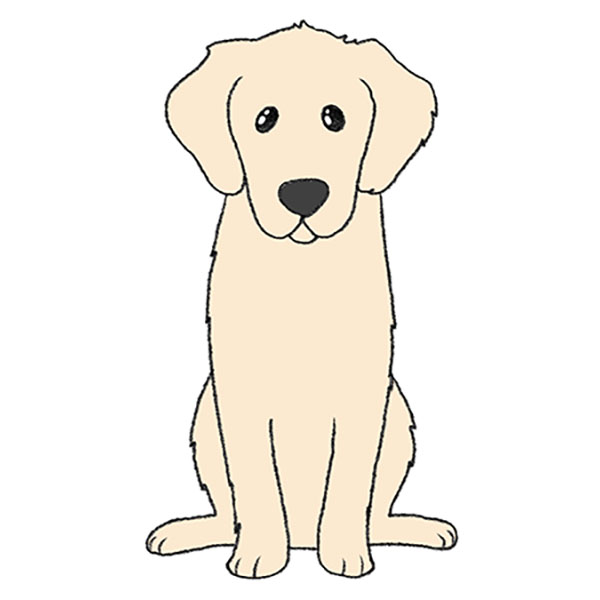
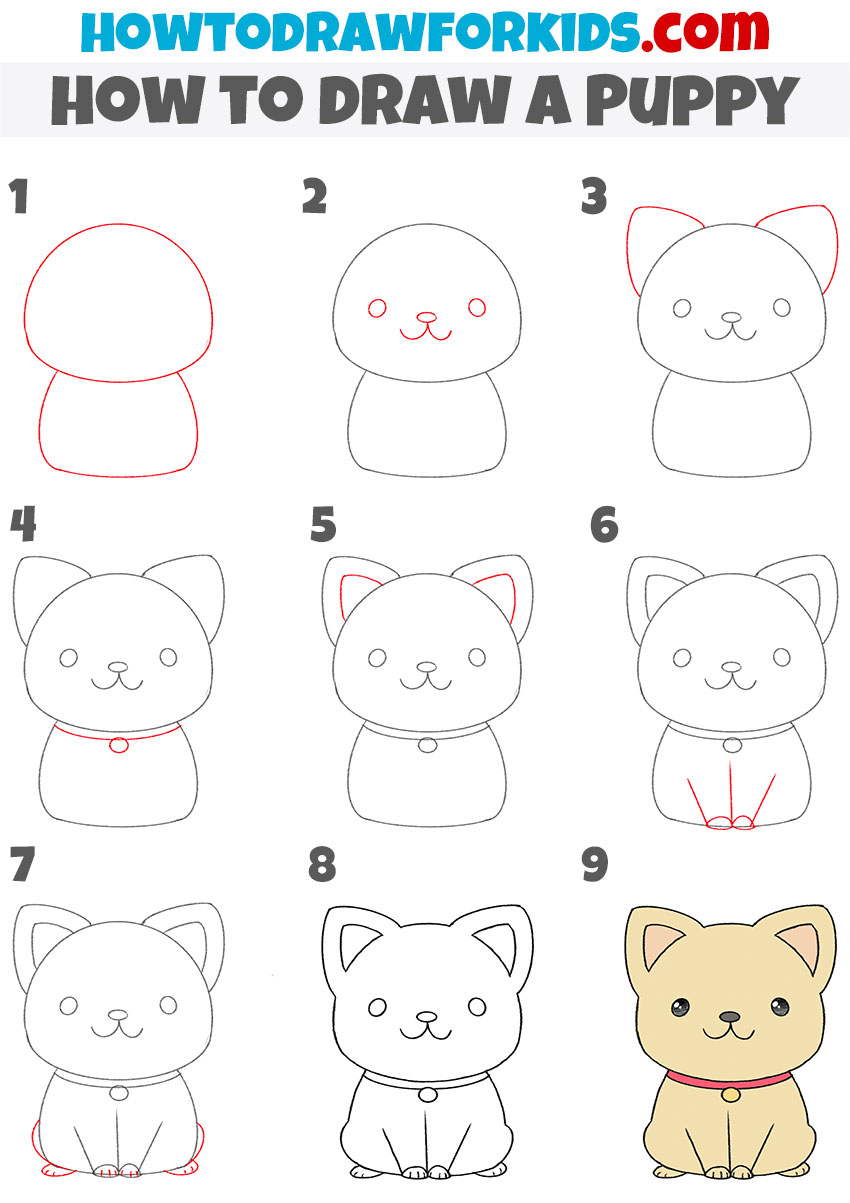
How to Draw a Sitting Puppy
Here you can see that the puppy is sitting and looking at you. The pose is symmetrical and simplified, demonstrating a front-facing view with both paws visible.
To draw a puppy in a sitting position, start by sketching an oval for the head and a slightly smaller shape beneath it for the body. Next, add facial features by drawing two small circles for the eyes, a rounded triangle for the nose, and two curved lines beneath it for the mouth. Draw large ears on either side of the head, using simple rounded triangles.
Draw a collar around the neck, placing a small circle in the center to represent a tag. Add inner ear details by drawing smaller triangles within each ear. For the front legs, draw two straight shapes extending downward from the body and add small rounded paws at the base. Complete the sitting puppy drawing by adding short curved lines on each side for the hind legs, and finish by coloring the little dog.
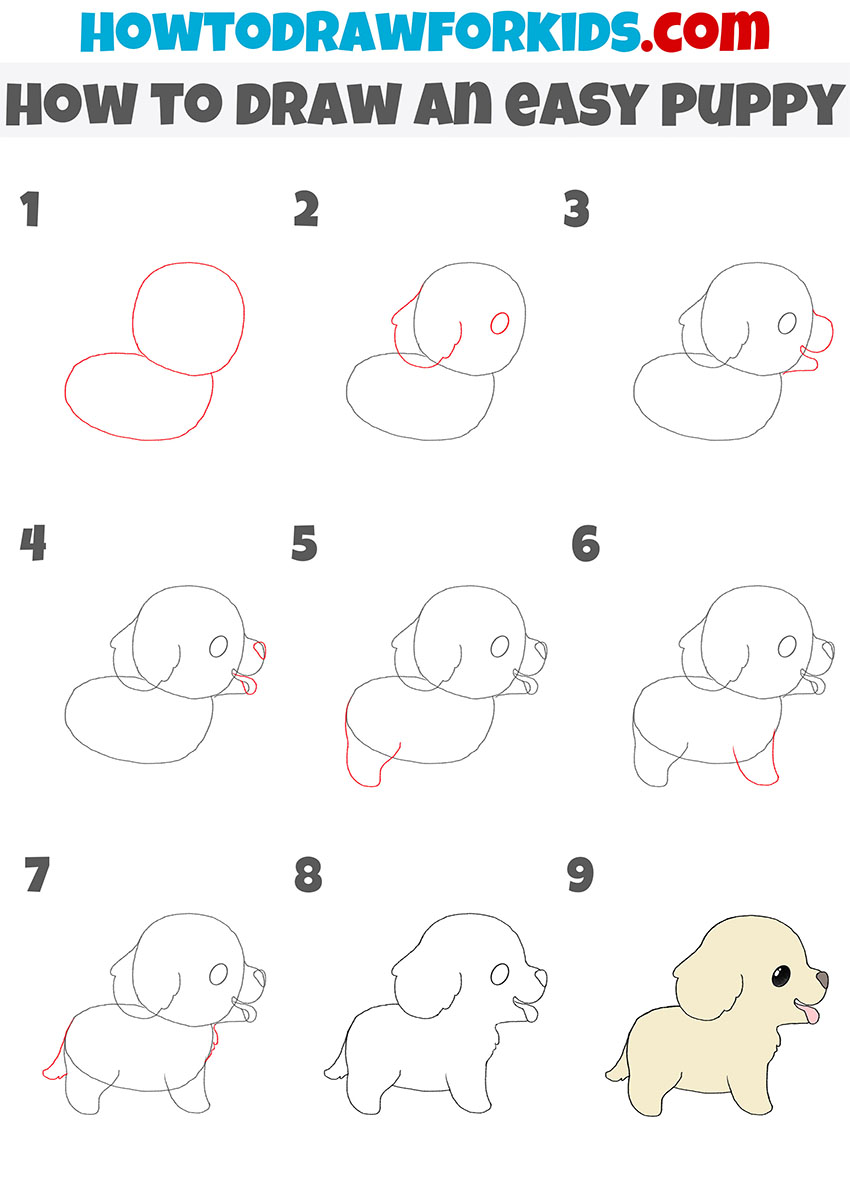
Simple Puppy Drawing Tutorial
This puppy drawing is made in cartoon style and the dog looks very funny. Pay attention to body proportions. The puppy has a big head, small ears and short legs. The puppy is very fluffy, and its body has a rounded shape. This tutorial shows a simpler way to draw a puppy, with rounded shapes and minimal details, making it easier for beginners to follow.
To draw a simple puppy, begin by sketching two overlapping ovals – one for the head and one for the body. Next, draw the facial features by adding two small simple circles for the eyes and a tiny oval for the nose. Draw two wide, curved lines for the mouth and add a small, rounded tongue underneath to give the puppy a cute look. For the ears, draw two small, rounded triangles on top of the head.
Then, draw the front legs as short, curved lines extending downward from the body. Add the back legs slightly behind the front ones, maintaining a consistent rounded shape. Draw a small, curled tail on the back. Refine the outline by smoothing the lines and erasing any unnecessary marks. Finish by coloring this simple puppy drawing with a light and solid shade to keep the appearance simple.
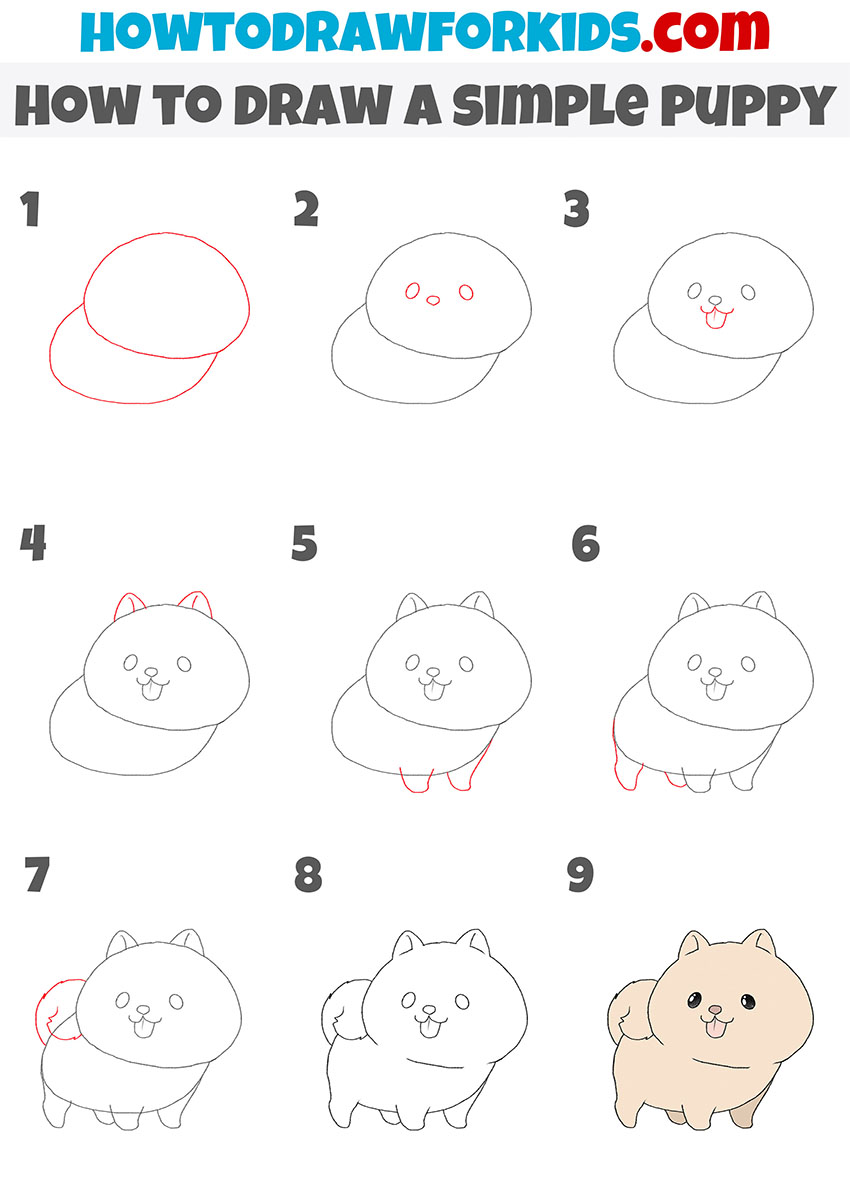
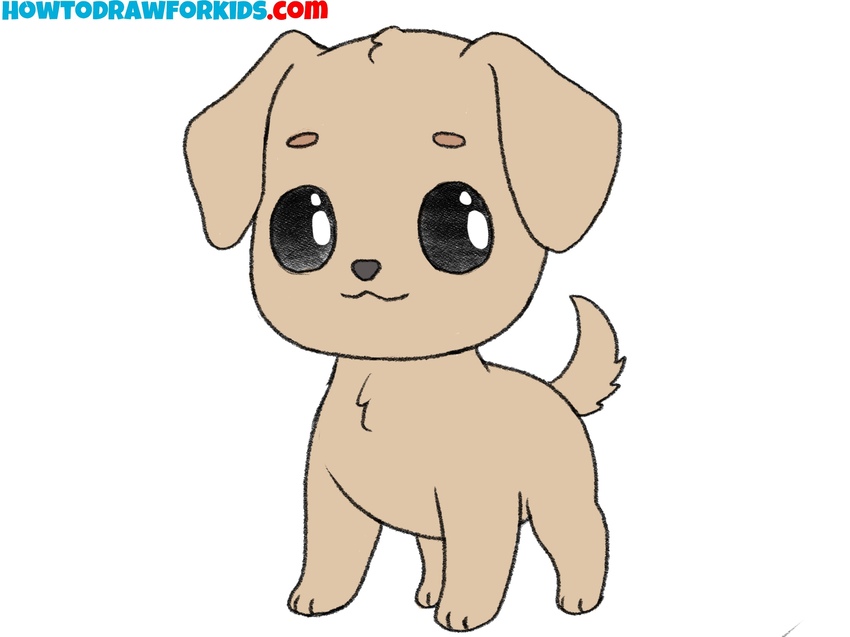
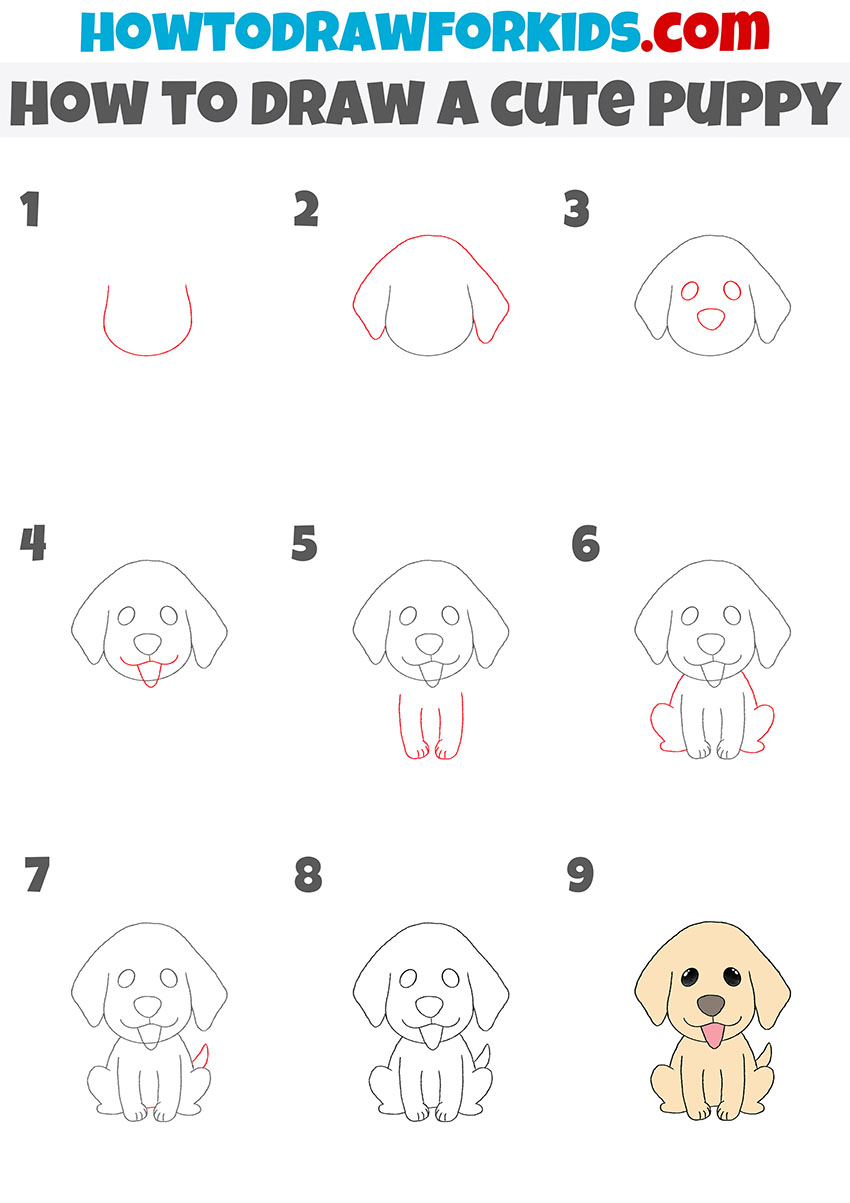
Cute Puppy Drawing Tutorial
In the picture, the puppy is shown in a sitting position with kind eyes and its tongue sticking out. It looks very cute and amusing. In this tutorial, we will learn to draw a puppy in a cute style and focus on keeping it very simple. The puppy is drawn with basic shapes, a large head, and an expressive face.
To learn how to draw a cute puppy, start by sketching a rounded shape for the head. Add the ears by drawing two rounded shapes on each side, keeping them simple and smooth. Next, draw the facial features, including two large, round eyes and a small oval nose in the center. Add a curved line for the mouth and a small, rounded tongue underneath.
Draw two parallel geometric shapes extending downward from the head to form the front legs, ending with small, rounded paws. For the hind legs, draw two curved shapes on either side, keeping them symmetrical. Add a small, curved tail on one side of the puppy’s body. Finally, erase any extra lines to clean up the drawing and color the cute puppy in a light shade.
Conclusion
You have reached the conclusion of the puppy drawing tutorial. If you completed all the instructions, consider what you learned. Now that you know how to draw a puppy, you can add shadows and textures to boost your drawing. Also you can use your knowledge to draw other similar animals.
Feel free to share your impressions of this lesson in the comments. Your feedback will guide me in creating future tutorials. Also, check out my other drawing tutorials; for example, you can learn how to draw a cat or practice drawing a horse using a simplified approach.
Leave a comment on this article, and don’t forget to follow me on Pinterest and YouTube.