How to Draw a Throne
This tutorial on how to draw a throne will show you how to sketch a royal seat with elegant but simple decorative elements.
How to Draw a Throne: Introduction
When we hear the word “throne,” we imagine a grand chair decorated with royal elements. Each of us may picture a different style of throne, and the essential details can vary. In this lesson on how to draw a throne, we’ll cover the basic techniques that can be used to design any type of royal seat.
The most important thing to keep in mind when drawing a throne is symmetry. The left and right sides of the throne should be perfectly balanced. In this lesson, we’ll review the fundamentals of symmetry and proportion to help you draw a throne that looks convincing and well-structured.
Beyond symmetry, understanding proportion is equally important. The seat should be wide enough to look comfortable, while the backrest should rise tall and grand without overpowering the overall design. Getting these proportions right will make your throne look both elegant and believable.
For creative variations, you can experiment with different crown shapes at the top of the throne, draw decorative carvings, or add plush cushions to give your throne a unique look. You can customize your throne even more by adding gems, embroidery, or royal crests to the backrest, or by drawing a red carpet beneath it.
Throne Drawing Tutorial
Materials
- Pencil
- Paper
- Eraser
- Coloring supplies
Time needed: 30 minutes
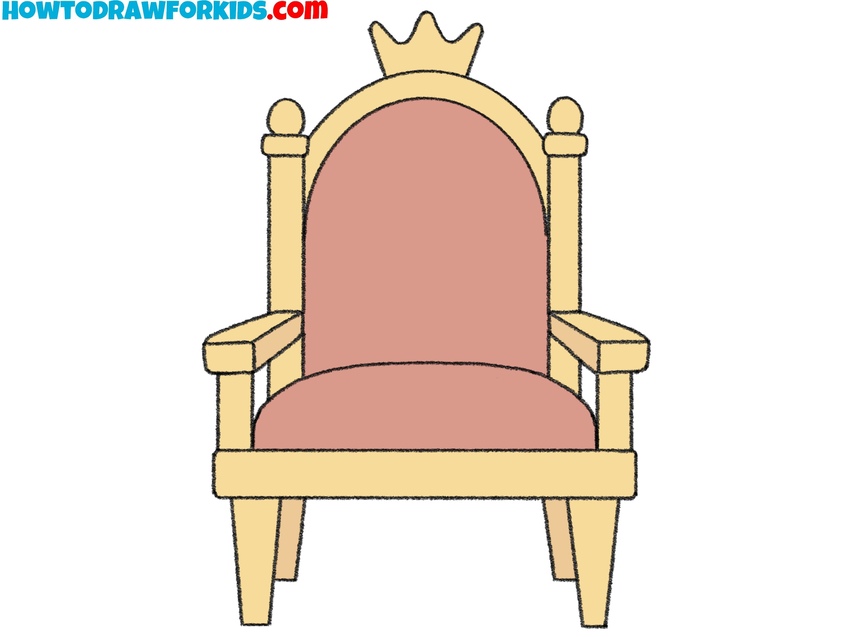
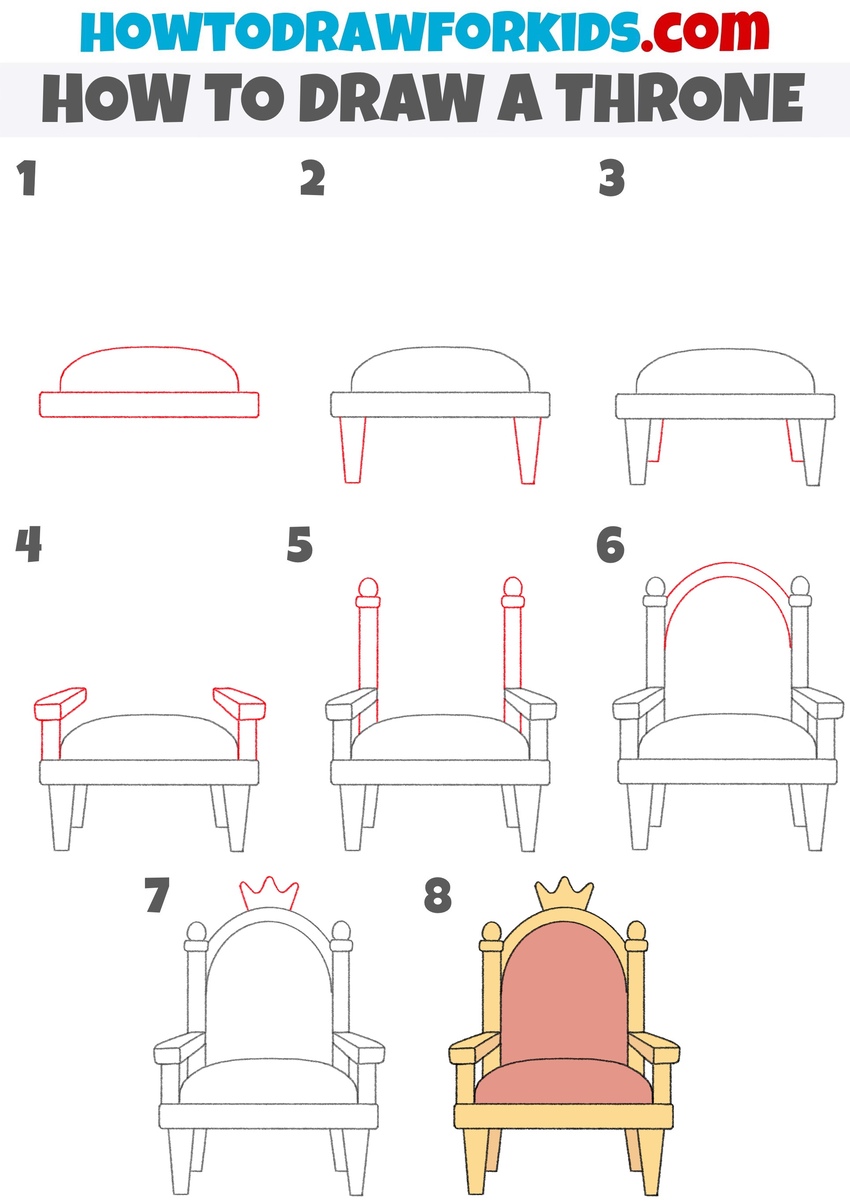
How to Draw a Throne
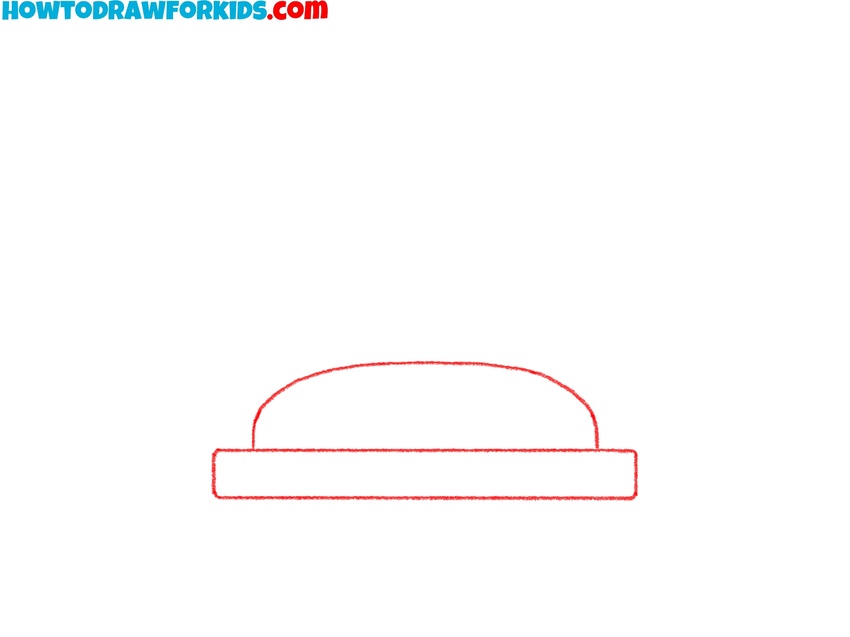
- Sketch the main seat area.
Begin to draw a throne by sketching the base rectangle for the seat. Above the rectangle, draw a large dome or oval shape sitting right on top – this will be the cushioned seat. You can make the dome taller or flatter. This foundation determines the throne’s size and proportion.
- Draw the throne’s front legs.
From each front corner of the base, draw downward lines that form rectangles or trapezoids. Make sure both legs are the same height and thickness so the throne doesn’t look uneven. Leg style makes a big difference- thicker legs create a heavy feel, while slimmer legs can make it look more refined.

- Sketch the back legs.
Continue to draw a throne by adding the rear legs. Sketch vertical lines dropping down from the back corners of the base, matching the front legs in style and width. Connect the lines at the bottom to finish each leg. For variations, you could add tiny carved patterns or slight curves on the rear legs.

- Draw the throne’s armrests.
Start drawing the throne’s armrests by sketching small vertical posts rising from the top of each front leg. Extend rectangles or gently sloped lines backward over the seat cushion to form the armrest surfaces. Try adding curls, swirls, or tiny shapes at the ends for a baroque or fantasy vibe.

- Sketch the vertical posts.
Now draw the tall posts that support the backrest. From the tops of the armrest posts, extend long vertical lines upward. Cap each post with a small rounded knob or finial for a regal detail, or try a pointed top for a more gothic or fantasy appearance. Adjust the post heights depending on your preference.

- Draw the throne’s arched top.
Sketch the throne’s curved top edge of the backrest by connecting the tops of the tall posts with a wide, smooth arch. When you draw a throne, the shape of the arch defines the character of the seat. You can make this part using smooth lines or give it an angular shape.

- Sketch a crown at the top.
Sketch three or more rounded or pointed tips for the crown. When you draw a throne, you can swap the crown for other crests, like a star, fleur-de-lis, or even a family emblem for a custom design. Keep the crown symmetrical so it feels like an integrated part of the throne’s upper silhouette.

- Complete the throne with royal colors.
To give your throne drawing a royal look, you can use rich golds or yellows for the wooden or metal frame and a deep red or purple for the seat and back cushions. You can also try adding patterns, such as small diamonds or lines on the seat or backrest, to make your artwork look more unique.

Conclusion
This tutorial on how to draw a throne guides you through creating a regal seat using a very simple step-by-step method, created for kids and beginners. Drawing a throne helps you practice straight lines and symmetry. By experimenting with leg shapes, backrest height, or crown designs, you can create variations from a simple royal chair to an elaborate fantasy throne.
For more projects in this style, try drawing other objects of power, like a scepter or treasure chest, to create a complete royal scene. And of course, you can draw a crown, the most recognizable royal symbol. To boost your object and character creating skills, visit the king drawing tutorial.
For additional step-by-step tutorials, printable worksheets, and video guides, follow on Pinterest or subscribe on YouTube to keep improving your drawing skills with new lessons and other materials added regularly.