How to Draw a Tiger Face
Step into the wild with my drawing lesson on how to draw a tiger face! By following along, you’ll learn to sketch this noble creature with ease. Perfect for young artists, this tutorial is a roaring good time, with clear steps that make drawing fun and rewarding. Let’s create a tiger face together!
How to Draw a Tiger Face: Basic Information
Hello, young sketch masters! Ready to tackle the wild with pencils and paper? I’ve crafted a delightful lesson on how to draw a tiger face, ensuring it’s accessible, enjoyable, and utterly doable. No more fears of intricate animal sketches; we’re about to make it as easy as a stroll in the park.
We’ll start with the base—a nice round face—and then it’s onto those piercing tiger eyes and a cute button nose, all while being mindful of symmetry and balance. Remember, every tiger has its unique stripes, so we’ll add those signature marks with a stroke of creativity and individuality.
As our sketch comes to an end, you’ll realize that to draw a tiger face is to weave a tale of stripes and shadows. This method is not just about filling in lines; it’s about telling a story through your art. And there you have it, a tiger face drawn with ease and brimming with personality, ready to proudly show off to the world.
Tiger Face Drawing Tutorial
Materials
- Pencil
- Paper
- Eraser
- Coloring supplies
Time needed: 25 minutes
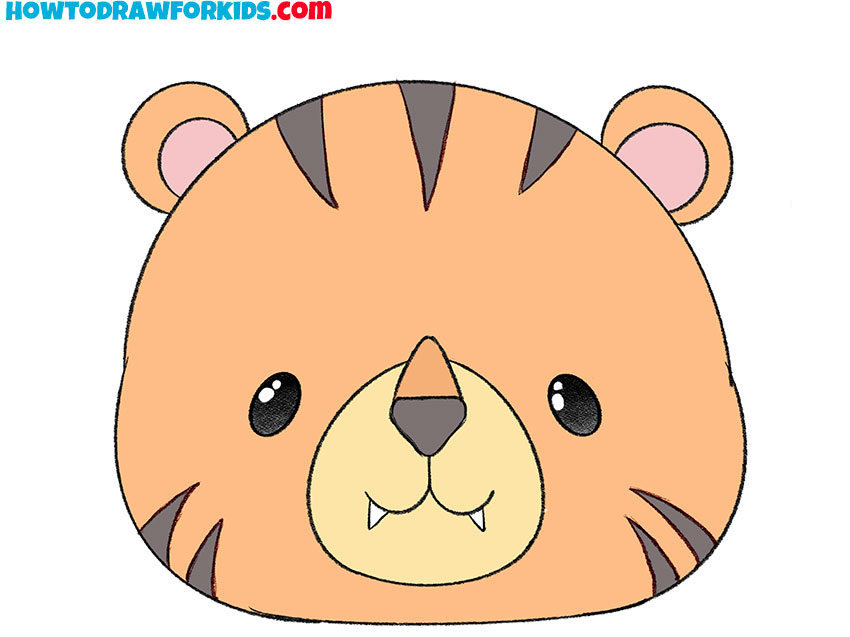
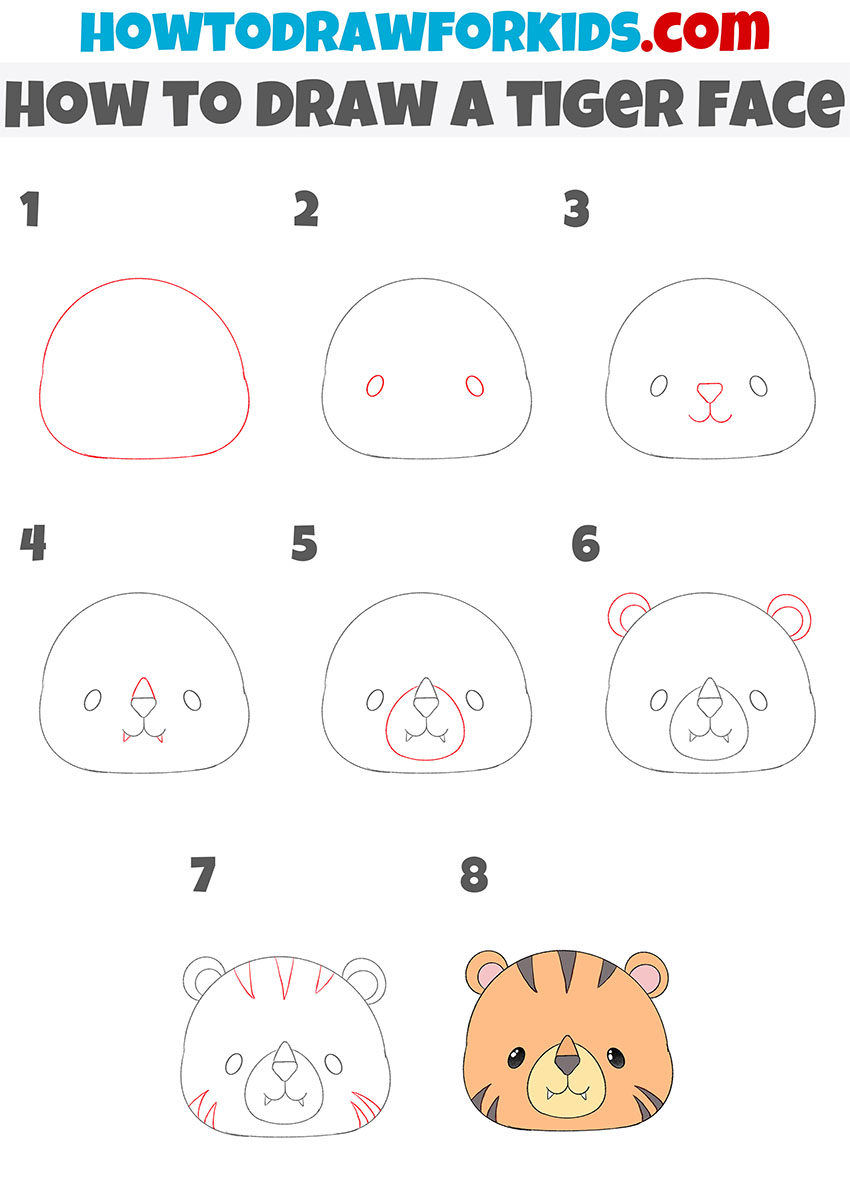
How to Draw a Tiger Face
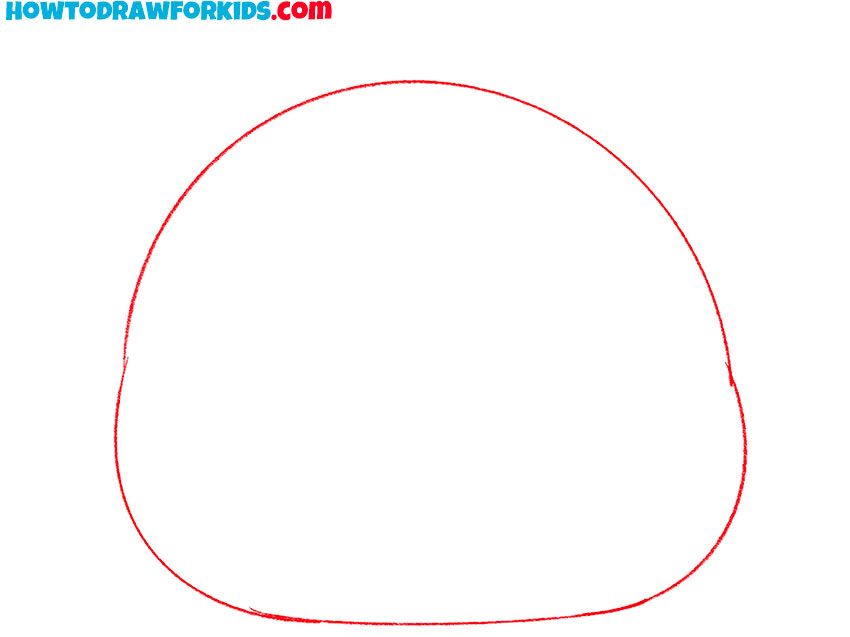
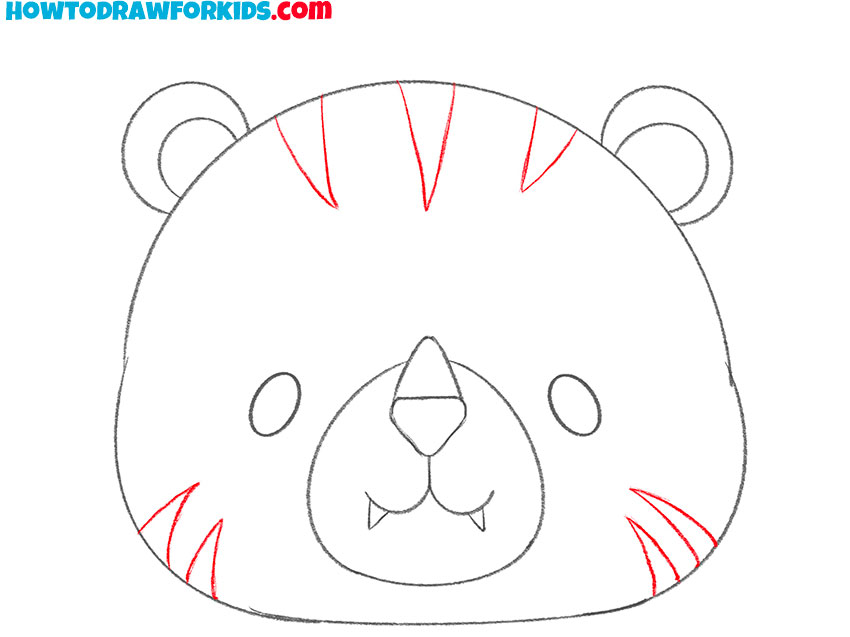
- Draw the outline of the head.
The head has a rounded shape, while the lower part is wider than the upper.
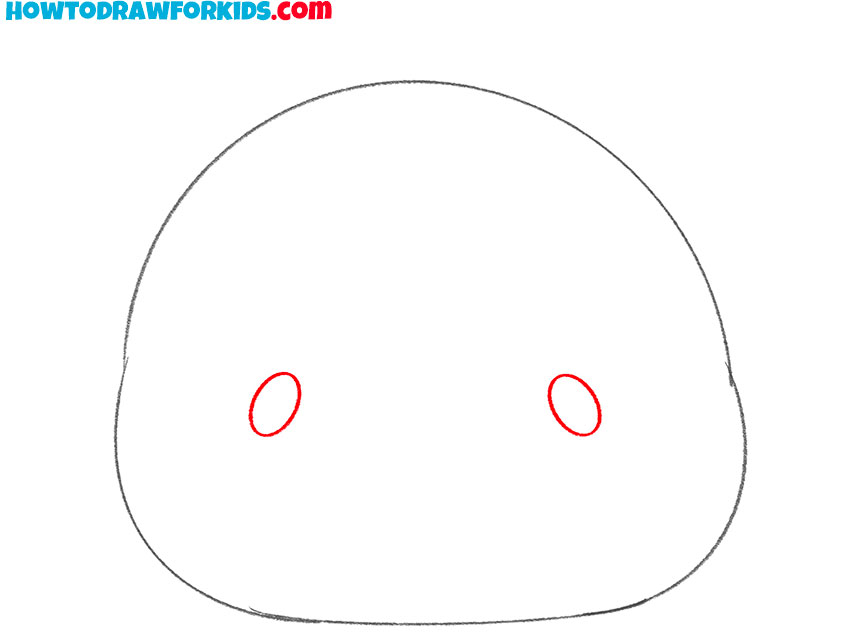
- Depict the eyes.
Approximately in the middle of the head, depict two small ovals.
- Add the nose and mouth.
Draw the nose. At the bottom of the nose, draw two rounded lines to depict the mouth.
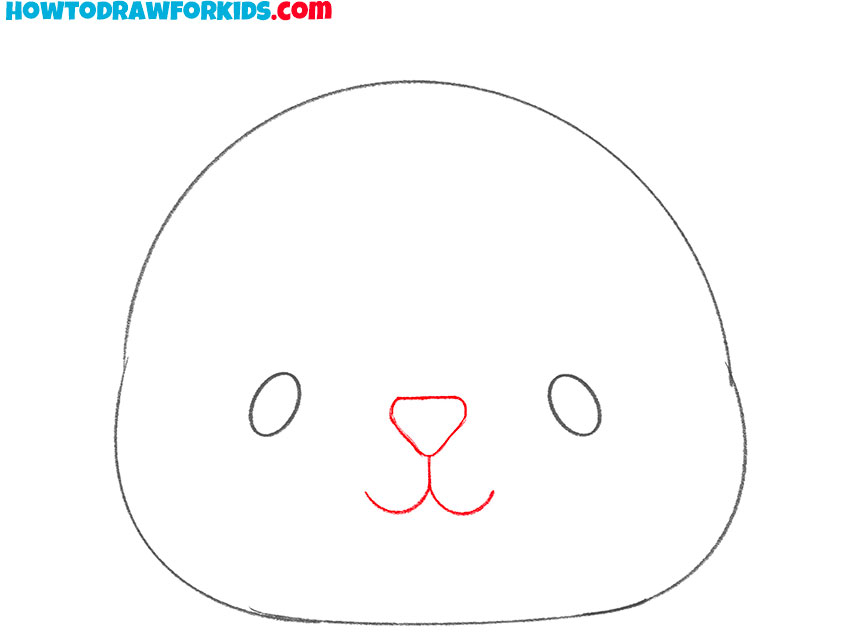
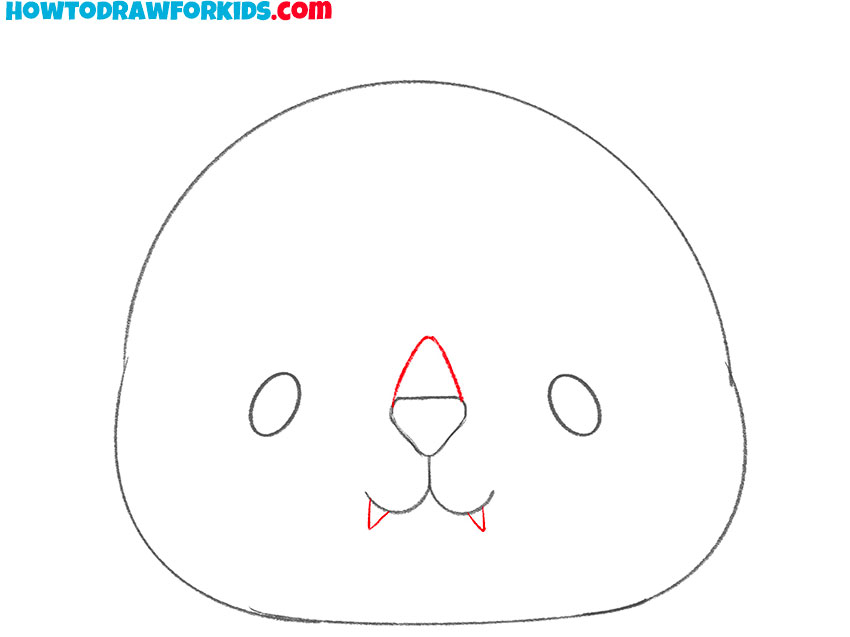
- Depict the teeth and the top of the nose.
At this stage, all these elements are triangular.
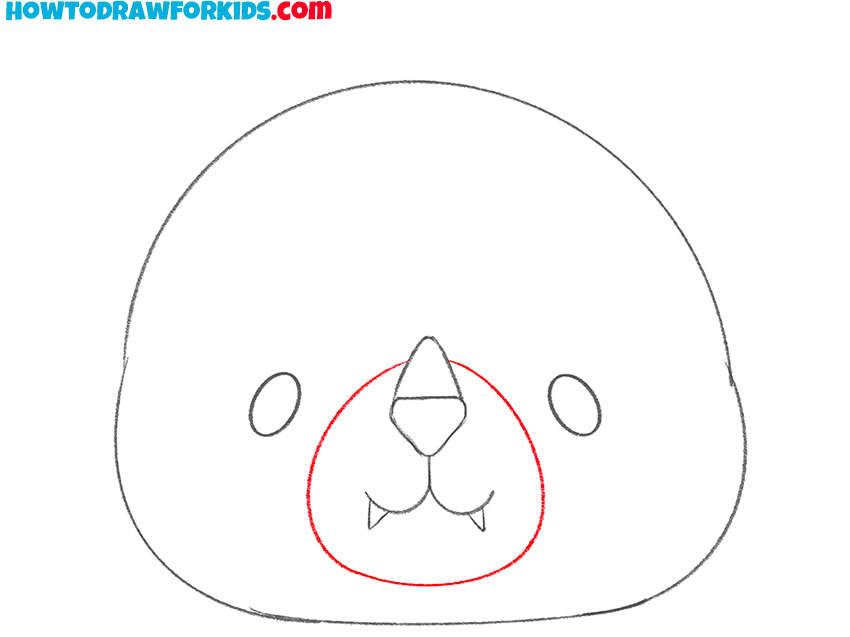
- Add the front of the muzzle.
Draw a circle around the nose and mouth.
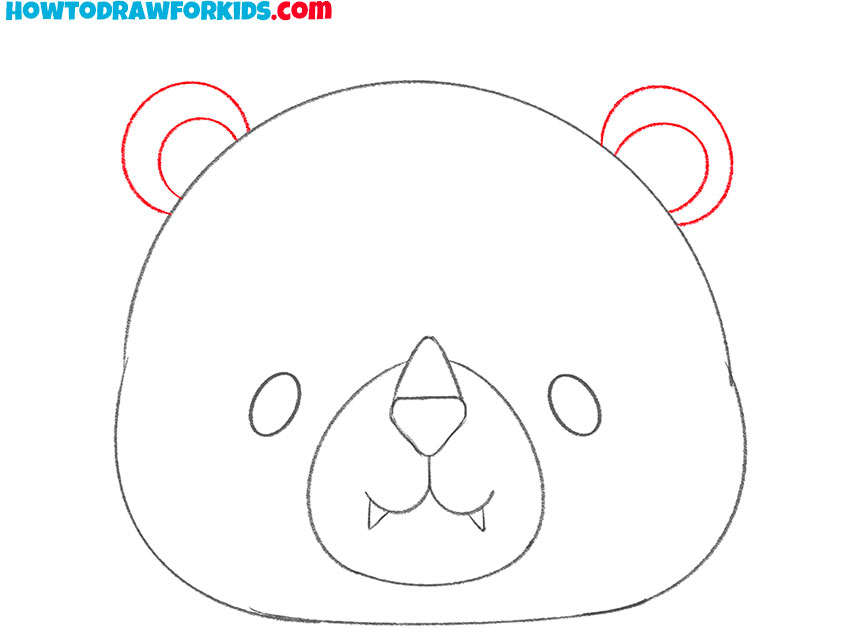
- Sketch out the ears.
Depict two rounded ears and immediately add the inner part.
- Add the stripes.
On the top of the head and on the sides, add the spiky stripes.
- Color the tiger face.
You will need beige, gray, orange, and pink. Add highlights to the eyes.
Additional Content
To supplement the interactive experience of drawing a tiger face, a free, downloadable PDF file is available, summarizing the key points of the lesson. It’s an ideal companion for offline practice, allowing children to take their artistic development into their own hands, literally.
This PDF is more than just a guide; it’s a bridge to greater artistic confidence and independence. It encourages kids to revisit and practice the art of drawing anytime, reinforcing the joy and satisfaction of learning at their own pace.
Fine-Tuning Your Tiger Face Art
As we put the final stripes on our tiger face, let’s reflect on how we can sharpen our pencils and skills even more. Drawing, like any adventure in the wild, gets better with every step we take. Here are some key points to help you improve your drawing:
- Consistent Lines: Practice drawing lines with consistent thickness. This will make your tiger’s stripes look bold and natural.
- Even Spacing: Keep an eye on the spacing between features. Symmetry is key to a balanced face.
- Shading Skills: Experiment with shading around the tiger’s cheeks and eyes to give your drawing depth and life.
- Practice, Practice, Practice: The more you draw, the better you’ll get. Try drawing the tiger face multiple times, each time trying to improve one aspect.
Remember, every artist was once a beginner, and every masterpiece started with a simple line. Continue to practice these techniques, and watch as your artwork transforms from the page to the pride of the jungle.
Conclusion
As our journey through the jungle of creativity comes to a close with a fierce and friendly tiger face staring back at us from the page, let’s remember that my website is a library of lessons on all sorts of subjects, from the delicate beauty of drawing a daisy to the playful challenge of sketching Charmander.
And don’t forget to join our community on social media – it’s the best way to keep up with all the artistic escapades that lie ahead. Your thoughts and ideas mean the world to me, so if there’s something you’re itching to draw, leave a comment below. Maybe your suggestion will be the star of our next drawing guide.
You make it so easy! Thanks!
It is so easy to draw! I love it!
It’s so easy, thanks, helped my son (Why when u click the name it reccomends John Doe is that a Roblox reference!)