How to Draw a Reindeer
If you enjoy drawing wildlife, this lesson will teach you how to draw a reindeer, one of the most majestic and graceful forest animals.

How to Draw a Reindeer: Introduction
There are many recognizable animal images in the world, whether it’s a lion or a horse. The image of a deer is one of them, as it can be found in various works of art as well as in ornaments, coats of arms, logos, and more.
Following our tradition, I want to show you how to draw a deer in its most recognizable form, with long, branching antlers and the characteristic outline of its body.
But we won’t stop at just one lesson, we’ll also look at several additional variations of how to draw a deer. This will help you reinforce the knowledge you gain and study the drawing process of this beautiful and graceful animal in different styles and from different angles.
Reindeer Drawing Tutorial
Materials
- Pencil
- Paper
- Eraser
- Coloring supplies
Time needed: 35 minutes
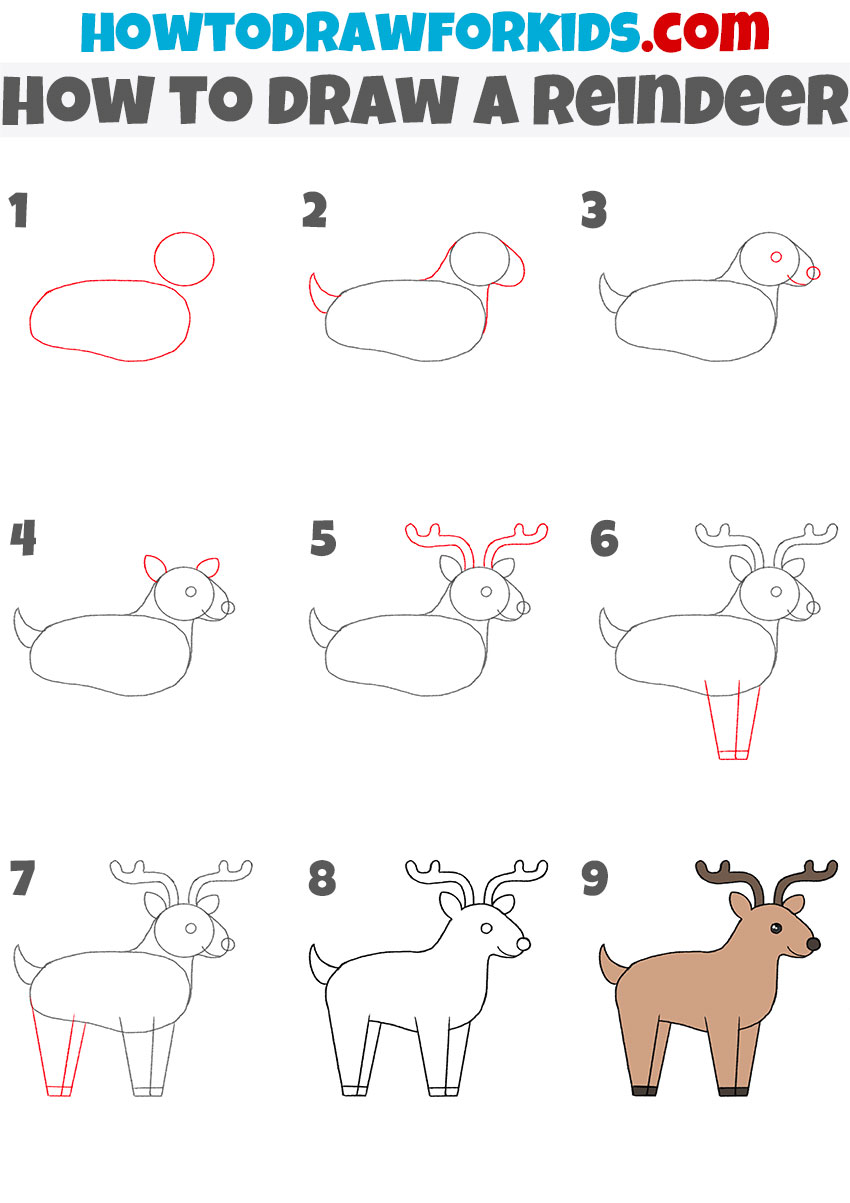
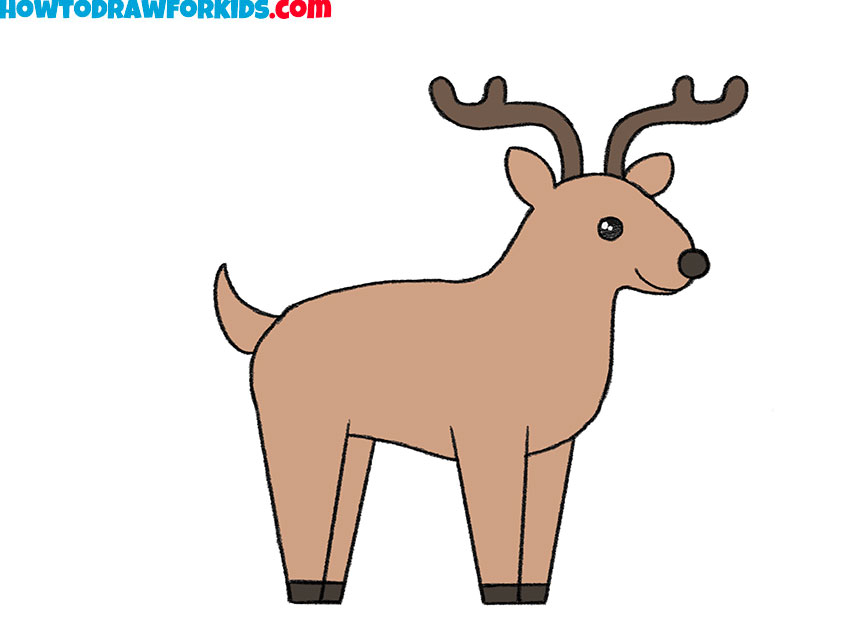
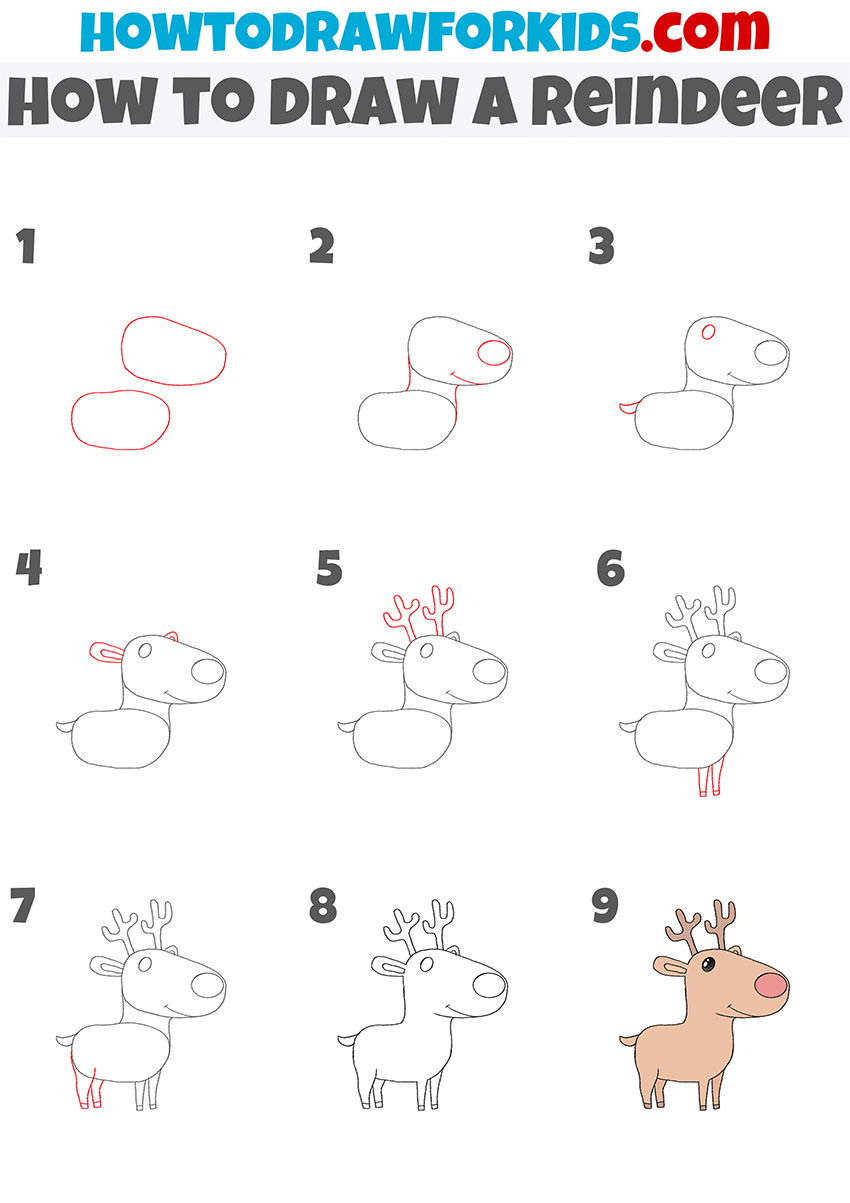
How to Draw a Reindeer
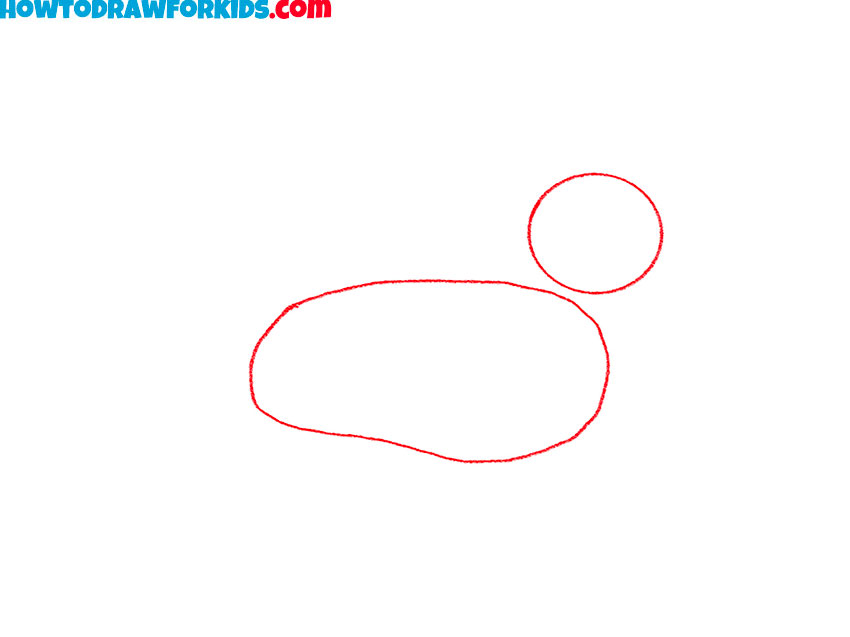
- Sketch the basic head and body shapes.
To begin the reindeer drawing, start with the basic and anlr familiar action, that is, illustrate two simple shapes for the body and head of this beautiful animal. The body can be an oval, and the head is a smaller circle or oval placed above. You can make the head slightly smaller for more realistic proportions.
- Draw a reindeer neck, muzzle, and tail.
Now connect the head and body with two smooth, slightly curved lines to form the reindeer’s neck. From the back of the body oval, sketch a small, slightly pointed shape for the tail. When you draw a reindeer’s neck, remember it’s not a straight line, it has a gentle slope that gives the animal a graceful posture.

- Add facial features to the head.
Inside the head shape, draw a small circle for the eye and a tiny oval for the nose at the tip of the snout. Use a short curved line to separate the muzzle area from the rest of the face. For younger artists, I often recommend making the eye slightly larger, this adds a cartoon-like look to the animal.

- Add pointed ear shapes above the eye.
On top of the head, sketch two ear shapes. They should be slightly pointed ovals, with one on each side. The ear closer to the viewer will be more visible, while the one on the far side will be partly hidden by the head. Try to make them symmetrical in size, but don’t worry about them being exactly identical.

- Illustrate the curved antler shapes.
From the top of the head, draw the first antler with a main stem and several branching points. Keep the lines smooth and slightly curved to give a realistic look. Then, draw the second antler on the far side of the head. You can make it slightly smaller and partially hidden behind the first to create volume.

- Draw the reindeer’s front legs and hooves.
From the underside of the body, sketch two straight, slightly tapered shapes for the front legs. Add a horizontal line near the bottom of each to indicate the hooves. You can draw the reindeer legs close together, as in my example, or leave a space between them.

- Sketch a reindeer’s rear legs.
Draw the two back legs in a similar way, starting from the rear underside of the body. As with the front legs, include a small horizontal line for each hoof. I often remind students to picture the skeleton underneath when sketching animal legs – it helps keep the angles and proportions believable.

- Clean up the reindeer sketch.
Before moving on to color, take a moment to erase all the construction lines you used to sketch the reindeer. These might be the initial ovals for the body and head, or any light marks you made to help place features. Use a clean eraser and work carefully so you don’t smudge the drawing.

- Color the animal with natural tones.
A light to medium brown works well for the body, with darker brown or black for the hooves and antlers. The inside of the ears can be a pale pink or beige, and the nose can be black or red if you’re going for a Rudolph look.
Additional Content
As usual, I’ve prepared a PDF version of this lesson, bringing together the steps in a clear, easy-to-follow format for use without an Internet connection. Inside, you’ll also find extra materials, including a coloring page, a tracing worksheet, and a grid drawing worksheet. This file is completely free to download and can be used anytime you want to practice offline.
How to Draw a Reindeer: Alternative Methods
Any artist benefits from knowing multiple approaches to the same subject, since different situations may require different styles. A reindeer for a cartoon scene, a logo, or a simple holiday card can each have its own proportions, level of detail, and pose. These additional tutorials show several variations so you can practice and choose the method that works best for the purpose you have in mind. So, let’s learn how to draw a reindeer in different ways.
Alternative Reindeer Drawing Tutorial
For those who prefer an easier approach, this alternative reindeer drawing method will show a smaller, more cartoon-like figure with chibi-style proportions. The head is larger in relation to the body, the legs are short, and the overall look is simpler than in the main tutorial.
Just as in the first step, begin with two rounded shapes, one for the head and one for the body, slightly offset from each other. Add the neck by connecting the two shapes with smooth lines. Don’t forget to make it smooth and curved. Draw the oval nose at the front of the head, along with a small curved mouth. Add a short tail at the back of the body, then sketch the ear on the side of the head.
Place the antlers on top, giving them simple, rounded branches. Draw two straight front legs beneath the body, followed by the shorter back legs. Once the outline is complete, trace the lines neatly, erase any guidelines, and color the reindeer with a light brown body, darker antlers, and a red or brown nose.
How to Draw a Running Reindeer
For those who want to go beyond the standing poses, this alternative reindeer drawing tutorial shows how to depict the same animal in motion. The body is still drawn in a simple style, but the arrangement of the limbs and the positioning of the neck and head give a clear sense of movement. This version is a good way to practice illustrating action in the same simplified style.
Begin with the same simple actions and sketch two horizontal ovals for the head and body, connecting them with smooth lines to form the neck. Add a small tail at the back and outline the head details, including the nose, mouth, and ear. Draw the second ear and start the antlers, giving them rounded branches.
Complete the antlers on both sides, then sketch the front legs bent forward as if in motion. Draw the rear legs extending backward with one slightly bent to show running movement. Once the outline is finished, trace the lines neatly, remove extra guidelines, and color the reindeer in light brown with darker antlers and a red or brown nose.

Simple Reindeer Drawing Tutorial
If you want a lighter and more cartoon look for your reindeer, this simple smiling version with facial expressions is what you need. The proportions are also simple, with a large head, wide smile, and cute eyes that make the character appear very funny. The antlers are small and simplified, and the steps are arranged so the face is fully formed early in the process before the rest of the body is added.
In contrast with the previous methods, begin by drawing the head first without the body, shaping it as two rounded forms, one for the top and a larger oval for the muzzle area. Add the eyes, a round nose, and a wide curved smile. Draw the ears on each side, then place the antlers on top with a few rounded branches.
Sketch the small body and tail, keeping the shapes simple. Add the front legs directly under the neck and the short rear legs behind them. Once the outline is complete, go over the lines to make them clear, remove any extra marks, and color the reindeer in light brown with darker antlers, a lighter muzzle, and a pink or red nose.

Conclusion
Once you’re comfortable drawing one animal, it becomes much easier to try others with similar proportions and features. If you enjoyed working on this reindeer, you might also like learning how to draw a deer for a slightly more woodland look.
For something a bit more different, try the wolf drawing tutorial, which shows how to illustrate another highly recognizable animal. And if you want to practice a smaller animal shape, the fox drawing tutorial is a great option, especially for refining fur outlines and facial features.