How to Draw an Ocean
In this lesson I want to show you how to draw an ocean and also illustrate in detail how to draw an ocean wave using two different methods.

How to Draw an Ocean: Introduction
I have prepared for you an original and very useful drawing lesson, in which I would like to tell and show you how to draw an ocean step by step. By learning how to draw the ocean with this easy tutorial, you can apply your skills to create many real masterpieces!
I am sure that many of you have seen the ocean. The ocean is the largest body of water that is part of the oceans, and also located among the continents. This is a large reservoir containing salt water. To represent the ocean, you can draw a beautiful high crest of the ocean, as well as part of the surface of the water.
This tutorial is great for beginners or kids. After following this instruction, you will be able to draw an ocean wave, a seascape, a natural landscape, as well as draw a ship, a mermaid, or various fish and marine animals against the background of the ocean.
Ocean Drawing Tutorial
Materials
- Pencil
- Paper
- Eraser
- Coloring supplies
Time needed: 30 minutes
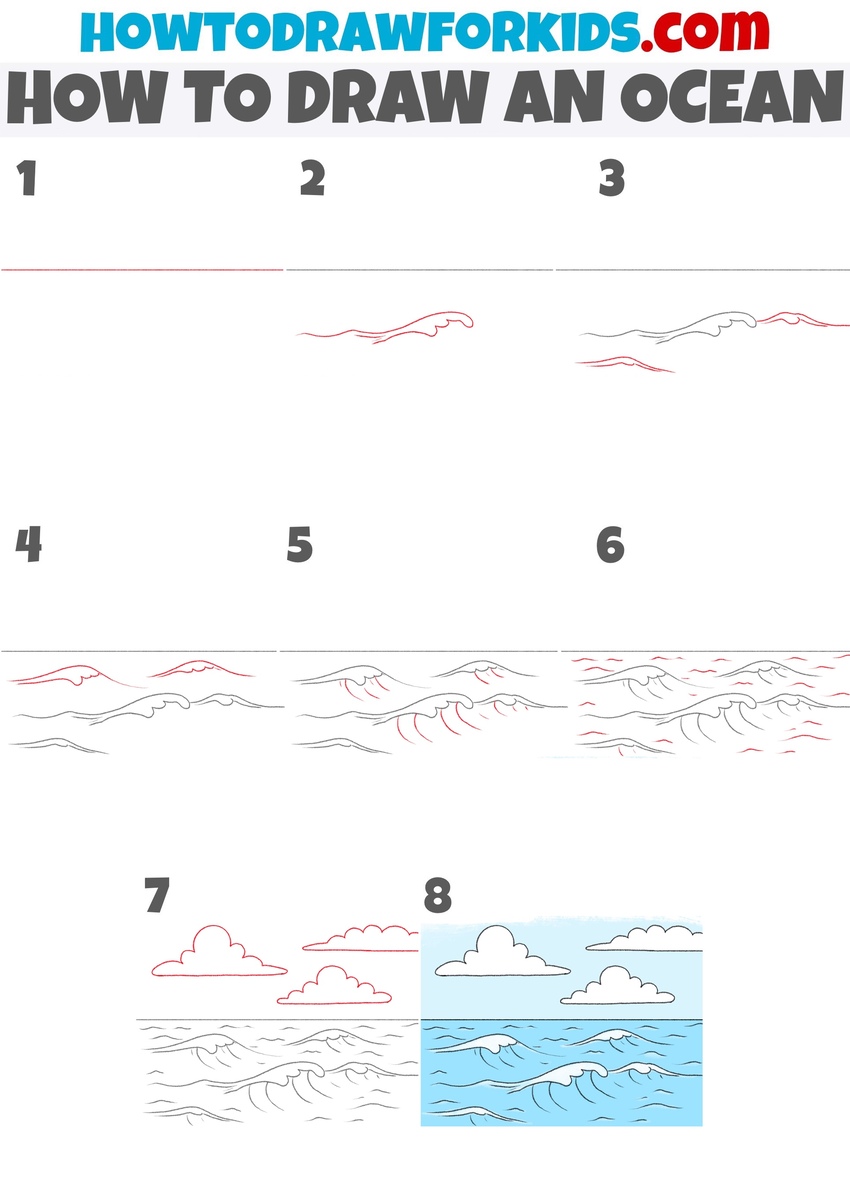
How to Draw an Ocean
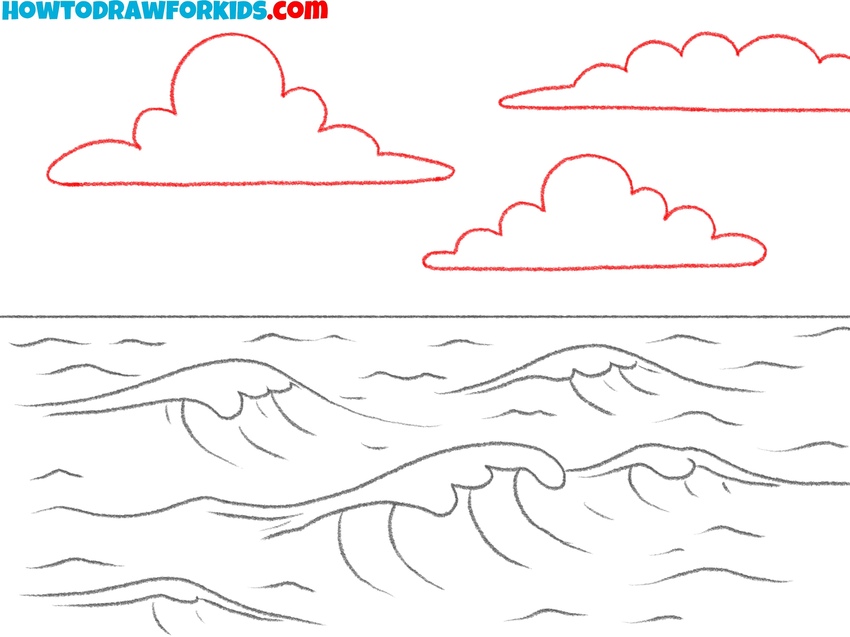
- Sketch the horizon line.
To draw an authentic and beautiful ocean landscape, sketch a straight horizontal line across the page. This horizon line will separate the water from the sky. Don’t press too hard with your pencil. Later on, the sky and clouds will rest above it, while the waves will build below.

- Draw the first ocean wave.
Now start to illustrate the first cresting wave near the horizon, using long and very smooth lines. Drawing waves can be tricky because they are irregular, but here we keep it simple with smooth, confident strokes. This first wave should be larger than the others you’ll add later, since it acts as a focal point.

- Illustrate smaller swells.
Sketch additional wave lines on either side of the first one. Keep their scale a bit smaller and less detailed to convey distance and perspective. Squint your eyes while looking at a photo of the sea – the smaller waves almost dissolve into lines and textures. Try to mimic that effect here with short, broken strokes.

- Add the background swells.
Add another layer of crests across the horizon, higher and slightly overlapping the previous ones. These new curves should look like they’re rising in the background, creating an effect of perspective. Drawing waves, imagine tracing the outline of a heartbeat line – up, down, and gently back again.

- Detail the ocean waves.
Begin sketching shorter, broken lines along the tops of your waves to make them look taller and more realistic. Use light, jagged strokes that look almost like teeth or lace resting on the wave. Vary the length of the strokes, making some of them long and sweeping, others short and sharp.

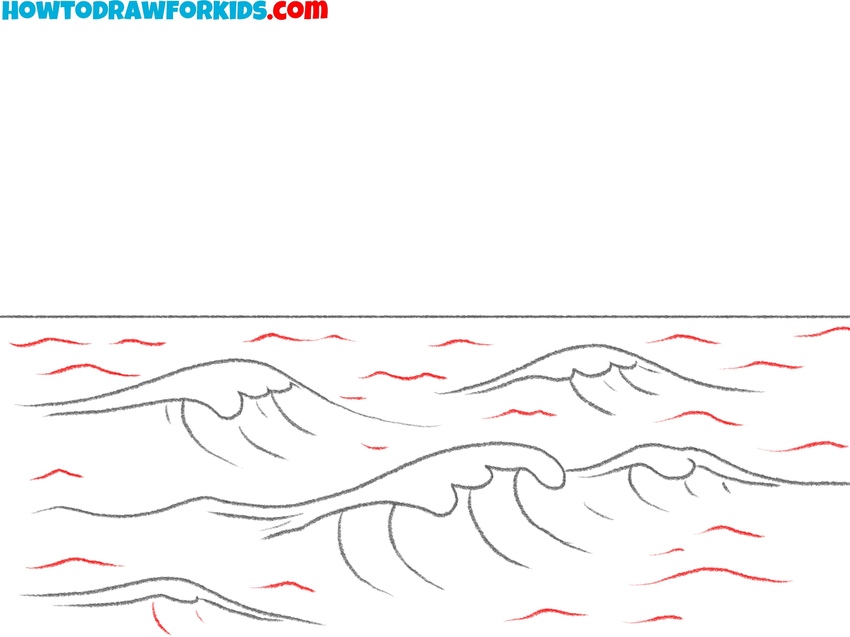
- Sketch surface ripples.
Now make your ocean drawing look even more realistic by adding multiple ripple lines across the ocean surface. These should run horizontally but follow the curve of your main waves. Keep the spacing uneven so they don’t look like a grid.
- Draw the clouds above the ocean.
Shift your focus upward and sketch soft, rounded clouds above the horizon. Drawing clouds imagine sketching overlapping circles and then erasing the bottoms, that’s how you get that fluffy cloud look. Including clouds helps balance the composition, adding elements to the upper part of the sketch.
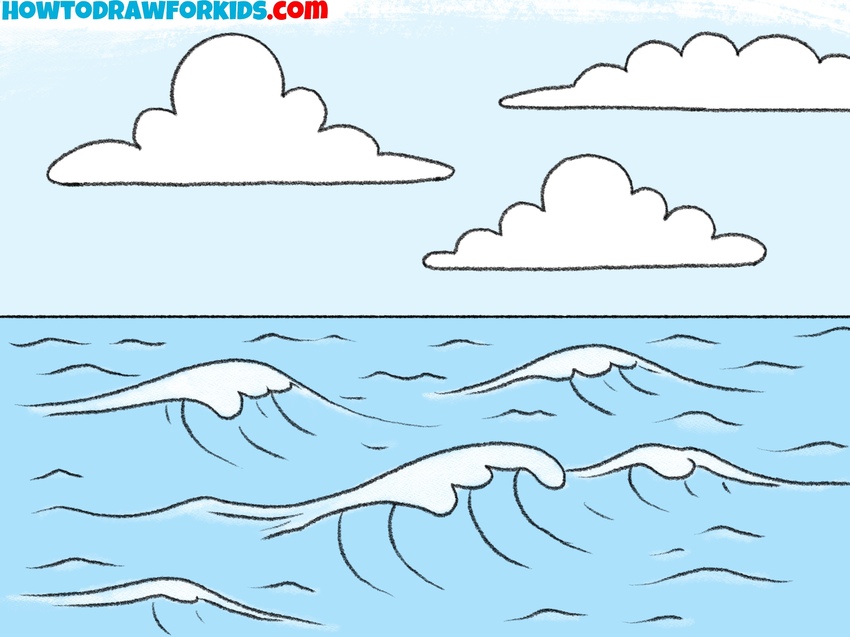
- Clean up and color the ocean.
Erase unnecessary guidelines and clean up the drawing so only the important lines remain. Then add color: fill the ocean with different shades of blue. Keep the sky a softer blue with bright white clouds, and consider adding light shading under them to convey volume.
How to Draw an Ocean: Additional Techniques
You can also offer your ideas for future drawing lessons. Download the PDF file, which contains a short version of this lesson, as well as additional useful materials for you.
Easy Ocean Drawing Tutorial
In addition to the main ocean lesson, here is another tutorial that shows a single large wave. This version shows the ocean in a more simplified form with basic detailing inside the crest. The drawing shows the curved shape of the wave and the rolling motion of water without including background elements such as the horizon or sky. Because of this, the composition looks very simple.
To draw an ocean using this technique, sketch the main outline of the wave, paying attention to the overall curve. Add inner contour lines. Draw the crest carefully, and keep your hand relaxed when shaping the foam, since the uneven edge is what makes it look natural. Include smaller details inside the wave to give it depth. Finish by adding smooth inner lines before applying color to complete the ocean drawing. Additionally, you can draw a ship on the surface or sketch a fish jumping out of the water.

Ocean Wave Drawing Tutorial
Another useful subject to practice is drawing natural elements and parts of the ocean, and this lesson shows an ocean wave. A wave has no fixed shape, so it must be shown through flowing, curved lines. The example here captures a breaking wave with a clear crest and rolling motion, drawn in a simple and clear style that can be repeated by beginners. This type of drawing can be useful for landscapes, backgrounds, or even complex compositions where water plays a central role.
Sketch the crest of the ocean wave with short, uneven lines to create foam. Keep the line smooth to create the upper arc of the wave. Add another sweeping curve beneath it. Continue building the crest with small irregular details while shaping the overall curve. Add long flowing lines beneath the crest to show the direction of water movement.
Keep your hand loose when drawing these, as rigidity will make the wave look unnatural. Add a few inner curves to indicate lines of rolling water. Finally, refine the outline and lightly shade or color the body of the wave with pale blue, leaving the crest white to represent foam. To make your artwork look more interesting and unusual, you can draw a mermaid resting on a rock or jumping out of the water.

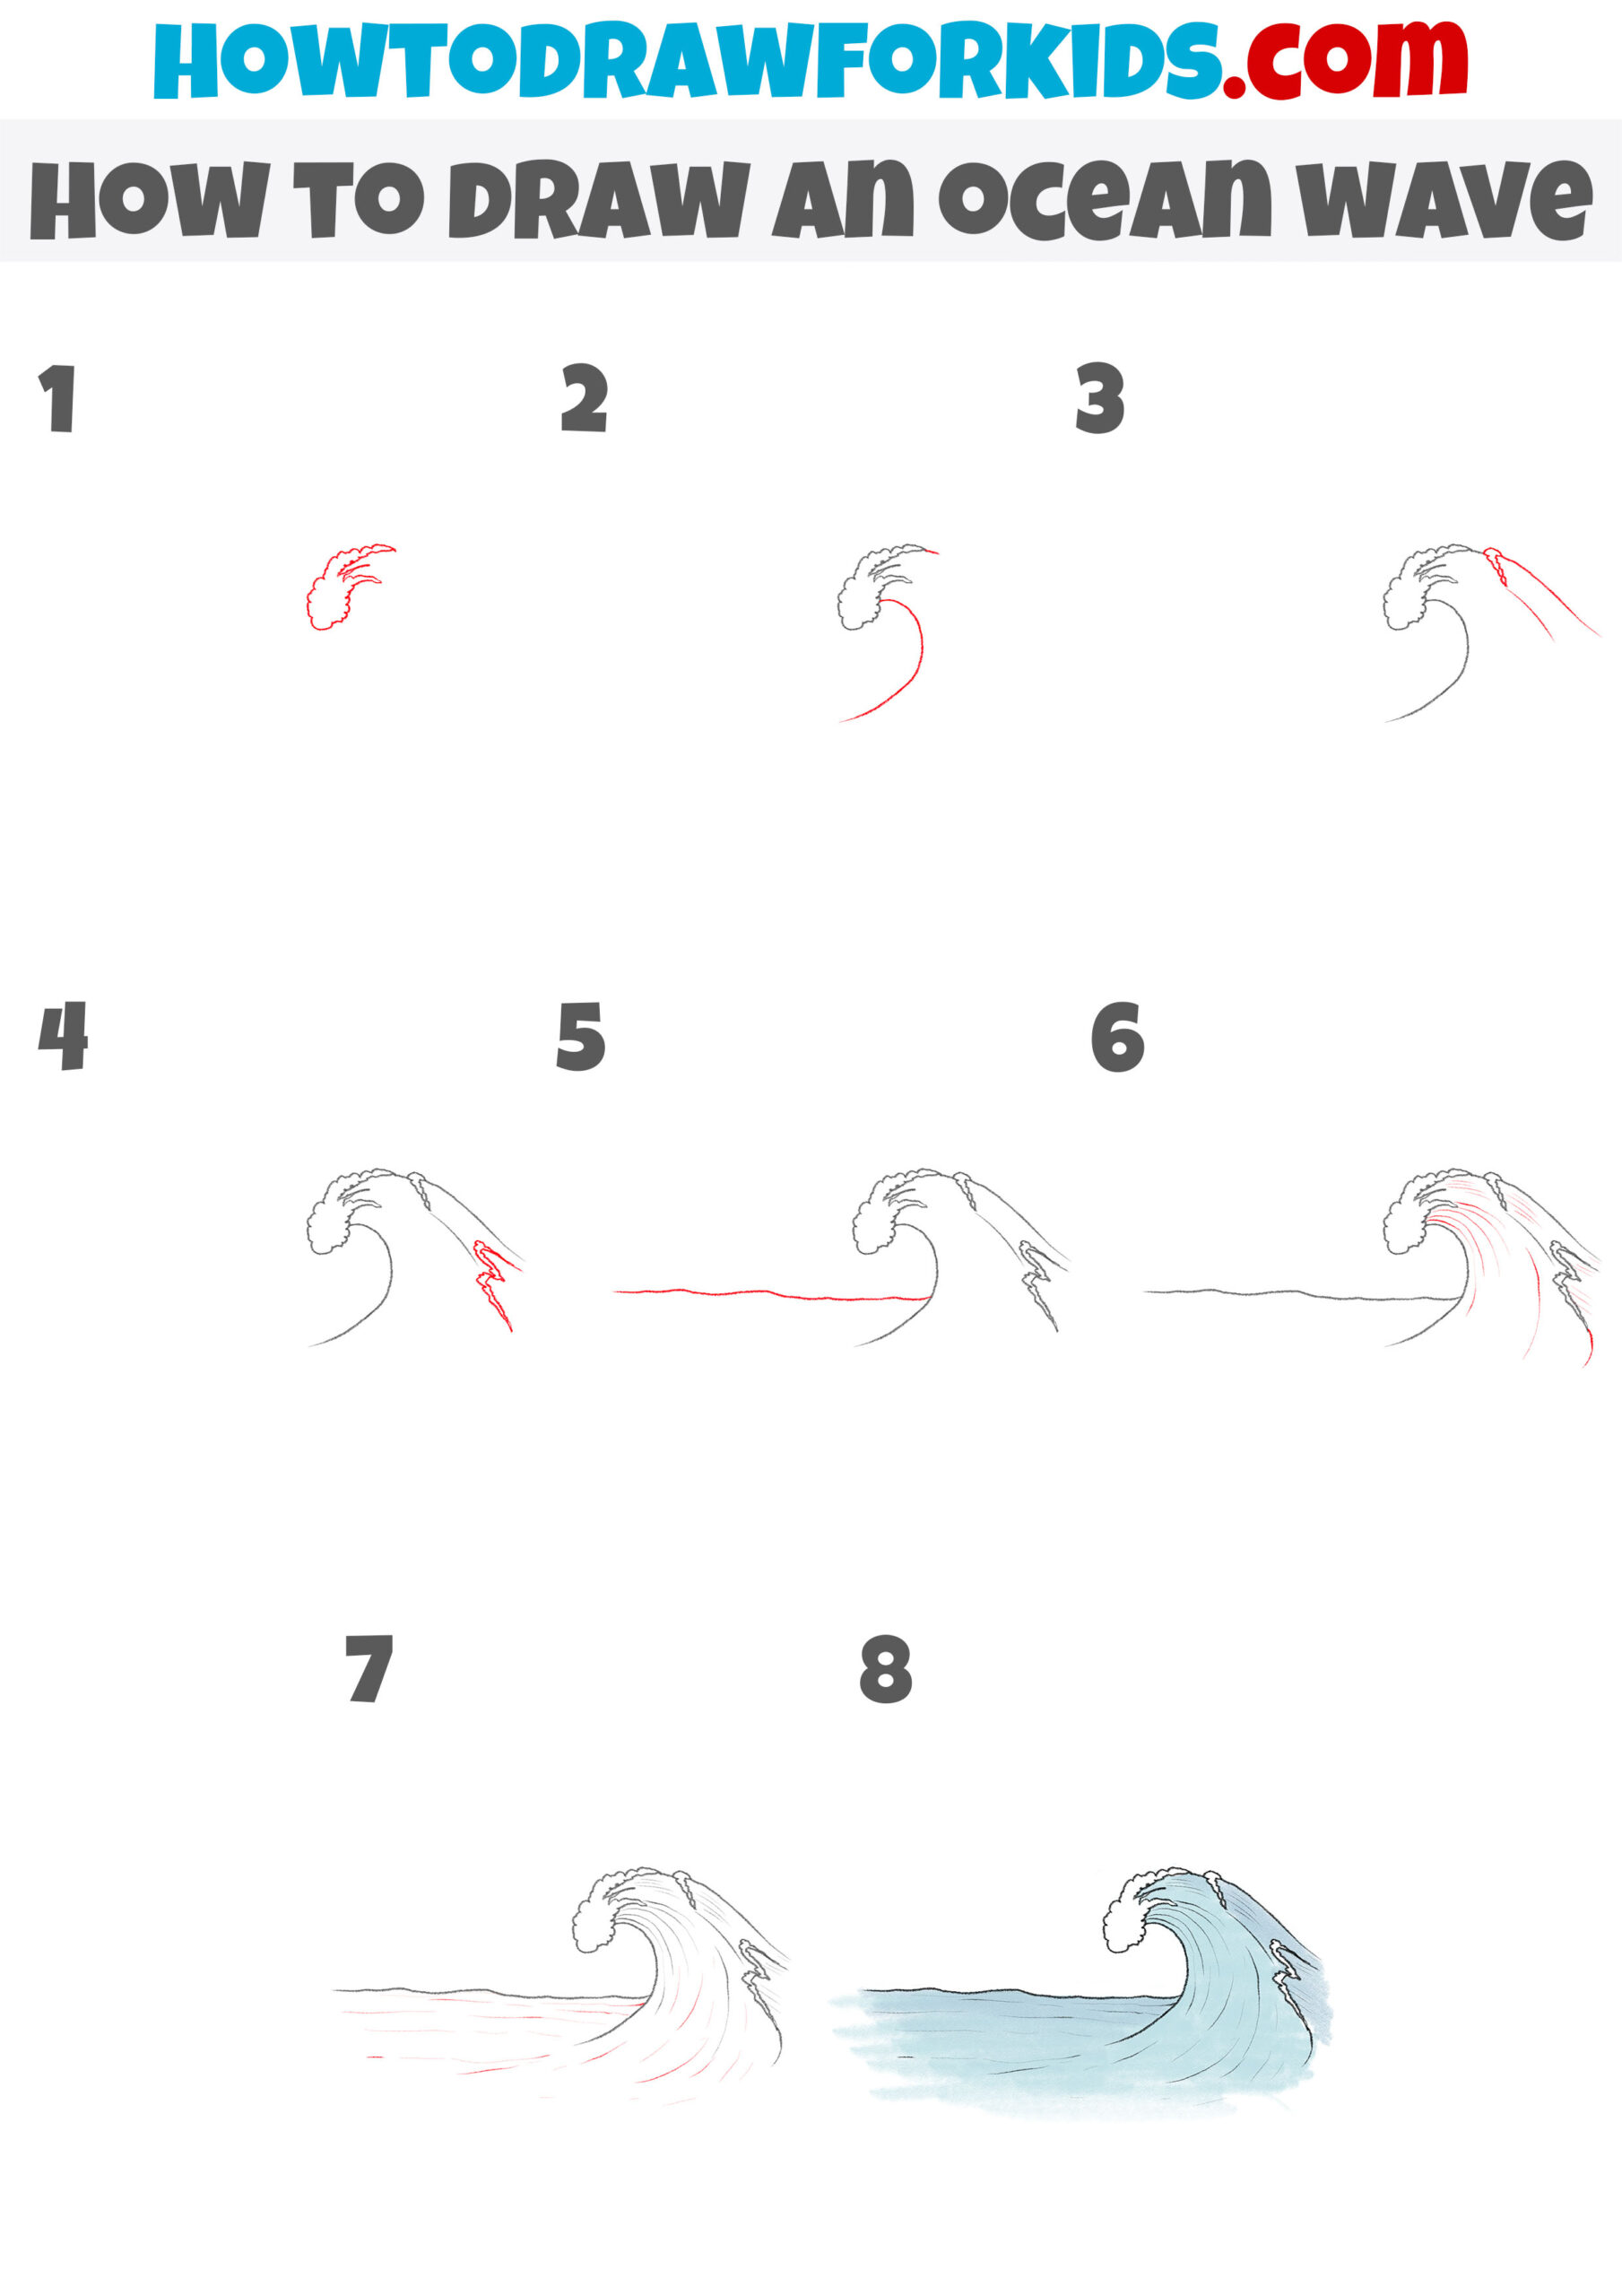
Realistic Ocean Wave Drawing Tutorial
Another variation worth practicing is this drawing of an ocean wave in a more realistic style. Compared to the previous version, this one looks more authentic and believable. This version uses a different sequence of steps and more realistic coloring technique.
Begin drawing an ocean wave with the foam of the crest using small irregular curves, then sketch a smooth line to create the arc of the wave. Add supporting lines to indicate the back of the crest. Draw the horizon with a straight horizontal line.
From the crest, sketch several flowing inner curves to show how the water folds inside the wave. Use varied line weight where possible. When coloring, keep the crest white or very light to represent foam, while the main part of the wave should be shaded in light and darker blues. Work gradually, checking proportions.