How to Draw the Sea
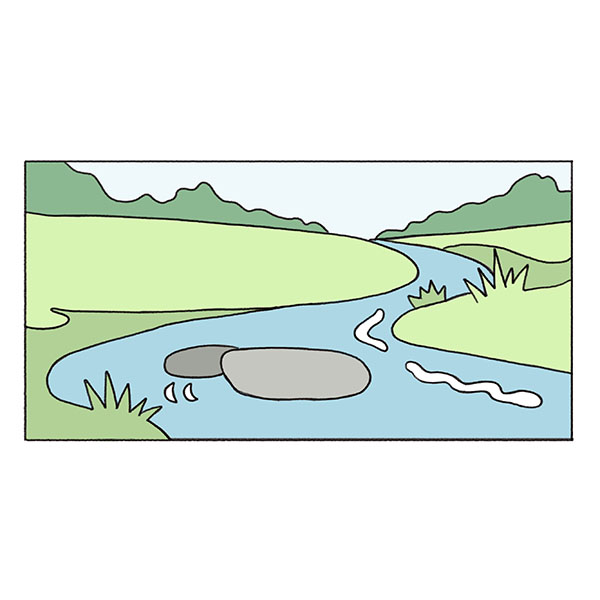
In this tutorial, I’ll show you how to draw the sea in a simple way that’s suitable for beginners and young artists. We’ll draw the horizon, waves, and other details that make a seascape look interesting.

Prepare to Draw the Sea
The sea is one of the simplest natural landscapes to draw because it consists of just a few basic elements.
In this step-by-step tutorial, you’ll learn how to draw the horizon and waves, then combine them into a simple seascape.
After that, you can use the same technique when drawing beaches, islands, ships, or other coastal scenes.
By the end of this lesson, I’ll also share a few simple ideas that will help you turn this sea drawing into a complete landscape with just a few additional details.
So grab your drawing tools and let’s get started.
Step-by-Step Sea Drawing Tutorial
Materials
- Pencil
- Paper
- Eraser
- Coloring supplies
Time needed: 30 minutes
How to Draw the Sea
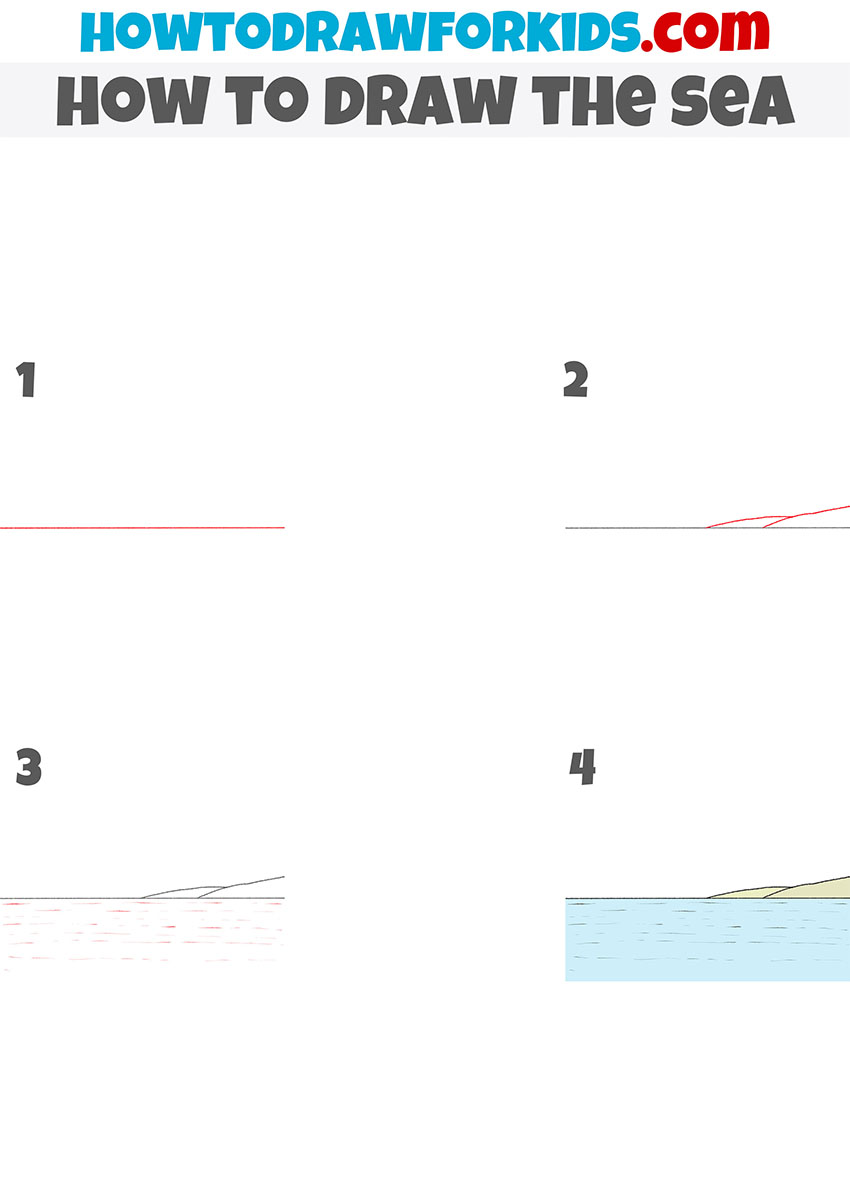
- Draw the horizon line.
Begin this drawing step by gently pressing your pencil onto the paper and carefully drawing a straight, horizontal line across to establish the horizon. Keep your hand steady for evenness.

- Depict the hills.
To draw the hills on the right side of your horizon line, draw curved lines that rise above the straight line. Ensure these curves are smooth and vary in height for a natural hillside appearance.

- Detail the surface of the water.
To simulate the rippling surface of the sea, gently draw numerous slender, horizontal lines across the water area. Space these lines unevenly, some longer and others shorter.

- Color the sea drawing.
Select a blue shade to fill in the sea, creating a tranquil and vast body of water. Then, for the hills, choose a light brown color to reflect their earthy and undulating terrain, complementing the seascape.
Additional Content
I’ve put together a special treat – a free PDF version of this drawing tutorial, just for you. It’s quick, easy, and best of all, it doesn’t cost a penny.
You can download it right away and take your drawing adventure offline, no internet needed. So you can practice drawing anytime, anywhere, without any hassle.
Creative Sea Scene Ideas
A simple sea drawing can easily become a complete landscape with just a few additional details.
You can add a boat drawing floating on the waves, draw a few fish beneath the surface, or draw a palm tree on a small beach in the background.
If you’d like to make the scene more detailed, add the sun drawing near the horizon or sketch a seagull flying above the water.
Small details like shells, rocks, or gentle waves along the shore can also make the landscape look more complete.
Try different combinations of these elements to create your own coastal scene. Even a few simple additions can completely change the look of the finished drawing.
What’s Next?
Now you know how to draw the sea and can use it as the foundation for many different landscapes.
If you’d like to continue practicing, try my cloud drawing tutorial to complete the sky above the water.
You can also follow the beach drawing guide and combine both tutorial into a simple coastal scene.
Follow me on social media to stay updated whenever I publish new drawing tutorials. If there’s another landscape or nature scene you’d like to learn how to draw, leave a comment below.
I always enjoy reading your suggestions for future drawing guides and coloring pages.