How to Draw Bamboo
Let’s learn how to draw bamboo giving branches and leaves a simple but very recognizable look using two very easy methods.

How to Draw Bamboo: Introduction
Bamboo is a tall tropical plant that has found application in various spheres of life. Bamboo has a solid, hollow stem and narrow, dark green leaves. There are various types of this plant, including indoor bamboo. This species is small in size and it is convenient to grow it at home since the plant is unpretentious to care for. It is believed that this plant attracts wealth and good luck.
The image of bamboo can be seen on various objects, for example, it is often used in the interior. The image of bamboo stems and leaves can be found on wallpaper, on curtains, in paintings, and on other objects in the home.
We will learn how to draw bamboo in a few simple steps. At each stage, you will draw different parts of this amazing plant. The stem of the bamboo consists of separate segments, few leaves. If you add shadows and highlights, the plant will look more realistic. You can easily complete this lesson, and the creative process will give you pleasure.
Bamboo Drawing Tutorial
Materials
- Pencil
- Paper
- Eraser
- Coloring supplies
Time needed: 20 minutes
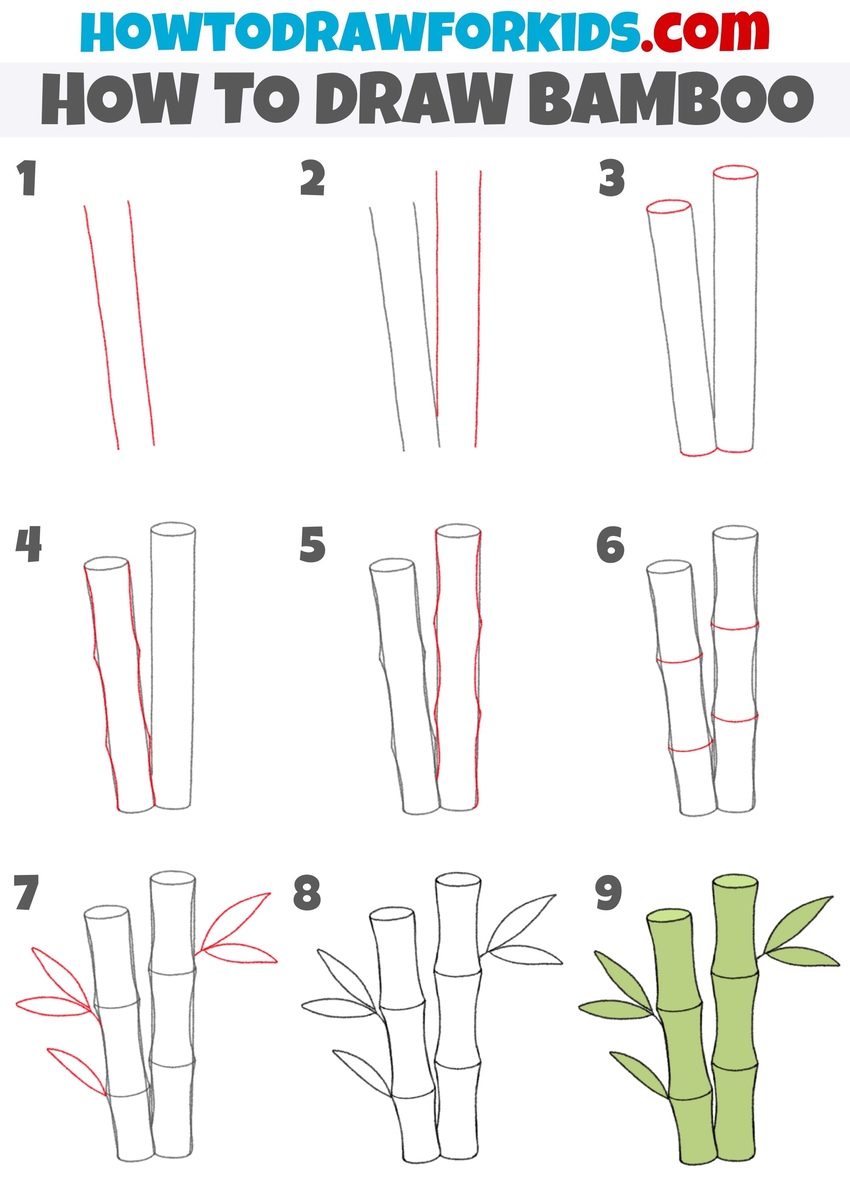
How to Draw Bamboo
- Sketch the first stalk guide lines.
Since bamboo grows in tall, straight stalks, it’s best to begin with the main vertical lines. Sketch two simple lines standing side by side. They should run parallel and close together, forming the sides of one bamboo stalk. Try to keep your strokes light. The lines don’t have to be perfectly straight.

- Add the second stalk guide lines.
Bamboo is rarely seen growing alone, so draw another stalk beside the first one. Again, use two long lines running parallel, but place them slightly closer together than the first stalk to make the composition look natural. Make one stalk taller than the other to add some variety.

- Close the stalk tops and bottoms.
Now turn those pairs of lines into full cylinders. At the top of each stalk, sketch an oval to close the opening. At the bottom, connect the lines with a slight curve to show the rounded base. This step gives the stalks a three-dimensional cylindrical look instead of just being flat lines.

- Shape the first stalk.
Bamboo doesn’t grow perfectly straight like a pole; its sides have slight irregularities. On one stalk, sketch gentle inward and outward curves along its sides. This makes the stalk look more natural and less like a man-made cylinder. Don’t make the bends too sharp, as bamboo still keeps a fairly smooth surface.

- Add curves to the other stalk.
Apply the same idea to the other stalk. Add slight inward and outward curves so the sides look natural and realistic. You can vary the bends a little compared to the first stalk so they don’t appear too identical. Small differences make the bamboo drawing look more convincing.

- Draw the bamboo segments.
One of the most recognizable features of bamboo is its segmented structure. To show this, draw horizontal curved lines across the stalks at equal intervals. These curves should wrap around the cylinder, following the perspective of the stalk, so they appear slightly bowed.

- Draw the bamboo leaves.
Bamboo is known not only for its stalks but also for its long, narrow leaves. From the sides of the stalks, sketch elongated pointed shapes growing outward. It’s a good idea to draw them in pairs or small groups, as bamboo leaves usually sprout in clusters.

- Finalize the stalk shapes.
Any drawing looks clearer once unnecessary lines are removed, so before finishing, it’s important to clean up the sketch. Take an eraser and carefully remove any construction marks, overlapping strokes, or stray lines that were helpful for building the structure but are no longer needed.

- Fill the stalks and leaves with green color.
Without color, bamboo remains only an outline, so this final step is about showing its natural shades. Take a green pencil or marker and paint the stalks with a light, even tone. For the leaves, use a a similar or deeper green so they feel distinct from the stalks.
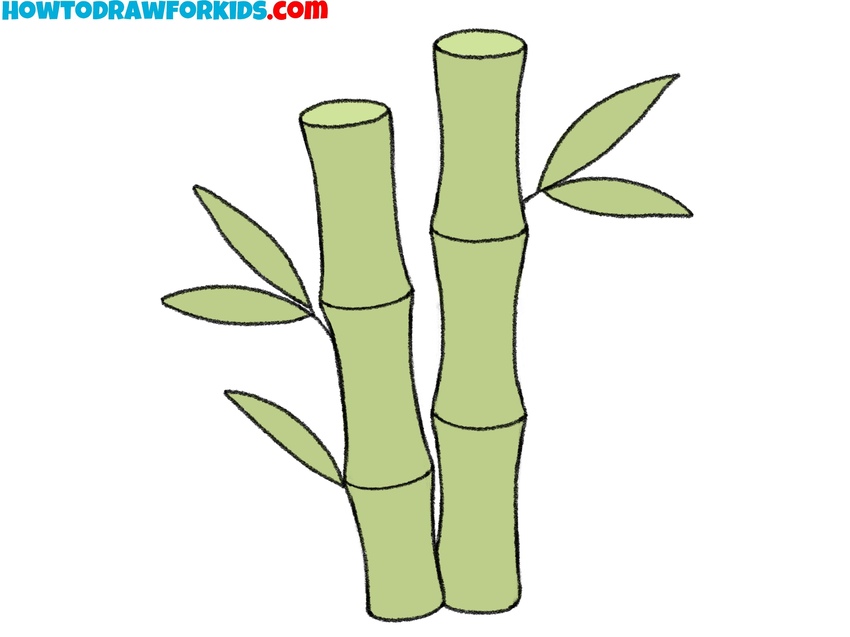
Easy Bamboo Drawing Tutorial
In continuation of the main lesson, here is another variation that shows how to draw bamboo in a more simplified manner. The composition shows a small group of bamboo stalks with a few leaves.
To create this bamboo drawing, outline two slightly uneven vertical lines for the first stalk. Add more stalks next to it by sketching parallel vertical lines with small variations in tilt. Close the tops with short curved lines so the stalks look open. At the base, connect the bottoms with smooth curves.
Draw several long, narrow leaves extending from the sides. Illustrate the horizontal segments along the stalks by adding lines that wrap around each section. Add extra leaves near the base for balance. When the outline is complete, fill the stalks with green, using darker tones for the stems and slightly lighter shades for the leaves.

Conclusion
The bamboo is ready! I hope you like the result. In the future, you will need the skills that you learned in this lesson. You can paint beautiful still lifes with bamboo twigs or you can paint a landscape with a bamboo grove.
If you’d like to continue working on plant drawings, you can also try my tutorials on how to draw a tree, or practice native landscapes with my cactus drawing tutorial. These lessons have similar principles of structure and proportion but demonstrate new shapes and details.