How to Draw Eyes
This drawing tutorial focuses on how to draw eyes step-by-step. This tutorial is one of the most important on my site, because drawing eyes is one of the most important skills in the process of creating a portrait of a person.
How to Draw Eyes: Basic information
Why is eyes drawing such an important skill for any artist?
Eyes are one of the most expressive parts of a person’s face, and by being able to draw them correctly, an artist can convey not only a person’s emotions but also his character.
If you look deep into the history of art, what do you see?
From ancient times to the present day, sculptors, painters, photographers and filmmakers have placed a very strong emphasis on the this part of the face. For example, in the Georgian era, artists even painted eyes on ivory and wore them on bracelets or rings.
Knowing how to draw eyes and outher details of the face, a young artist will be able to create portraits of a wide variety of people.
So, where to start the process of learning? At first, young artists should learn to illustrate this part of the face. That is the outlines, eyelids, pupils, and eyelashes.
Then the artist should learn how to draw emotions. That is, to make the eyes kind, evil, sad, cheerful, etc.
Well, let’s get started!
Eyes Drawing Tutorial
Materials
- Pencil
- Paper
- Eraser
- Coloring supplies (optional)
Time needed: 30 minutes
How to Draw Eyes Step-by-Step
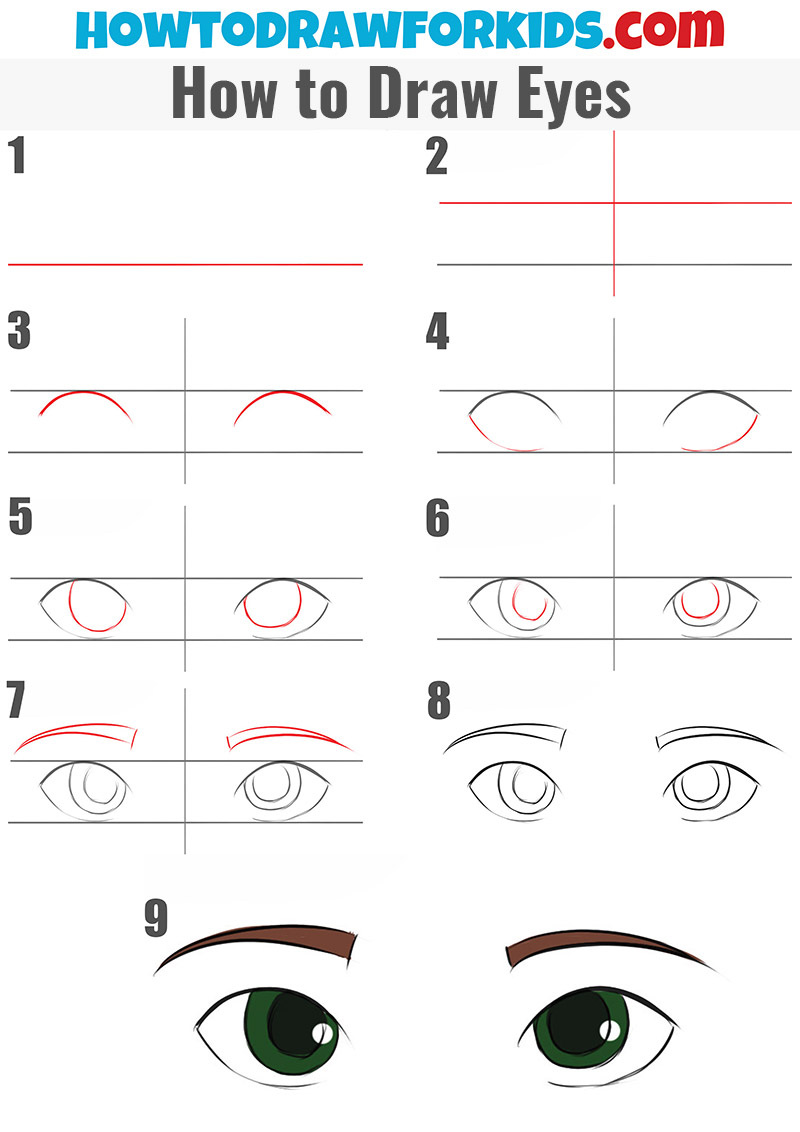
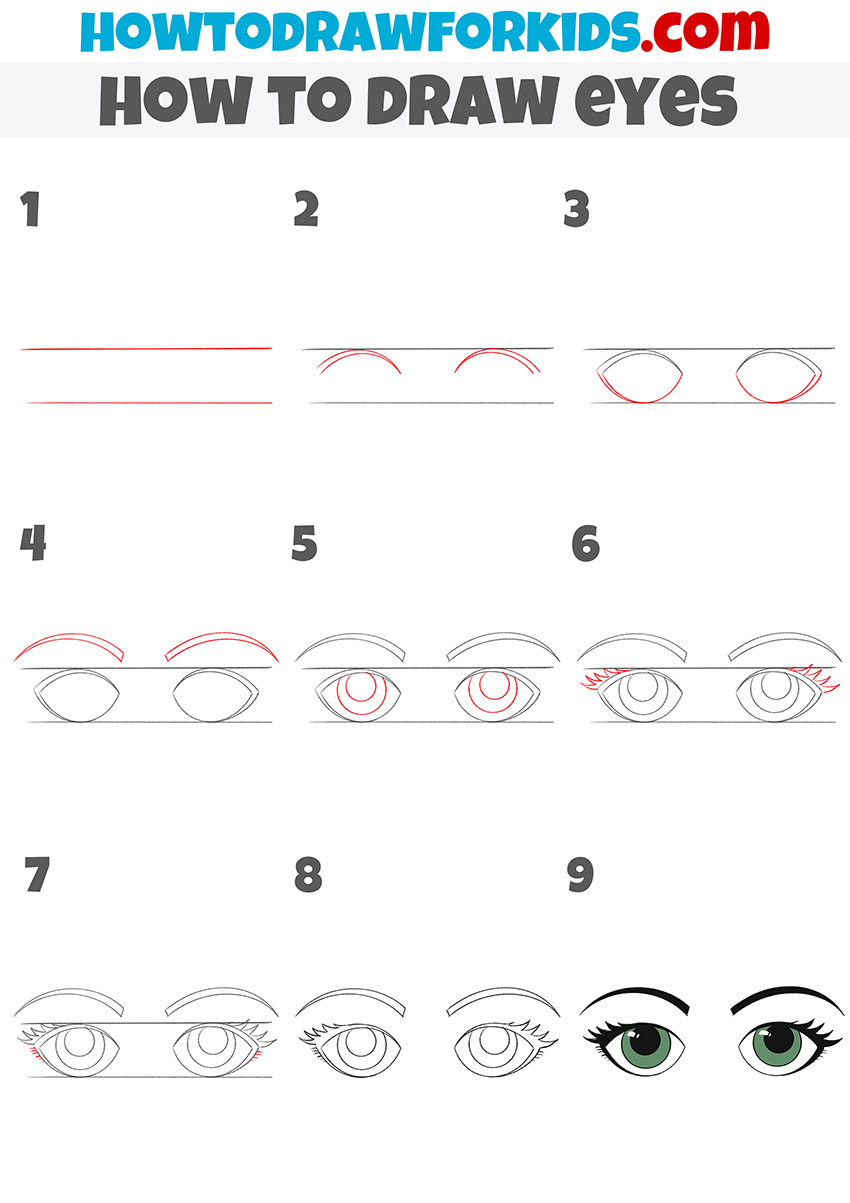
- Draw a horizontal guideline.
Start by drawing a horizontal line across the center of the page. This line serves as a guide to ensure that both eyes are drawn symmetrically and at the same level. The line acts as the base for drawing both the eyes and their features, providing structure and balance.

- Draw a second guideline a little higher.
Add a second horizontal line slightly above the first one, running parallel to it. Then draw a vertical line down the center of the page, intersecting both horizontal lines. This creates a grid that divides the face into quadrants, helping to ensure symmetry between the left and right eyes.

- Illustrate the upper eyelids.
Between the two horizontal guidelines, draw a curved line on each side of the vertical guideline, forming the upper eyelids. These lines should follow a gentle arch that mirrors the natural curve of an eye’s upper lid. Ensure that the curves are symmetrical, with their inner and outer ends aligned on both eyes.

- Add the lower eyelids.
Below the first curved lines, draw another curved lines on each side, mirroring the curves drawn for the upper eyelids. These lines complete the outline of the eyes, forming the almond-shaped design. Make sure these curves are symmetrical.

- Illustrate the irises of the eyes.
Inside each eye outline, draw a circular shape touching the bottom of the lower eyelid. This creates the irises, the colored part of the eyes. Ensure these circles are centered and symmetrical, with enough white space around them to show the sclera, or the whites of the eyes.

- Add the pupils.
Inside each iris, draw a smaller circle entirely contained within it. These circles represent the pupils, which are essential for giving the eyes a lifelike appearance. Make sure the pupils are centered and of equal size for consistency.

- Sketch the eyebrows.
Above each eye, draw an arched line following the natural curve of the eye shapes. This forms the base of the eyebrows. Add a parallel line beneath each arch to give the eyebrows more thickness. Connect the lines at their ends to create a full, arched shape.

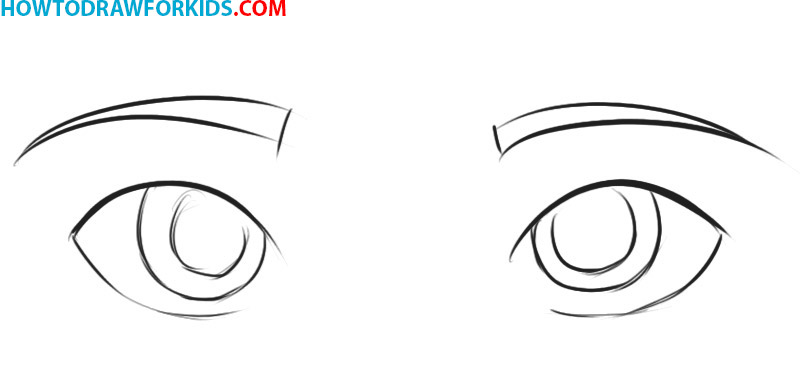
- Erase the guidelines and refine the drawing.
Erase the guidelines from the eyes drawing, cleaning up the overall appearance. Darken the outlines of the eyes, irises, and pupils for a more defined look. You can also add subtle details around the eyes, such as slight wrinkles or eyelashes, to make the eyes more realistic.
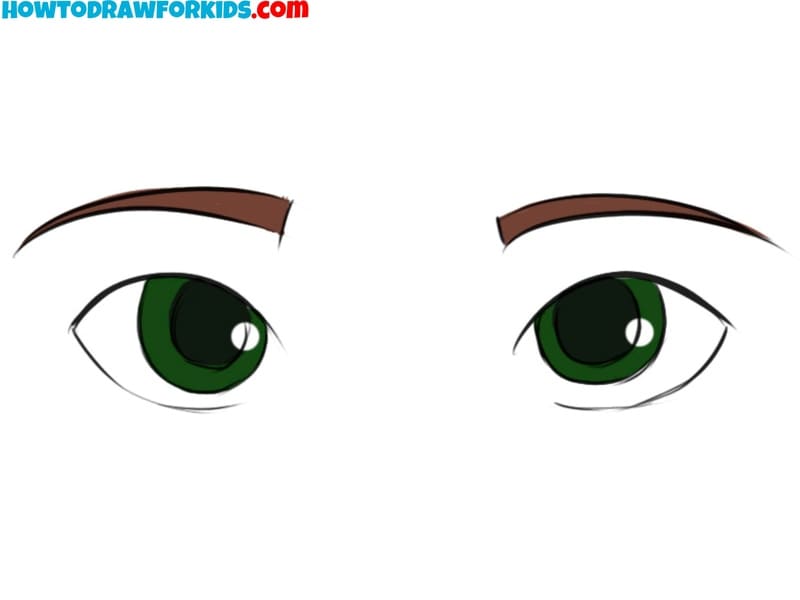
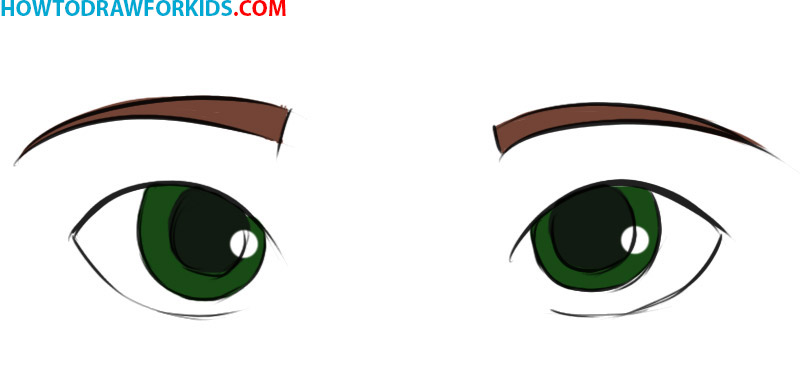
- Color the eyes.
Finally, fill in the irises with a vibrant hue of your choice, such as blue, green, or brown. Shade the eyebrows with a natural color like brown or black. For the pupils, use solid black. You can add subtle shading to the whites of the eyes and eyelids for a more realistic appearance.
Additional Materials
To use this step-by-step drawing guide and all additional materials at any time, even if you don’t have internet, you can download a completely free PDF that I created just for you.
What will you find in this free PDF file?
- Eyes step-by-step drawing instruction
- Coloring page
- Tracing worksheet
- Grid drawing worksheet
You can print this lesson and any additional materials and use it at home or school to make learning easier.
Advanced Techniques
So, the eyes drawing lesson is over, what should you do next?
To take your skills to the next level, you need to practice a lot and perform the simple but very useful exercises described below.
- First of all, try repeating all the steps several times, but each time adding new elements, or changing those presented in my steps. For example, try changing the position of the pupils or adding longer eyelashes.
- You can also try to draw different emotions on the face by changing the shape of the eyebrows. Try to portray a more cheerful expression or a sadder one. This is exactly the process of conveying emotions through the correct drawing of eyes, which I spoke about above.
- Next, you can try to draw the entire face, depicting the eyes from this lesson and adding elements such as the nose, lips, ears, hair, etc.
After you have completed all these exercises, I advise you to try to draw a more voluminous and realistic drawing. To achieve this, you need to add the right shadows, highlights and midtones. I talk about what light and shadow are and how to apply it in the drawing process in my article about light and shadow.
How to Draw Eyes: Alternative Methods
Now that you’ve learned the step-by-step approach to drawing eyes, let’s explore some alternative methods to expand your skills. In the following section, you’ll find techniques that allow for a range of styles, from cartoonish and abstract eyes to more freeform, intuitive approaches.
We’ll also explore different coloring techniques and how to use a variety of methods to achieve unique effects. By experimenting with these methods, you’ll diversify your drawing repertoire and train your ability to draw eyes in various styles, enriching your overall skills.
Adding Eyelashes
In this lesson, I’ll provide a detailed guide on how to draw eyes with long eyelashes, particularly for beginners. The illustration depicts a woman’s eyes, which are wide open and elegantly shaped, with lush eyelashes adorning the lids. The result is an attractive and pleasing appearance.
To create the effect of long lashes like in my example, draw a series of thick, elongated curved lines that taper at the ends. Ensure the lines are symmetrical and evenly spaced as they fan out. Please keep in mind that the upper eyelashes should be significantly longer and thicker than the lower ones.
Drawing Eyes in Cartoon Style
Here, the eyes are drawn in a cartoon style, characterized by an oval shape. This shape is commonly found in many cartoon characters, providing them with a distinct and cute appearance. By mastering this tutorial, you’ll gain the skills needed to not only draw eyes in this style but also to create entire faces for cartoon characters.
This style of drawing eyes is much simpler and more cartoonish compared to the previous styles. It features large, circular eyes with exaggerated irises and pupils, giving a more cute and cartoonish appearance. The shapes are very basic, focusing on circles for the eyes and curved lines for the eyelids and eyebrows, without any detailed eyelashes or reflections.

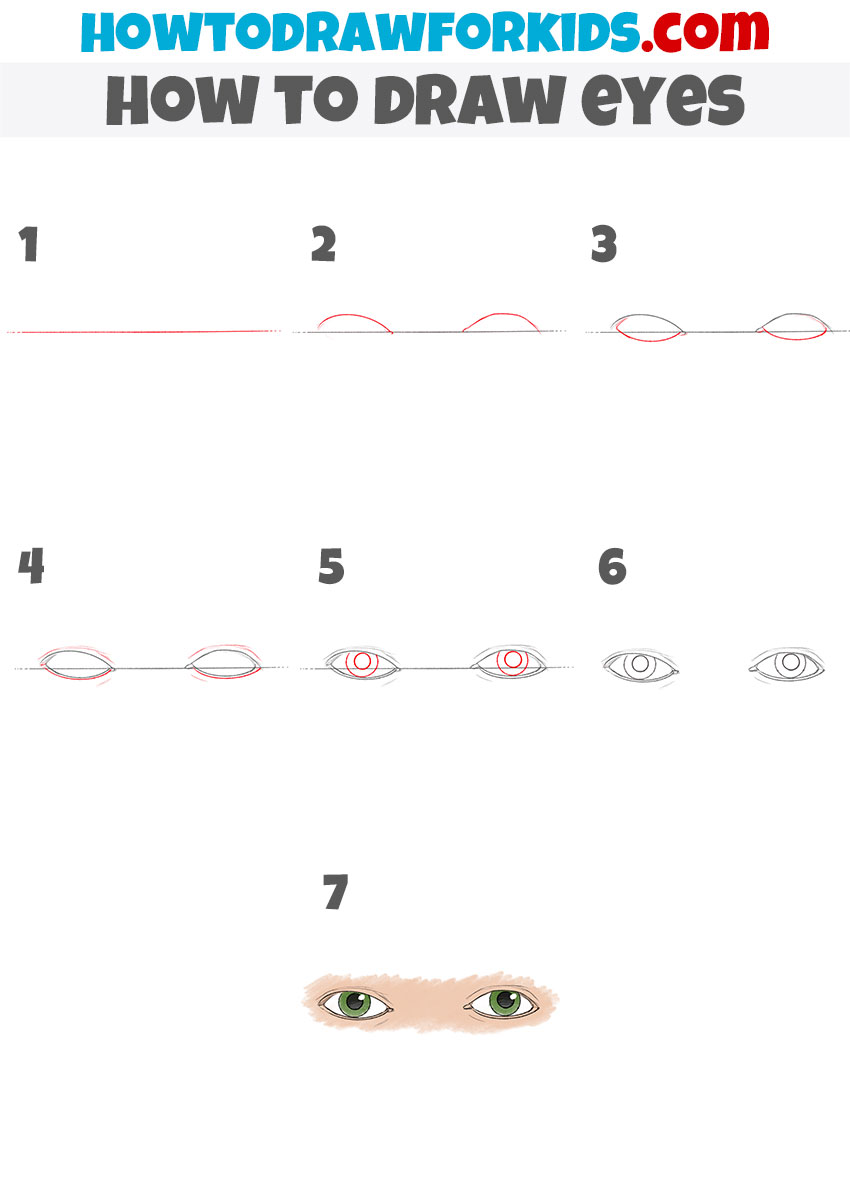
Drawing Eyes in Realistic Style
This style differs from the previous ones by focusing on a more realistic and subtle approach to drawing eyes. The eyes are elongated and narrow, with less emphasis on exaggerated features. The lines are finer and more detailed, giving a natural, almost serene expression.
To achieve this effect, start by drawing thin horizontal guidelines, then sketch the upper and lower eyelids with gentle, curved lines. Add small irises and pupils within the narrow eye shapes. The final step includes subtle shading and soft coloring to enhance realism. The overall effect is delicate and lifelike, with a focus on natural proportions.
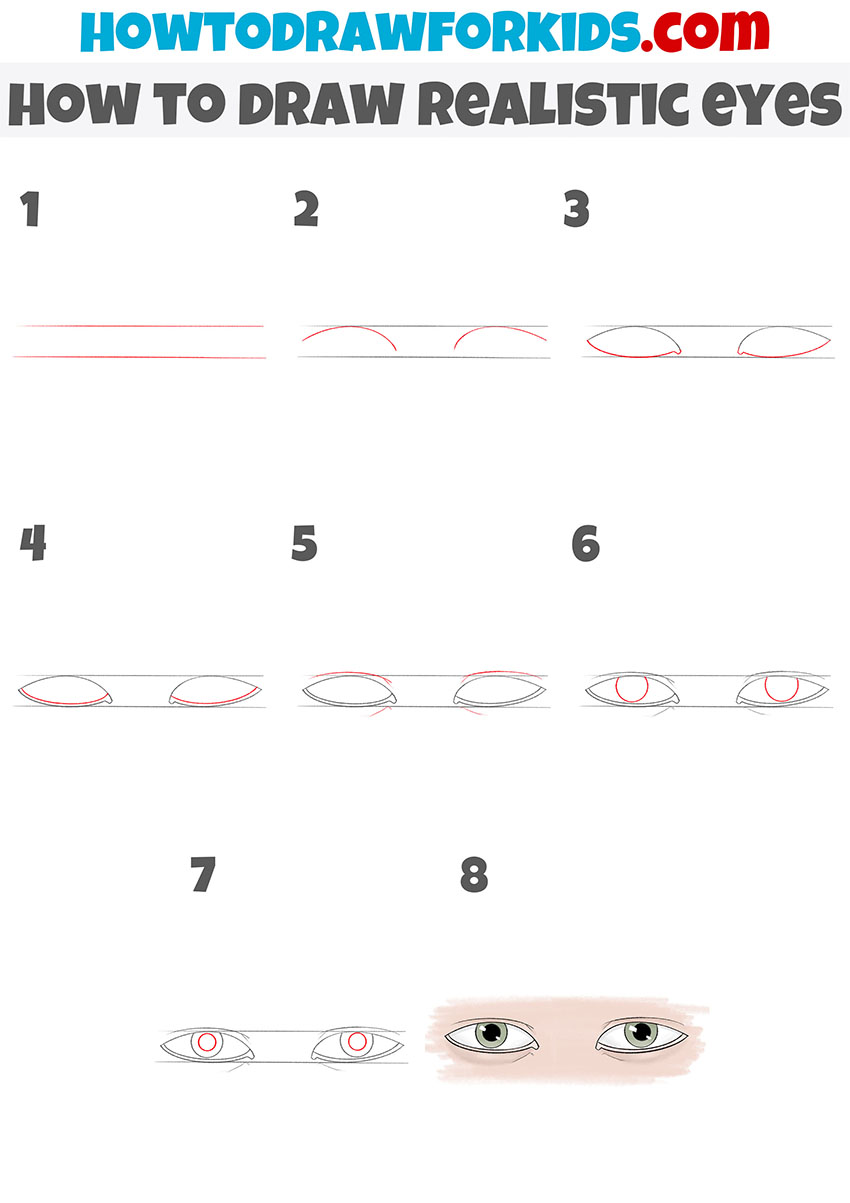
Adding Realistic Shadows and Highlights
This style of drawing eyes is even more focused on realism compared to the previous example. The eyes are elongated and almond-shaped, with an emphasis on natural curves and subtle details that create a lifelike appearance. Unlike the more stylized or simplified versions, this approach uses careful construction of the eyelids and precise placement of the irises and pupils to achieve a realistic effect.
To create this look, begin by drawing horizontal guidelines to establish the eye level. The eyelids are sketched with smooth, curved lines that form the almond shape of the eyes. The irises are positioned slightly below the center of each eye, adding to the natural look. Shading is used subtly to give depth, and the addition of skin tone around the eyes improves the lifelike effect.
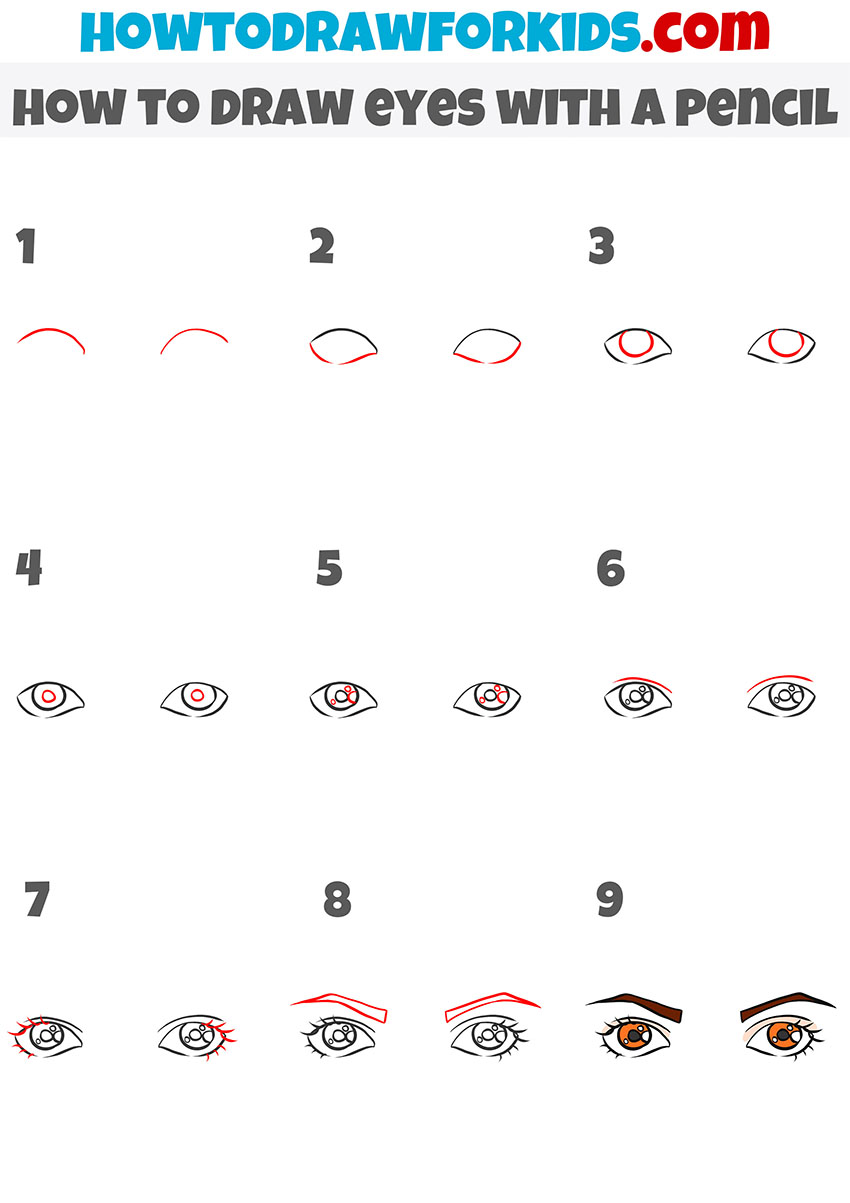
Alternative Method
Now let’s learn an alternative method for drawing eyes. In previous instructions, we incorporated additional steps and auxiliary lines to guide the drawing process. This time, let’s skip those preliminary steps and focus on depicting this part of the human face by adding detail after detail.
This style of drawing eyes is more stylized and illustrative compared to the previous, more realistic approach. It focuses on bold lines and clear shapes, making it well-suited for comic-style artwork. The eyes are drawn with defined, clean lines, emphasizing strong contrasts between the different parts of the eye, such as the eyelids, iris, and pupil.
The process begins by sketching the basic curved shapes for the eyelids, followed by adding the iris and pupil with clear, circular forms. Additional details like reflections in the eyes and eyelashes are added to make the drawing more expressive. The eyebrows are drawn with sharp, angular lines, contributing to the overall stylized effect. Coloring is applied with solid tones, particularly in the iris and the surrounding skin, to create a vivid and eye-catching appearance.
How to Draw Eyes: Conclusion
So, this was quite a long but very, very useful tutorial and I hope you enjoyed it.
What could you learn by reading the article from beginning to end?
First, of course, you learned how to draw and paint eyes. This is the most important thing this article was supposed to teach you.
In addition, the instructions and additional materials taught you to be more confident when you pick up a pencil and begin to create images of a person’s face on paper.
But this is just the beginning in the process of learning how to create portraits. The next, extremely important step is to learn how to draw a portrait using the knowledge from this article. To continue the learning process, go to the article on drawing a face.


Answer my text
not hard at all