How to Draw a Boy
Prepare your supplies for this simple tutorial where I’ll show you how to draw a boy with four different step by step methods.

How to Draw a Boy: Introduction
This simple and informative tutorial will teach one of the basic skills that every artist needs – drawing a boy. Additionally, this guide will demonstrate basic principles that can be applied to drawing people in general.
Since my website is dedicated to drawing for kids, the method is simplified to ensure that young artists can follow along easily and focus on the basic aspects of drawing a boy without becoming overwhelmed by unnecessary details.
The method prioritizes simplicity, using basic shapes and simplified proportions that are easy to understand. By following this process, children can build a foundation that they can apply to drawing more complex characters over time.
After completing the main, detailed tutorial, you will also find three additional methods for drawing a boy. These methods will illustrate a boy in different styles, offering variations that introduce young artists to multiple approaches while keeping the process simple.
Boy Drawing Tutorial
Materials
- Pencil
- Paper
- Eraser
- Coloring supplies
Time needed: 40 minutes
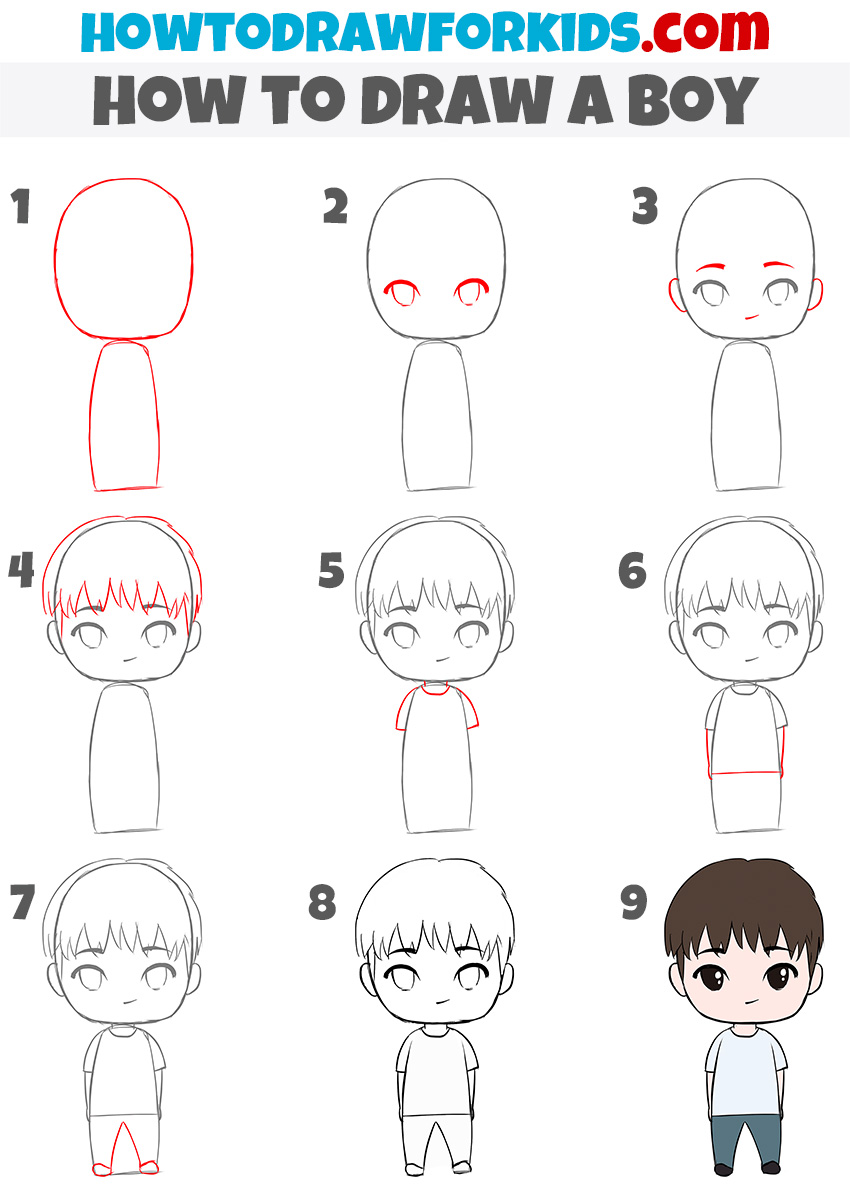
How to Draw a Boy
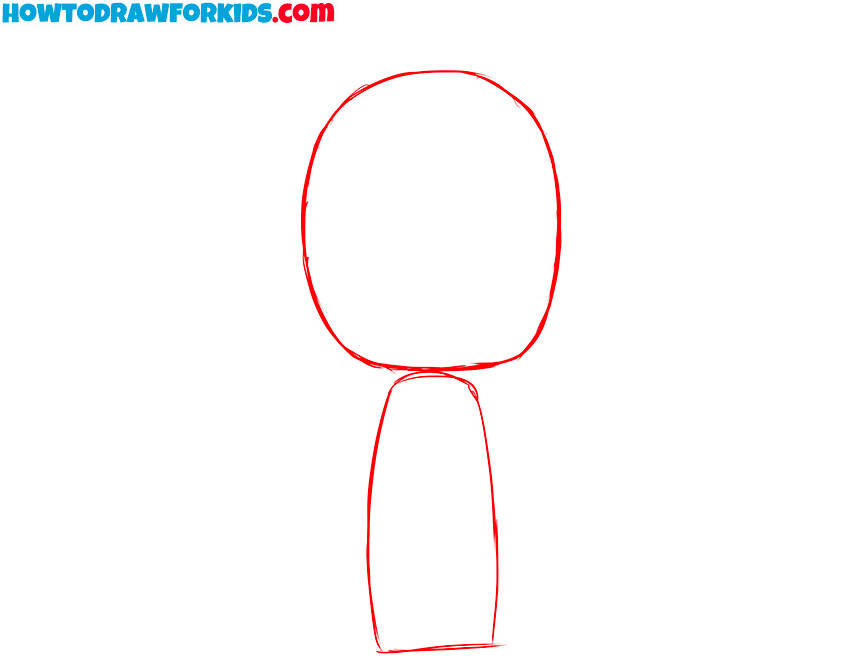
- Sketch the basic head and body shapes.
Start by lightly sketching an oval for the boy’s head. The oval should be a bit wider at the top and gently taper toward the bottom to give the head a natural shape. Beneath the head, draw a simple, elongated rectangle for the body.
- Draw the eyes of the boy.
Let’s start drawing the facial features of the boy. For the start, draw the eyes, placing them slightly below the center of the face. Draw two large, oval shapes spaced evenly apart for the pupils, leaving room for the nose and mouth below. Add slight curves above the eyes for the upper eyelids.

- Add the ears, eyebrow, and mouth.
In this step, continue detailing the face by adding more features. Draw small, curved ears on each side of the boy’s head, making sure they are aligned with the eyes. Then, sketch two simple, short curved lines above the eyes for the eyebrows. Next, draw a mouth with a small curved line, positioning it just below the eyes.

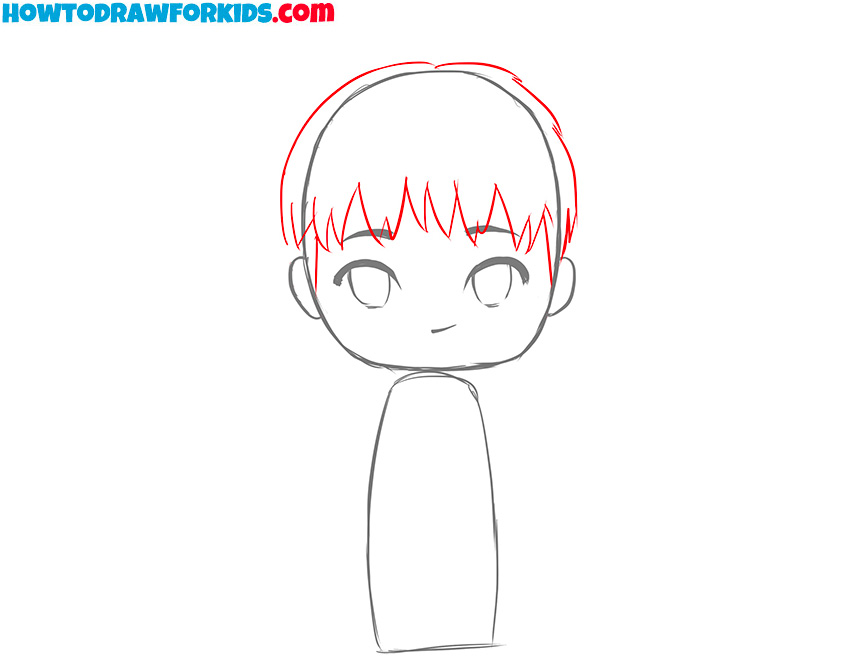
- Draw boy’s hair shape.
Start by outlining the fringe, using short, jagged lines to create the appearance of spiky bangs falling over the forehead. Continue drawing the hairline around the head, following the shape of the skull. Keep the hair relatively simple, but add some subtle curves and spikes to give it a more natural look.
- Outline the sleeves and neck.
With the head and facial features completed, focus on detailing the upper body. Begin by drawing the neckline of the shirt, a curved line just below the head to connect the torso. Next, sketch the short sleeves of the shirt by adding curved lines that extend outward from each shoulder.

- Draw the arms of the boy.
From the sleeves, extend two simple, almost straight lines down to outline each arm. The arms should be drawn close to the body. To make the arms look more natural, draw the hands with simple shapes. You can also add a small line to define the shirt’s hem at the bottom of the torso.
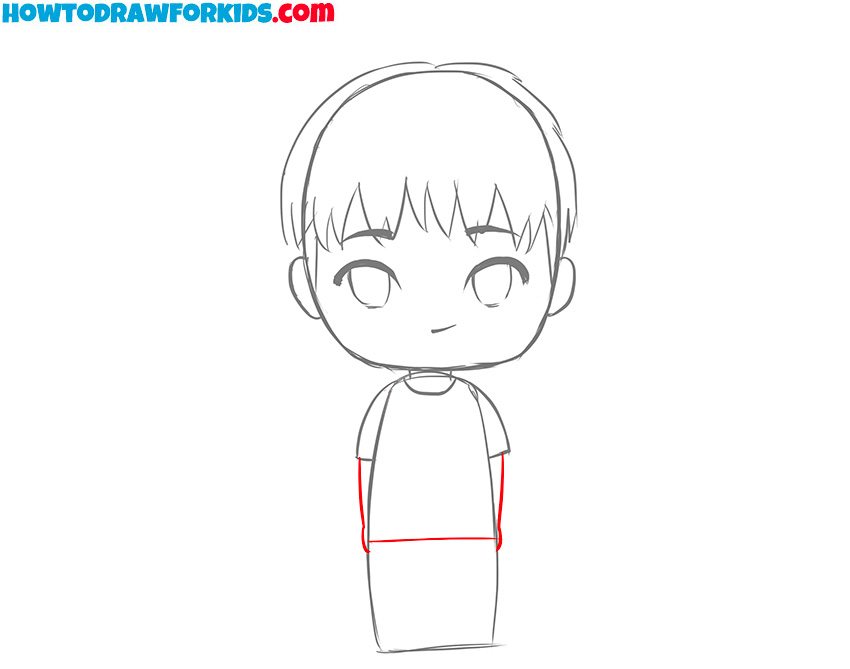
- Add the legs and shoes.
Now, complete the lower half of the body. Begin by drawing two slightly tapered lines coming down from the bottom of the torso to form the legs. At the bottom of each leg, draw small, rounded shapes to represent the shoes. The shoes can be simple and understated, without any complicated details.

- Refine and review the sketch.
In this step, take a moment to carefully review the boy drawing and refine any details. Look closely at the sketch, erasing any unnecessary guidelines and adding extra details, if it’s necessary. This step is about polishing the overall look of the boy by making sure everything is ready for the last step.

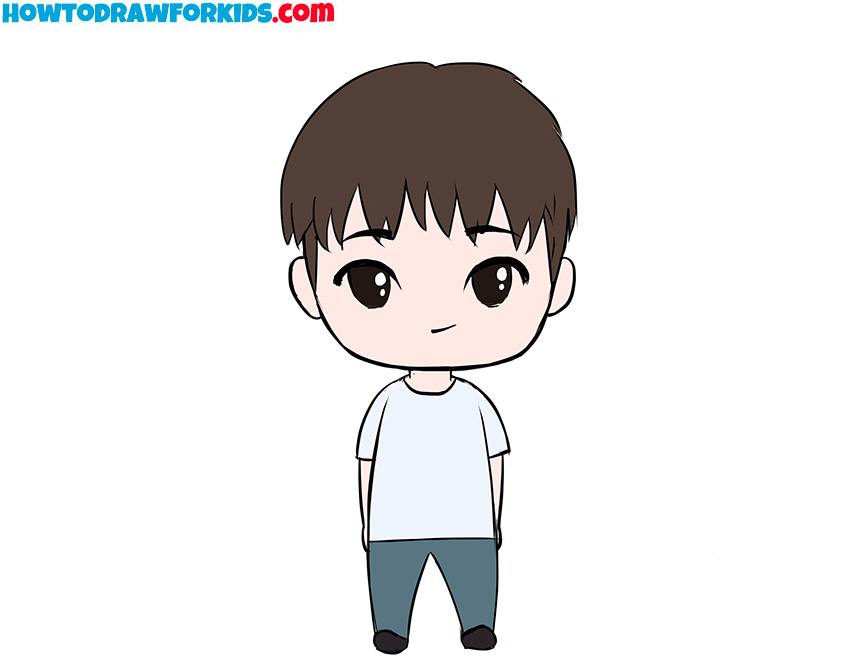
- Color the boy drawing.
Start by coloring the hair a dark brown, light yellow, or any other color you like. For the skin tone, you can also choose any color and tone, to to give the character a natural and realistic look. The shirt can be colored a neutral shade like light gray, while the pants can be a darker blue to add or black.
Additional Content
You can now download a free PDF file that complements the drawing tutorial. The PDF includes a detailed collage of the tutorial steps, a coloring page, a tracing worksheet, and a grid drawing worksheet. These materials are created to help young artists practice and refine their skills at their own pace.
Simply download, print, and use them alongside your drawing supplies to keep learning, even offline. This additional resource makes it easier to review the tutorial and continue improving your drawing techniques with different exercises provided in the file.
How to Draw a Boy: Alternative Techniques
Especially for you, I’ve developed multiple alternative techniques to depict a boy in the simplified style. These methods provide additional practice to help improve drawing skills. Each additional drawing tutorial offers a different way to represent the character, ensuring continued development in drawing techniques.
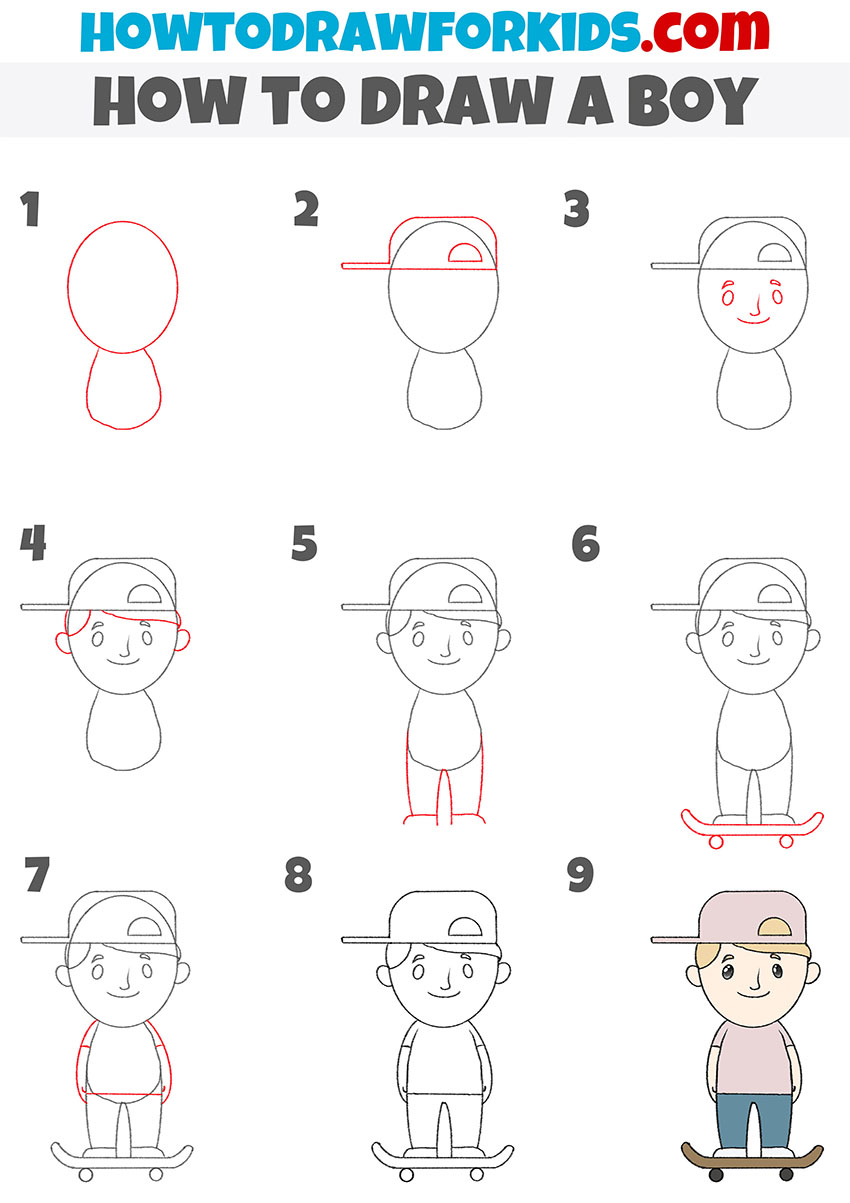
How to Draw a Boy on a Skateboard
To draw a boy on a skateboard, start by drawing an oval for the boy’s head and add a small curved shape below for the body. Next, draw the baseball cap, starting with the brim extending out from the head and adding the top of the hat with a small semicircle detail.
Add simple facial features, including round eyes, eyebrows, a small nose, and a smile. Draw ears on the sides of the head and add a section of hair peeking out from under the cap. Sketch the legs and feet. Below the feet, draw a skateboard, including its curved deck and small wheels.
Then, draw the arms and hands hanging naturally by the sides. Add details to the clothes, such as the sleeves and bottom hem of the shirt. Finally, refine the lines and color the drawing, giving the boy light-colored clothes and a skateboard for a completed look.
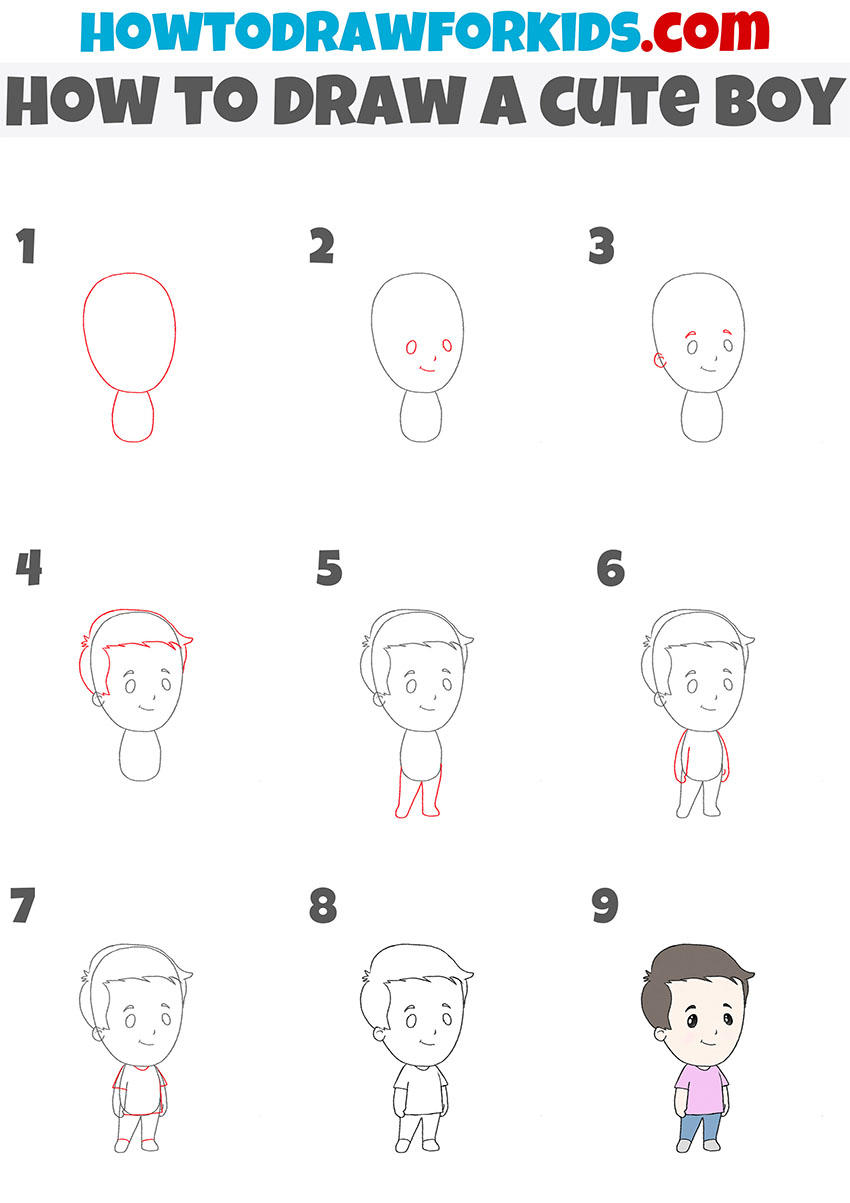
Cute Boy Drawing Tutorial
Start by drawing a boy an oval for the head and a small, curved shape below it for the body. Then, sketch the facial features by adding two small circles for the eyes, a tiny curved line for the nose, and a simple smile below. Next, draw the ears on both sides of the head, aligned with the eyes.
Add the hairstyle, drawing the outline of the hair around the head with some small details to indicate the bangs. Move on to the body by sketching the legs, followed by the arms, drawn hanging naturally at the sides. Add simple details for the clothes, including short sleeves and shoes.
Finally, check the boy drawing for any corrections, refine the lines, and add color to the drawing, giving the boy a light-colored shirt, pants, and hair. To make your sketch look a bit more realistic, you can draw shadows or some additional details.
Little Boy Drawing Tutorial
Begin by drawing an oval for the boy’s head, and underneath, add a small rounded shape for the body. Sketch two small circles for the eyes and place a curved line below for the nose, followed by a simple smile. Add small ears on either side of the head, then draw the eyebrows above the eyes.
Continue by sketching the boy’s hair with short, curved lines around the head. Draw the legs, making sure they are in proportion with the body. Add simple shoes at the bottom. Next, draw the arms hanging down by the sides, followed by short sleeves and the outline of a simple shirt.
Review your drawing and make adjustments as needed. Refine any details like the hair, facial features, and clothing lines. Finish by coloring the boy’s hair, clothes, and skin tone, keeping the colors light and simple for a completed drawing.

Conclusion
You have now completed the tutorial on how to draw a little boy. You learned how to create the basic head and body shapes, add facial features, and include details like hair and clothing.
As mentioned above, the knowledge gained in this lesson will be very useful for you. Try drawing the boy again, but this time, add different features and details to reinforce what you’ve learned. To build on these skills, visit my other lessons, such as the one on how to draw a person, for additional methods and tips.
If you found this tutorial helpful, consider sharing it with others. You can also subscribe to social media to stay updated with new lessons. Feel free to leave comments with any questions, suggestions, or feedback you have regarding this or other tutorials.