How to Draw a Helicopter
Hey there, future pilots and sketch artists! I’m excited to offer you a streamlined way to learn how to draw a helicopter, cutting through the complexity and getting straight to the joy of drawing. I designed this lesson to transform what may seem like a daunting task into a series of simple, achievable steps.

How to Draw a Helicopter: Basic Information
Greetings, aspiring artists and aviation enthusiasts! I’m thrilled to guide you through the exhilarating process of how to draw a helicopter. Crafted for ease and enjoyment, this tutorial breaks down the helicopter’s complex machinery into simple, manageable shapes that anyone can tackle.
Observing this helicopter, you’ll notice the careful attention to proportion and balance, essential for capturing the aircraft’s sleek design. Each step is designed to add another layer of detail, gradually building up from a basic outline to the intricate cockpit and rotor blades. My method ensures you won’t get lost in the technicalities, keeping the process straightforward and fun.
By the final stroke, you’ll see how we draw a helicopter that’s both accurate in structure and pleasing to the eye. With these steps, I aim to demystify the process, empowering you to sketch this symbol of human ingenuity with confidence and flair. Let’s take this creative flight together and see where our pencils land!
Helicopter Drawing Tutorial
Materials
- Pencil
- Paper
- Eraser
- Coloring supplies
Time needed: 20 minutes
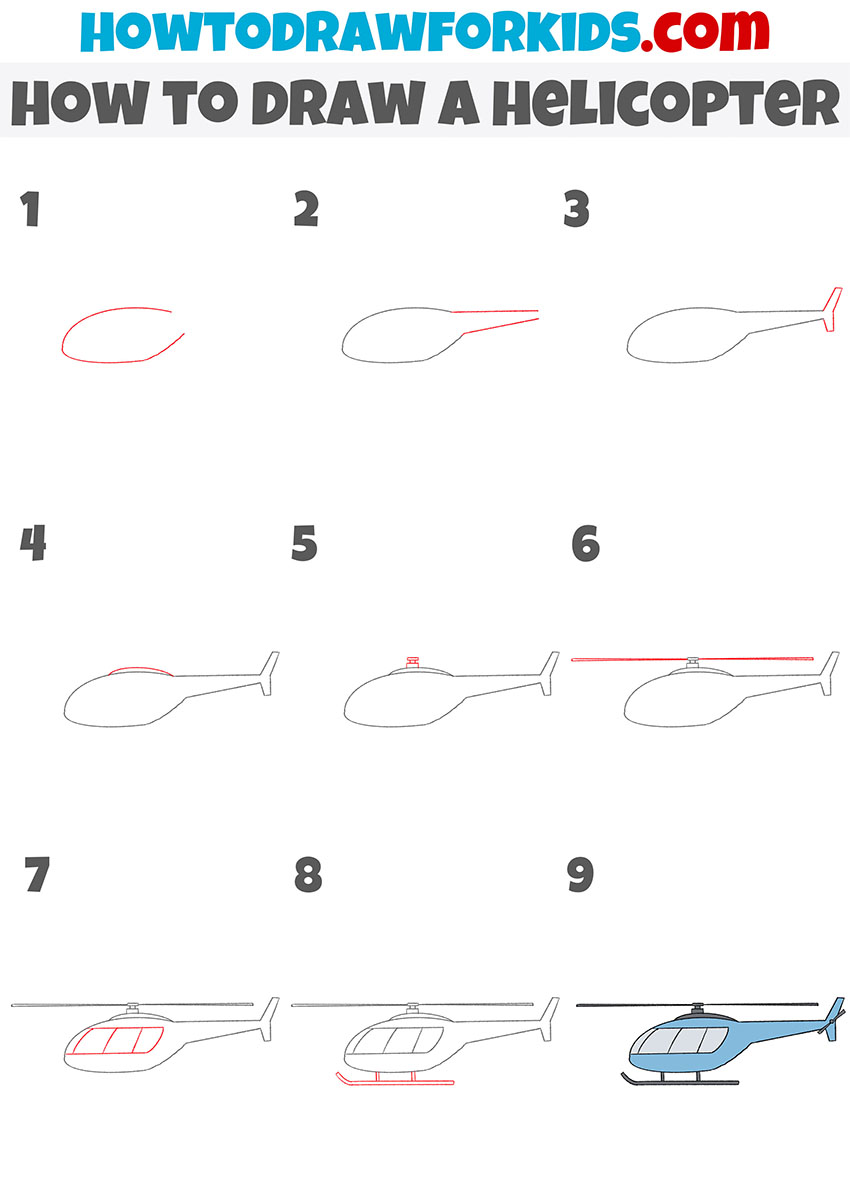
How to Draw a Helicopter
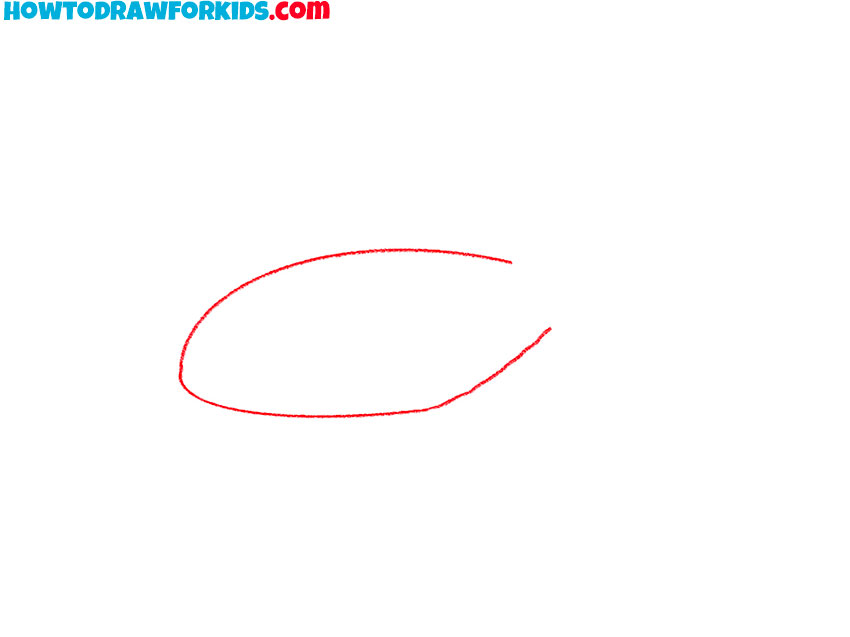
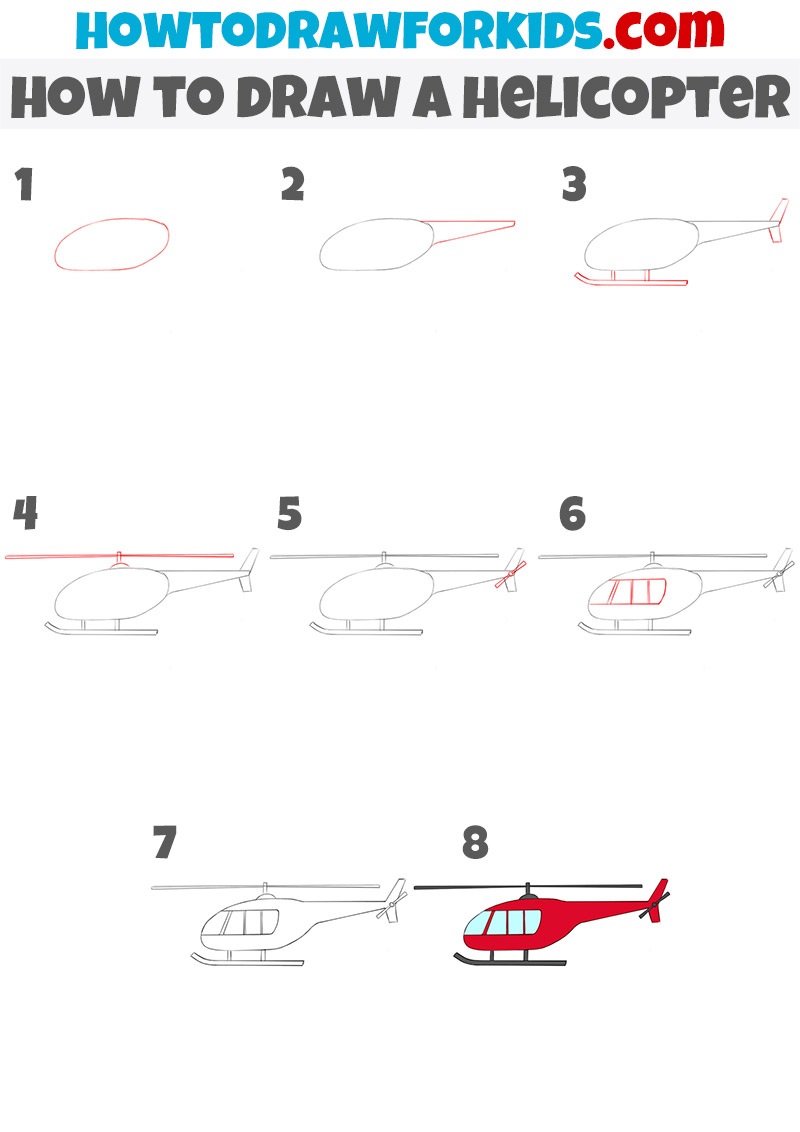
- Draw the outline of the main part of the helicopter.
To complete this simple step you have to draw one long curved line.
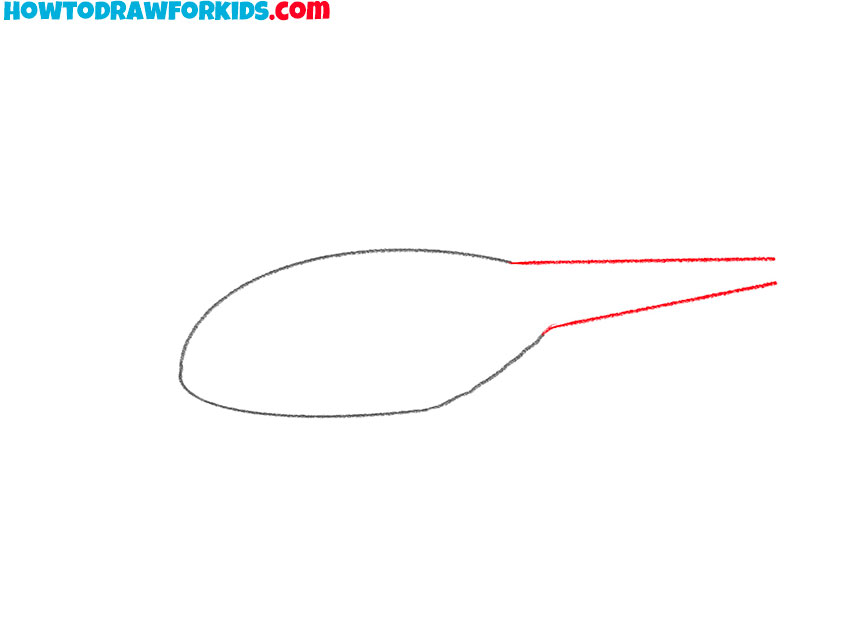
- Add an outline of the back of the helicopter.
From the two ends of the previously drawn curved lines draw two straight lines.
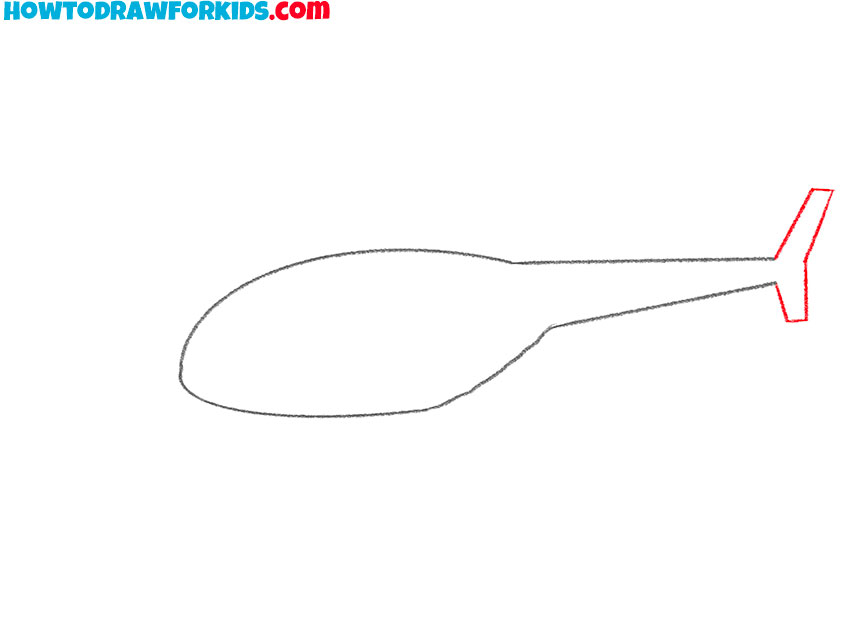
- Picture the helicopter’s tail.
To draw this detail, depict two short straight horizontal lines, and several straight oblique lines.
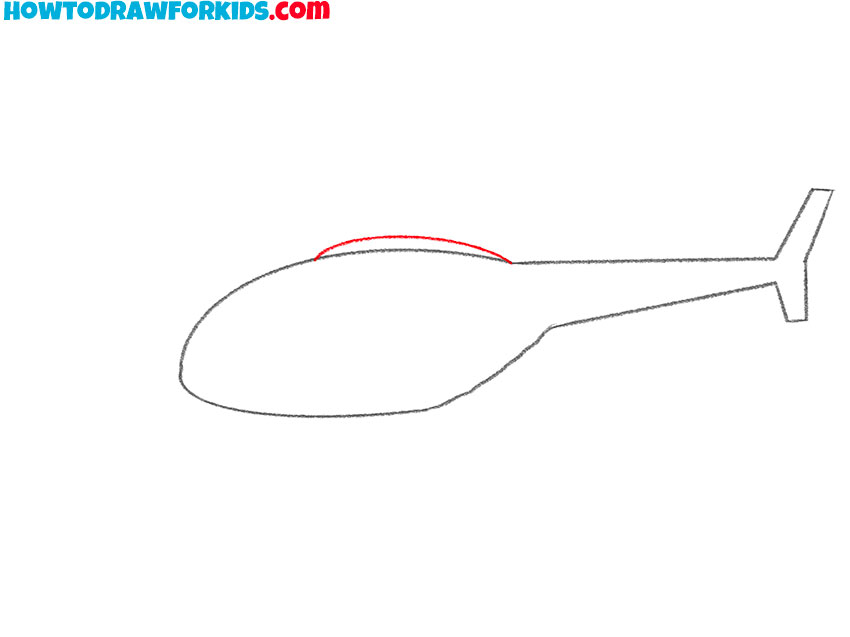
- Add an element on top of the helicopter.
Above the main part of the helicopter depict a small curved line.
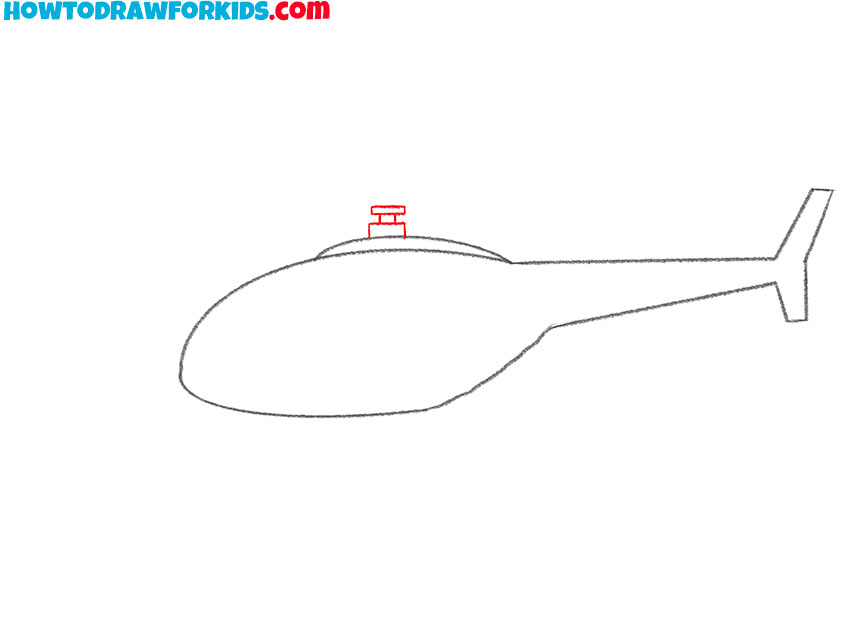
- Draw the main rotor of the helicopter.
Above the curved line add two small rectangles and one rectangle without a bottom base.
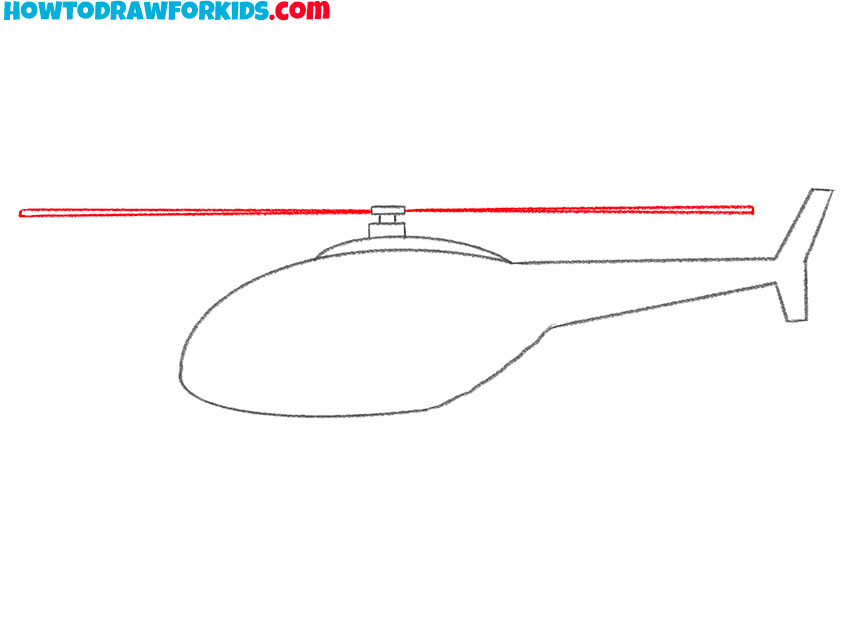
- Picture the helicopter blades.
From the previously drawn detail draw long straight lines to the sides and connect their ends.
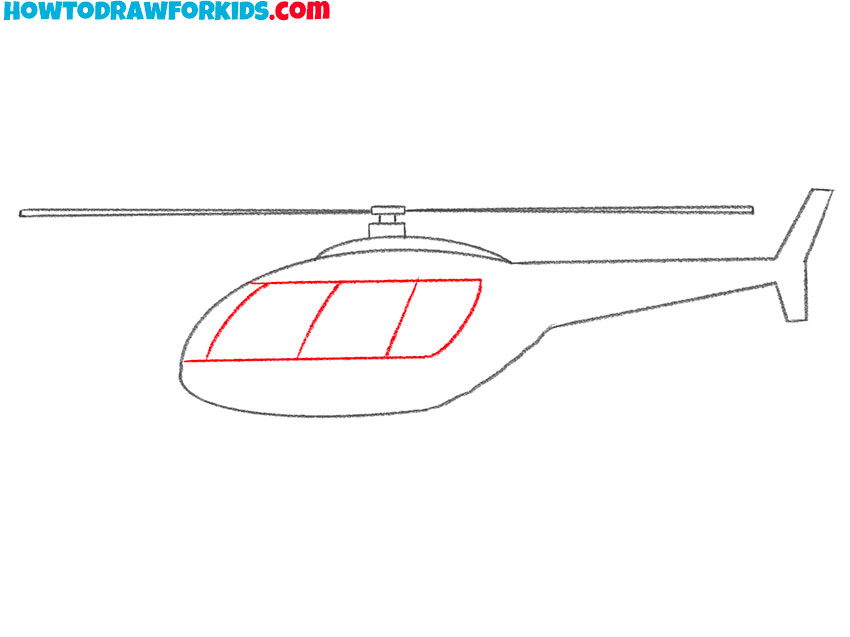
- Draw the windows of the helicopter.
Outline two straight horizontal parallel lines and add some curved lines between them.
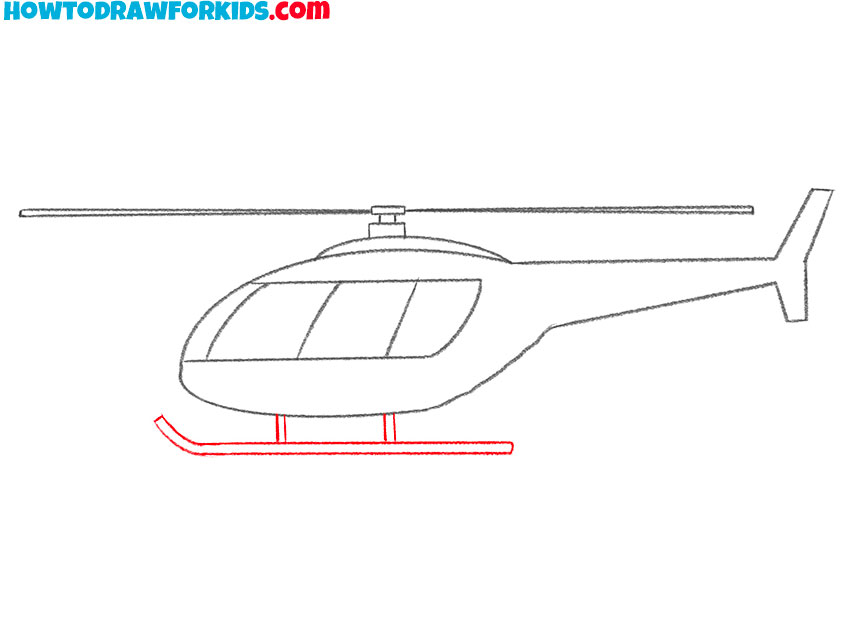
- Depict the landing skids.
Under the helicopter add straight vertical and horizontal lines, and also curved lines.
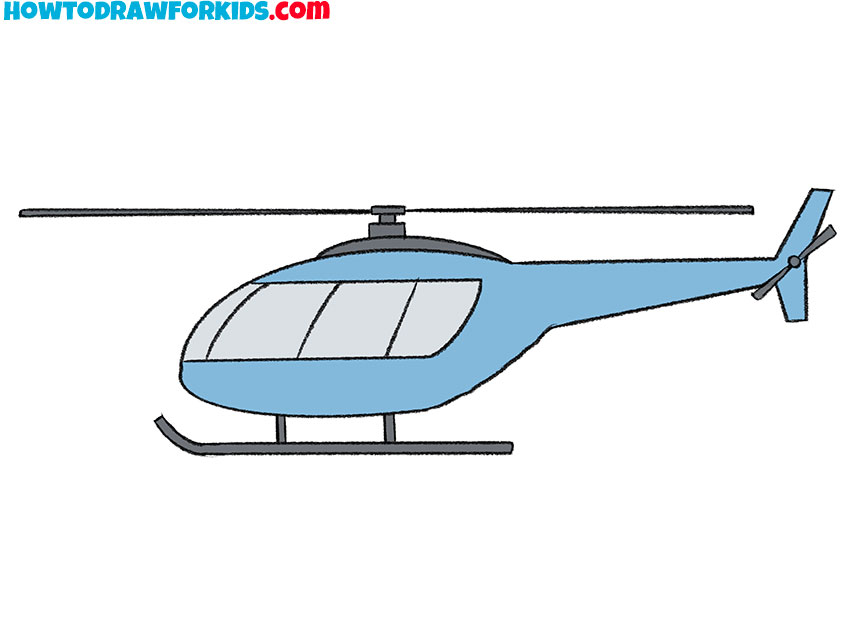
- Color the drawing.
To color this helicopter, use blue and shades of gray.
Additional Content
To supplement your artistic practice, I’ve prepared a free PDF file that serves as a companion to this lesson. It’s a concise guide available for download, ready for those times when you’re offline. The content within is designed to refine your drawing techniques following the basics you’ve already learned.
The PDF is filled with exercises that build on the core principles of drawing helicopters, pushing your skills further. These activities are crafted to reinforce what you’ve learned and encourage precision and attention to detail in your art.
This PDF stands as a resource to aid your ongoing practice, offering structured exercises that inspire. Use it as a stepping stone to advance your helicopter drawings, turning foundational knowledge into intricate and accurate artistry.
Alternative Drawing Methods
In addition to the primary lesson, I’ve devised several alternative drawing techniques for helicopters to offer you ample practice and to sharpen your artistic abilities. These varied approaches are tailored to help you explore different perspectives and styles, enhancing your versatility as an artist.
Using these techniques will diversify your practice and expand your artistic repertoire. You’ll find that with each method, your ability to capture the essence and function of helicopters in your drawings becomes more intuitive and refined.
How to Draw a Helicopter: More Practice
This alternate drawing method, although yielding a helicopter that mirrors the one in the first approach, introduces a distinct technique to our drawing practice. It reshapes the process, focusing on streamlined movements and the relationships between parts of the helicopter.
The essence of this technique lies in simplicity and a change of perception. By deconstructing the helicopter into more straightforward segments, it becomes accessible for young artists. It’s a shift that emphasizes ease without compromising the integrity of the subject.
Through this new lens, the familiar contours of a helicopter gain a different dimension. The drawing evolves, not through complexity, but through a clearer, more direct path of creation, equipping you with alternative strategies to express the same subject with confidence and ease.
Now that you’ve mastered drawing this sleek helicopter, it’s time to add a splash of color to your creation. Revisit the design and envision it anew; the sky’s the canvas, and your palette is limitless. Experiment with hues that reflect different times of day, seasons, or even your mood.
Consider the purpose of each helicopter as you choose its colors. Rescue helicopters in vivid, alerting colors, private choppers in sophisticated shades, or playful, bright tones for a festival in the sky. Each color brings a new layer of depth and story to your artwork, transforming the simple outlines into vibrant masterpieces.

Helicopter Drawing for Kindergarten
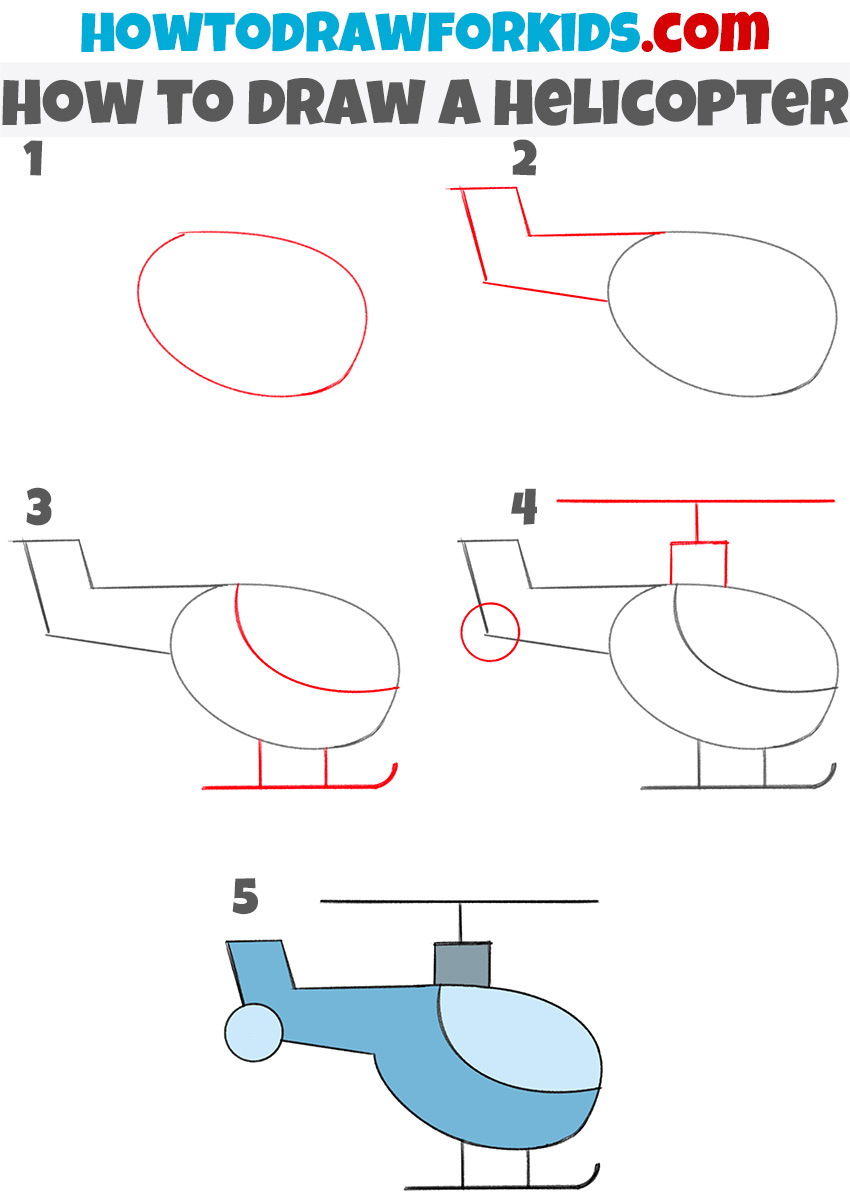
I’m excited to introduce a fresh alternative method that, in just five steps, will teach you to sketch a helicopter. Starting with a simple oval, this method to draw a helicopter is perfect for beginners and kindergarteners. The oval forms the primary body of the helicopter, a foundational step that’s easy and fun.
In the next phase, we add the tail and rotor to our basic shape. The key here is to encourage young artists to understand the helicopter’s parts without feeling overwhelmed. Each line and curve introduces a new aspect of the helicopter, blending simplicity with a touch of technicality.
By the final step, the basic drawing has transformed into a recognizable helicopter, complete with landing skids and rotor blades. It’s a method that shows how a complex vehicle can be broken down into manageable, straightforward sketches.
Sky-High Sketches: Navigating Your Helicopter Drawing Questions
Drawing, after all, is an evolving process that blooms with time and patience. To assist you, I’ve compiled a selection of frequently asked questions. These aim to address common curiosities and challenges you may encounter, ensuring your path to becoming a proficient artist is as clear and enjoyable as possible.
- How can I make my helicopter look more realistic? Study pictures of helicopters for reference and pay attention to details like reflections and shadows.
- What if my proportions look off? Use reference lines to measure and compare different parts of the helicopter during the sketching phase.
- How do I draw the rotor blades in motion? Slightly curved lines or blurred edges can create the effect of moving blades.
- Is there a trick to drawing straight lines for the rotor blades? A ruler or a straight edge can help, but practice freehand for a more natural look.
And there you have it – answers to some of the most pertinent questions that can arise while learning to draw helicopters. Keep these FAQs by your side as you progress, and may your artistic process be as uplifting and adventurous as the helicopters you bring to life on paper.
Conclusion
With the final stroke of our helicopter drawing complete, I warmly encourage you to explore the array of lessons on my website. Whether you wish to capture the energy of Goku or the sly charm of a fox, there’s a tutorial waiting to guide your hand.
I’d love for you to stay connected with me through social media for the latest updates and creative inspirations. Your feedback and suggestions are the wind beneath the wings of future tutorials, so please leave your thoughts and requests beneath the lesson, propelling us forward to new artistic adventures.


i like this helicopter