How to Draw an Aerostat
This lesson on how to draw an aerostat will teach you how to quickly and easily draw this flying machine using two step-by-step methods.
How to Draw an Aerostat: Introduction
In this lesson, I will show you how to draw an aerostat. This is an aircraft that is lighter than air. It has the shape of a ball and is filled with hot air inside. Thanks to this, it can easily be lifted up. Aerostats come in different types and designs, but this lesson presents the basic shape of a balloon, which will not be difficult to repeat.
As you can see, the upper part of the aerostat is large, round in shape, and at the bottom, there is a small compartment for the crew. It will not be difficult to draw a balloon, the main thing is to make an even rounded line of the balloon. I’m sure you can handle it.
Among other things, this lesson teaches young readers how to create symmetrical and rounded objects, one of the most important skills for artists that requires consistent practice. And to strengthen the resulting buildings, I added a bonus lesson on drawing a hot air balloon at the bottom of the page.
Before drawing a hot air balloon, you can try learning how to draw a perfect circle using my tutorial. This will help you feel more confident when drawing a balloon. But if you are ready to draw a hot air balloon, then grab your art supplies and let’s get started drawing.
Aerostat Drawing Tutorial
Materials
- Pencil
- Paper
- Eraser
- Coloring supplies
Time needed: 30 minutes
How to Draw an Aerostat
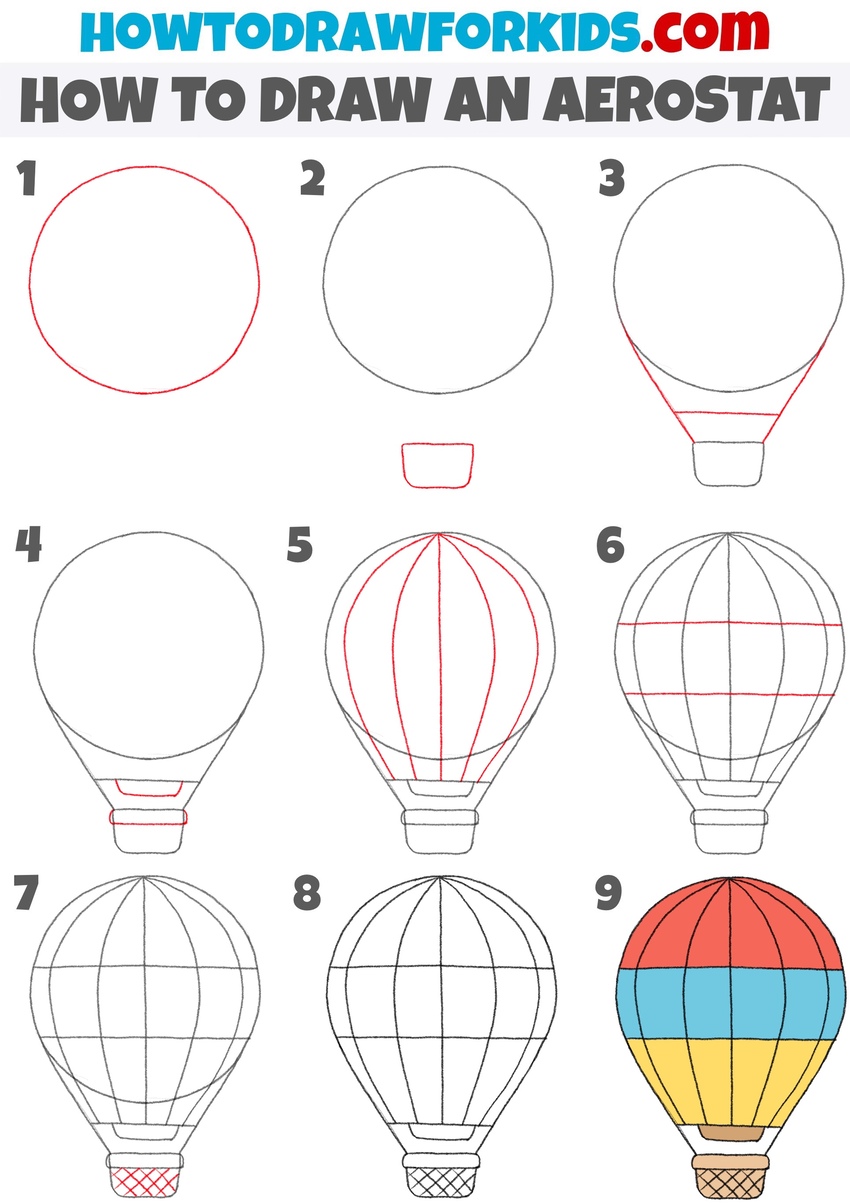
- Sketch the balloon of the aerostat.
Start drawing the aerostat by stretching a large, rounded circle in the upper part of your paper. This circle will form the main part of the aerostat’s balloon, so aim to make it as symmetrical as possible. A well-proportioned circle will help the aerostat look more natural.

- Outline the basket of the vehicle.
Below the balloon, draw a small trapezoid shape that will serve as the aerostat’s basket. This shape should be wider at the top and narrower at the bottom, resembling the general structure of a basket. This part should be well-centered under the balloon.

- Connect the balloon to the basket.
Now, add two diagonal lines that connect the bottom of the balloon to the top corners of the basket. These lines represent the ropes or cords that attach the balloon to the basket. Keep these lines straight. Next, draw the bottom edge of the balloon as a horizontal line.

- Detail the balloon and basket.
To make your aerostat drawing appear more realistic and three-dimensional, draw a small rectangular shape at the bottom of the balloon. This shape represents the mechanisms of the aerostat. Then draw the top edge of the basket with a few simple lines.

- Create the balloon’s panels.
Add several vertical curved lines along the surface of the balloon, starting from the top center and extending down to the bottom edges. These lines represent the balloon’s fabric panels, which are sewn together to form the shape.

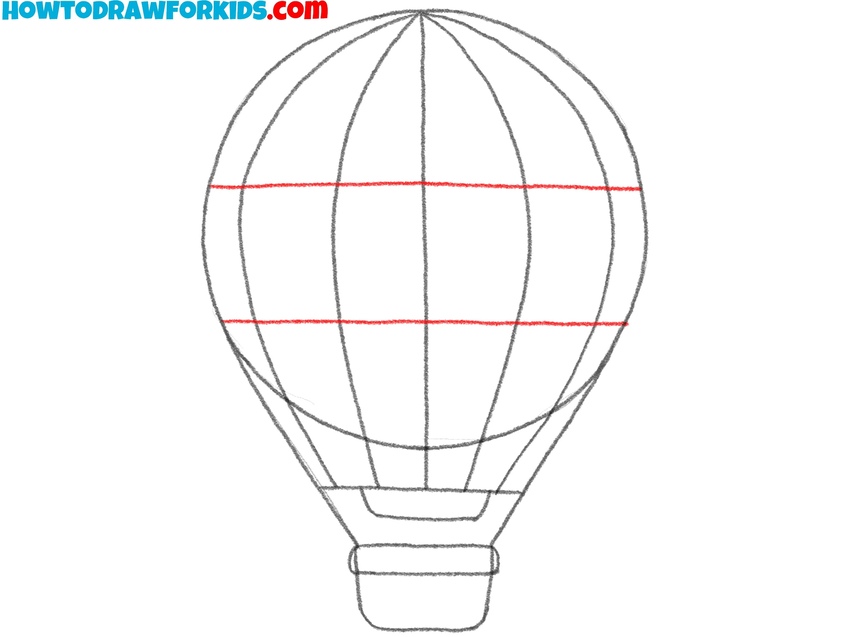
- Add horizontal lines to the balloon.
As I wrote above, balloons come in many different shapes and types, and generally their most noticeable differences are in the appearance of their balloons. To give your balloon a more unique look, draw two horizontal lines in the center as in my. Later, you will color this part in a separate color.
- Complete the basket of the aerostat.
To give the basket a woven appearance, add a crisscross pattern to its lower part. Draw diagonal lines crossing each other to form small diamond shapes within the basket area. This pattern mimics a wicker or woven texture, which is commonly seen in hot air balloon baskets.

- Refine the aerostat sketch.
Go over your entire aerostat drawing, carefully refining the lines to ensure that all parts of the sketch look smooth and polished. This step ensures that the drawing of an aerostat has a finished, complete look, ready for coloring.

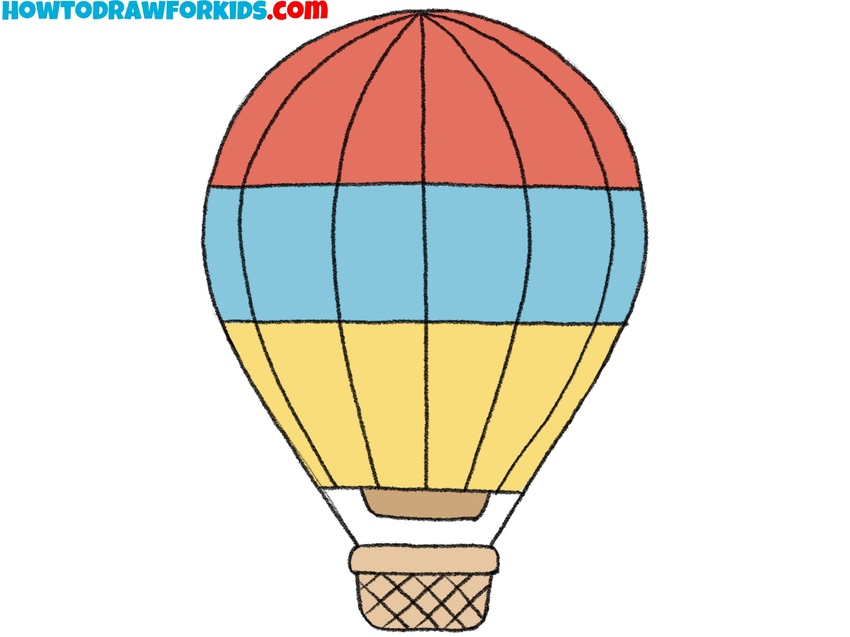
- Color the aerostat.
You can choose any colors for the balloon, such as red, blue, and yellow, to color the segmented panels. For the basket, shades of brown will create a realistic, natural woven appearance. Additionally, you can draw fire at the bottom of the balloon to show the vehicle in flight.

How to Draw an Aerostat for Preschoolers
So, the basic lesson of drawing a hot air balloon is complete, and if it seemed too difficult for you, then it’s time to try to depict this vehicle in a simpler style.
To draw an aerostat in this simplified style, begin by sketching a large, rounded circle for the balloon. This circle will form the main structure of the aerostat, so aim to keep it symmetrical and smooth. Below this, add two vertical lines extending from the bottom of the balloon, then draw a rectangular shape at the end to create the basket.
Once the main shapes are outlined, add two horizontal lines to separate the from the balloon. Go over the drawing to clean up the lines and ensure a well-defined outline. Finally, color the balloon with a bright color, such as blue, and shade the basket with contrasting colors.

Conclusion
What are your thoughts on my hot air balloon drawing lesson? Did you find it helpful? Do you have any suggestions or feedback? Please share your thoughts in the comments.
Be sure to check out the main hot air balloon drawing tutorial on my website to learn in detail how to draw this type of air transportation. Also, I strongly advise you to continue your drawing practices and try your hand at drawing an airplane, helicopter and other flying vehicles.
Additionally, consider subscribing to my social media channels, including Pinterest and YouTube, to receive updates and video versions of my tutorials.