How to Draw an Owl
Let’s learn how to draw an owl with just a few simple shapes and lines, and depict the one of nature’s most beloved avians.

How to Draw an Owl: Introduction
In this lesson, we will examine the process of drawing an owl in detail. We will not only focus on how to draw it but also consider this character from various angles and in different styles, as this lesson includes six different methods.
Each method introduces a distinct style and approach. First, we will review a basic method that demonstrates how to draw an owl in a simple yet realistic style. After that, we will look at more cartoonish, realistic, and stylized versions.
Despite the variations in styles and details, all the owls share a set of fundamental features that make them recognizable. These include the rounded outline of the body, a round head with a wide neck, large circular eyes, and distinctive shapes of the beak and other parts of the body.
This lesson, along with additional exercises, will guide you step by step in drawing an owl with the specific appearance you want.
Owl Drawing Tutorial
Time needed: 40 minutes
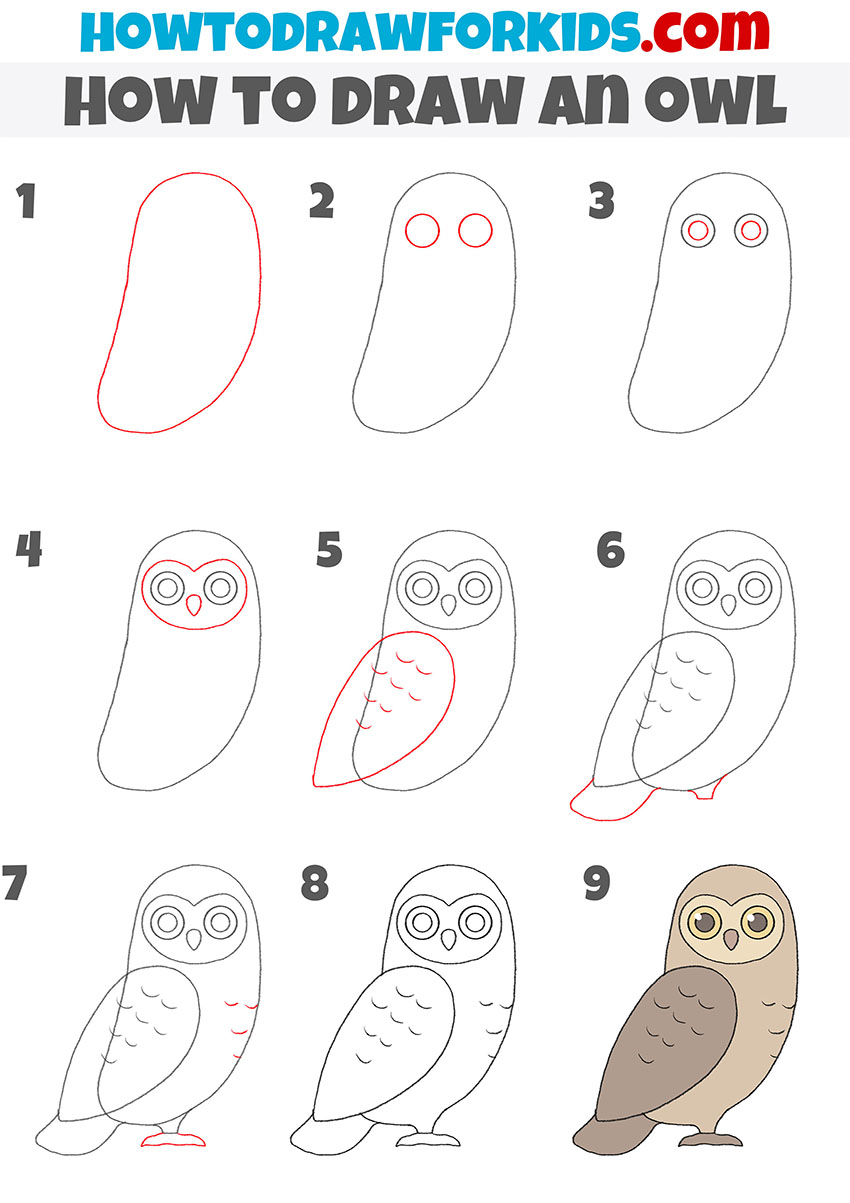
How to Draw an Owl
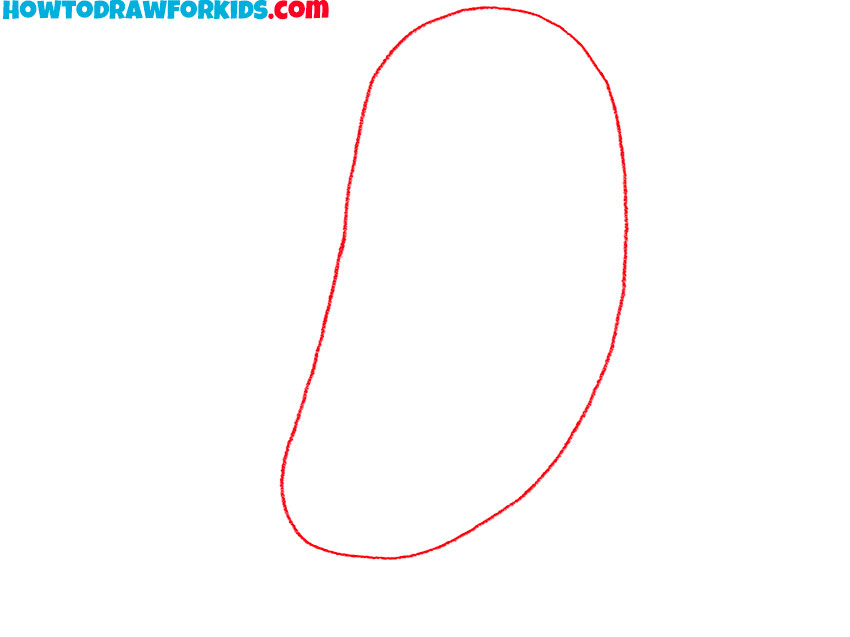
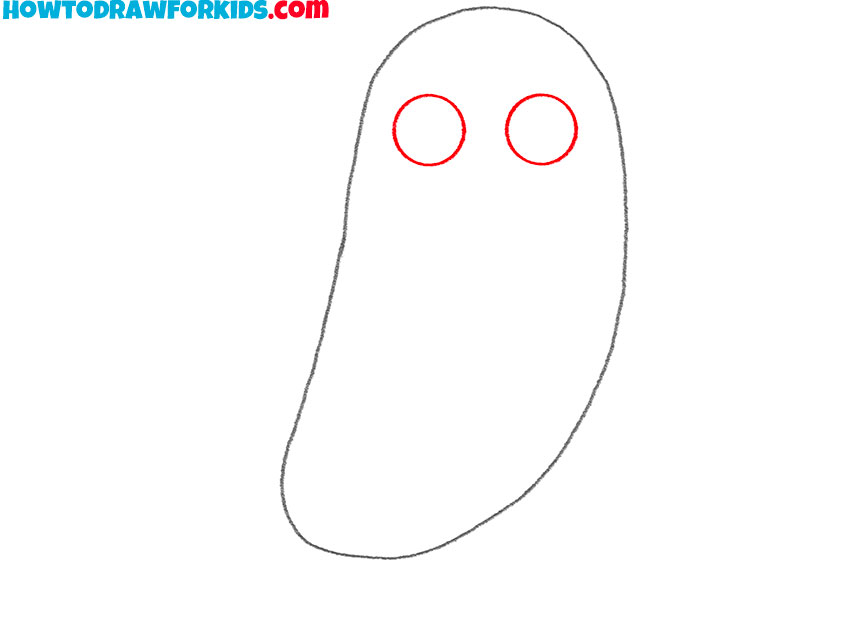
- Sketch the shape of the body.
Start drawing an owl by creating the general shape of the bird’s body. This simple shape is the base for the bird’s head and torso. Make one side convex to represent the chest, and the other side concave for the back. Keep your lines light so they can be refined later.
- Outline the bird’s eyes.
Inside the top portion of the outline, draw two large, circular shapes for the owl’s eyes, a key feature in drawing an owl. Make the owl’s eyes perfectly circular and ensure they are the same size. Position them symmetrically, leaving some space between the eyes for the owl’s beak.
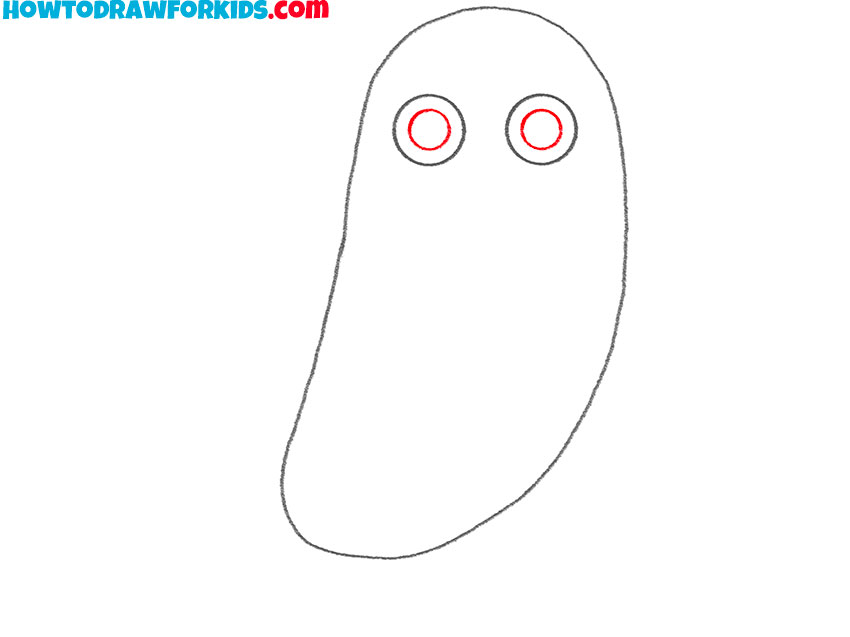
- Add the pupils inside the eyes.
Inside the large circles drawn in the previous step, add two smaller circles to represent the pupils. These circles should be positioned toward the center of each eye but can be slightly adjusted to give the owl a particular expression.
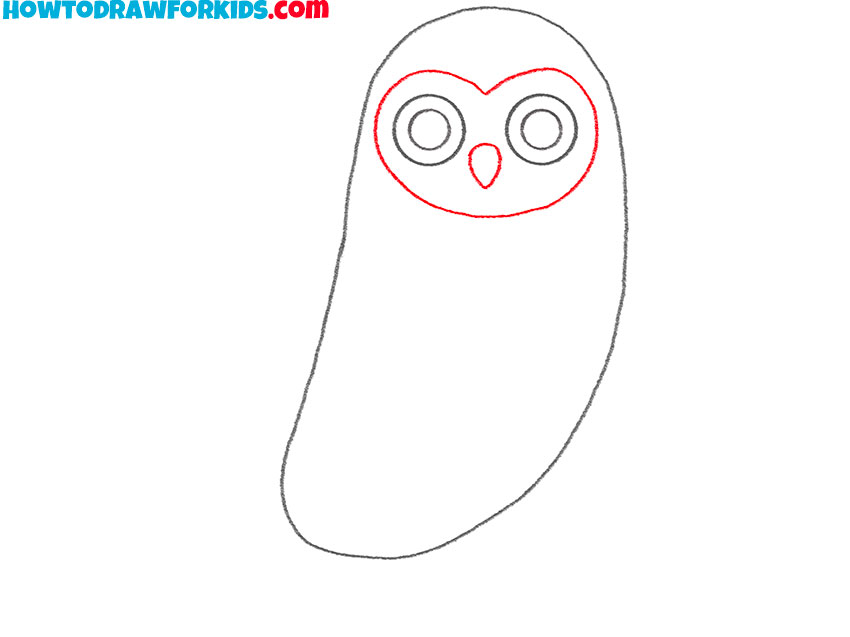
- Outline the face and beak.
Using curved lines, draw an outline around the eyes to define the face of the owl. This pattern is typical of an owl’s facial features and adds to its uniqueness. Inside this defined face area, add a small triangular shape below the eyes for the beak.
- Add the wing and feathers.
On one side of the owl’s body, draw a long, curved oval shape extending from just below the face to the lower part of the body. This line will outline the owl’s wing. Inside the wing, add a few short, curved lines to indicate the feathers.

- Sketch the bird’s tail and leg.
Draw a small, triangular shape at the bottom of the body to represent the owl’s tail. Next, sketch the top portion of the leg by adding a curved line near the base of the body, just above where the feet will be. This detail helps connect the body to the foot.
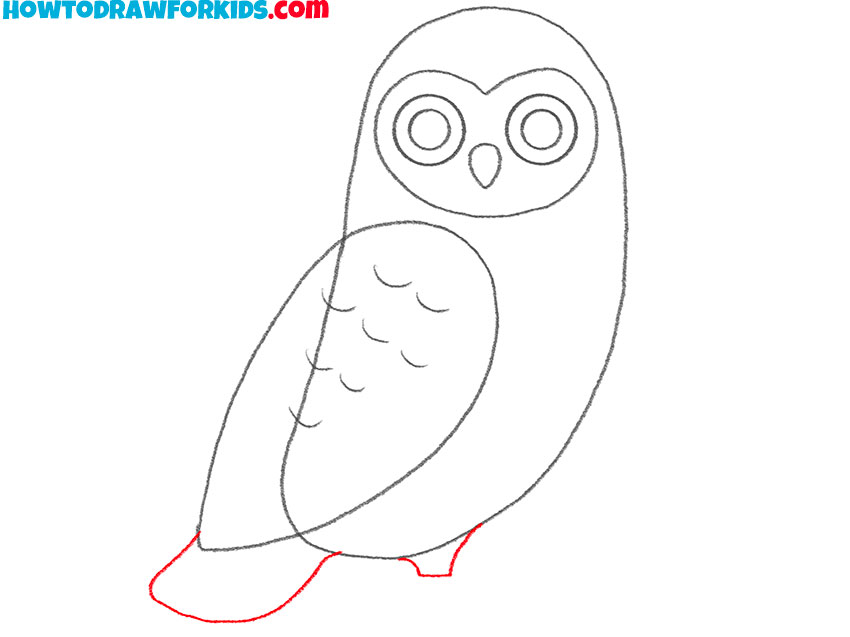
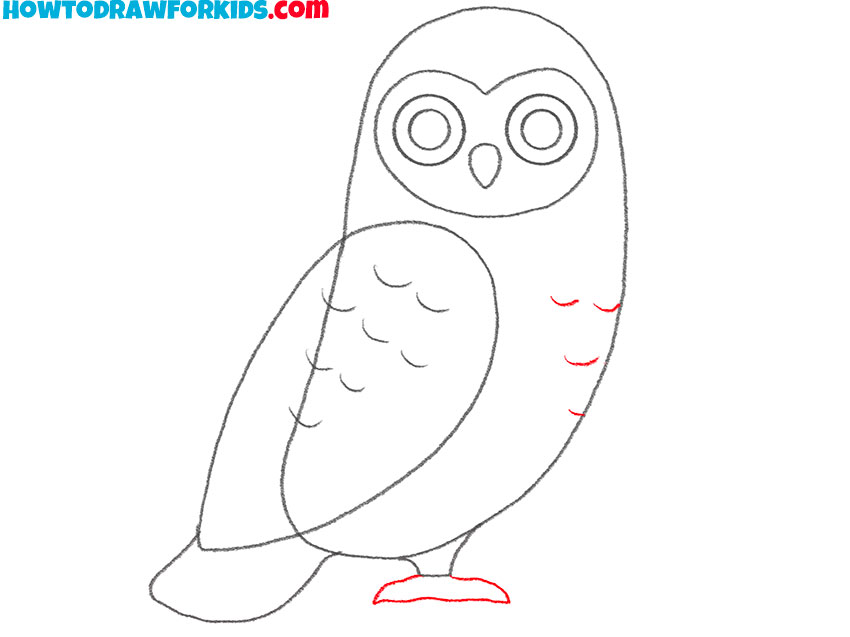
- Add the foot and chest feathers.
The owl’s foot in the example is drawn in a simple manner. Use smooth, slightly curved lines to outline the toes and sharp claws, avoiding excessive detail. Then, add a series of short, curved lines on the chest to represent the feathers in that area.
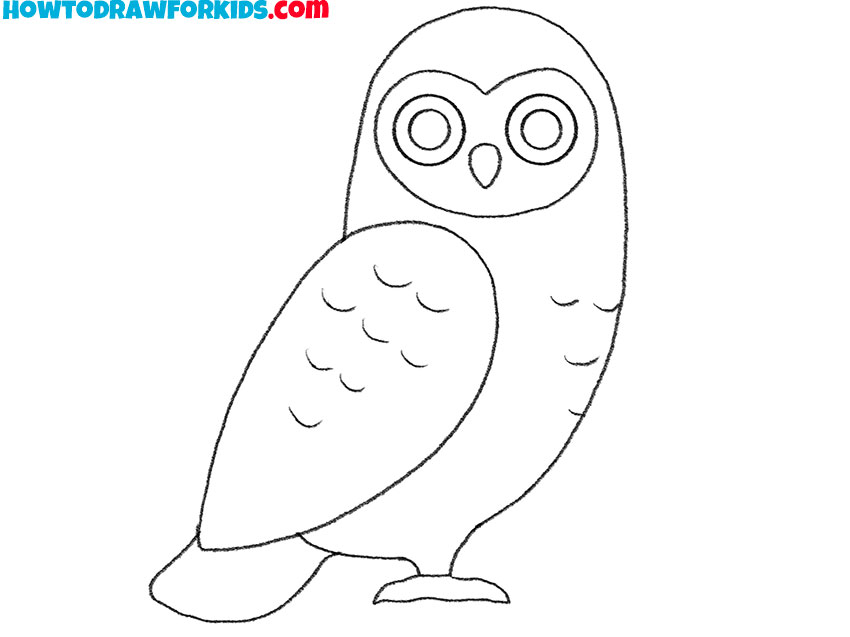
- Finalize the bird sketch.
Give your owl drawing more finished look refining the lines and erasing any unnecessary guidelines. Also, you can add more texture to the wings and body by sketching small feather-like shapes. Check the proportions and adjust any elements if needed.
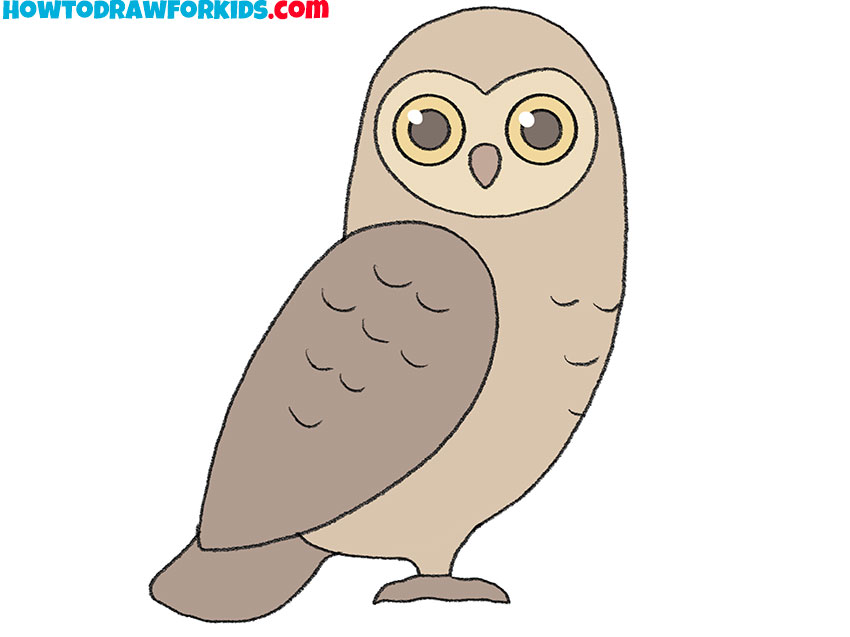
- Color the owl drawing.
Finally, use shades of brown, beige, and yellow to color the body of the owl. Add darker tones to the wing and tail for contrast, and use lighter shades for the face. Color the eyes a yellow with a darker brown for the pupils. Add small highlights to make your owl drawing look more natural.
Additional Content
A free downloadable PDF has been provided to support your learning from the owl-drawing class. The PDF file also includes a coloring page, a tracing worksheet, and a grid drawing worksheet in addition to the steps. This resource allows you to review the key elements of the lesson at any time without needing an internet connection. It serves as a concise reference and includes additional exercises to help refine your technique.
Alternative Drawing Techniques
This collection of alternative drawing techniques for owls focuses on different aspects of their appearance, such as feather patterns and gaze, to help train your skills. By practicing these techniques, you will boost your ability to illustrate the distinctive features of owls while improving overall drawing accuracy and confidence.
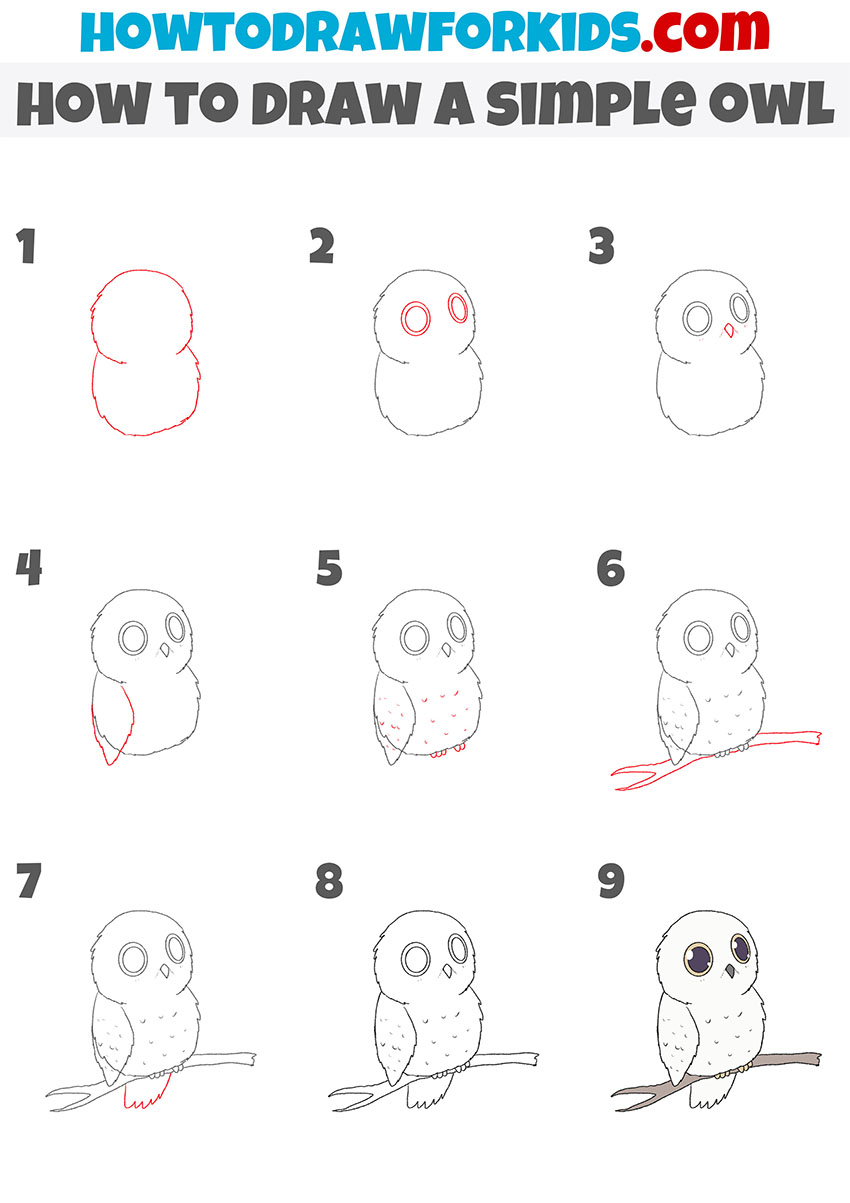
How to Draw an Owl on a Branch
In the very first, basic lesson, we drew an owl in empty space, and now we will learn how to depict this bird sitting on a branch. This will help you deepen your skills and understanding of how to add details to a drawing and how to use the acquired skills to create more complex compositions.
To draw a simple owl on a branch, begin by sketching the head and body using two overlapping ovals with slightly uneven, jagged edges to mimic feathers. Add two large circular eyes in the top oval and ensure they are evenly sized. Draw small pupils inside the eyes and add a triangular beak between them. Define the wing with curved lines extending from the side of the body.
Next, create a pattern of small dots and lines on the chest to represent feathers, and add small claws at the bottom of the body. Draw a horizontal branch beneath the owl, ensuring the claws are positioned gripping the branch. Add a small, feathery tail extending below the branch. Refine the details, erase unnecessary lines, and then add color to complete the drawing of an owl sitting on a branch.
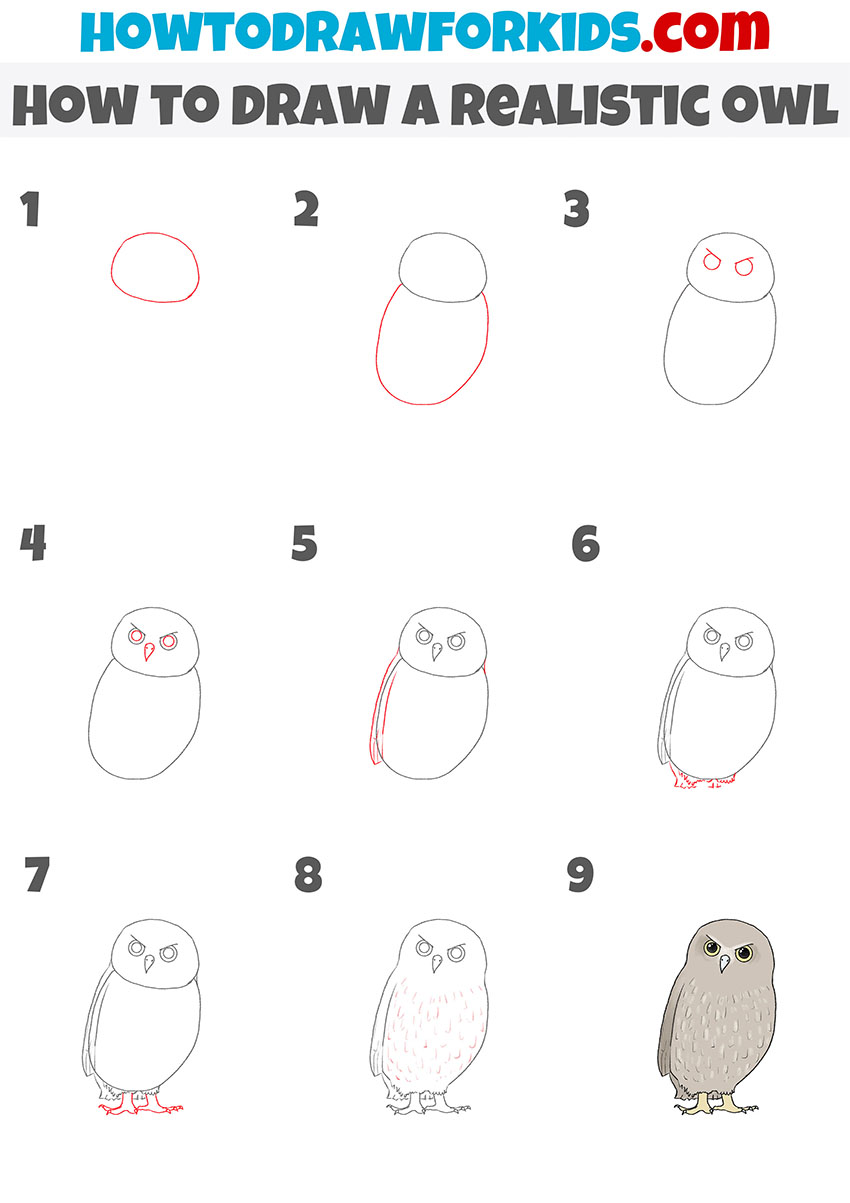
How to Draw a Realistic Owl
This versions will demonstrate you how to draw a realistic owl, creating more natural shapes, refined details, and a realistic coloring approach. Unlike the first owl drawing lesson, I used more complex shadows and tonal transitions here. Try this technique if you are ready for more complex drawings.
To draw a realistic owl, begin by sketching the head and body using two connected ovals, with the head being slightly smaller than the body. Add sharp, angled eyes to the head. Between the eyes, draw a pointed triangular beak. Illustrate the wing with a long, curved lines extending along the side of the body. Add details to the legs and talons at the base of the body. Sketch the claws with sharp and slightly curved tips.
Create a texture of small, curved lines across the chest and wings to represent the owl’s feathers. Use long lines on the wings to illustrate feather patterns, while the chest should have a denser arrangement. Finalize the drawing by erasing extra guidelines and using shades of brown, gray, and yellow for the body, wings, and eyes to complete the realistic look of the owl.
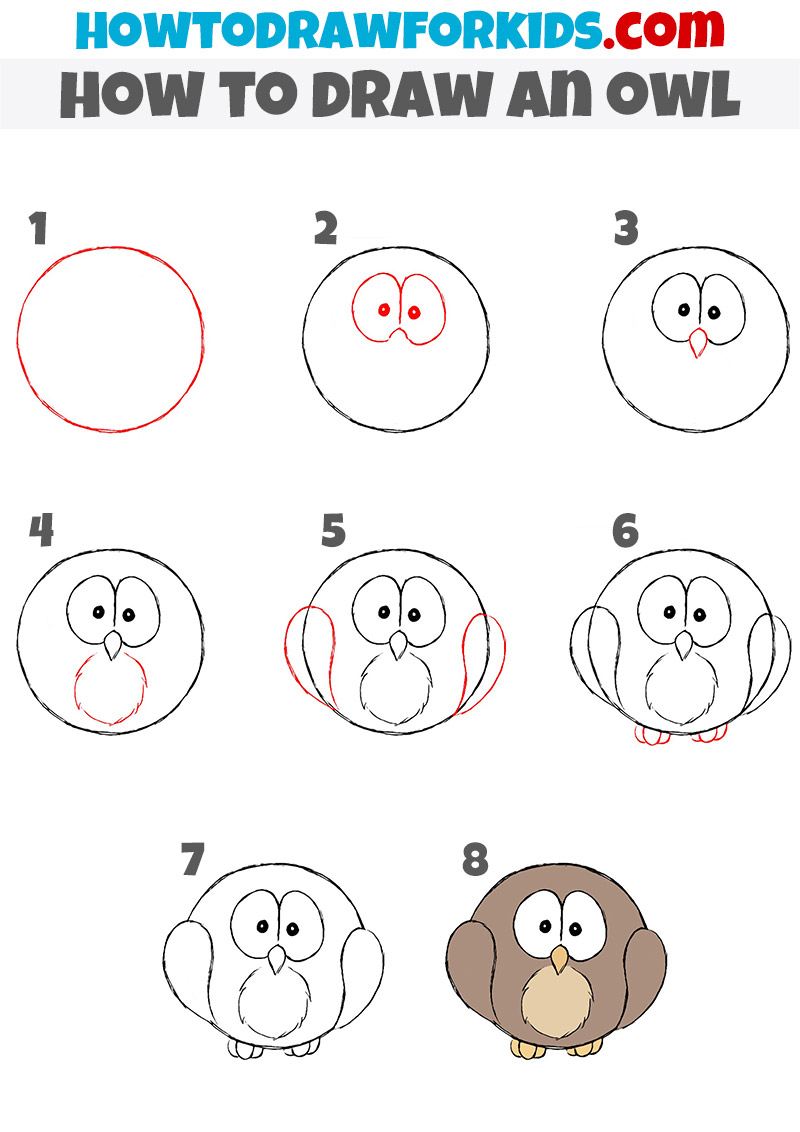
Circle Owl Drawing Lesson
This is a stylized version of an owl drawing that humorously begins with a circle, similar to the well-known meme where a drawing starts with a simple shape and ends with a detailed, realistic result. However, this tutorial will demonstrate the proper way to transform the circle into a recognizable owl step by step, keeping the process simple and approachable.
Begin by drawing a large circle for the body, as it will serve as the foundation for the owl. Inside the circle, sketch two large oval eyes positioned near the top center. Add small pupils inside the ovals. Between the eyes, draw a small triangular beak pointing downward. Below the beak, create a curved line to define the chest area, adding texture to illustrate fluffy feathers.
Draw two curved wings on each side of the circle. At the bottom, sketch two simple feet with small toes. Refine the shapes to smoothen the lines and ensure proportionality. Add final details such as feathers and adjust the outlines as needed. Complete the drawing by coloring the owl in shades of brown, beige, and yellow, keeping the style simple.
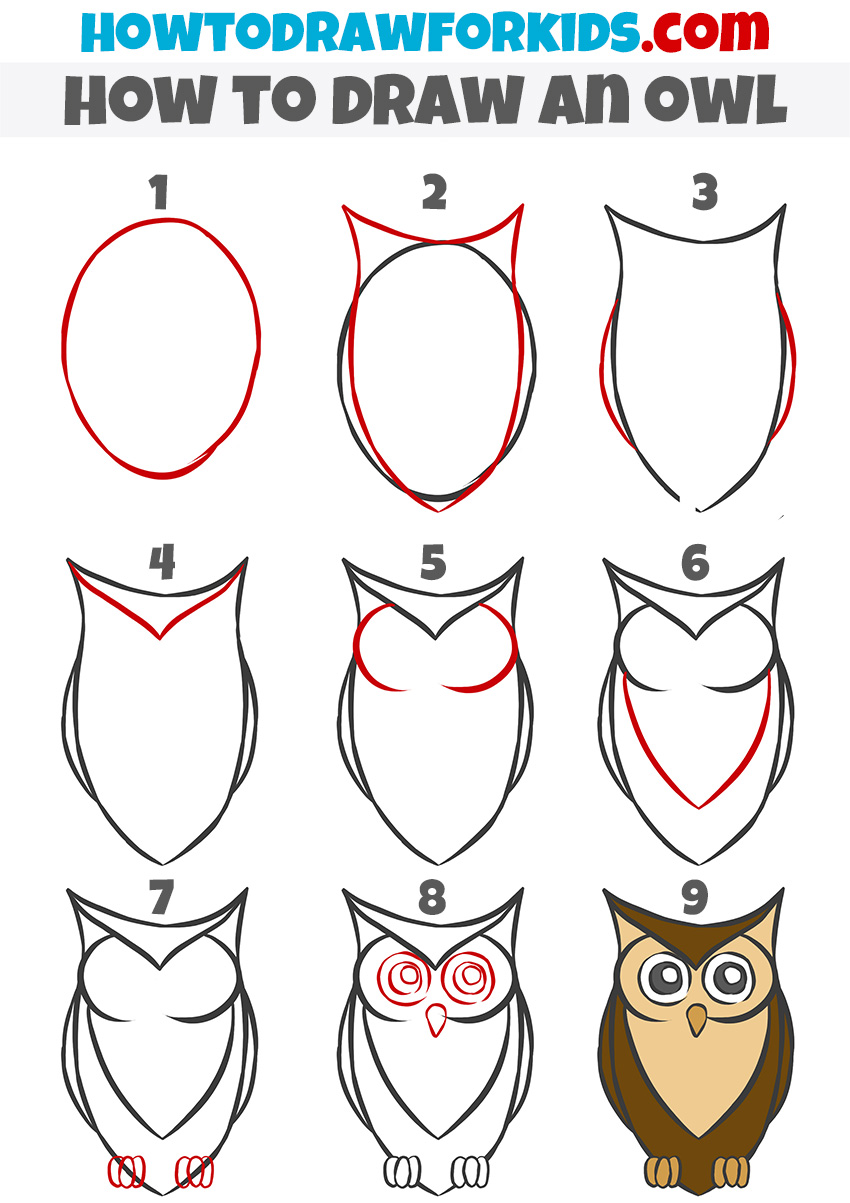
Simple Owl Drawing Technique
This is a simplified version of an owl, where the details are intentionally kept minimal to make the drawing process very easy. While the sequence of steps differs from other tutorials, it still leads to a recognizable owl drawing with clean lines and distinct features.
Start by drawing a large oval for the body. Add two pointed shapes at the top of the oval to represent the owl’s prominent tufts. Next, refine the body by drawing curves along the sides that taper into a pointed end at the bottom, forming the owl’s overall shape.
Draw a curved line across the top portion of the body to define the head and extend the curves downward to create a smooth transition into the chest. Add symmetrical circular eyes near the top center of the shape, followed by a small triangular beak between them. At the bottom, add small feet using simple ovals or curved shapes. Erase unnecessary guidelines and refine the outline. Color the owl in natural tones like brown and beige.
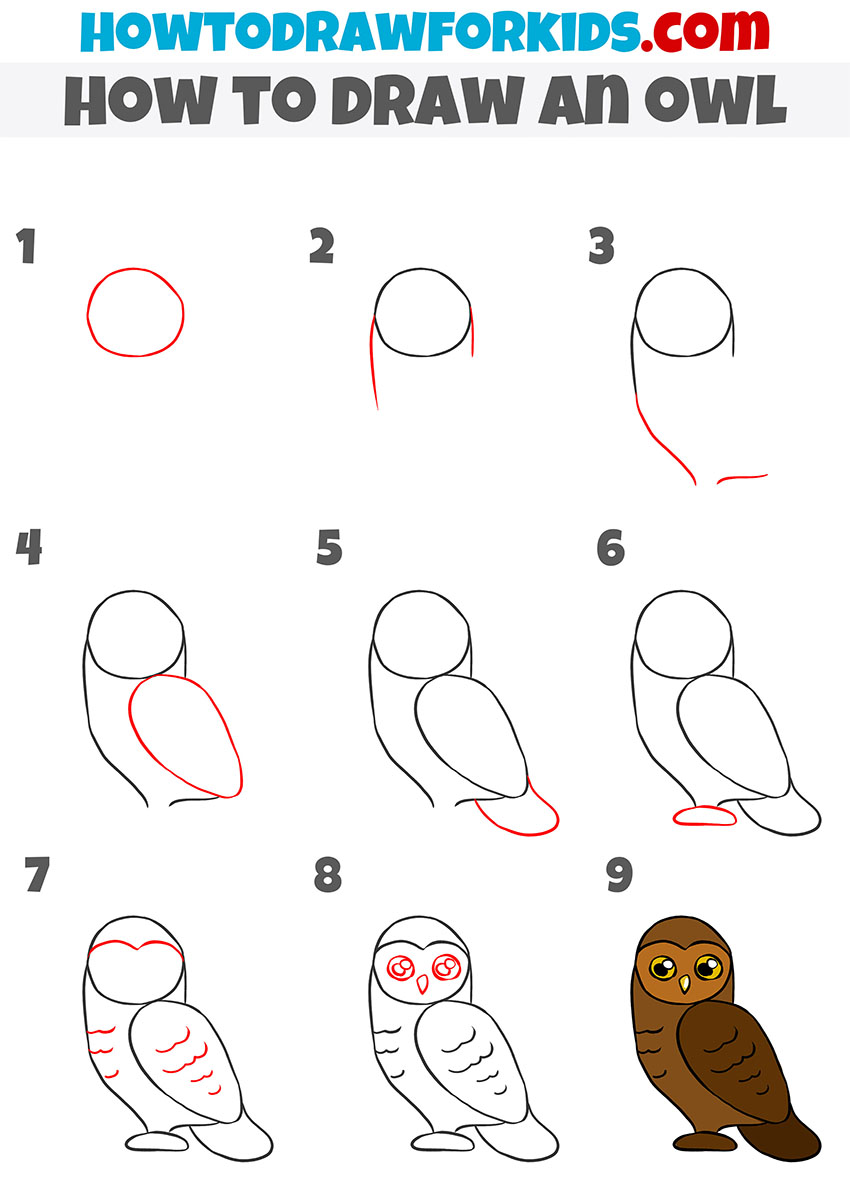
Alternative Owl Drawing Tutorial
This is the last but not least owl drawing tutorial, showcasing a completely different style and approach compared to the others. It features a unique sequence of steps that leads to a recognizable owl while demonstrating a fresh and distinctive technique.
To learn how to draw an owl with this alternative method, start by sketching a small circle at the top of the page to serve as the head. Extend two curved lines downward from the sides of the circle to outline the top of the body. Gradually connect these lines to form a rounded and slightly tilted body shape. Add a large, oval wing on one side of the body. Sketch a smaller, rounded tail at the base of the body and draw a simple oval shape beneath it to represent one foot.
Define the head by drawing a curved line across its top portion to form the face. Add large, circular eyes with pupils inside, along with a small triangular beak in the center. Enhance the wings with simple, curved feather patterns. Erase unnecessary guidelines and refine the shapes. Complete the owl drawing by coloring it in shades of brown and yellow for a clean, finished appearance.
Conclusion
If you found this owl drawing tutorial helpful, consider trying my easy tutorial on how to draw a bird or visiting my bat drawing tutorial. Additionally, you can learn how to draw a duck to further develop your skills in drawing winged and feathered animals.
I want to remind you that I also have a YouTube channel and a Pinterest account, where I share video versions of my lessons, announcements of upcoming articles, and other bonus content. To stay informed about new lessons and events on my site, make sure to subscribe to these platforms and follow the updates regularly.