How to Draw Batman
In this tutorial, I’ll show you how to draw Batman from the DC universe using four simple methods, created to be easy for kids to follow.
How to Draw Batman: Basic Information
Ready to channel your inner superhero artist? Let me guide you through how to draw Batman in a whimsical chibi style. My approach is designed to simplify the process, making the formidable Batman approachable for artists at any stage. It’s about capturing the spirit of heroism on a smaller, but no less mighty scale.
With this lesson, I aim to demystify the art of drawing the beloved Batman. You’ll discover how basic shapes come together to form his iconic silhouette, all while maintaining the playful proportions that make chibi art so endearing. This method ensures that anyone can draw Batman with a touch of charm and ease.
Let’s draw Batman together, transforming a complex icon into a delightful drawing challenge. You’ll learn not just the strokes and shapes but the joy of reimagining a superhero. Each line you draw brings you closer to having your own miniature Guardian of Gotham, ready to take on any artistic challenge.
Batman Drawing Tutorial
Materials
- Pencil
- Paper
- Eraser
- Coloring supplies
Time needed: 45 minutes
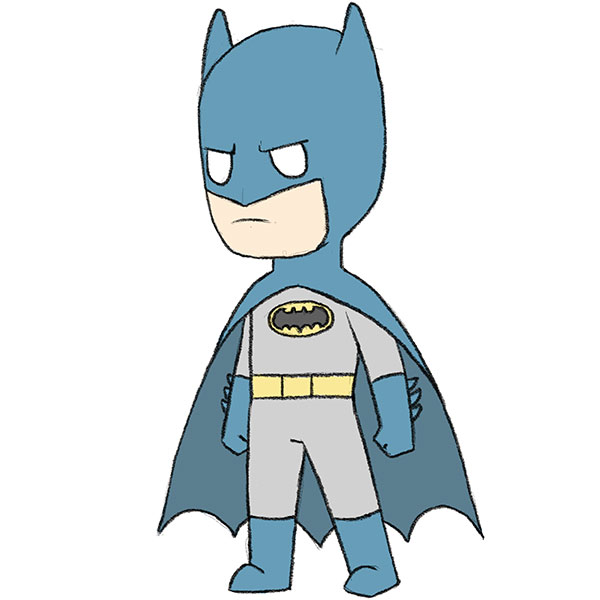
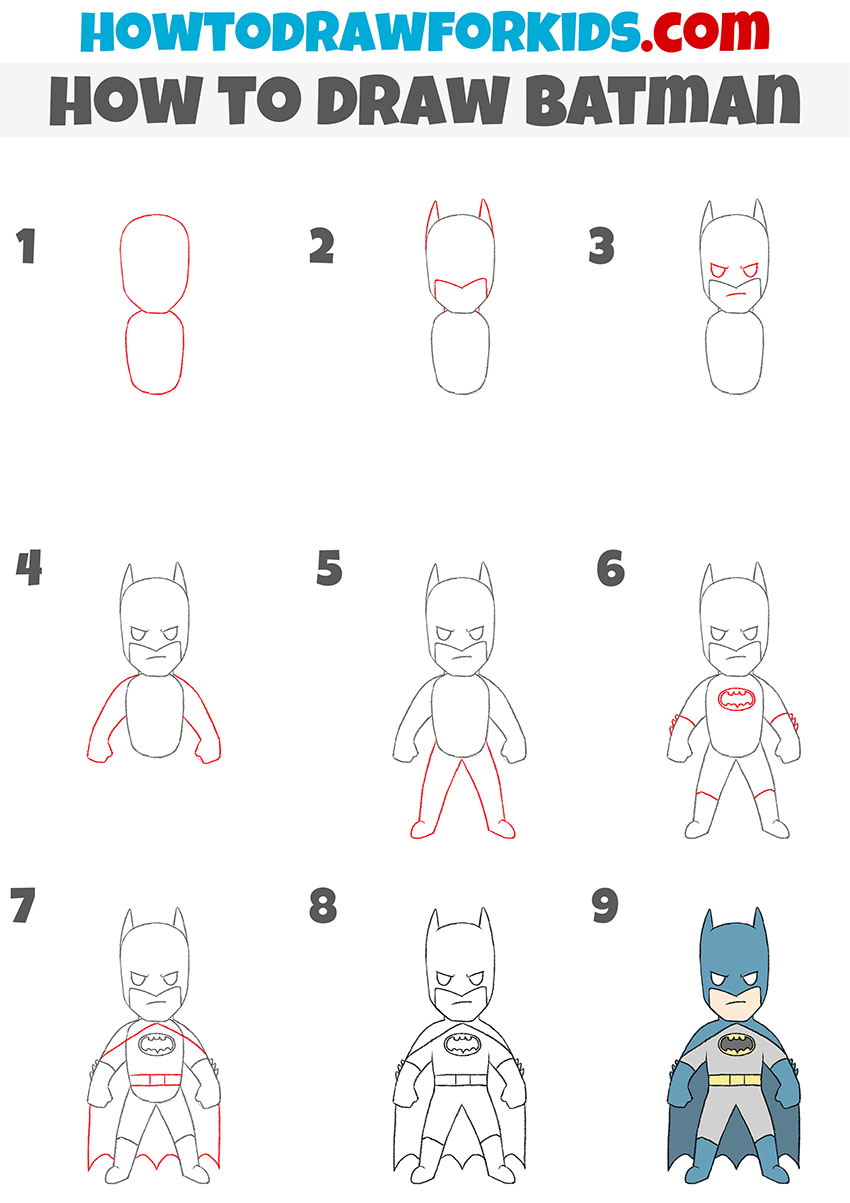
How to Draw Batman
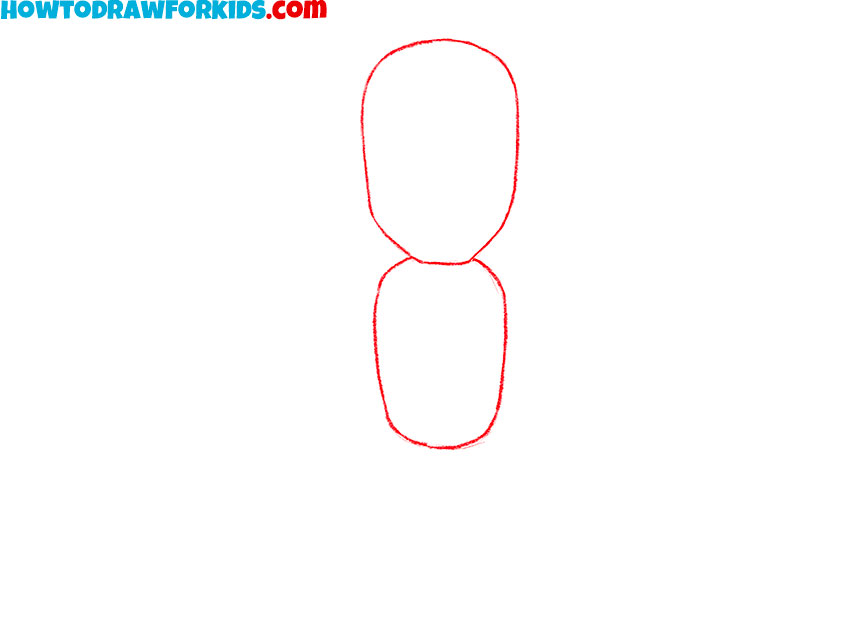
- Sketch the head and torso of Batman.
Start by drawing two simple ovals for Batman’s body. One oval for the head and another one below it for the torso. The head should be slightly larger and oval-shaped, while the torso is smaller and more rounded. These shapes will serve as the foundation for the rest of the body.
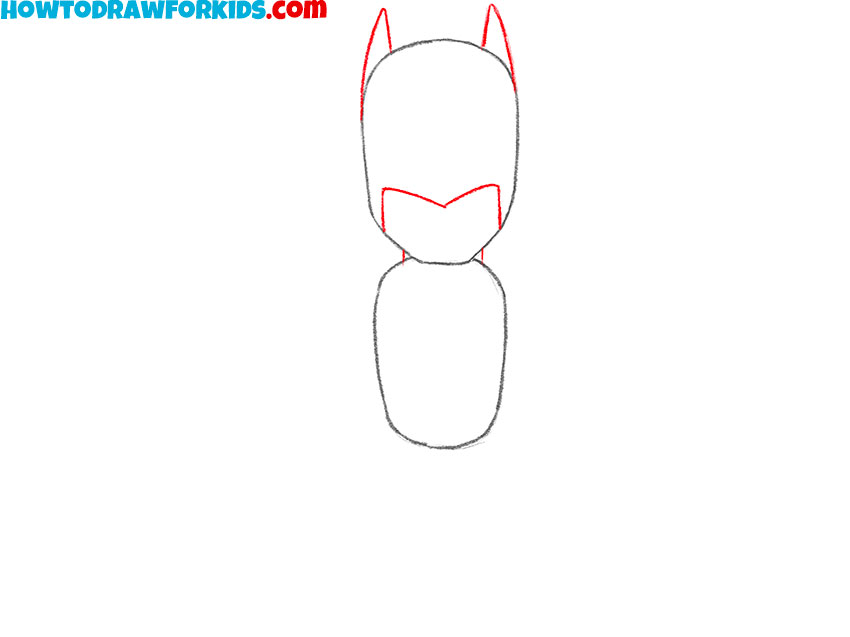
- Draw the ears and mask opening.
Start by sketching two pointy bat ears at the top of the head, making sure they’re sharp and tall. Then, add the angular mask opening shape, outlining where the face will go. Now, with these details, the initial sketch starts looking like Batman drawing.
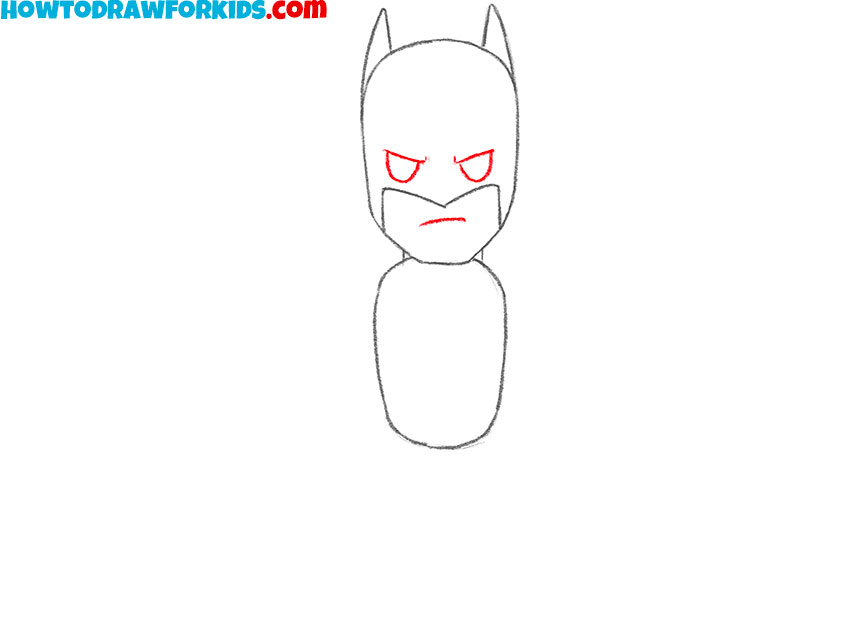
- Illustrate the eyes and mouth.
Begin by drawing two narrow, slanted eyes to give Batman a his recognisable glaze. Below the eyes, sketch a small, straight mouth with a serious look. You can make the fact of Batman look more detailed, adding come folds around the eyes or at the sides of the mouth.
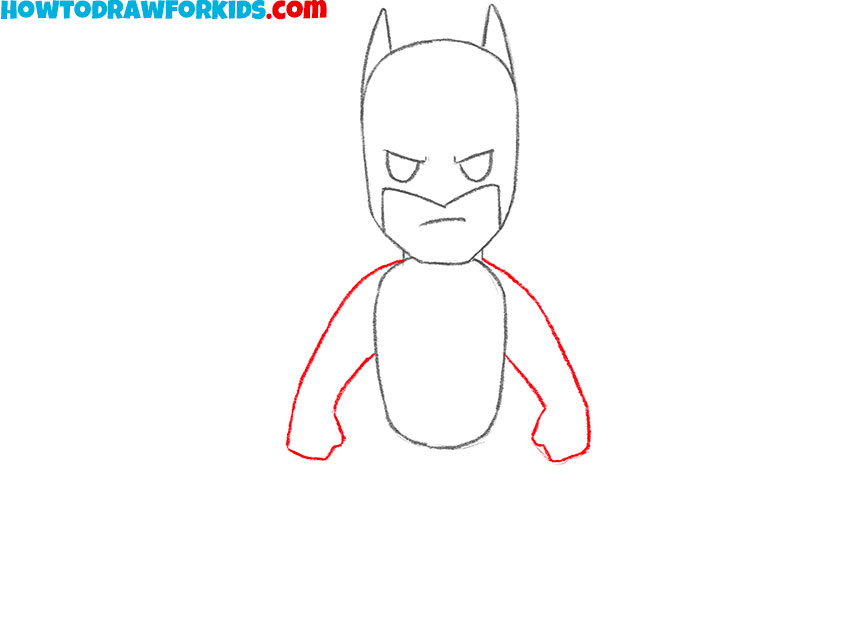
- Draw the arms of the superhero.
Start drawing Batam’s arms with simple line that come from the shoulder. Then, draw the hands at the ends of the arms. Make the hands into clenched fists to add to Batman’s strong appearance. Don’t make the shapes overcomplicated.
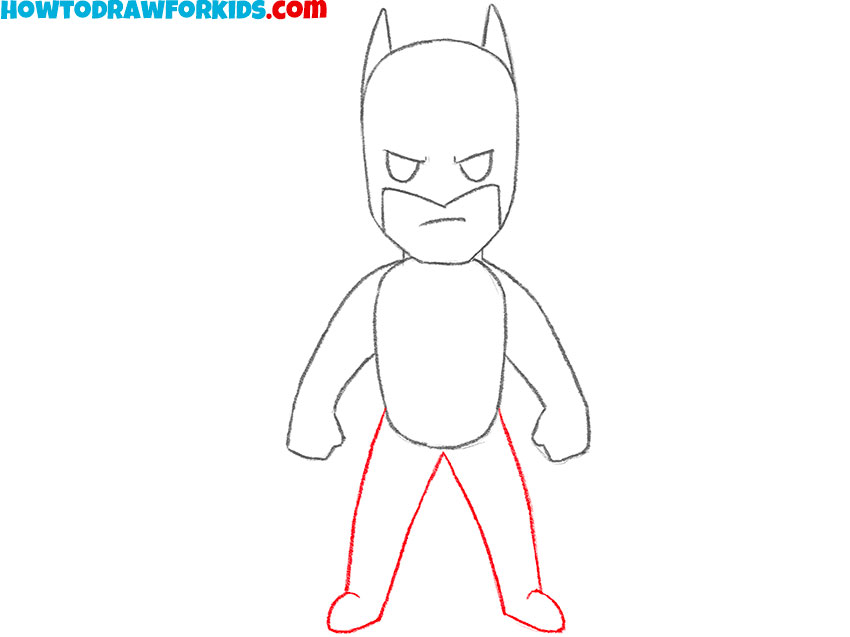
- Sketch the legs of the Dark Knight.
To sketch Batman’s legs, create simple lines extending downward from the bottom of the torso. Make sure the legs are spread apart slightly. At the bottoms of the legs illustrate the feet with simple shapes. The legs, as well as the arms, should look really simple.
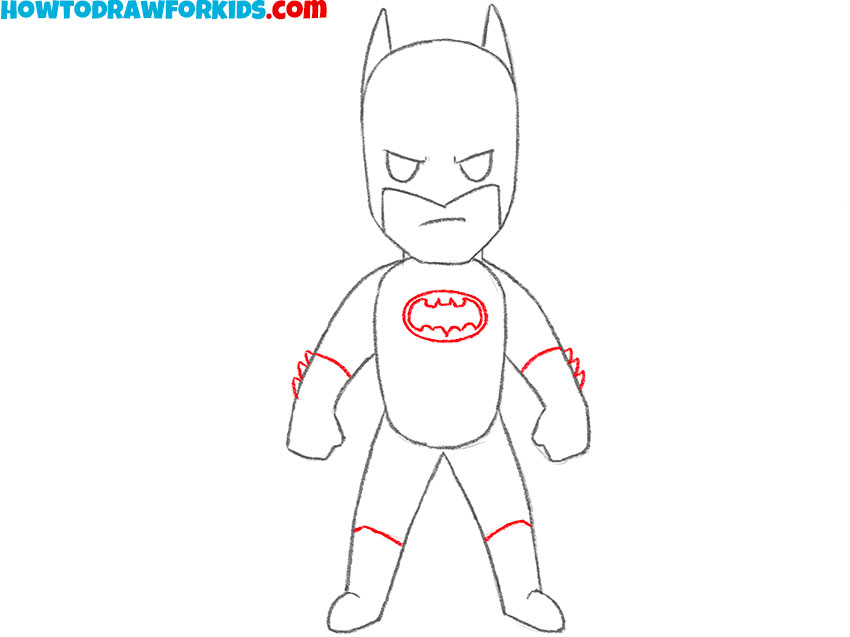
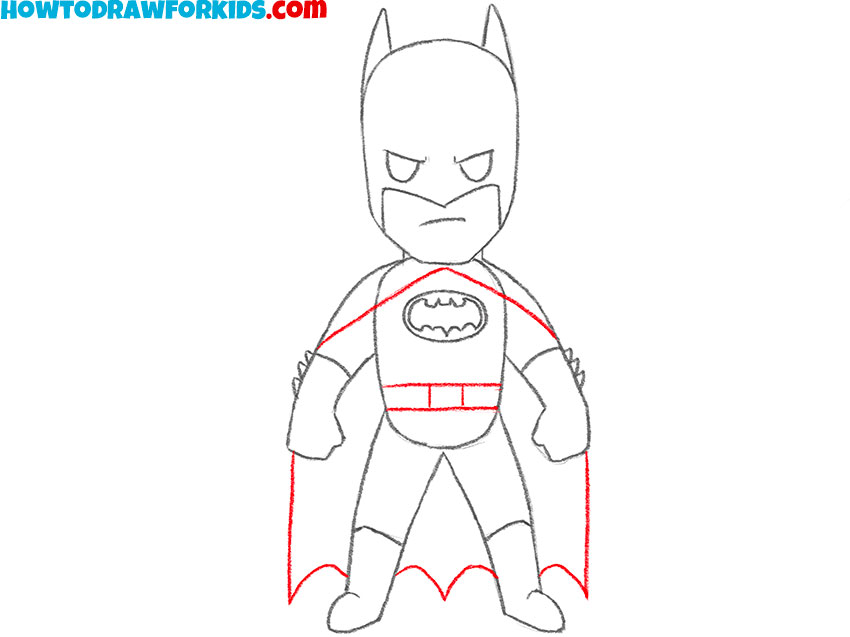
- Sketch the bat symbol and add costume details.
Start with an oval shape in the middle of the torso, then draw the bat symbol inside. Additionally, draw simple lines to illustrate the gloves and boots. At the sides of the forearms draw iconic Batman spikes. This will make the silhouette of the superhero instantly recognisable.
- Draw Batman’s cape and belt.
The belt should be drawn around his waist, with large rectangular pouches. Next, draw the cape flowing behind him. It should fall just below his knees and flare out slightly to the sides. To give Batman’s cape a distinctive look, draw the bottom edge using a series of arched lines.
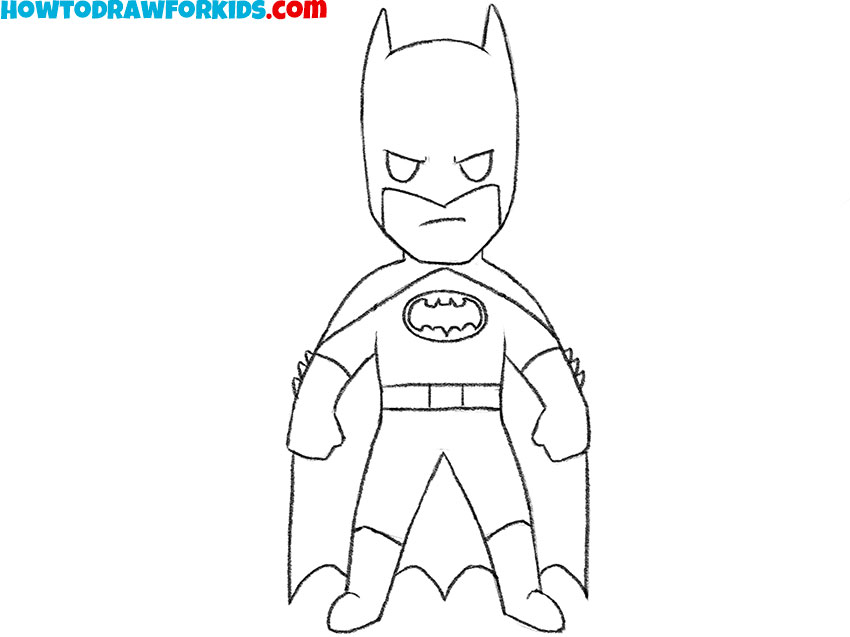
- Erase the guidelines from your Batman sketch
Go over the previously sketched lines and sharpen them, adding any final adjustments as needed. Make sure all the lines on your Batman sketch are clear and solid. Also, you can add some extra details, to make your Dark Knight drawing look more realistic.
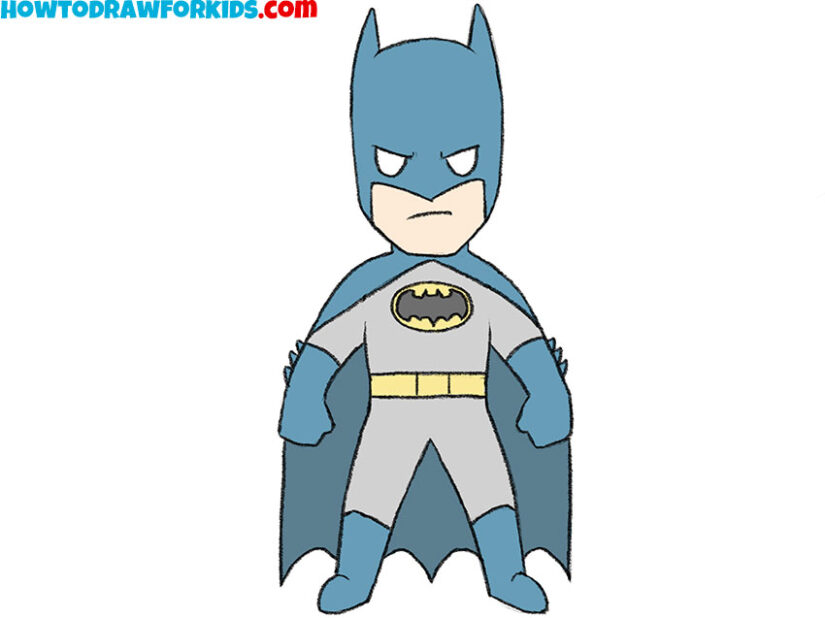
- Color your Batman drawing.
Finally, color Batman using his classic color scheme. Use shades of dark gray for his suit, black or dark blue for the cape and mask, and yellow for the belt and bat emblem. The boots, gloves, and other parts of the costume should also be black or dark blue.

Alternative Ways to Draw Batman
In addition to the main lesson, I’ve created several alternative drawing techniques for Batman. These methods focus on different aspects of Batman’s design, from his stance to the details of his costume.
These alternative Batman drawing methods allow you to try various styles and perspectives, improving your ability to illustrate the Dark Knight.
Alternative Batman Drawing Tutorial
This tutorial is an additional guide, complementing the original Batman drawing tutorial, but featuring a more stylized version and illustrating Bruce Wayne in a slightly different costume.
Start by drawing a large, rounded head and a small, simple body, keeping the proportions exaggerated. Then, sketch the arms placed on Batman’s hips, giving him a confident pose. Add the legs, keeping them short and stubby to maintain the cartoon look.
Next, draw the signature bat ears on the head and add the facial details, focusing on Batman’s serious expression with sharp, angular eyes and a frowning mouth. After this, sketch the cape flowing behind him and the bat emblem on his chest, adding simple shapes for his utility belt around the waist. Continue by refining the outlines of his costume, paying attention to the gloves, belt, and cape.
Once the outline is done, finalize the drawing by adding more details, such as the folds in the cape and the lines on the belt. Lastly, color Batman using the traditional dark gray for the suit, black for the cape and mask, and yellow for the belt and emblem.

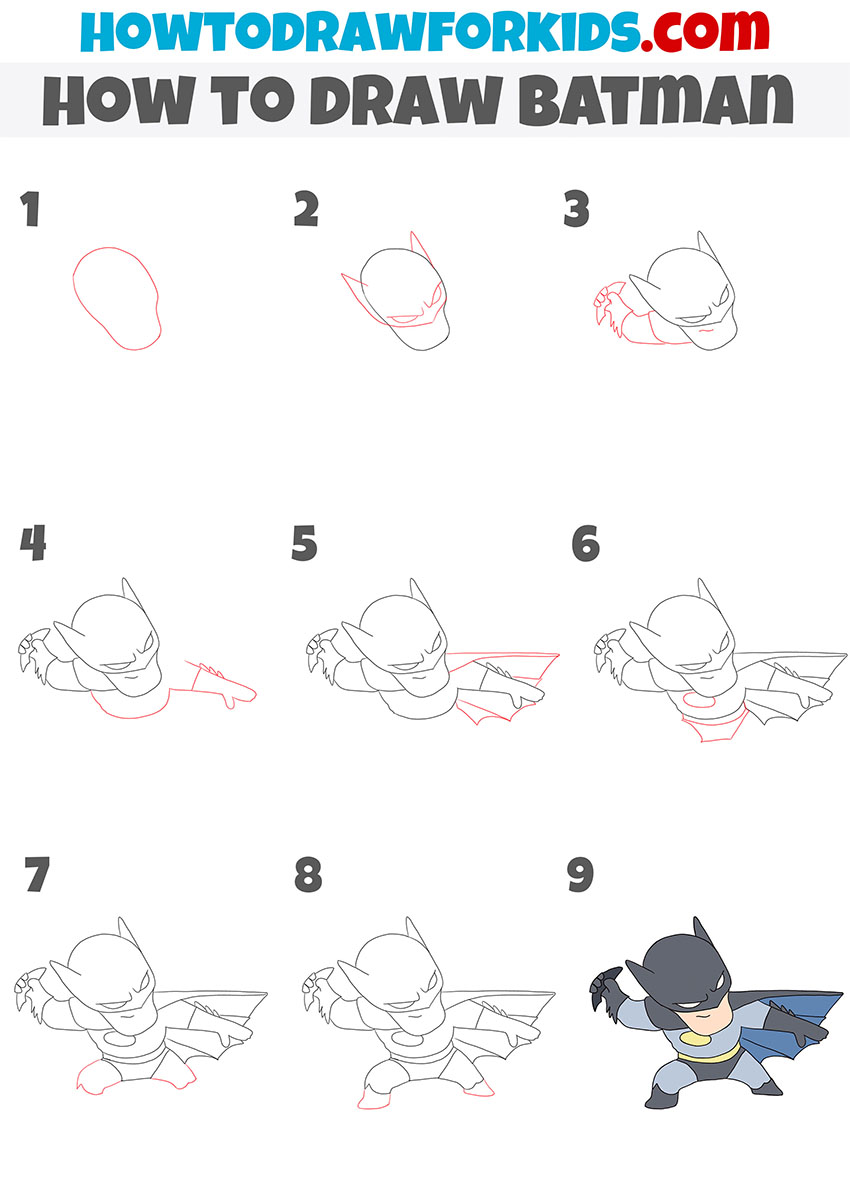
Drawing Batman in a Dynamic Pose
This tutorial offers an additional way to draw Batman, building on the first tutorial with a more dynamic pose. The steps are simplified but focus on drawing Batman in action.
Start by sketching an oval for the head and adding basic features like the eyes and bat ears. Then, draw his facial details, giving him a focused expression. Next, sketch the upper body with one arm extended forward and the other pulled back as if he’s ready for action. Continue by adding his cape flowing to the side and his clenched fists.
Move on to drawing the legs, with one bent forward and the other stretched back, creating a crouching stance. This adds to the dynamic feel of the pose. After finishing the body and cape, include details like the bat emblem on his chest, the gloves, and the belt.
Finally, outline the entire figure, making the lines clear and sharp. Finish by coloring the drawing using Batman’s typical colors: black for the mask and cape, gray for the suit, and yellow for the emblem and belt.
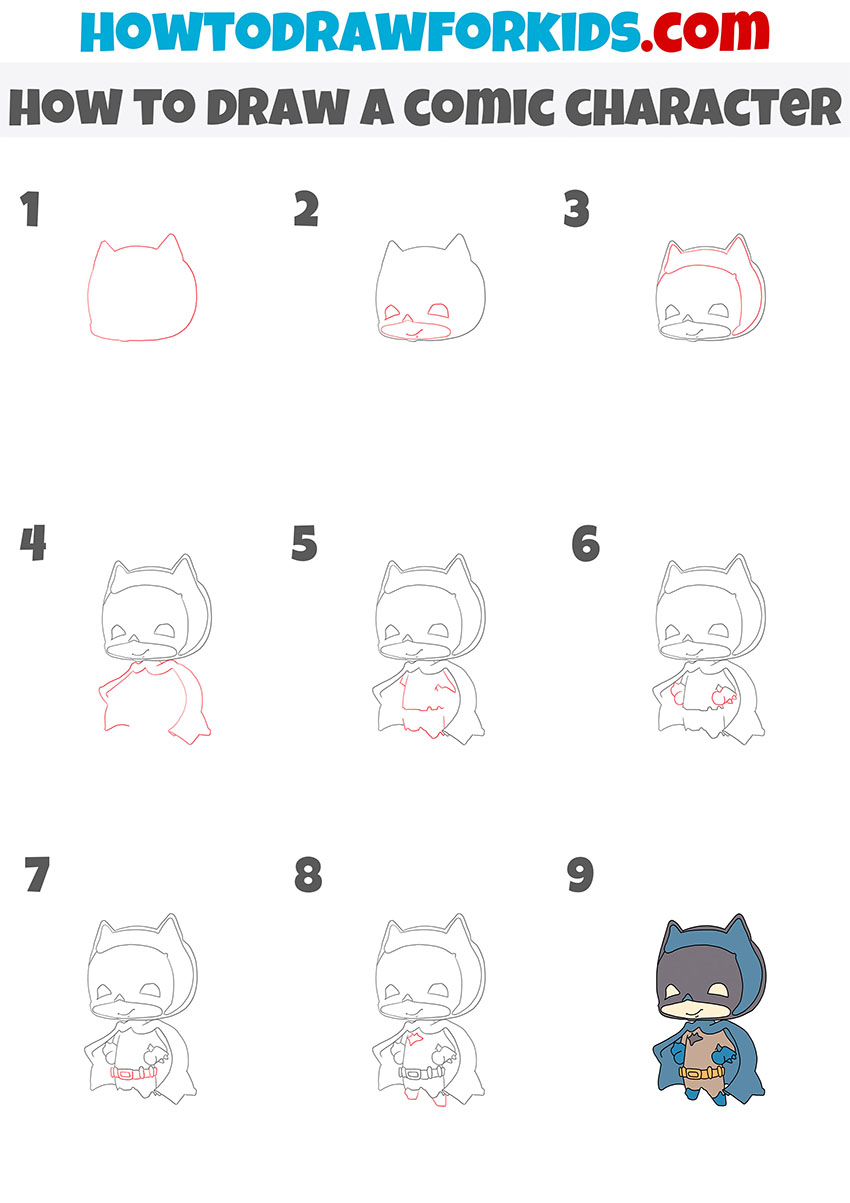
How to Draw Cartoon Batman
This tutorial shows an additional, more cartoonish version of Batman compared to the first two instructions. The drawing steps are simplified and focus on creating a cute, exaggerated look.
To draw Batman in cartoon style, start by sketching the head as a rounded shape and adding the pointed ears. Then, sketch the facial features, including the small eyes and a tiny nose and mouth to highlight the cartoon style. Next, add the outline of Batman’s mask and outlines of cartoon shadows on the head.
For the body, draw his arm positioned on his hip, giving him a confident stance. Also, don’t forget to add the cape draped around his small body, and include the bat emblem on his chest. Continue by sketching the legs, keeping them short and stubby to match the overall cartoonish appearance.
Add details like the utility belt around his waist and the rest of the cape. The , color your Batman drawing using his typical colors: dark gray for the mask and cape, yellow for the belt, and blue for the outer parts of the suit.
Conclusion
As we finish this tutorial on drawing a simplified version of Gotham’s guardian, I invite you to chech out more drawing tutorials available on my site. There, you’ll find a lot of different cool tutorials focused on sketching different superheroes, including the guide on how to draw Spider-Man and others.
Be sure to stay updated with the latest tutorials and tips by following my social media channels. Follow me on Pinterest to stay updated with new drawing tutorials and share your drawings in the comments. Also, be sure to subscribe to my YouTube channel for video versions of my easy drawing tutorials.