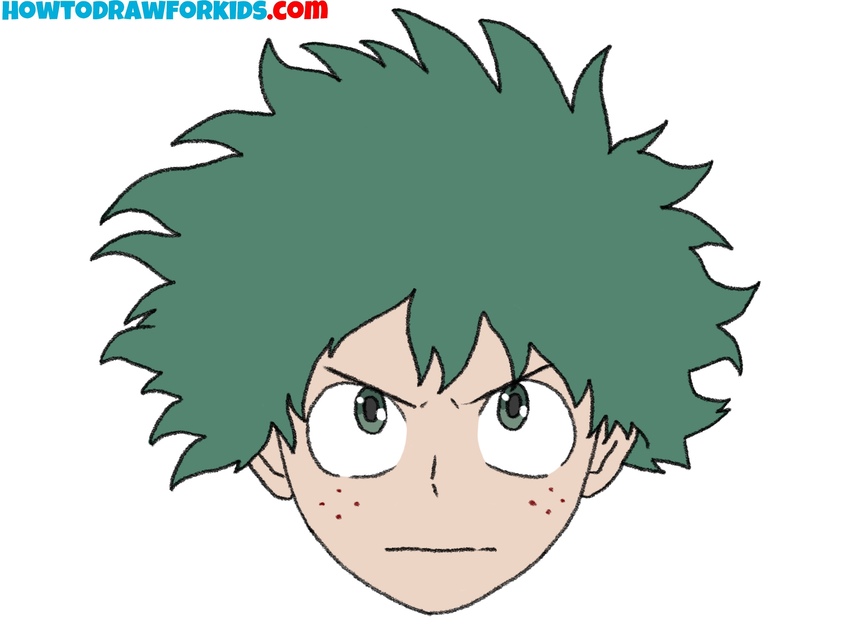
How to Draw Deku Face
In this tutorial, we will practice drawing specific anime faces using my lesson on how to draw Deku face from My Hero Academia anime.
How to Draw Deku Face: Introduction
In one of my previous drawing lessons, I showed you how to draw Deku, a character from My Hero Academia. Like many other anime characters, he has very distinctive facial features combined with standard anime drawing techniques. These include characteristic eyes, face shape, and other traits typical of the style.
This lesson on how to draw Deku face will guide you on how to accurately illustrate the character on paper while maintaining his recognizability. The goal is to keep his appearance as true to the anime as possible, ensuring that his defining features are properly represented.
To maintain accessibility for all readers, we won’t use excessive details. Keeping the drawing process very simple will allow anyone to follow along and create a recognizable anime-style character with ease.
Like many other anime drawing tutorials, this one will use standard techniques commonly employed by professional artists in anime and manga. Once you learn the basics, you’ll be able to create any anime portrait, from drawing Goku’s face to any other character.
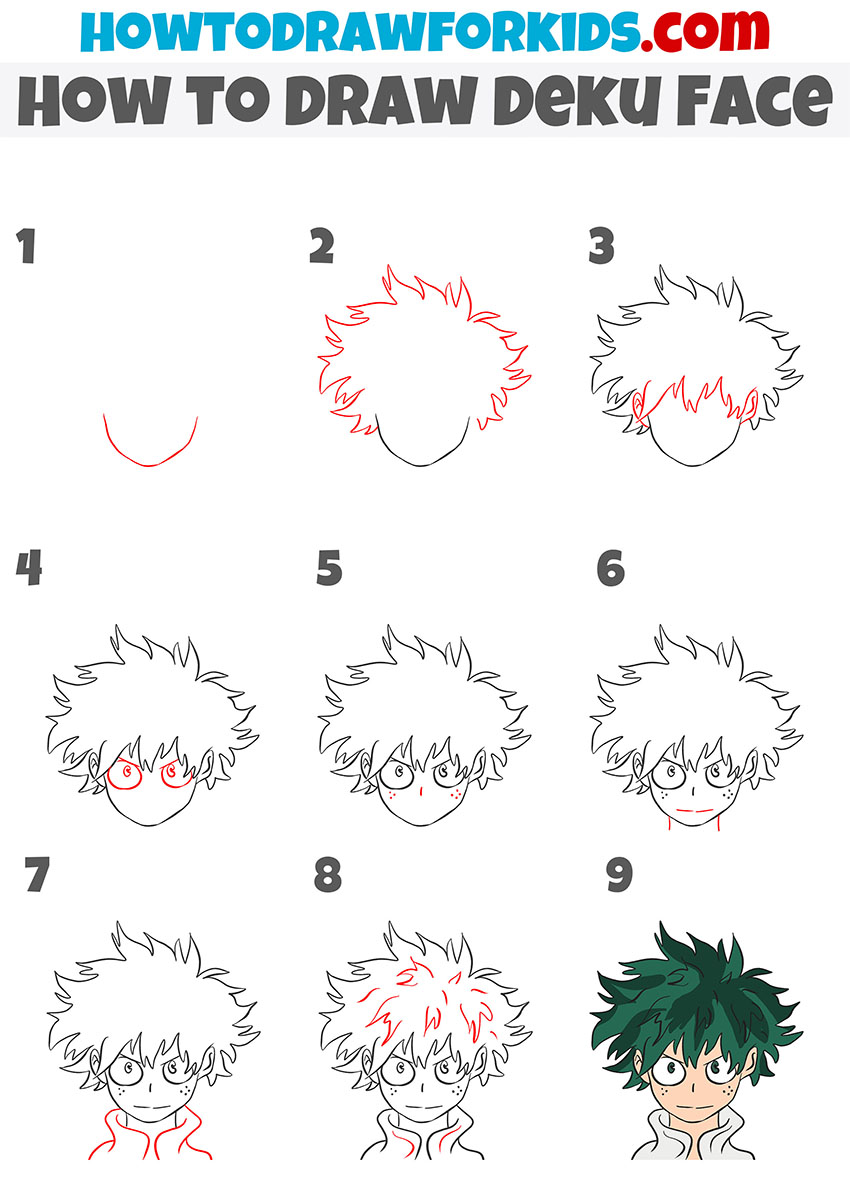
Deku Face Drawing Tutorial
Materials
- Pencil
- Paper
- Eraser
- Coloring supplies
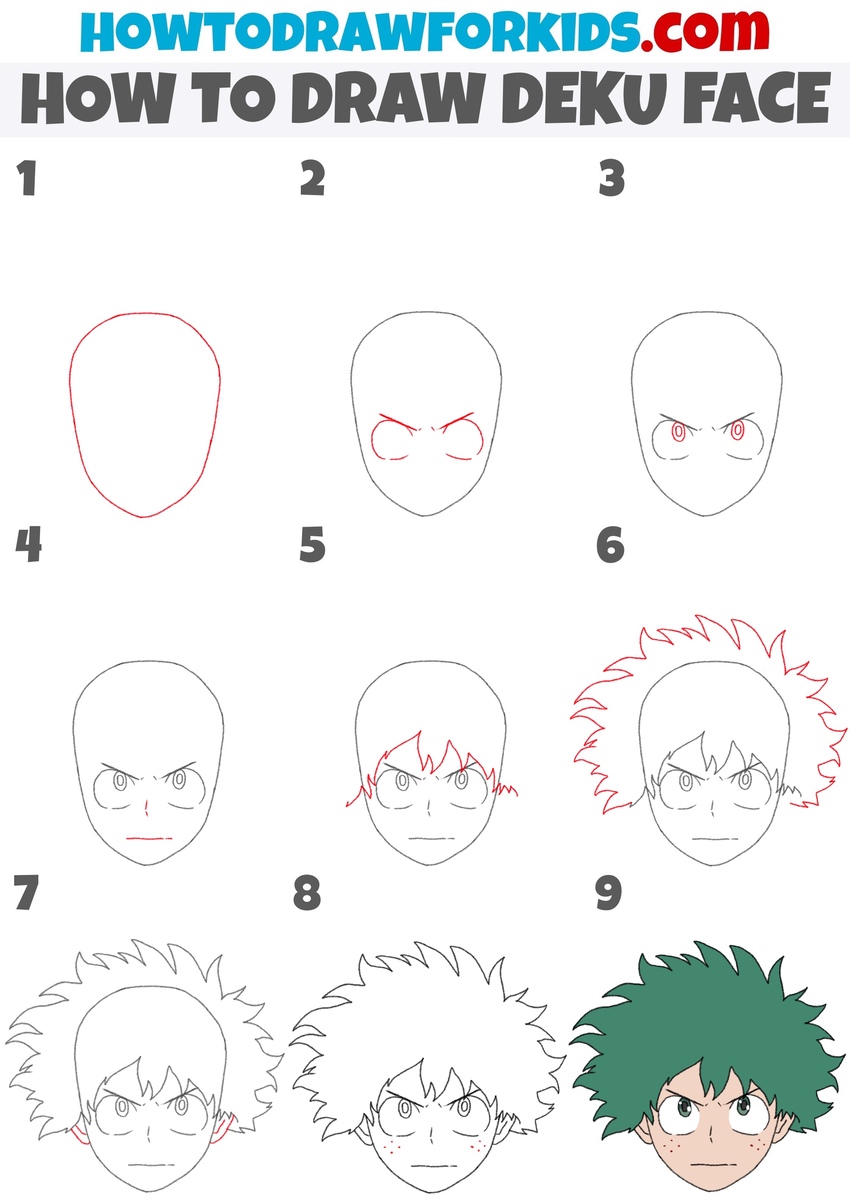
Simple Deku Face Drawing Tutorial
Time needed: 35 minutes
How to Draw Deku Face
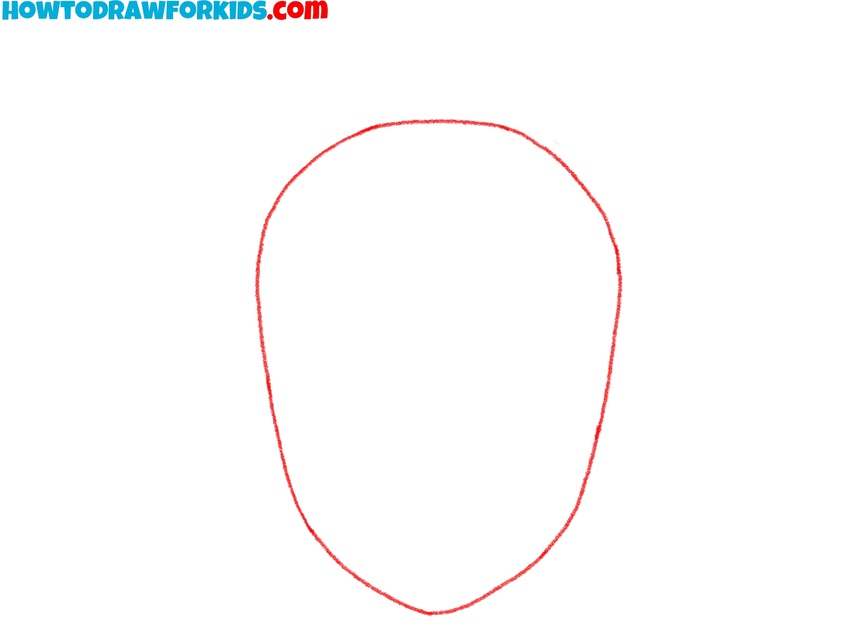
- Draw the basic head shape.
Deku’s face is slightly elongated, forming an angular chin at the bottom. Sketch a light pencil stroke, making an oval-like shape that tapers towards the chin. Deku’s face follows a standard anime style, with a slightly pointed chin and a broad forehead. Be careful to maintain symmetry.
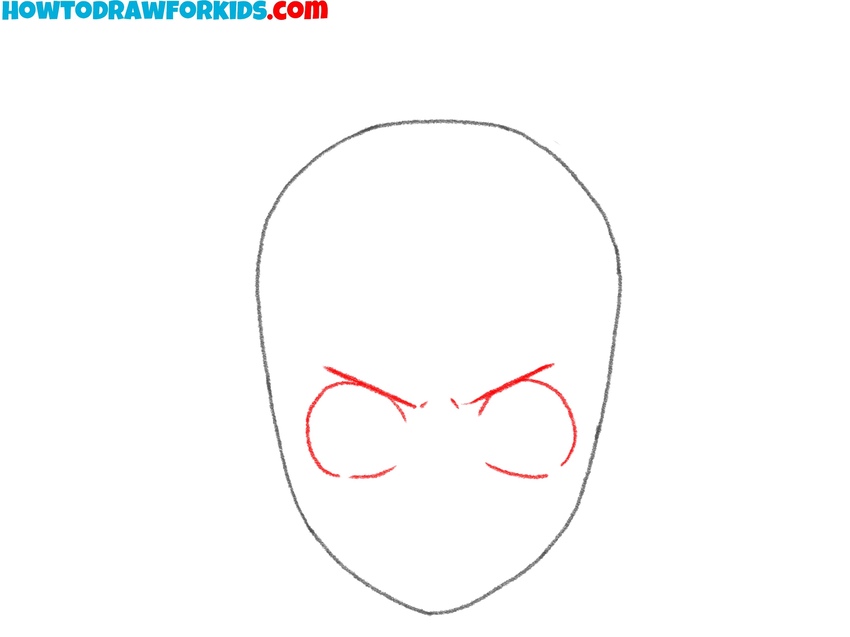
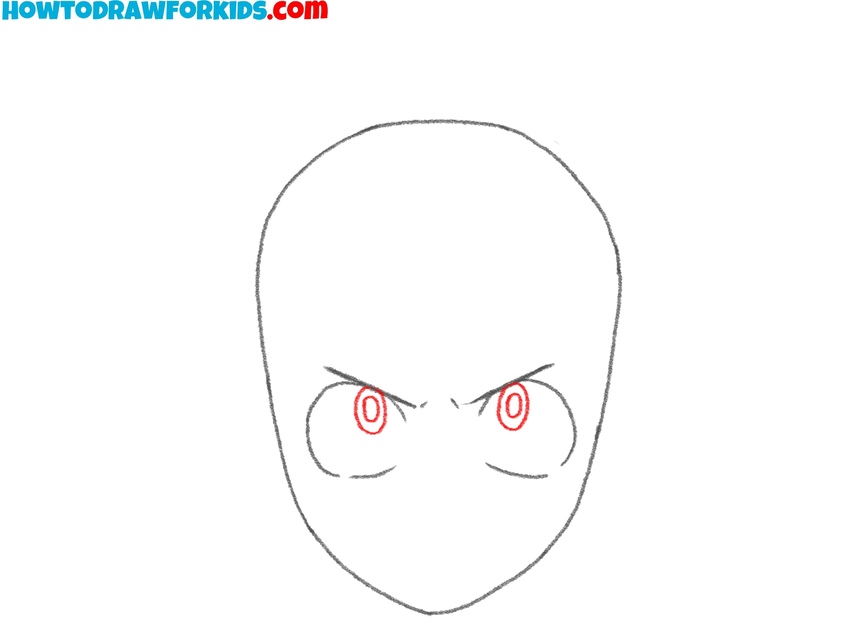
- Outline the eyes and eyebrows.
Now, draw the anime eyes as two slightly curved lines at the center of the face. His eyebrows are slightly furrowed, so sketch them using a couple of angled lines. Next, add a couple of short strokes between the eyebrows to emphasize the frown expression.
- Add the inner eye details.
Inside the circular shapes of the eyes, draw the outlines of the irises and pupils as simple ovals. Deku’s eyes are large, with thick upper lids. They should be placed near the center but slightly closer to the upper edges of the eyes. To change the gaze, adjust the placement of the irises and pupils.
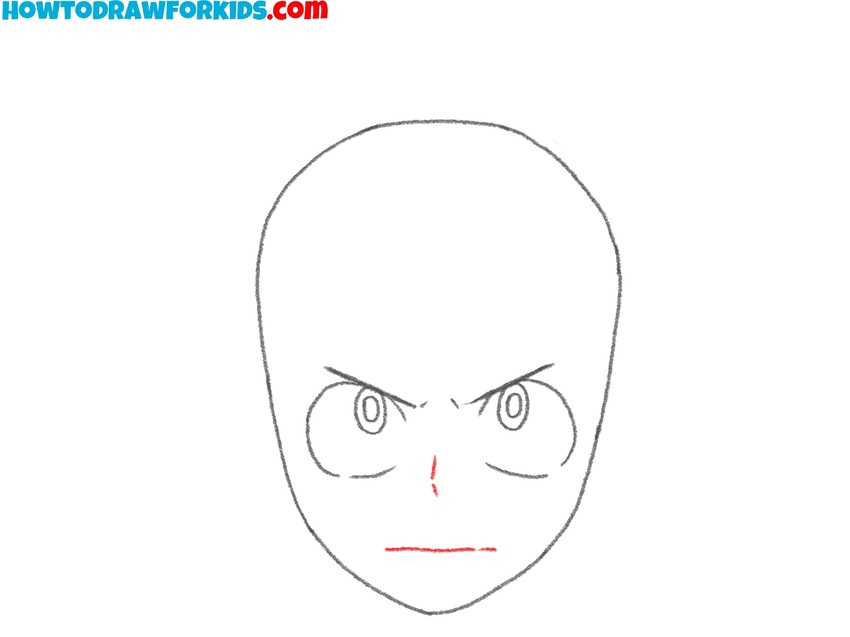
- Draw the nose and mouth.
Now, add Deku’s nose and mouth to complete the facial structure. The nose in anime style is often simplified, so a small, slightly curved line just below the eyes is enough to represent it. So draw the anime nose using a short vertical line. For the mouth, draw a straight line with a slight curve at the ends.
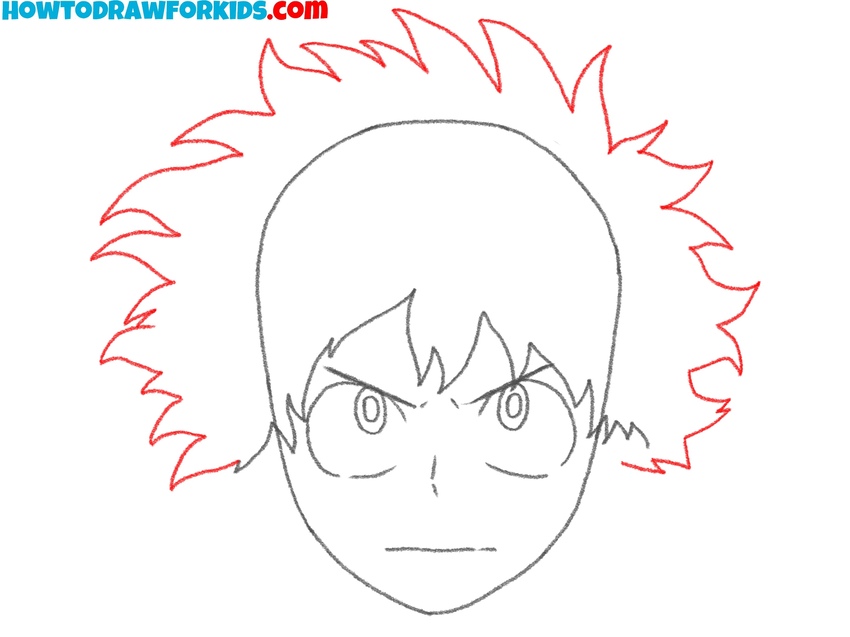
- Outline the hair base.
Deku’s hair is one of his most recognizable features, so begin by sketching the bottom part of his hairline. Start from the forehead, drawing jagged, slightly messy spikes. The hair should slightly cover the forehead. Draw short, pointed sections near the temples and extend some lines outward.

- Draw the outer hair spikes.
Now, expand on the hair by drawing the outer spikes. Deku’s hair is thick and bushy, with large spikes extending in multiple directions. Begin from the base you sketched earlier and add bigger spikes that surround the head. The spikes should have an irregular flow.
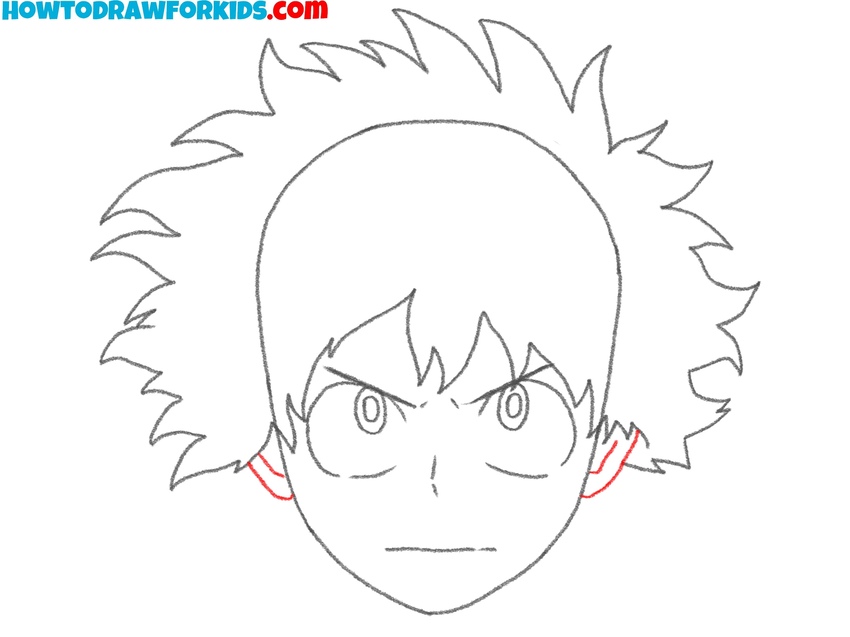
- Draw the ears of Deku.
Now, draw the anime ears of Deku, positioning them at the sides of the head, just below the eye level. His ears follow a simple anime style, with a few internal details. Use soft curved lines to show the inner ear folds, but don’t overcomplicate them.
- Erase the guidelines from the sketch.
Draw three small dots on each cheek. Don’t try to make them perfectly symmetrical. These freckles are a subtle but important detail that makes the character instantly recognizable. Now, erase any unnecessary from your Deku face drawing.

- Color the head of Deku.
Now that the linework is complete, it’s time to add color to the anime character. Start by filling in his skin with a light peach or beige tone. Next, color his eyes with a rich green hue. Leave small white highlights within the pupils. Then, color the hair with a lighter green color.

Simple Drawing Technique
This method demonstrates simplified and rounded depiction of Deku’s face. The hair is drawn with fewer sharp edges. The steps in this tutorial build up the structure differently, starting with the chin rather than a full head outline. The eyes are also drawn slightly larger in proportion.
To draw Deku’s face, start by sketching the lower part of the head with a simple curved line for the chin. Next, outline the spiky shape of the hair around the head. Add the front strands covering part of the forehead. Draw the eyes as large circles with inner details for the pupils and irises. Sketch the freckles on both cheeks. Place the mouth slightly below the nose and add simple lines for the neck.
Draw the collar with curved lines for the jacket. Finalize the sketch by adding extra details to the hair and collar. Clean up the drawing of Deku face and prepare for coloring. Fill in the eyes, skin, and clothing with the correct colors. Shade the hair with different tones of green.
Conclusion
Today, we once again explored the theme of anime and learned how to draw Deku face. As I mentioned at the beginning of the lesson, we used the simplest style possible. Let me know if this tutorial was easy for you, whether it helped you draw Deku’s face the way you wanted, and how similar your final result is to my example – the original image of Deku.
If you enjoyed this lesson, be sure to share it with your friends so they can also draw this anime character. Also, make sure to visit the anime category on my website, where you’ll find a wide variety of interesting drawing tutorials. With my simple instructions, you can learn to draw Naruto and other characters from different franchises, titles, and universes. Additionally, by exploring other categories on my website, you can learn to draw cartoons, animals, comic book characters, and figures from books and movies.