How to Draw Freddy Fazbear
Let’s return to video games and learn how to draw Freddy Fazbear from the legendary horror survival game Five Nights at Freddy’s.

How to Draw Freddy Fazbear: Introduction
In this tutorial, you’ll learn how to draw Freddy Fazbear, a mechanical robot designed in the shape of a bear. He’s widely recognized as the main character in the Five Nights at Freddy’s game series. Despite his creepy role in the game, this version of Freddy appears more cartoonish and humorous in style.
Freddy Fazbear has a sturdy build, a rounded belly, and large feet with three toes on each paw. His overall body shape resembles a pear. Two of his most iconic features are a black top hat and a matching black bow tie – both are permanent parts of his character design and should be included in your drawing.
As you draw Freddy, focus on accurately recreating his segmented body structure. Each part of his body – head, limbs, and torso – is made of separate mechanical components that should be clearly defined in your sketch.
Also pay attention to the correct color combinations. Using accurate colors will help give your Freddy Fazbear drawing a more recognizable and faithful appearance.
Freddy Fazbear Drawing Tutorial
Materials
- Pencil
- Paper
- Eraser
- Coloring supplies
Time needed: 40 minutes
How to Draw Freddy Fazbear
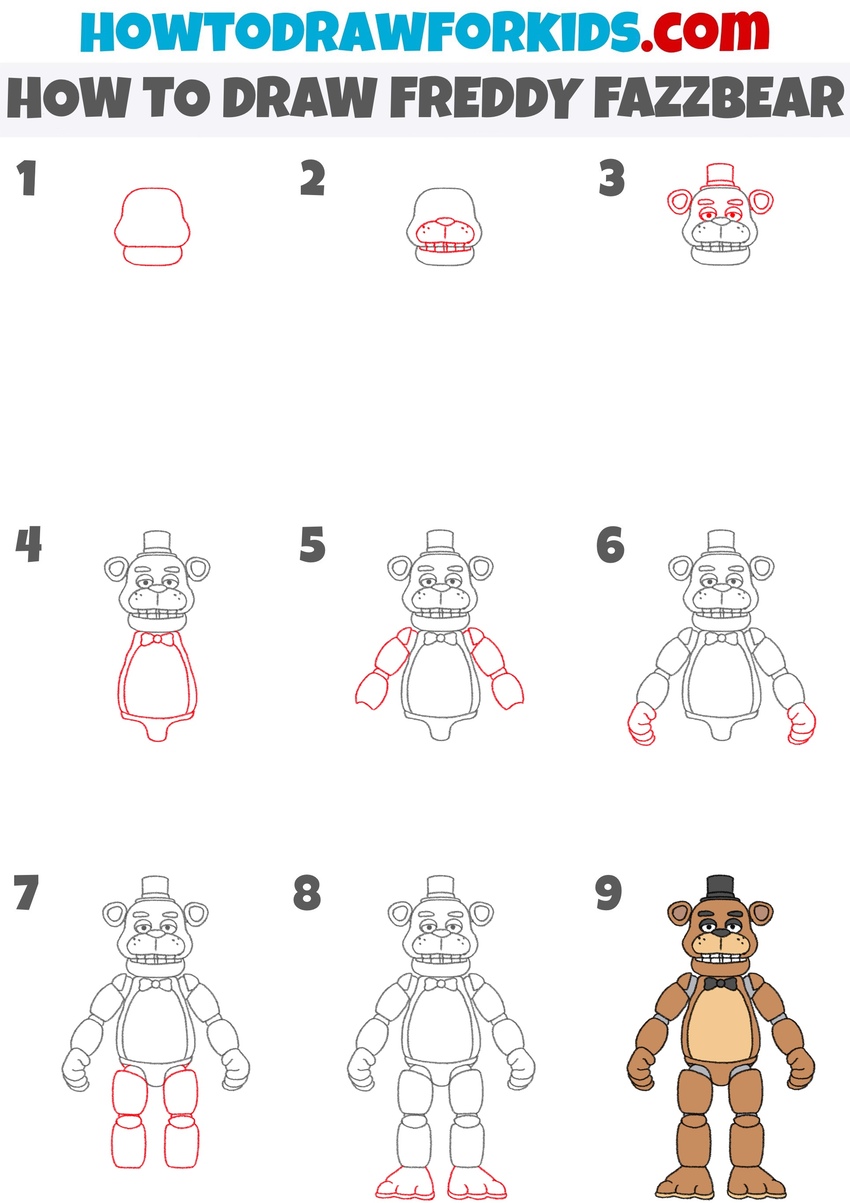
- Sketch the outline of the head.
First, sketch the general shape of Freddy’s head in a pear-like shape. Then, add a smaller horizontal oval shape at the bottom of the head for the lower jaw. Freddy’s head has a mechanical, slightly boxy look, but keep the edges smooth.

- Add the snout and teeth.
Inside the head shape, start detailing Freddy’s snout area. First, draw Freddy Fazbear’s nose as a triangle. Then, sketch the snout with smooth liens. Then, add small dots to the snout for whiskers. Sketch a row of blocky square teeth within the mouth. This grin is one of Freddy’s most iconic features.

- Add the hat, ears, and eyes.
Now move on to the rest of the face by sketching two circular ears. Inside each ear, add a smaller inner circle. Draw two small, rounded eyes above the muzzle and place thick, slightly arched eyebrows above. On top of the head, add a small top hat.

- Draw the torso and bow tie.
Below the head, draw Freddy’s large pear-shaped torso. Then, add a small bow tie just below the chin. Sketch the knot, and two triangular shapes on either side. Define the belly area with smooth lines. After that, draw the pelvis area as a triangular shape.

- Sketch the robotic arms.
From each side of the torso, draw the segmented arms. Start with a rounded shoulder segment that connects to the top of the torso. Below each shoulder, draw a curved upper arm segment, then another for the lower arm. Each arm is made of three distinct sections.

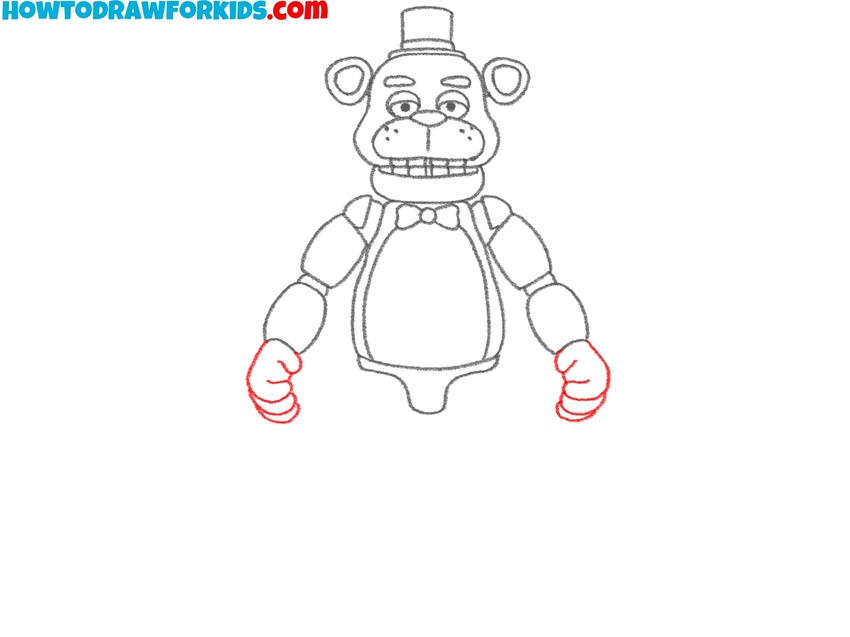
- Complete the arms with hands.
Now complete the arms by drawing the hands at the end of each forearm segment. Each hand should be rounded with four distinct fingers. Keep the hands simplified. Draw the left and right hands in mirrored poses. These hands complete the upper limbs of Freddy Fazbear.
- Illustrate the segmented legs.
Add two thick rectangular shapes just beneath the body to form Freddy’s upper legs. These segments should be similar in shape to the upper arm parts. After that, draw the knees as ovals and lower legs as two more rectangular shapes.

- Draw the feet of the character.
Now, finish drawing the legs adding the feet of Freddy Fazbear. The feet of the character should be wide and flat with there curved toes for each foot. At the same step, erase the guidelines and trace your Freddy Fazbear drawing with darker lines to give it more finished look.

- Color your drawing of Freddy Fazbear.
Color your Freddy Fazbear drawing using a warm brown for the body and a lighter tan for the belly, snout, and inner ears. Fill the hat, eyebrows, and bow tie with solid black or dark gray. The eyes should remain white with dark pupils.

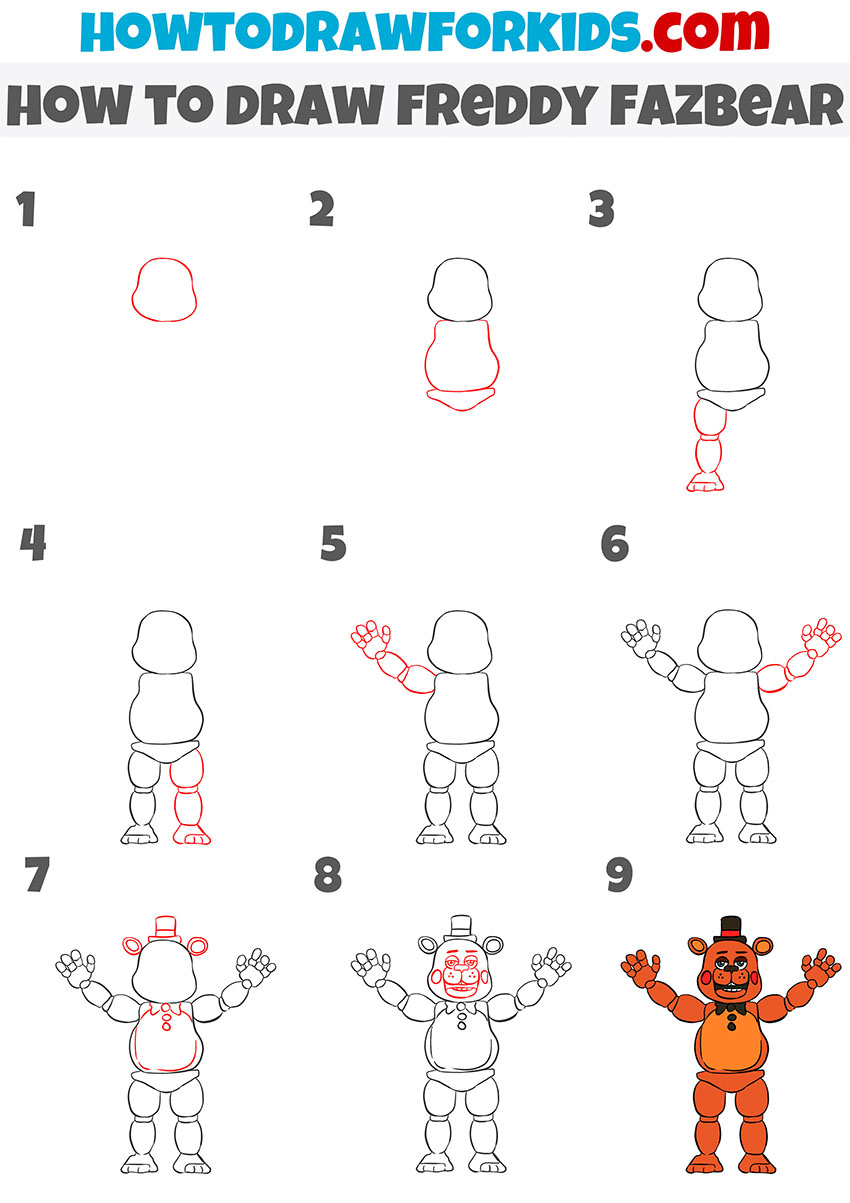
Simple Freddy Fazbear Drawing Tutorial
This method of the tutorial on how to draw Freddy Fazbear uses a simplified cartoon-like style. Unlike the previous tutorial, this Freddy Fazbear has raised arms and a different sequence of steps. Additionally, this tutorial finishes with a different color scheme.
Begin this Freddy Fazbear drawing tutorial by sketching the basic head shape as a rounded, uneven form. Next, add a wide, rounded torso and a small lower body segment. Continue by drawing segmented limbs one at a time, starting with the legs, then moving onto the arms, using rounded shapes for each joint. Position Freddy Fazbear’s arms raised upward, with open palms facing forward.
After completing limbs, add distinctive features such as a small top hat, round ears, and simple facial details including eyes, snout, cheeks, and teeth. Outline Freddy Fazbear’s belly, buttons, and bow tie clearly. Finish by applying flat colors typical for Freddy – brown for the body, black for details like the hat and bow tie, and red for the cheeks.
Conclusion
Now that you’ve finished drawing Freddy Fazbear, take a moment to review the proportions and shapes. If you followed the steps closely, your drawing should look clean and instantly recognizable. You can try drawing Freddy in different poses, adjusting his expression, or placing him in a scene from the game.
For more fun, combine him with other characters from Five Nights at Freddy’s or create crossover drawings with characters like Slenderman. And don’t forget to check out my other tutorials if you want to keep building your horror-themed collection.
If you enjoyed this Freddy Fazbear drawing tutorial, you might also like my bear drawing tutorial, where I show in detail how to draw the ruler of the forest in several different ways.


wow
Glad you liked it, Lynnlee. Sometimes a simple “wow” says it all.