How to Draw Thanos Face
In the universe of drawing, capturing the visage of Thanos is as thrilling as it is challenging. My guide on how to draw Thanos face is designed to guide you through each line, simplifying his complex features into easy steps. It’s crafted to help you embody the Titan’s might on your canvas, with a touch of your unique artistic voice.

How to Draw Thanos Face: Basic Information
Capturing the essence of Thanos’s face with pencil and paper is an art of balance – between his notorious strength and the finer subtleties that a face conveys. In this guide on how to draw Thanos face, I aim to equip you with a simple technique that will empower you to sketch not just a character, but a symbol of formidable power.
Through each phase of this lesson, from the broad shape of his head to the intricate lines defining his features, you’ll learn to navigate the complexities of his face. The focus here is on grasping the intensity in his eyes and the stark lines of his expressions, elements that convey his ominous presence.
By the end of this tutorial, to draw Thanos face will mean you’ve captured more than a villain’s image; you’ve grasped a narrative within a single expression. I hope you find this process both enlightening and enjoyable, as you bring forth the face of the Mad Titan with your artistry.
Thanos Face Drawing Tutorial
Materials
- Pencil
- Paper
- Eraser
- Coloring supplies
Time needed: 19 minutes
How to Draw Thanos Face
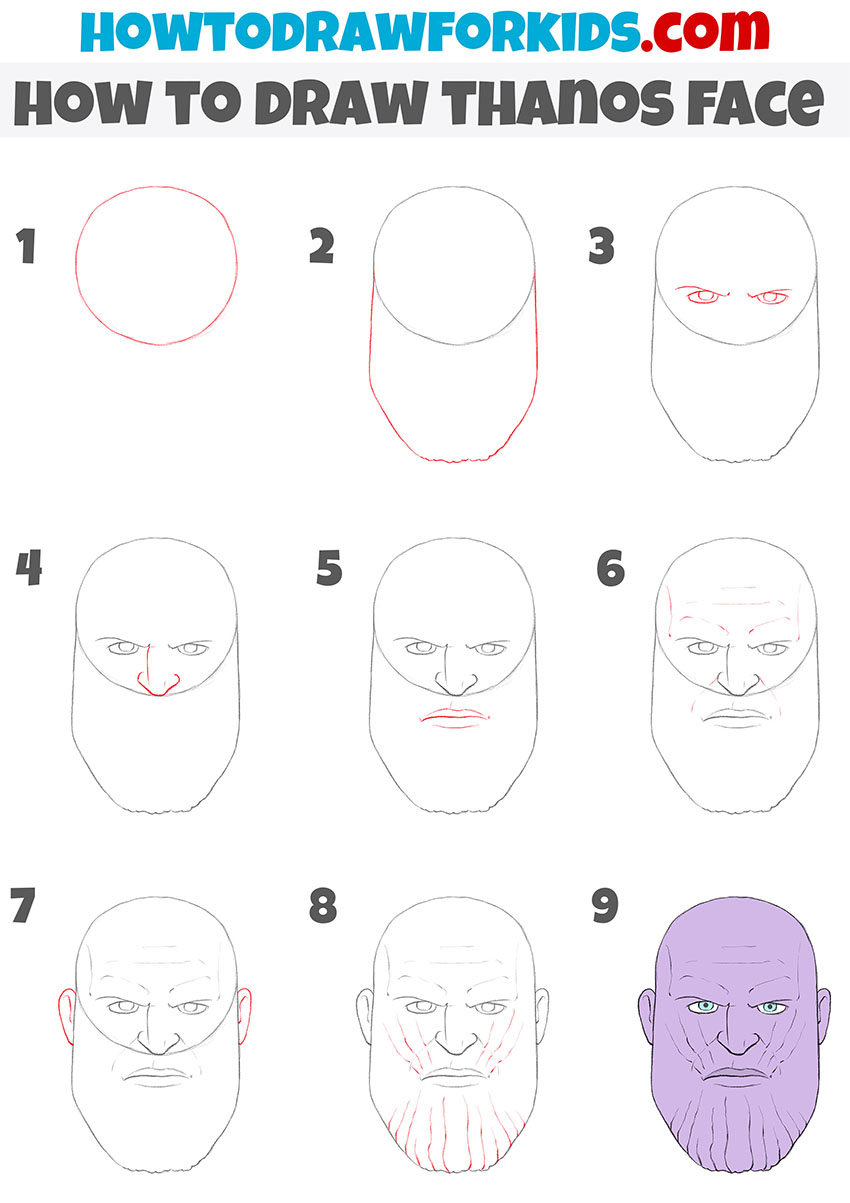
- Draw the basic circle.
Begin by sketching a large circle shape to form the foundation of Thanos’ head. It’s important to get the shape as even as possible, as Thanos has a very symmetrical and balanced face.

- Draw Thanos’s lower face.
So, draw a shape that resembles an inverted trapezoid to represent Thanos’ powerful jaw and chin. This shape should have straight sides that slant inwards towards the bottom of his chin.

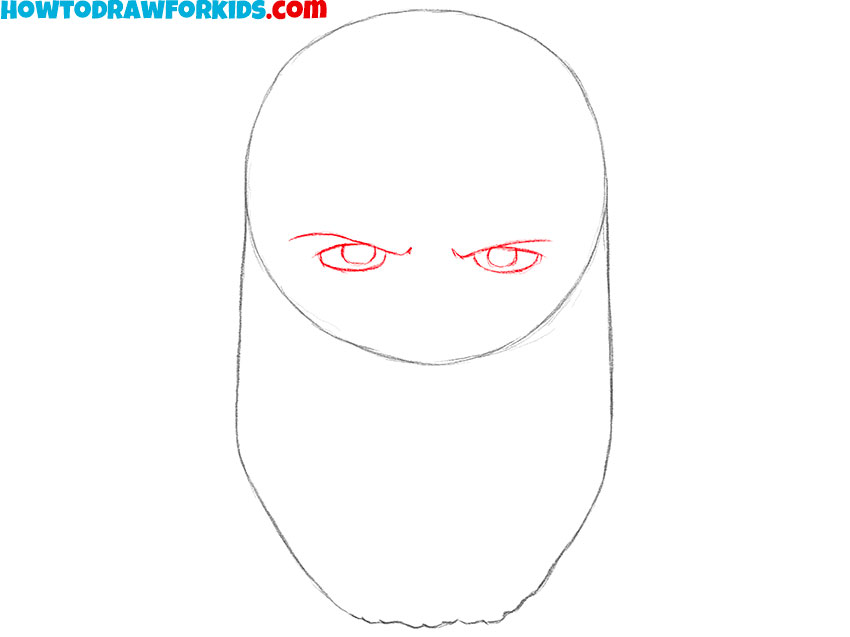
- Add the eyes.
Above the lower face, inside the oval, sketch two horizontal almond-shaped eyes to establish Thanos’ intense gaze. The eyes should have a slight upward tilt at the outer edges, giving him a menacing look.
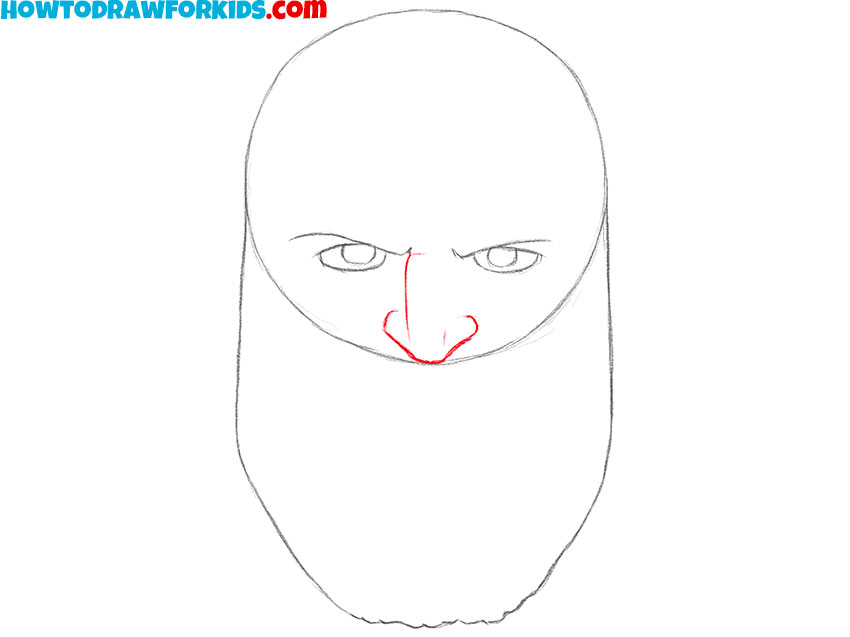
- Draw the nose of the Thanos.
Start with a wide base at eye level and bring the lines down to a rounded point. Add nostrils by placing small curves at the base of the nose.
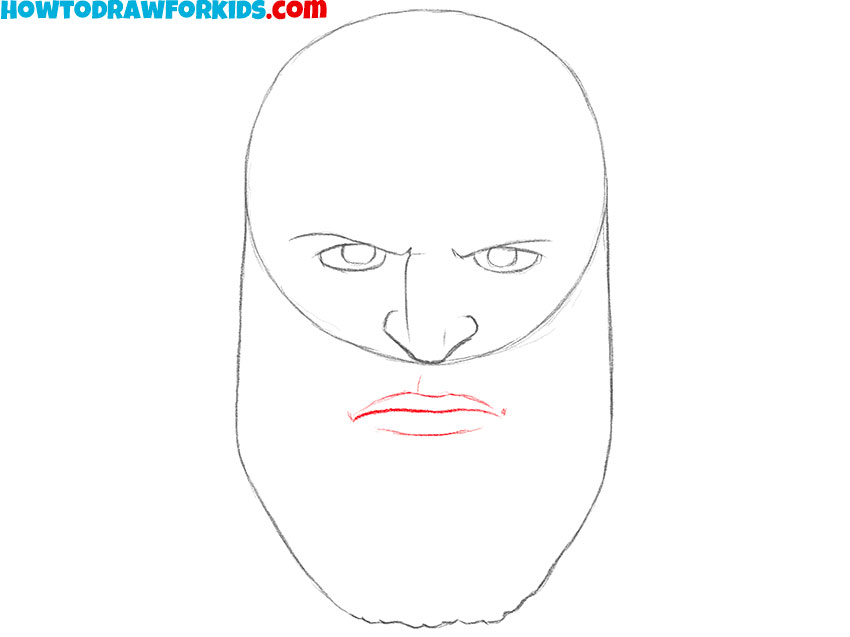
- Draw the lips.
Just below the nose, sketch the outline of Thanos’s lips. Begin with a straight line for the closed mouth, and then add a fuller shape for the lower lip beneath it.
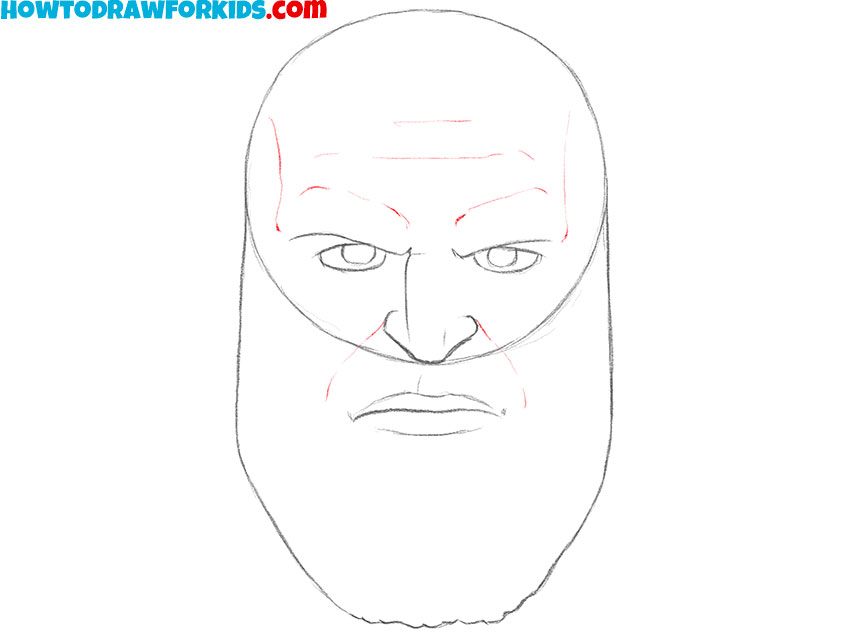
- Add nasolabial folds and forehead wrinkles.
So, add long nasolabial folds in the form of oblique lines to the side of the mouth. Then draw vertical lines for the forehead and some horizontal wrinkles.
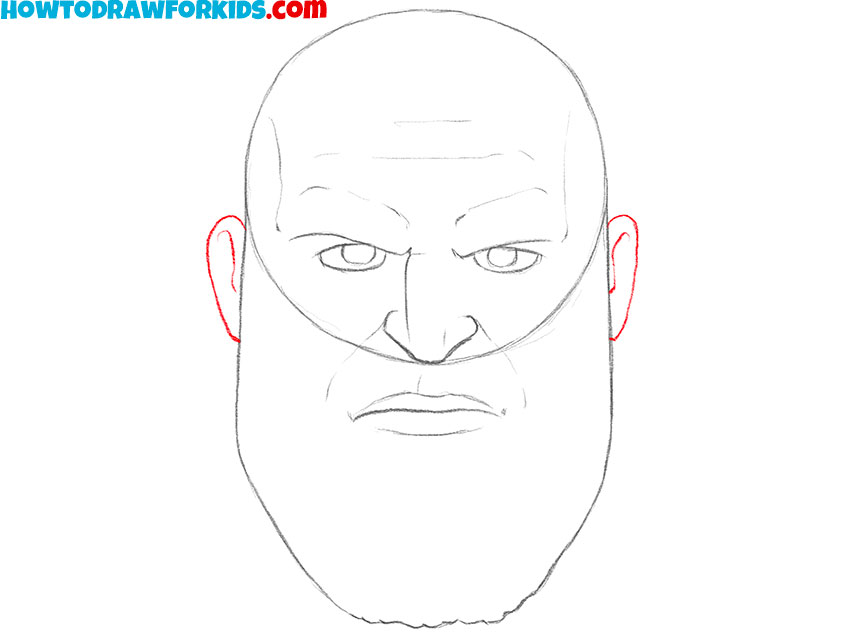
- Draw the ears.
The ears should be proportionate to the head and detailed with inner ear shapes, like the helix and lobes. Focus on the eyebrows and the tip of the nose for the correct ear length.
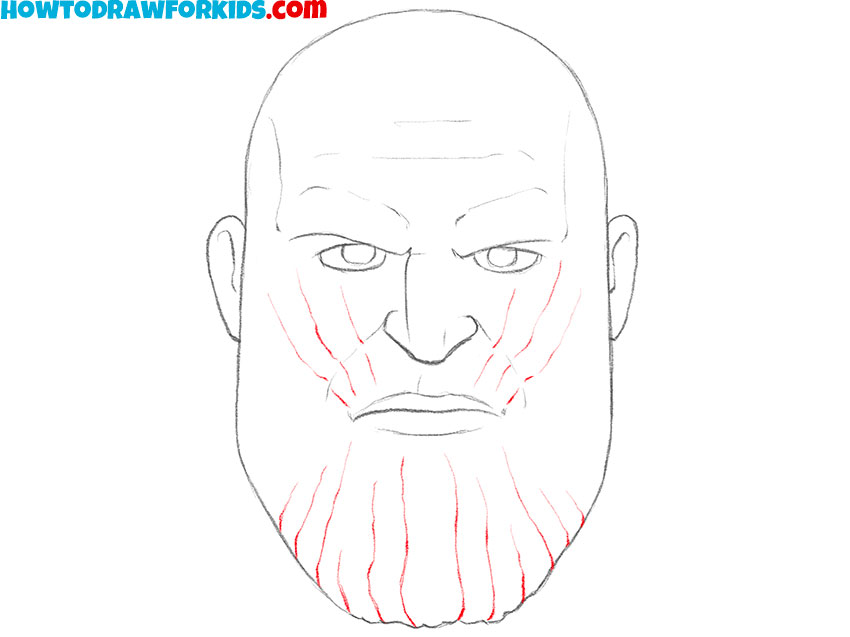
- Draw wrinkles on the face.
We recently drew Spider-Man. The principle of drawing Thanos’ wrinkles is very similar to drawing the pattern of Spider-Man’s suit – these are vertical lines in the direction from the center to the periphery.
- Color the face.
For the final step, bring Thanos to life with color. Use a deep, purplish hue for his skin, which is one of his most recognizable traits.

Additional Content
To enhance your artistic journey, I’ve compiled a free PDF file that complements our lesson. It’s designed for easy access, allowing you to delve deeper into your drawing practice anywhere, without the need for internet connectivity. This guide focuses on enriching your skills beyond the foundational techniques we’ve explored together.
Inside, you won’t find the basic steps or tips from the lesson; instead, it’s packed with additional exercises aimed at advancing your drawing capabilities. These exercises are curated to challenge you, encouraging growth and refinement of your technique as you progress from the basics to more complex aspects of drawing.
This PDF is intended to be a resource you return to, time and again, as you continue to develop your artistic talents. It’s a stepping stone to greater mastery, offering a structured path for those ready to expand their drawing repertoire and explore new dimensions of their creativity.
Key Strategies for Enhancing Your Thanos Face Drawing
Drawing is a journey of continuous learning and refinement, where even the smallest details can have a profound impact on the overall result. Here, I share with you some distilled wisdom that has the power to transform your approach and execution, ensuring that every piece you create resonates with depth, emotion, and precision.
- Layering Your Sketches: Begin with light, barely-there strokes to outline your subject, gradually building up to darker, more defined lines. This technique allows for easy corrections and adds a sense of depth to your drawings.
- Understanding Light and Shadow: Pay close attention to where the light falls and where the shadows form. Mastering this aspect can add a three-dimensional quality to your art, making your subjects pop off the page.
- The Power of Contrast: Use contrasting elements effectively, whether it’s in color, texture, or line thickness. Contrast attracts the eye and can be used to direct the viewer’s attention to focal points within your piece.
- Fine-Tuning Details: Invest time in the details that matter. Small touches can dramatically enhance the realism and appeal of your drawings, especially in the final stages of your work.
- Practice with Purpose: Regular practice is key, but aimless repetition won’t yield improvements. Set specific goals for each practice session, focusing on areas where you feel less confident.
Employing these tips and tricks in your drawing practice can significantly impact your artistic development, imbuing your work with a level of sophistication and finesse that sets it apart. The essence of mastery lies not in a single monumental leap, but in the gradual accumulation of skills gained through dedicated practice and experimentation.
Insights and Answers for Budding Artists
Navigating the intricate journey of learning to draw, questions naturally arise, marking milestones of curiosity and understanding. In the spirit of fostering a deeper connection with your art, I’ve compiled a list of frequently asked questions encountered during this lesson.
- What if my proportions always seem off? Begin with grid methods or basic shapes to establish accurate proportions before detailing. Practice regularly, focusing on different subjects to improve your spatial awareness.
- How do I enhance the realism in my drawings? Study the play of light and shadow in real life and incorporate it into your sketches. Observing and replicating these nuances can dramatically increase the lifelike quality of your work.
- Can I improve my drawing speed? Speed will naturally increase with confidence and muscle memory. Focus on accuracy before speed, allowing efficiency to develop over time through consistent practice.
- Why do my sketches look flat? To add depth, utilize varying line weights, and master shading techniques. Understanding perspective and how light interacts with objects will also contribute to a more dynamic drawing.
In the realm of art, questions are as important as the strokes on a canvas, guiding us to new understandings and heights of achievement. This collection of FAQs serves as a beacon for those moments of doubt or curiosity, illuminating the path ahead with shared knowledge.
Remember, every artist’s journey is unique, yet bound by a common thread of inquiry and the relentless pursuit of growth. Let these questions and their answers be stepping stones, not just to better drawings, but to becoming a more thoughtful and insightful artist.
Conclusion
With the completion of our Thanos face tutorial, consider this a portal to a broader artistic adventure. Explore my site for tutorials on diverse themes, like conjuring a werewolf‘s fury on paper or capturing the tranquility of snow. Each lesson expands your canvas, inviting new challenges and discoveries.
Connect with me on social media to catch the latest tutorials and creative insights. Your input shapes our journey, so share your thoughts and suggestions for what you’d like to explore next. Let’s craft a vibrant tapestry of art together, with each lesson building upon the last, broadening our shared world of creativity.